NewFEIMAS
Refer to Revision Record on page 2.
T.Anzai
Nov. 20, 2008
K.Okada
Rev
04
03
PAGE
53
/
138
PFU LIMITED
P1PA03334-B30X/6
Refer to Revision Record on page 2.
T.Anzai
July 7, 2008
K.Okada
Refer to Revision Record on page 2.
K.Okada
K.Okada
DESCRIPTION
CHECK
DATE
T.Anzai
APPR.
K.Okada
K.Okada
Aug.19, 2005
DESIG
N
DESIG
.
CUST.
I.Fujioka
I.Fujioka
T.Anzai
CHECK
fi-5530C/fi-5530C2
IMAGE SCANNER
MAINTENANCE MANUAL
APPR.
TITLE
DRAW.
No.
Feb.23, 2007
05
Section 3-3-9
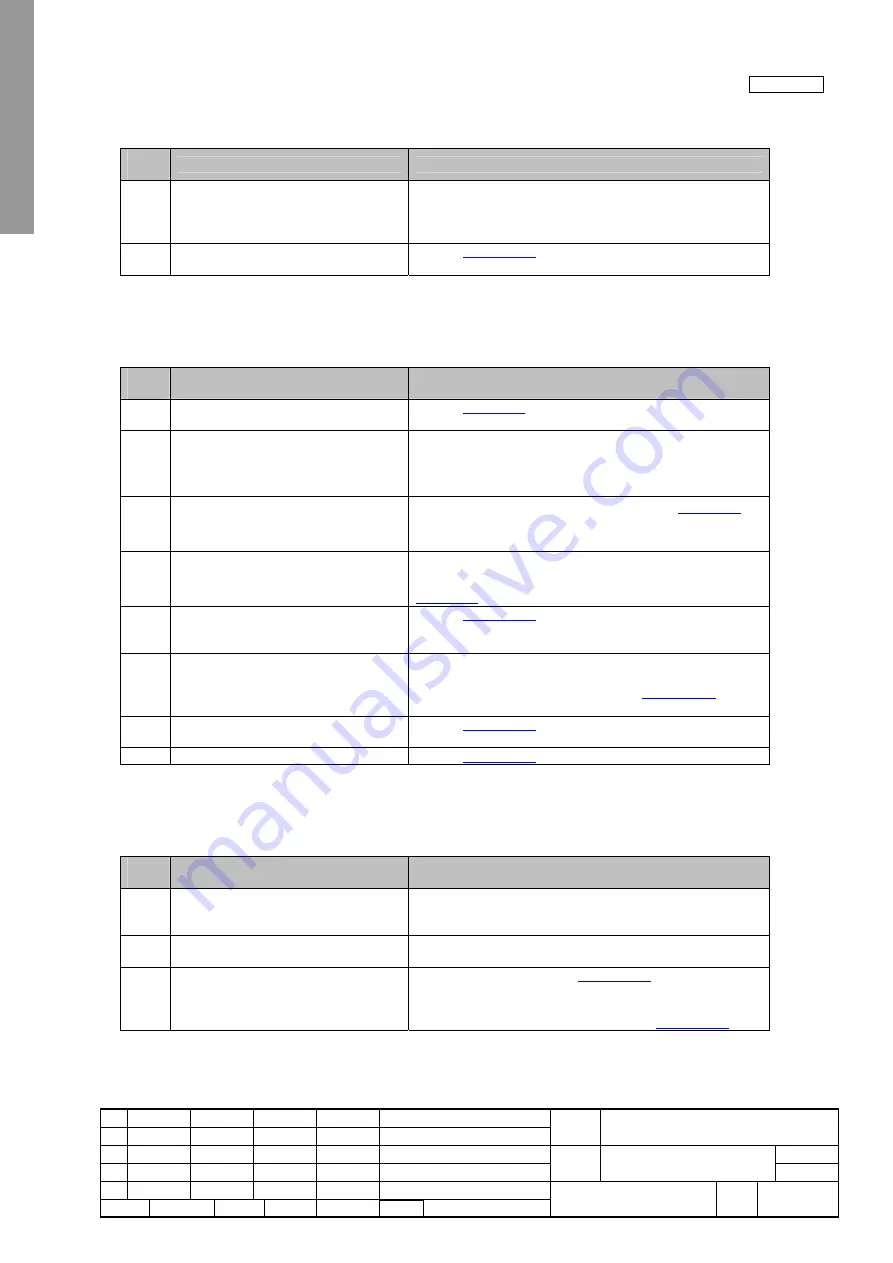
3-3-9. When calibrating white of scanned image
Table 3-3-9
Item
No.
Check items
How/where to check
1
Check the items listed in the right
column.
- Are the scan settings (density or color number) correct for the
application software used?
- Is the sheet guide (Guide P ASSY, White part) in the ADF
dirty?
2
Conduct the white adjustment by
Maintenance mode.
Refer to
Section 5-1-5
.
3-3-10. Frequent “U1: paper jam error”
Table 3-3-10
Item
No.
Check items
How/where to check
1
Do the documents satisfy paper
specification?
Refer to
Section 1-2
for paper specification
2
Have the documents been jogged?
•
Align the edge of documents for stable paper feeding.
•
Remove documents with crease or dog-ear.
•
Scanning different width of documents may cause skew
and result in paper jam.
3
Is Paper thickness switch set to “Thin”
while document thickness is more than
52 g/m
2
.
Set the switch to “Normal” position. Refer to
Section 1-1
for
Paper thickness switch.
4
Is Paper thickness switch set to
“Normal” while document thickness is
less than 52 g/m
2
.
Set the switch to “Thin” position. However, this does not mean
that feeding of thin paper less than 52 g/m
2
is assured. Refer to
Section 1-1
for Paper thickness switch.
5
Clean feed rollers, eject rollers and
plastic rollers and see if the error is
resolved.
Refer to
Section 1-7-1
.
6
Replace Pick roller and Pad ASSY and
see if the error is resolved.
Check the consumable counter from the TWAIN driver screen
or from the built-in Maintenance mode (Section 5-1-6). When
the counter exceeds the values shown in
Section 1-8-1
, replace
Pick roller or Pad ASSY.
7
Check the performance of Sensor PICK
and Sensor TOP.
Refer to
Section 5-1-2
for checking.
8
Is Cover open sensor malfunctioning?
Refer to
Section 5-1-2
for checking.
3-3-11. Error detection of “No paper on the Chute unit”
Table 3-3-11
Item
No.
Check items
How/where to check
1
Does the same symptom occur after
turning OFF and ON the scanner?
Press power button of the scanner for more than 2 seconds to
turn it OFF, and after more than 2 seconds elapse, press the
power button to turn the scanner ON.
2
Is there a slip of paper left near Hopper
empty sensor?
Open the ADF and check inside visually.
3
Check the performance of Hopper empty
sensor.
Conduct Maintenance mode (
Section 5-1-2
) to see if the sensor
works properly.
If the error still occurs, confirm that the cable is correctly
connected then replace the sensor. (Refer to
Section 4-9-7
.)


