Parker PAC Installation Manual Download Page 103


a good earth connection to the PAC, which can be accomplished by attaching the DIN rail to a suitable 
Earth ground and also utilizing Pin-3 on the Controller DC power input connector. This connection must 
be made with the shortest possible, heavy gage wire or braided cable. Low-resistance (<0.5 ohms) 
continuity should be verified with an ohmmeter for proper grounding. In addition, all communication 
cables should be shielded and grounded, preferably only on one end. 
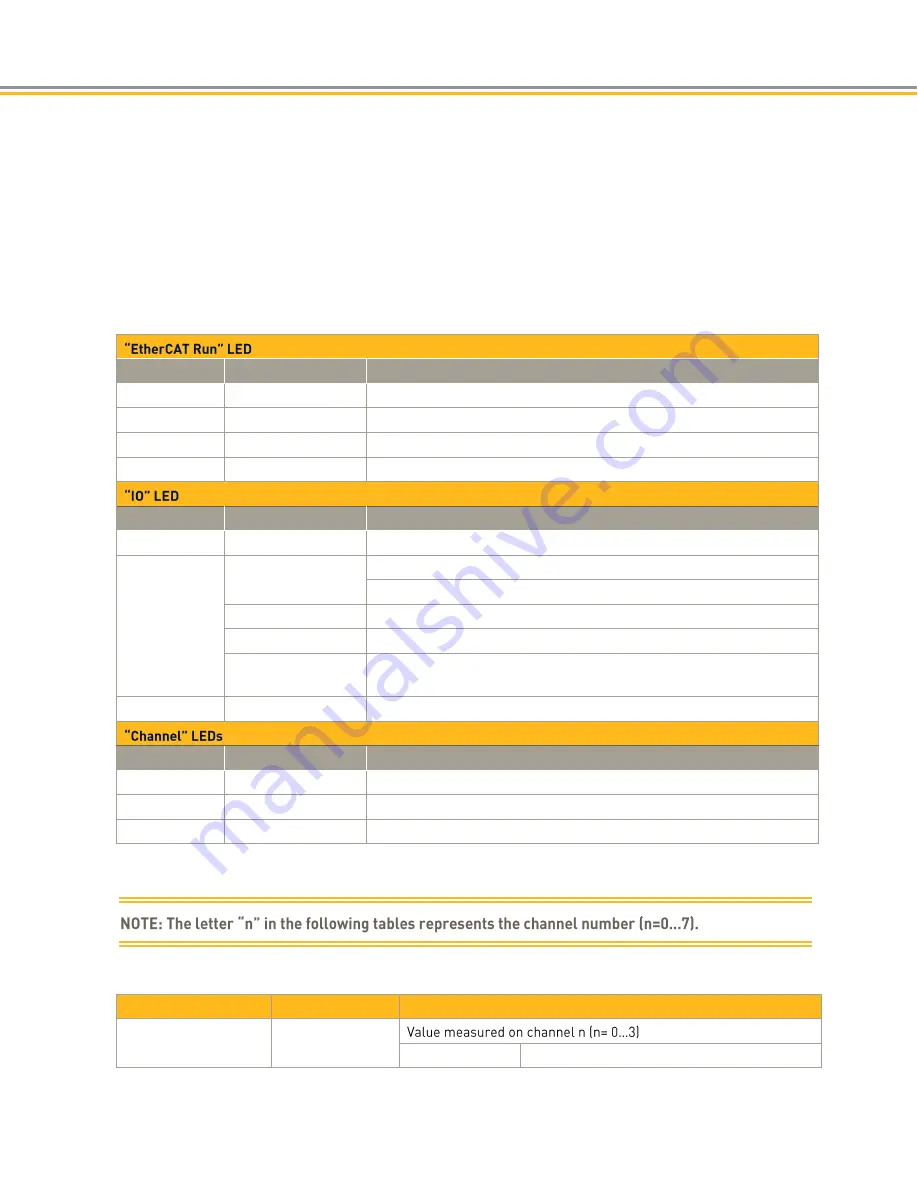
Status LEDs 

The LED labeled "EtherCAT" indicates the state of the EtherCAT ASIC. The LED labeled "IO" indicates the 
state of the Module inputs and outputs.  


State 

LED Flash Code 

Explanation 

Init 

Red, on 

Initializing, no data exchange 

Pre-Op 

Red/green, 1:1 

Pre-operational, no data exchange 

Safe-Op 

Red/green, 5:1 

Safe operation, inputs readable 

Op 

Green, on 

Operational, unrestricted data exchange 


State 

LED Flash Code 

Explanation 

Ok 

Green, on 

No error 

Error 

Off 

Malfunction of Module if E-Bus LED = On 
Inoperative if E-bus LED = Off 

Red, 4x 

EtherCAT watchdog control 

Red, 6x 

Module-specific fault 

Red, 7x 

Configuration error (E-Bus pre-operational), number of process data 
differs from that in the Module 

Defective 

Red, on 

Module defective 


State 

LED Flash Code 

Explanation 

On 

Green, on 

Channel enabled 

Off 

Off 

Channel disabled 

Error 

Red  

Short circuit, Broken wire 

Analog Inputs 


Check the following variable for the digitized input values.  

Variable 

Data type 

Explanation 

Channel_n 

INT 


Default 

in 1/10 °C 

Summary of Contents for PAC

Page 1: ...PARKER AUTOMATION CONTROLLER PAC Installation Guide 2014 Parker Hannifin Corporation All Rights Reserved...

Page 2: ...GmbH Germany CoDeSys is a registered trademark of 3S Smart Software Solutions GmbH Windows is a registered trademark of Microsoft Corporation PROFINET is a registered trademark of PROFIBUS and PROFIN...

Page 3: ...utput PACIO Modules are not fault tolerant and are not designed or intended for any use in any systems machines or applications where failure or fault of any kind of the Products could reasonably be s...

Page 4: ...ments of the application are met The user must analyze all aspects of the application follow applicable industry standards and follow the information concerning the product in the current product cata...

Page 5: ...al Requirements EN61010 2 201 2013 Safety Requirements for Electrical Equipment for Measurement Control and Laboratory use Part 2 201 Particular Requirements for Control Equipment The PACIO Modules an...

Page 6: ...s rated at 24 VDC 15 25 SELV Limited Energy 1 2 A 29W External power to the PAC must be provided by a Class 2 power source For customer convenience Parker offers an AC input Model PS 60W Class 2 24VDC...

Page 7: ...ng the Compax3 EtherCAT slave node 57 Downloading and Uploading a Project to the PAC 59 Programming your Xpress HMI in the PAC 64 CHAPTER 4 PACIO Modules 69 PACIO Module Overview 70 PACIO 400 00 Bus C...

Page 8: ...ional 159 Ethernet IP Overview 160 PROFINET Overview 169 Configuration of PROFINET Communications Module 172 CHAPTER 6 Troubleshooting 177 Troubleshooting Overview 178 LED Status Indicators 178 EtherC...

Page 9: ...le pg 108 Updated the Set Counter Range section of PACIO 454 01 pg 131 Modified PACIO Headings and Table formats pg 71 150 On PACIO modules changed Safe Op LED flashing from 3 1 to 5 1 pg 71 150 Added...

Page 10: ...that is especially important or useful WARNING A warning provides information about a potential for property damage personal injury or death CAUTION A caution provides information intended to help pre...

Page 11: ...CHAPTER 1 Product Overview...

Page 12: ...AC LED indicators on the PAC front panel help you to monitor and its installation requires only a small screwdriver Product training videos are available on our website These include videos on Quick S...

Page 13: ...ule The following sections highlight the various features of the PAC Features of the PAC and PACIO Modules Number Feature Name Description 1 PAC Controller The main control unit of the PAC 2 PACIO Mod...

Page 14: ...EtherCAT connectivity 5 EtherCAT LEDs indicate internal and external EtherCAT network status and bus link activity 6 System Status LEDs 3 LEDs P RUN S E indicate the system status 7 USB Ports Dual st...

Page 15: ...ectors and indicators Number Description 1 Ventilation slots 2 Earth ground bar for attachment of Shield Connection Terminal Block 3 I O signal state indicators LEDs 4 Module unlock button 5 User labe...

Page 16: ...control systems overcoming the issue of bus transfer times that burden conventional fieldbus systems LED Indicators In addition to the Ethernet and EtherCAT LEDs the PAC has three LEDS that indicate t...

Page 17: ...specific application The selection of PACIO Modules consists of several different types including a variety of digital or analog input output modules a counter encoder module temperature modules inter...

Page 18: ......

Page 19: ...CHAPTER 2 Installation...

Page 20: ...8 032477 01 Required Tools Installing the PAC and PACIO Modules on the DIN rail requires no tools However a small flat blade screwdriver tip size 0 04mm x 2 5mm is required for attaching the wiring to...

Page 21: ...hat a defined state at restart excludes all dangerous conditions Incorporate emergency disconnect circuits to ensure safe and effective machine shutoff Comply with local and national safety regulation...

Page 22: ...ng each step 1 Verify the shipment is correct 2 Mount the PAC Controller on a DIN rail in a suitable tool accessed fire enclosure 3 Remove the protective rubber E Bus cover from the right side of the...

Page 23: ...safely operate the PAC System within the temperature specified in the Environmental Specifications in Appendix A However when using a protective enclosure remember that the temperature within an enclo...

Page 24: ...ints to consider when performing a site review What is the expected maximum outside ambient temperature surrounding the industrial enclosure Are there any additional heat generating components inside...

Page 25: ...Low resistance 0 5 ohms continuity should be verified with an ohmmeter for proper grounding In addition all communication cables should be shielded and grounded preferably only on one end Earth Groun...

Page 26: ...do so may cause damage to the E Bus interconnections or result in intermittent or unintended system operation The mounting system is designed to attach to an EN 50022 35 x 7 5 mm DIN rail Mount the D...

Page 27: ...AC Controller to the DIN Rail 1 Push the module up against the mounting rail from below allowing the metal spring to snap in between the mounting rail and mounting area 2 Push the module against the m...

Page 28: ...module away from the rail as shown in the illustration 3 Pull the module down and out of the mounting rail Adding PACIO Modules WARNING Always attach or remove PACIO Modules with the system in a powe...

Page 29: ...nnections to verify that The connection between the PACIO Module housing and DIN rail conducts well The connection between the DIN rail and control cabinet conducts well The control cabinet is connect...

Page 30: ...tal spring to snap in between the mounting rail and mounting area 2 Push the Module against the mounting wall until it snaps into place 3 Slide the module to the left until it engages with the E Bus c...

Page 31: ...n the adjacent Module to the right of the Module to be removed and slide the Module that needs to be removed to the left just enough to clear the E Bus connector on the right Module 3 Push the Module...

Page 32: ...e reliable communications with the best performance possible the cabling components used must conform to US standard EIA TIA 568 or European standard EN50173 1 Class D Category 5 CAT5 or preferably CA...

Page 33: ...CHAPTER 3 System Start up and Configuration...

Page 34: ...he PAC Connecting Power to the Controller Warning The PAC has no power switch It will start functioning as soon as live power is applied The PAC operates on nominal 24VDC SELV Limited Power Source or...

Page 35: ...wer keep the 24VDC wiring away from any AC interfering sources such as motor leads or other devices and keep the wiring as short as possible How to attach the wires to the tension clamp terminals 1 Pu...

Page 36: ...ternal switch on the Controller 24 L and the PACIO Module supply voltage L power wires For safety power disconnect can also be incorporated into the Emergency Stop power loop CAUTION Permanently conne...

Page 37: ...oling no forced air required Operation up to 50 load permissible with sideways or front side up mounting orientation Relative Humidity 90 RH non condensing IEC 68 2 3 68 2 3 Overvoltage Category II Pr...

Page 38: ...on or data signals fieldbus or network wiring or similar Keep the following power circuits separate from control circuits DC voltages 60 V to 400 V AC voltages 25 V to 400 V The following control circ...

Page 39: ...e control unit TIP A rapid shut down of all PACIO outputs can be performed by externally switching off of the I O supply voltage L TIP If you need to monitor the presence of the PACIO power supply in...

Page 40: ...been connected to the Controller Field wiring and 24VDC power wiring has been connected to the PACIO Modules Communication Network cables are connected to the Controller per the following table LED Co...

Page 41: ...ring Center b c Right d Click Properties e Select Internet Protocol Version 4 TCP IPv4 f Click Properties g Enter the following IP address that will not conflict with the Controller 192 168 10 51 Ente...

Page 42: ...ick on the button at the upper right corner of the page to display online help at any time to learn more about using the PAC Configuration Tool This tool is useful for setting or changing the Controll...

Page 43: ...IP addresses of the PAC Controller s do not conflict with any other devices on the same network Tab 2 System Settings This tab is used for assigning the PAC Controller and for setting the date and tim...

Page 44: ...FIGURATION 44 Parker Automation Controller Installation Guide Tab 4 Xpress HMI Settings This tab is used for the Xpress HMI option on the PAC It allows the user to launch the Xpress Shell and Upload D...

Page 45: ...rogram the PAC with the IEC611 31 language The Parker Automation Manager software can be downloaded from parkermotion com under the PAC product page or in the Support and Downloads page After installi...

Page 46: ...AC with motion PAC320 PAC320 MXX2X XX If you have a PAC with CNC motion PAC320 ose PAC320 CXX2X XX If you have a PAC with PLC only PAC320 PXX2X XX 5 Choose Add Device This will add the PAC320 to your...

Page 47: ...8 The Help menu in Parker Automation Manager is a great resource with documentation to help you start programming your project...

Page 48: ...onnection to the PAC The following section will step you through the process to connect Parker Automation Manger to the PAC section 1 Device PAC320 MXX2X XX Under the Communications Settings tab selec...

Page 49: ...ervo drive such as the Compax3 then these steps are required Note For PAM versions 1 3 0 and higher the EtherCAT_Master Task actions listed below were already set by default 1 In the Devices tree doub...

Page 50: ...EtherCAT cycle time that you wish to achieve 2000 usec in this example For an EtherCAT network that includes a Compax3 the Distributed Clock Cycletime should not be lower than 500 usec and must be a m...

Page 51: ...this list is missing a slave ensure the slave is connected and powered on and then click the Scan for Devices button to re scan 4 When the list is complete Copy all devices to project and the PACIO wi...

Page 52: ...aster you can now add your PACIO Modules as slaves under the PAC320_BusCoupler You can add the modules to the project without having an Ethernet connection to the PAC 1 Right click on the PAC320_BusCo...

Page 53: ...3 The new module appears in the list You can continue to append more PACIO Modules as needed to match your hardware by repeating these steps...

Page 54: ...Double click the PACIO module node in the device tree 2 Next click on IO Mapping tab This will open the IO Mapping dialog that contains a table of all the IO point 3 Double click in the Variable colum...

Page 55: ...ices tree right click the EtherCAT Master node and select Scan For Devices This opens the Scan For Devices dialog 3 In the dialog select the Compax3_EtherCat_DS402_CoE device and click Copy to project...

Page 56: ...iguration in the Configuring the Compax3 EtherCAT slave node section Add the Compax3 as an EtherCAT slave Offline Method 1 In the Devices tree right click the EtherCAT Master node 2 Select Add Devices...

Page 57: ...erCAT_DS402_CoE click on the SM_Drive_ETC_Parker node and select Rename Change the name as appropriate This will also be the main name used for the SoftMotion Function blocks Configuring the Compax3 E...

Page 58: ...Double click the SM_Drive_ETC_Parker node The SM_Drive_ETC_Parker dialog is opened and can be used to configure the SoftMotion properties of the axis Use the Basic tab to configure limits and the Sca...

Page 59: ...nload to the PAC use the following instructions to help with this process 1 To download the project execution code select the Login Icon on the Toolbar 2 You may be prompted to find an active path To...

Page 60: ...e project the first time to a PAC without a project it may prompt you with a pop up window asking if you want to download the application click Yes The project is now downloaded to the PAC Downloading...

Page 61: ...k to locate the PAC Select OK to download the project Uploading Project Source Code To upload a project from the PAC use the following instructions to help with this process 1 In Parker Automation Man...

Page 62: ...ow saved to your computer 4 If you would like to open the project click Yes Your project and source files are now opened in Parker Automation Manager Opening a PAM 1 2 1 project in PAM 1 3 0 PAM 1 3 w...

Page 63: ...on to set the project to use the latest 3 5 9 libraries or keep the old 3 5 5 libraries The default of this p To upgrade the project from 1 2 1 to 1 3 1 2 3 From the Devices Tree This will tell the pr...

Page 64: ...Xpress User Guide to help develop your project on the PAC The Interact Xpress user guide can be downloaded from the PAC product page on www parkermotion com The PAC with the embedded Xpress HMI optio...

Page 65: ...ation to open the symbol configuration worksheet 7 8 shown below This will expose them for use with the Xpress HMI Note In order to expose your tags to Xpress you must check the box for each tag Any P...

Page 66: ...e Online Menu e Choose Login f Choose Yes This will download the PLC project to the PAC and allow the variables to be accessed by Xpress To develop your Xpress project on the PAC and access the tags f...

Page 67: ...e Xpress HMI Note Not all data types are allowed to be shared to your PAC project The data types NOT allowed are TIME DATE BITORBYTE TOD DT REF VOID LTIME BIT Note An Xpress tag will be created for ea...

Page 68: ...er Installation Guide To help program your Xpress project refer to the Interact Xpress user guide that can be downloaded from the Interact Xpress Manager product page on line at address http www parke...

Page 69: ...CHAPTER 4 PACIO Modules...

Page 70: ...0 02 PACIO DI16 DO16 1ms 0 5A PACIO 450 03 PACIO DI8 DO8 1ms 0 5A PACIO 450 05 PACIO DI16 DO16 1ms 0 5A LS PACIO 450 13 PACIO DI32 1ms PACIO 451 02 PACIO DI16 1ms PACIO 451 03 PACIO DO16 0 5A PACIO 45...

Page 71: ...upler and you can attach approximately 20 modules locally A Bus Coupler 3A Extender Module is required when exceeding the 3 Amps and you would like to add additional modules The figure below shows how...

Page 72: ...erCAT cable to Earth ground see PACIO Shield Connection Terminal Block on page 149 Module State Variable Data Type Explanation Undervoltage BOOL Low voltage supplied power 19 2V Terminals Module Power...

Page 73: ...Explanation Init Off Initializing no data exchange Pre Op Off green 1 1 Pre operational no data exchange Safe Op Off green 5 1 Safe operation inputs readable Op Green on Operational unrestricted data...

Page 74: ...utputs Technical data PACIO DI16 DO8 1A Part number PACIO 450 02 Controller ASIC ET1200 Baud Rate 100 Mbit s Power Supply 24 VDC 20 25 E Bus Load 135mA Connector IO Power Plug 36 pole 43 026592 01 Inp...

Page 75: ...he LED labeled Power indicates the state of the I O power supply the Module is not monitored for low voltage status State LED Flash Code Explanation Init Off Initializing no data exchange Pre Op Off g...

Page 76: ...ler Installation Guide CAUTION The output drivers have a thermal fuse to automatically turn off any short circuited outputs If a short circuit occurs remove the fault and allow the output to cool down...

Page 77: ...mber PACIO 450 03 Controller ASIC ET1200 Baud Rate 100 Mbit s Power Supply 24 VDC 20 25 E Bus Load 135mA Connector IO Power Plug 36 pole 43 026592 01 Input Specs Digital Inputs 16 Max Input Frequency...

Page 78: ...r low voltage states State LED Flash Code Explanation Init Off Initializing no data exchange Pre Op Off green 1 1 Pre operational no data exchange Safe Op Off green 5 1 Safe operation inputs readable...

Page 79: ...ACIO 450 05 Connector IO Power Plug 18 pole 43 026591 01 Controller ASIC ET1200 Baud rate 100 Mbit s Power supply 24 VDC 20 25 E Bus load 135mA Digital inputs 8 Maximum Input Frequency 1000 Hz Signal...

Page 80: ...exchange Pre Op Off green 1 1 Pre operational no data exchange Safe Op Off green 5 1 Safe operation inputs readable Op Green on Operational unrestricted data exchange State LED Flash Code Explanation...

Page 81: ...5A LS Part number PACIO 450 13 Connector IO Power Plug 36 pole 43 026592 01 Controller ASIC ET1200 Baud rate 100 Mbit s Power supply 24 VDC 20 25 E Bus load 135mA Input Specs Digital inputs 16 Maximum...

Page 82: ...on Init Off Initializing no data exchange Pre Op Off green 1 1 Pre operational no data exchange Safe Op Off green 5 1 Safe operation inputs readable Op Green on Operational unrestricted data exchange...

Page 83: ...2 01 Controller ASIC ET1200 Baud rate 100 Mbit s Power supply 24 VDC 20 25 E Bus load 85 mA Inputs Specs Digital inputs 32 Maximum Input Frequency 1000 Hz Signal level Off 2 type 1 Typical current dra...

Page 84: ...State LED Flash Code Explanation Init Off Initializing no data exchange Pre Op Off green 1 1 Pre operational no data exchange Safe Op Off green 5 1 Safe operation inputs readable Op Green on Operation...

Page 85: ...O Power Plug 18 pole 43 026591 01 Controller ASIC ET1200 Baud rate 100 Mbit s Power supply 24 VDC 20 25 E Bus load 100 mA Input Specs Digital inputs 16 Maximum Input Frequency 1000 Hz Signal level Off...

Page 86: ...of the State LED Flash Code Explanation Init Off Initializing no data exchange Pre Op Off green 1 1 Pre operational no data exchange Safe Op Off green 5 1 Safe operation inputs readable Op Green on Op...

Page 87: ...er PACIO 452 01 Connector IO Power Plug 18 pole 43 026591 01 Controller ASIC ET1200 Baud rate 100 Mbit s Power supply 24 VDC 20 25 E Bus load 130mA Output Specs Digital outputs 16 Maximum current 0 5A...

Page 88: ...een 1 1 Pre operational no data exchange Safe Op Off green 5 1 Safe operation inputs readable Op Green on Operational unrestricted data exchange State LED Flash Code Explanation Ok Off No error SC Red...

Page 89: ...r ASIC ET1200 Baud rate 100 Mbit s Power supply 24 VDC 20 25 E Bus load 130mA Output Specs Digital outputs 8 Maximum current 1A per output Total current Maximum 8A Variable Variable Data type Explanat...

Page 90: ...data exchange Safe Op Off green 5 1 Safe operation inputs readable Op Green on Operational unrestricted data exchange State LED Flash Code Explanation Ok Off No error SC Red on Short circuited digita...

Page 91: ...it Part number PACIO 441 01 Analog inputs 4 single ended Resolution 12 bit Measuring range 0 20 mA 4 20 mA limit 21 3675mA Temperature drift 25 ppm C regarding range limit Critical frequency typical 1...

Page 92: ...Op Red green 1 1 Pre operational no data exchange Safe Op Red green 5 1 Safe operation inputs readable Op Green on Operational unrestricted data exchange State LED Flash Code Explanation Ok Green on N...

Page 93: ...by the channel LED Analog Values Current Measuring Variable Values Measuring Variable Values mA Decimal Hexadecimal mA Decimal Hexadecimal 0 0 0 12 36784 16 8FB0 1 3056 16 0BF0 13 39856 16 9BB0 2 6128...

Page 94: ...Variable Data type Explanation SetOptions BOOL Rising edge accepts module options ResetError BOOL Rising edge acknowledges error Module Options The following options are available for the Module To se...

Page 95: ...rsion runs cyclically and is not synchronized with the receipt of EtherCAT telegrams The cycle consists of the analog value conversion plus transmitting the values into the EtherCAT data area The PACI...

Page 96: ...MODULES 96 Parker Automation Controller Installation Guide NOTE Best results are obtained by connecting the shield of the signal cables to operative earth current sensor 24V ext 24V 0 V Connector chan...

Page 97: ...C 13 Bit Part number PACIO 441 02 Analog inputs 8 single ended or 4 differential Resolution 13 bit 1 221 V unipolar 2 442 V bipolar Measuring range 0 10V 10V Temperature drift 15 ppm C regarding range...

Page 98: ...1 1 Pre operational no data exchange Safe Op Red green 5 1 Safe operation inputs readable Op Green on Operational unrestricted data exchange State LED Flash Code Explanation Ok Green on No error Error...

Page 99: ...edge Variable Data type Explanation SetOptions BOOL Rising edge accepts Module options ResetError BOOL Rising edge acknowledges error Measuring Variable Value Volt Bipolar Unipolar Decimal Hexadecimal...

Page 100: ...sages see Variable Data type Explanation Shortcut BOOL not used Undervoltage BOOL not used Watchdog BOOL Module internal watchdog EtherCAT_Error BOOL Configuration error or watchdog control Specific_E...

Page 101: ...unt to assess how much the values stored by the EtherCAT master are up to date The Module described in this section will accept the above times as the ideal EtherCAT cycle setup Quality of Analog Valu...

Page 102: ...ge limit less measurement failure on demand Cold junction compensation Yes Critical frequency typical 0 33 Hz Sampling frequency 3 82 Hz if all channels are enabled Connector IO Power Plug 18 pole 43...

Page 103: ...ED Flash Code Explanation Init Red on Initializing no data exchange Pre Op Red green 1 1 Pre operational no data exchange Safe Op Red green 5 1 Safe operation inputs readable Op Green on Operational u...

Page 104: ...used for error indication by the IO LED To reset the error bits set control bit ResetError to a rising edge Variable Data type Explanation SetOptions BOOL Rising edge accepts Module options ResetError...

Page 105: ...or channel 0 equivalent applies to other channels Conversion Time The analog signals are converted one by one down every channel Disabling one or several channels will shorten the entire analog to dig...

Page 106: ...Controller Installation Guide Quality of Analog Values Best results are obtained by Connecting the shield of the signal cables to operative earth Connecting unused single ended lines to Ground Short c...

Page 107: ...Bit Part number PACIO 442 02 Analog inputs 4 Resolution 12 bit Measuring range 0 10 V 10 V mA 20 mA Only available on modules shipped before approximately January 2017 Output impedance 22 1 each chan...

Page 108: ...nitializing no data exchange Pre Op Off green 1 1 Pre operational no data exchange Safe Op Off green 5 1 Safe operation inputs readable Op Green on Operational unrestricted data exchange State LED Fla...

Page 109: ...ational number of process data differs from that in the Module Defective Red on Module defective Power State LED Flash Code Explanation On Green on 24 VDC supply ok Off Off 24 VDC supply not ok State...

Page 110: ...olt Bipolar Unipolar Decimal Hexadecimal Decimal Hexadecimal 10 32768 16 8000 9 36044 16 8CCC 8 39321 16 9999 7 42598 16 A666 6 45875 16 B333 5 49152 16 C000 4 52428 16 CCCC 3 55705 16 D999 2 58982 16...

Page 111: ...nation Channel_n_On BOOL Enables channel n set to high impedance to disable Channel_n_Current BOOL Sets channel n to current output mode Channel_n_n 1_Unipolar BOOL Sets channels 1 and 2 or 2 and 3 to...

Page 112: ...ble Data type Explanation Channel_n_Shortcut BOOL Voltage mode channel n load is 600 Specific_Error TRUE Channel_n_Open BOOL Current mode channel n load is 500 Specific_Error TRUE Channel_n_Overtemp B...

Page 113: ...measure resistances between 700 and 3000 Technical Data PACIO AI4 Pt Ni100 16 Bit Part Number PACIO 443 01 Analog inputs 4 Resolution 16 bit resistance 0 01 temperature 0 1 C Pt100 measuring range Ni1...

Page 114: ...ectromagnetic and emission standards To reduce radiated emissions ensure that there is a good earth connection to the PAC which can be accomplished by attaching the DIN rail to a suitable Earth ground...

Page 115: ...options To set up the Modules choose the options as appropriate and accept by setting control bit SetOptions to a rising edge The Modules will confirm by returning OptionsSet There are various Module...

Page 116: ...e state concerned has returned to normal They are combined into a single Specific_Error state and output to the IO LED as Module Variable Data type Explanation Channel_n_Open BOOL Channel n load is gt...

Page 117: ...ore processing power Take the EtherCAT cycle into account to assess how much the values stored by the EtherCAT master are up to date The Module described in this section will accept the above times as...

Page 118: ...Encoder Channels A A B B Ref Ref Unused encoder signals should be pulled up to 5V Encoder type 5 24 Vdc Quadrature RS422 Differential Maximum Input Frequency 200 kHz Input Specs Digital inputs 8 Maxim...

Page 119: ...ly 5V 0 2A fuse 14 0 VDC Encoder supply 0V 15 n c Not recommended for use 16 24 VDC 24 VDC supply 17 0 VDC 0 VDC Supply Unused encoder signals should be pulled up to 5V The PACIO Counter Enc Module ha...

Page 120: ...1 Safe operation inputs readable Op Green on Operational unrestricted data exchange State LED Flash Code Explanation Ok Green on No error Error Off Malfunction of Module if E Bus LED On Inoperative if...

Page 121: ...rame or DC Synchronous Mode Dependent on whether Distributed Clocks DC are used or not the Module adjusts itself independently on the suitable mode of operation The Module is pre set to Frame synchron...

Page 122: ...e Watchdog BOOL Module internal Watchdog EtherCAT_Error BOOL Configuration error or Timeout Controlling Watching Counter The setting of the functions of the counter is carried out with the variables f...

Page 123: ...all digital and analog outputs are forced to 0 Counter Control Enabling and disabling of counting and referencing are determined by the state of the control variables Set and Reset functions are activ...

Page 124: ...r 1 are set OutputsOnErrorOff_1 BOOL Outputs will be switched off in case of error Counter Errors These variables are provided for the indication of error states Variable Data type Explanation Outputs...

Page 125: ...tCompare_1 SetPreset_1 or SetMax_1 Counter Actual Values These variables display the current counter value and the current set values The set values are represented in the variable SelectedValue_1 Det...

Page 126: ...0 Reads the status Counter Input Edge Timestamp The variables indicate the time at which the status of the digital input has changed The time at which the measurement starts depends on the mode of op...

Page 127: ...input is stored in the time stamp and sent in the following frame to the EtherCAT master Frame Digital Input Variable Timestamp n 1 TRUE Timestamp n n 2 FALSE Timestamp n 1 In DC synchronous mode The...

Page 128: ...1 Variable Data type Explanation Output_0_0 BOOL Digital Output 0 Sets the output Counter 2 Variable Data type Explanation Output_1_0 BOOL Digital Output 0 Sets the output Output Set Delay This varia...

Page 129: ...or information on Output values see Analog Voltage Current Values on page 110 Variable Data type Explanation AnalogOutput_1 UINT Analog Output 1 AnalogOutput_2 UINT Analog Output 2 Examples Enable Cou...

Page 130: ...ions_1 The successful take over of the options is confirmed with the status bit OptionsSet_1 For example set compare function PROGRAM Initialization VAR bInit BOOL TRUE Step USINT END_VAR IF bInit THE...

Page 131: ...2 147 483 647 which means the overall counter range is 0 to 2 147 483 647 To change this range load SetValue_1 SetValue_2 to the desired maximum value and then set the Boolean SetMax_1 SetMax_2 which...

Page 132: ...2 END_IF 2 Enable Encoder Counter EnableCounter1 TRUE IF Counting1 THEN STATE 3 END_IF 3 Encoder Counter enabled Encoder_Configured1 TRUE END_CASE Digital Output The digital output can be controlled...

Page 133: ...UE Pulses Referencing The counter can be set to a preset value when a pulse occurs at the Ref input The preset value can be 0 but also any other 32 bit number using SetValue_1 and SetPreset_1 Task An...

Page 134: ...E END_CASE END_IF 2 Controlling the referencing IF bInitReady THEN CASE Step OF Switch on the referencing mode 0 Term2_EnableReferencing_1 TRUE Step 1 Wait for a referencing pulse 1 IF Term2_Reference...

Page 135: ...ed_1 A capture event has occurred if TRUE Term2_ResetCaptured_1 Reset of Term2_Captured_1 Digital Inputs Input_0_x The status of the digital inputs is indicated in the variables Input_0_x The current...

Page 136: ...dressing via EtherCAT Variable GSD File Park6943 GSD W x H x D 25x120x90 mm Mounting 35mm DIN top hat rail Controller ASIC ET1200 Power supply from EtherCAT Coupler via E Bus plug E Bus load 210mA Gal...

Page 137: ...ault Start Defect Red on Module is not initialized Function The Module PROFIBUS DP Slave is an EtherCAT PROFIBUS DP gateway It accomplishes the data transfer between an EtherCAT system and a PROFIBUS...

Page 138: ...Slave address Module State The following Module states are indicated below To reset the messages see above Variable Data type Explanation Shortcut BOOL not used Undervoltage BOOL not used Watchdog BOO...

Page 139: ...rCATModules xml into the PAC320 master configurator See also Chapter 4 System Set up and Configuration NOTE Online configuration Scan Boxes Reading of the configuration data from the connected EtherCA...

Page 140: ...e connection to the new address by its GAP update The status of the connection is shown in ProfibusRunning Example Setting of usiDP_Address as DP Slave address Start Single action Term2_Address usiDP_...

Page 141: ...nfigure your processor 5 Configure the processor to match your particular type model Configuration for the type used in this project is shown below 6 Select the X1 Port Configure the X1 port to Addres...

Page 142: ...ht pane expand the ProfiBus Module to display the 16 Byte Data In Out branch and add this to the project 13 Configure as shown below 14 Create a Variable Table and reference the following variables 15...

Page 143: ...2 After adding the device and code to the project you will configure the IO map as displayed...

Page 144: ...144 Parker Automation Controller Installation Guide 3 Download the project to the PAC and enter RUN mode 4 You should now be able to monitor data being produced by the PAC by monitoring data in the ST...

Page 145: ...CIO 400 02 Controller ASIC ET1200 Baud rate 100Mbit s Cable CAT5 Cable length Maximum 100m 328 feet EtherCAT connection 2 x RJ45 Power supply via E Bus E Bus load 160mA for Out1 210 mA for Out1 Out2 T...

Page 146: ...ffic Green flashing Exchanging telegrams Function The Extender Module changes the transmitting physics of LVDS E Bus on a twisted pair The Module is usually arranged at the end of the block but this n...

Page 147: ...equence in which the connections are operated is important to the configuration which way the EtherCAT frame runs Port Connection Sequence Port A E Bus In 1 Port B Out 2 3 Port C E Bus Out 4 Port D Ou...

Page 148: ...2 x 16 Part number PACIO 411 00 Connector potential Plug 36 pole 43 026592 01 E Bus load none TERMINALS The PACIO Power Distribution 2 x 16 Module has two separate potential lines The Module distribut...

Page 149: ...Data PACIO Shield Connection Terminal Block 2x8mm Part number PACIO 412 01 Shield clamp 8mm 2 pieces Technical Data PACIO Shield Connection Terminal Block 14mm Part number PACIO 412 02 Shield clamp 1...

Page 150: ...grounding the I O wiring cable shields to Earth ground for EMI noise suppression CAUTION Ensure that the mounting rail has a suitable earth connection For more information see the chapter Installation...

Page 151: ...odules Typically you should wire your home and limit sensors to your EtherCAT drive But if your application requires these sensors to be connected to the PAC use the following diagrams PAC with P8S se...

Page 152: ...N C 0 2M with M8 003 3743 05 P8S GNFLX NPN N O 3 0M FLY LEADS P8S GNFAX NPN N O 3 0M FLY LEADS 003 3743 06 P8S GPFLX PNP N O 3 0M FLY LEADS P8S GPFAX PNP N O 3 0M FLY LEADS 003 3743 07 P8S GMFLX NPN N...

Page 153: ...DS 003 4475 02 P8S MQSHX PNP N C 0 3M with M8 P8S MQCHY PNP N C 0 3M with M8 003 4475 03 P8S MMFLX NPN N C 3 0M FLY LEADS P8S MMFLY NPN N C 3 0M FLY LEADS 003 4475 04 P8S MMSHX NPN N C 0 3M with M8 P8...

Page 154: ...Automation Controller Installation Guide P8S MPCHY PNP N O 0 3M with M8 003 4475 07 P8S MNFLX NPN N O 3 0M FLY LEADS P8S MNFLY NPN N O 3 0M FLY LEADS 003 4475 08 P8S MNSHX NPN N O 0 3M with M8 P8S MN...

Page 155: ...PAC with 400XR series...

Page 156: ...PACIO MODULES 156 Parker Automation Controller Installation Guide...

Page 157: ...PAC with 400LXR...

Page 158: ...PACIO MODULES 158 Parker Automation Controller Installation Guide PAC with SMH sensors...

Page 159: ...CHAPTER 5 Communication Interfaces Optional...

Page 160: ...eate a project using a PAC device 3 Expand the Tools Menu in PAM a Select Device Repository b Click the Install button c Browse to the location of the Adapter EDS file on your computer d Be sure the f...

Page 161: ...djust the RPI to fit the Task time of the Main Task or EtherCAT Master Task time Set the EtherNet IP Scanner I O Mapping tab to use the MainTask as the bus cycle task For example to fit the MainTask I...

Page 162: ...roducedVars VAR ControlLogix DINT END_VAR 9 Enter the following text into the Program section of this POU IF ControlLogix 200 THEN ControlLogix ControlLogix 1 ELSE ControlLogix 0 END_IF 10 Double clic...

Page 163: ...select New Project and enter a name for the project Example ENIP_to_L75 2 Under the ControlLogix 5570 Series select 1756 L75 Configure a new controller as displayed below 3 Select Next 4 Enter Chassi...

Page 164: ...r Installation Guide 5 Choose Finish 6 In the tree right click on I O Configuration and choose New Module Choose as shown This will represent the network module you are communicating with from the PLC...

Page 165: ...omation web site rockwellautomation com for information on how to install additional eds file 7 Choose Create 8 Configure the menu that displays as shown Enter the IP address for this module It is als...

Page 166: ...w Module 11 Select new module as shown 12 Configure the new module as shown below This represents the PAC unit you will be communicating with What is important here is to configure the IP Address of t...

Page 167: ...PACNetworkCard and select the 1756 L1 catalog number 15 Choose Create 16 The only thing that must be entered is the name representing the PAC unit Enter PAC 17 Choose OK 18 Near the top of the tree do...

Page 168: ...mPAC and hit enter 21 Right click that tag and choose Edit Tag Properties and enter the following 22 Select the Connection tab and configure as shown in the right graphic above 23 Save the project dow...

Page 169: ...PROFINET Overview The illustrations below show top and bottom views of the optional Communication Module for the PAC Number Description 1 Status LEDs 2 Device label 3 Ventilation posts...

Page 170: ...onnection for EMI shielding 3 Connector Interfaces with the PAC Installation 1 First remove power from the PAC Controller 2 Set the sliding latch located on the underside of the Communication Module t...

Page 171: ...into the internal board cutouts 6 Push the Module further into the Controller until the final position is reached and the module cannot be further inserted 7 To lock the Module into the Controller pu...

Page 172: ...a PAC to a Siemens S7 controller communicating PROFINET by way of the PROFINET communication module Hardware PAC320 with PROFINET Module Siemens CPU315 2 PN DP Software Parker Automation Manager Sieme...

Page 173: ...te the variable name 25 Double click the 1_Word_Digital_Input branch and to the right select the PNIODev Module I O Mapping tab 26 click in that same column the entry for Bit0 Create the variable name...

Page 174: ...tab and enter the following values o IP Address 192 168 0 1 o Subnet Mask 255 255 255 0 o Default Gateway 0 0 0 0 o Station Name PAC Siemens S7 Configuration This section describes configuration of t...

Page 175: ...etwork branch appear in the graphical display This will allow you to add the PAC PROFINET device to the configuration 5 In the right window listing devices select the PROFINET 6 Select Additional Fiel...

Page 176: ......

Page 177: ...CHAPTER 6 Troubleshooting...

Page 178: ...24V is present but an internal power rail has malfunctioned Contact Parker Hannifin Technical Assistance General Troubleshooting Procedures Use the following list as a guideline for troubleshooting T...

Page 179: ...detected and control is handed off to the Bootloader on the SD card On A bootable device has not yet been detected During Runtime Off The runtime system has not detected an error On An error has been...

Page 180: ...model number is invalid or missing EtherCAT Connection There are a variety of reasons for problems with the EtherCAT connection The PAC does not find the EtherCAT slave There is a device conflict The...

Page 181: ...he speed of the connection Off 10 Mb s Green 100 Mb s Orange 1000 Mb s The bottom right LED on connector X2 and X3 indicates link and activity status Off No link On Link is detected Blinking Link is d...

Page 182: ...lobalpac Before you run the utility you need a computer that has a native or external SD card reader writer You can use the flashback utility when A new version of the PAC firmware is available The us...

Page 183: ...eject the SD card from the computer Push Button Log IP Address If you do not know the IP Address of the PAC you can use the Push Button to log the IP Address If you press and hold the button it will r...

Page 184: ...2 Duo LED red green Red On Watchdog timeout channel Generic or extended diagnosis present system error Red Flashing cyclic at 2 Hz 3 sec DCP signal service is initiated via the bus Off Off No error B...

Page 185: ...the SD card Do not remove or modify any files on the SD card unless instructed to in the documentation This card is used as a removable drive and provides non volatile memory storage Although this ca...

Page 186: ...help the user track the history of PAC since the last power cycle To learn more about the log files click on the Help link in the up I O Modules Refer to Chapter 5 for troubleshooting the individual P...

Page 187: ...ed as a repair order or the battery can be simply replaced by the customer The replacement battery is an industry standard CR2032 lithium coin cell and is easily obtainable To replace simply remove th...

Page 188: ...TROUBLESHOOTING 188 Parker Automation Controller Installation Guide...

Page 189: ...APPENDIX A PAC System Specifications...

Page 190: ...ed to be installed in a suitable fire enclosure Pollution Degree 2 RoHS RoHS Compliant Electrical Specifications Electrical Specifications Table Category Specifications Input voltage 24 VDC 15 25 SELV...

Page 191: ...H2O Storage 2GB minimum Secure Digital Card SD Ports Two RJ45 10 100 1000BaseT Ethernet One RJ45 100Mbit s EtherCAT supporting IEEE1588 Distributed Clocks Two USB 2 0 Host Type A Dimensions H x W x L...

Page 192: ...utomation Controller Installation Guide PAC Controller Dimensions inches mm PACIO Dimensions inches mm 3 27 83 0 2 73 69 4 2 28 57 9 1 31 33 2 4 74 120 4 8 02 203 6 7 96 202 2 4 98 126 6 4 86 123 5 4...

Page 193: ...Frequency Magnetic Field Immunity IEC 61000 4 8 2009 Voltage Interrupts Immunity IEC 61000 4 11 2004 Radiated Conducted Emissions CISPR 11 Group 1 Class A EN 55011 2009 A1 2010 CISPR 11 2009 A1 2010 E...

Page 194: ...e state broken wire excessive current Number of ports up to 32 digital I Os on every Module up to 8 analog channels per Module Supply voltage 24 VDC 20 25 Number of I O Modules 20 per bus coupler tota...

Page 195: ...APPENDIX B Additional Information...

Page 196: ...nd Acronyms The following table lists terms and acronyms used in this guide along with their definitions Term Definition ATC Automation Technology Center LVDS Low voltage Differential Signaling PLC Pr...

Page 197: ...mation Controller PAC320 Series Software P IEC Only M IEC PLCOpen Motion C IEC PLCOpen Motion CNC Visualization X Xpress Embedded W Web visualization for CNC N No visualization Communication Interface...

Reviews: