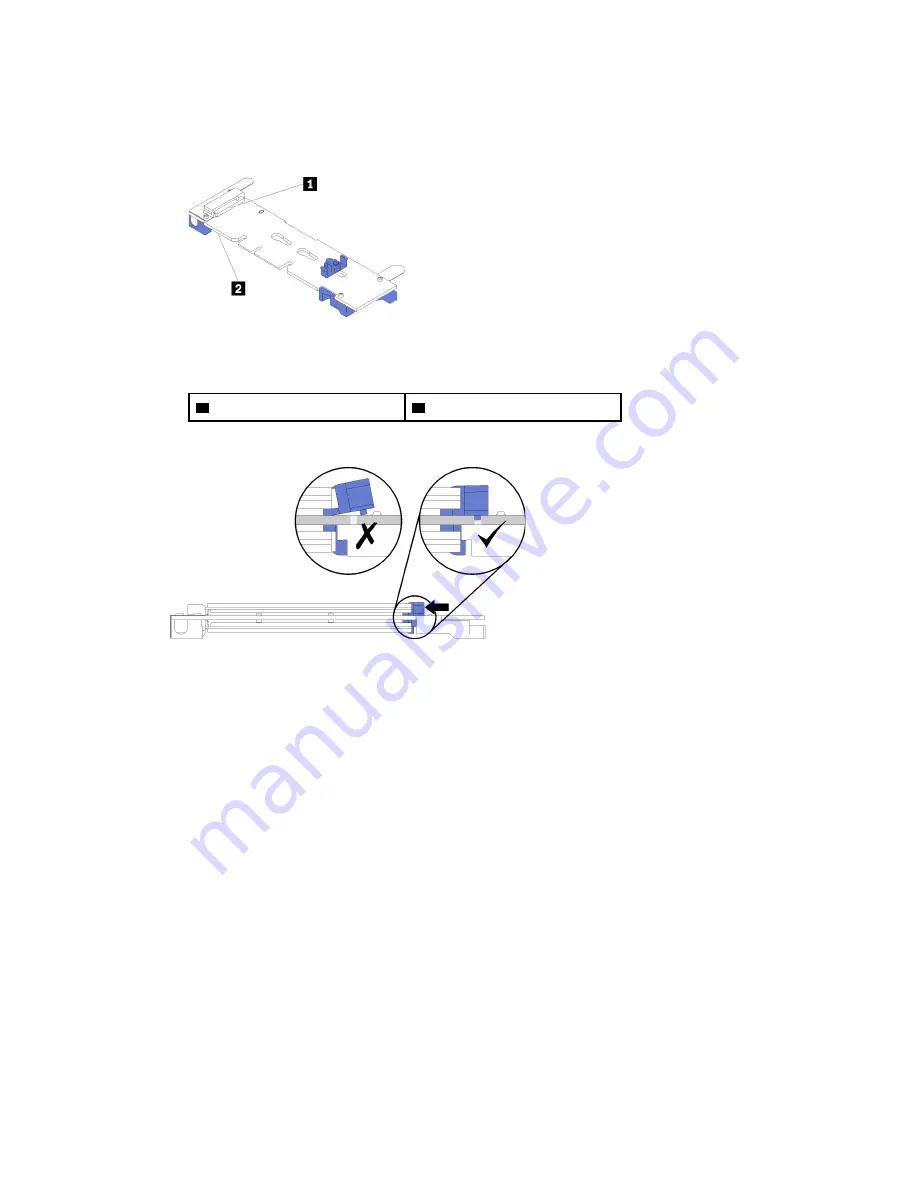
• When installing two drives, align and support both drives before sliding the retainer forward to
secure the drives.
• When only one drive is installed, it must be in slot 0.
Figure 93. M.2 drive slots
Table 33. M.2 drive slots
1
Slot 0
2
Slot 1
Step 3. Secure the M.2 drives in the backplane.
Figure 94. Securing the M.2 drives
Attention:
Make sure the two nubs on the retainer are in the small holes on the M.2 backplane
when the retainer is slid forward.
Slide the retainer forward (toward the connector) until you hear a soft “click” sound.
After installing an M.2 drive:
1. Install the M.2 backplane. See “Install the M.2 backplane” on page 165.
2. Install the riser that you removed to access the M.2 backplane. See “Install the riser for slot 10 to 15
(riser 2)” on page 220 or “Install the riser for slot 16 to 17 (riser 3)” on page 222.
3. Install the I/O tray and connect all cables. See “Install the I/O tray” on page 154.
.
Hardware replacement procedures
169
Summary of Contents for ThinkAgile VX 4-Socket 4U Certified Node
Page 6: ...iv User Guide for ThinkAgile VX7820 Appliance ThinkAgile VX 4 Socket 4U Certified Node ...
Page 10: ...viii User Guide for ThinkAgile VX7820 Appliance ThinkAgile VX 4 Socket 4U Certified Node ...
Page 69: ...Chapter 2 Server components 59 ...
Page 76: ...66 User Guide for ThinkAgile VX7820 Appliance ThinkAgile VX 4 Socket 4U Certified Node ...
Page 96: ...86 User Guide for ThinkAgile VX7820 Appliance ThinkAgile VX 4 Socket 4U Certified Node ...
Page 252: ...242 User Guide for ThinkAgile VX7820 Appliance ThinkAgile VX 4 Socket 4U Certified Node ...
Page 276: ...266 User Guide for ThinkAgile VX7820 Appliance ThinkAgile VX 4 Socket 4U Certified Node ...
Page 284: ...274 User Guide for ThinkAgile VX7820 Appliance ThinkAgile VX 4 Socket 4U Certified Node ...
Page 295: ......
Page 296: ......


