


2
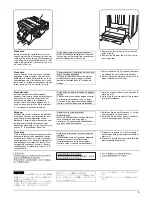
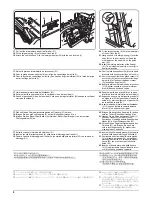
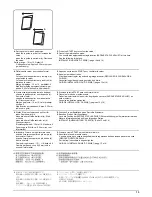
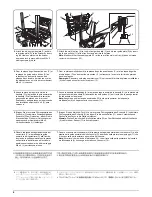
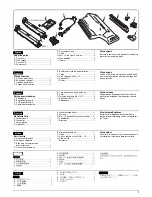
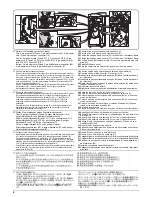
* 開梱時の注意
マルチジョブトレイを取り出すときは、フ
レーム前後を持つこと。底部分を持つと貼り
付けられたフィルムが変形する可能性があ
る。
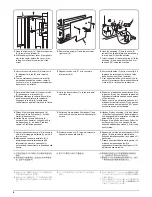
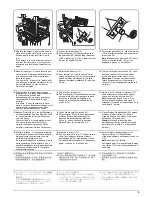
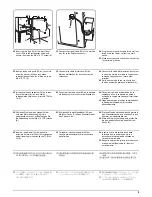
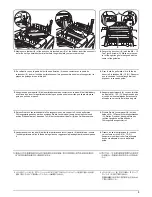
[ 取付手順 ]
マルチジョブトレイを設置するときは、必ず複
写機本体のメインスイッチを OFF にし、電源プ
ラグを抜いてから作業すること。また、フィ
ニッシャのメイントレイを取り付けてからマ
ルチジョブトレイを設置すること。
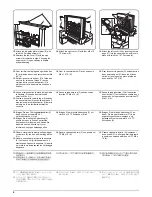
* フィニッシャの後カバーを外した状態で作
業してください。
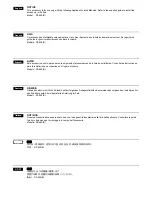
* マルチジョブトレイ設置前の注意事項
中折りユニットとセットで設置する場合は、
先に中折りユニット設置後、マルチジョブト
レイを設置してください。
* Unpacking Precautions
Hold the frame at the front and back when
removing the multi job tray from the box. Sup-
porting the multi job tray from the bottom may
cause deformation of the film adhered to it.
Procedure
Before installing the multi job tray, turn the
copier off from the main switch and unplug the
power cable from the wall outlet. Install the
multi job tray after attaching the finisher main
tray.
* Installation should be carried out with
the finisher’s rear panel removed.
* Notes before installing the multi job tray
When installing the multi job tray and center-
fold unit as a set, first install the centerfold
unit and then the multi job tray.
* Précautions de déballage
Maintenir le cadre à l'avant et à l'arrière lors
du retrait du plateau multitâches de la boîte.
Porter le plateau multitâches par le fond peut
endommager le film qui le recouvre.
Procédure
Avant d’installer le plateau multitâches, mettre
le copieur hors tension en appuyant sur
l’interrupteur principal et débrancher le câble
d’alimentation de la prise murale. Installer le
plateau multitâches après avoir fixé le plateau
principal du retoucheur.
* Avant l’installation, vous devez avoir
retiré le panneau arrière du retoucheur.
* Remarques avant d’installer le plateau
multitâches
Lorsque vous installez l’ensemble plateau multi-
tâches et unité pour pages centrales dépliables,
installez d’abord l’unité, puis le plateau.
* Precauciones al desempaquetar
Al sacar la bandeja multitrabajos de la caja,
sujete el marco por delante y por detrás. Sos-
tener la bandeja multitrabajos por abajo
puede causar deformaciones en la película
que hay adherida a la misma.
Procedimiento
Antes de instalar la bandeja multitrabajos,
apague el interruptor principal de la copiadora
y desconecte el cable de alimentación del
receptáculo de pared. Instale la bandeja
multitrabajos luego de haber anexado la
bandeja principal del finalizador.
* La instalación debe realizarse con el
panel posterior del finalizador extraído.
* Notas antes de instalar la bandeja multi-
trabajos
Cuando instale la bandeja multitrabajos y la
unidad de plegado central como un juego,
instale en primer lugar la unidad de plegado
central y después la bandeja multitrabajos.
* Vorsichtsmaßnahmen beim
Auspacken Halten Sie, wenn Sie das Multi-
Job-Fach aus dem Karton herausnehmen,
den Rahmen vorne und hinten fest. Wenn Sie
das Multi-Job-Fach von unten abstützen,
kann die aufgeklebte Folie verformt werden.
Vorgang
Schalten Sie vor der Installation des Multi-Job-
Fachs den Kopierer am Hauptschalter aus,
und ziehen Sie den Netzstecker aus der
Steckdose. Installieren Sie das Multi-Job-Fach
nach der Anbringung des Hauptfach des
Finishers.
* Vor der Installation sollte die
Finisherrückwand entfernt werden.
* Hinweise zur Installation des Multi-Job-
Fachs
Wenn das Multi-Job-Fach und die Mittelfal-
teinheit zusammen installiert werden, install-
ieren Sie zunächst die Mittelfalteinheit und
dann das Multi-Job-Fach.
* Precauzioni per il disimballaggio
Tenere ferme le parti anteriore e posteriore
della struttura quando si rimuove il vassoio
multi-funzionale dal contenitore. Sorreggere il
vassoio multi-funzionale dal fondo può
causare una deformazione della pellicola ad
esso aderente.
Procedura
Prima di installare il vassoio multi-funzionale,
spegnere la fotocopiatrice utilizzando
l’interruttore principale e disinserire il cavo di
alimentazione dalla presa a muro. Installare il
vassoio multi-funzionale dopo aver fissato il
vassoio principale della finitrice.
* L’installazione deve essere eseguita con il
pannello posteriore del finisher rimosso.
* Note prima di installare il vassoio multi-
funzionale
Nell’installare come set il vassoio multi-funzi-
onale e l’unità centro-piega, installare
dapprima l’unità centro-piega, quindi il vas-
soio multi-funzionale.
Summary of Contents for TASKalfa 620
Page 1: ...SERVICE MANUAL Published in August 2009 842KP112 2KPSM062 Rev 2 TASKalfa 620 820 ...
Page 4: ...This page is intentionally left blank ...
Page 10: ...This page is intentionally left blank ...
Page 144: ...2KN 2KP 1 3 106 This page is intentionally left blank ...
Page 308: ...2KN 2KP 1 5 88 This page is intentionally left blank ...
Page 412: ...2KN 2KP 2 3 60 This page is intentionally left blank ...
Page 435: ...1 1 INSTALLATION GUIDE INSTALLATION GUIDE FOR SIDE FEEDER ...
Page 442: ...INSTALLATION GUIDE FOR LARGE SIZE SIDE FEEDER ...
Page 460: ...INSTALLATION GUIDE FOR DOCUMENT FINISHER ...
Page 475: ...INSTALLATION GUIDE FOR CENTERFOLD UNIT ...
Page 490: ...INSTALLATION GUIDE FOR MULTI JOB TRAY ...
Page 501: ...INSTALLATION GUIDE FOR PUNCH UNIT ...
Page 512: ...INSTALLATION GUIDE FOR STOPPER GUIDE ...
Page 515: ...INSTALLATION GUIDE FOR PRINTING SYSTEM ...
Page 518: ...INSTALLATION GUIDE FOR SCAN SYSTEM ...
Page 520: ......
Page 521: ......


