2KN/2KP-1
1-5-12
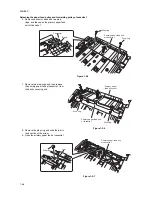
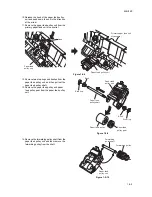
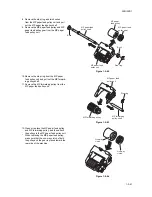
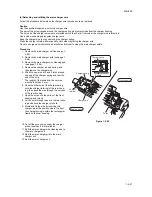
9. Remove two stop rings and bushes, and
then pull out the paper feed pulley shaft.
10. Remove the paper feed pulley and paper
feed pulley gear from the paper feed pulley
unit.
Figure 1-5-23
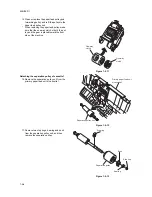
11. Remove the forwarding pulley shaft from the
paper feed pulley unit and then remove the
forwarding pulley from the shaft.
Figure 1-5-24
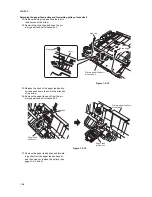
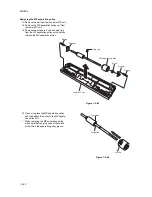
12. Clean or replace the paper feed pulley and
forwarding pulley, and then attach the pul-
leys to the paper feed pulley unit.
* When replacing the paper feed pulley, make
sure that the one-way clutch of both the pul-
ley and the gear is placed toward the front
side of the machine.
Figure 1-5-25
Paper feed pulley
Paper feed
pulley gear
Stop ring
Stop ring
Bush
Bush
Paper feed
pulley shaft
Paper feed
pulley unit
Forwarding pulley shaft
Paper feed
pulley unit
Forwarding pulley
One-way
clutch
One-way
clutch
Summary of Contents for TASKalfa 620
Page 1: ...SERVICE MANUAL Published in August 2009 842KP112 2KPSM062 Rev 2 TASKalfa 620 820 ...
Page 4: ...This page is intentionally left blank ...
Page 10: ...This page is intentionally left blank ...
Page 144: ...2KN 2KP 1 3 106 This page is intentionally left blank ...
Page 308: ...2KN 2KP 1 5 88 This page is intentionally left blank ...
Page 412: ...2KN 2KP 2 3 60 This page is intentionally left blank ...
Page 435: ...1 1 INSTALLATION GUIDE INSTALLATION GUIDE FOR SIDE FEEDER ...
Page 442: ...INSTALLATION GUIDE FOR LARGE SIZE SIDE FEEDER ...
Page 460: ...INSTALLATION GUIDE FOR DOCUMENT FINISHER ...
Page 475: ...INSTALLATION GUIDE FOR CENTERFOLD UNIT ...
Page 490: ...INSTALLATION GUIDE FOR MULTI JOB TRAY ...
Page 501: ...INSTALLATION GUIDE FOR PUNCH UNIT ...
Page 512: ...INSTALLATION GUIDE FOR STOPPER GUIDE ...
Page 515: ...INSTALLATION GUIDE FOR PRINTING SYSTEM ...
Page 518: ...INSTALLATION GUIDE FOR SCAN SYSTEM ...
Page 520: ......
Page 521: ......

