

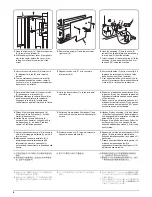
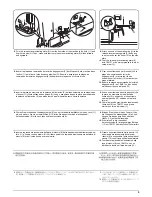
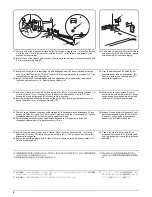

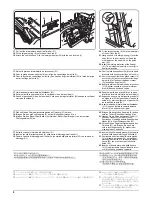


12
Operation check
1.
Make a test copy to check that the centerfold
unit operates correctly.
Adjustment of centerfold position
1.
Make a test copy in centerfold mode. A test
copy must be made for each of the following
paper sizes.
A3, A4R, B4, LGR (11"
×
17"), LTR (8.5"
×
11", LGL (8.5"
×
14")
2.
If the sheets are not folded at the correct
position, perform maintenance mode U248
to make the following adjustments for each
paper size.
3.
Select SADDLE ADJUST mode.
<Reference value>
Distance from centerfold position: within
±3 mm
Vérification du fonctionnement
1.
Effectuer une copie de test pour vérifier le
bon fonctionnement de l’unité pour pages
centrales dépliables.
Réglage ade la position pages
centrales dépliables
1.
Effectuez un test d’impression en mode
pages centrales dépliables, et ce, pour cha-
cun des formats papier suivants.
A3, A4R, B4, LGR (11"
×
17"), LTR (8,5"
×
11", LGL (8,5"
×
14")
2.
Si les feuilles ne sont pas pliées
correctement, utilisez le mode entretien U248
pour effectuer les réglages suivants pour
chaque format papier.
3.
Sélectionnez le mode SADDLE ADJUST
(REGLAGE A CHEVAL).
<Valeur de référence>
Distance à la position de la page centrale
dépliable: ±3 mm
Comprobación operacional
1.
Haga una copia de prueba para comprobar
que la unidad de plegado funciona correcta-
mente.
Ajuste de la posición de plegado
central
1.
Haga una copia de prueba en el modo de
plegado central. Debe hacer una copia de
prueba para cada uno de los siguientes
tamaños de papel.
A3, A4R, B4, LGR (11"
×
17"), LTR (8,5"
×
11", LGL (8,5"
×
14")
2.
Si las hojas no se pliegan en la posición
correcta, lleve a cabo en modo de
funcionamiento U248 para realizar los
siguientes ajustes para cada tamaño de
papel.
3.
Seleccione el modo SADDLE ADJUST.
<Valor de referencia >
Distancia desde la posición de plegado: ±3
mm
Betriebsprüfung
1.
Machen Sie eine Testkopie, um zu prüfen,
ob die Mittelfalt-Einheit ordnungsgemäß
funktioniert.
Mittelfaltposition justieren
1.
Machen Sie ein Testkopie im Mittelfaltmo-
dus. Testkopien müssen für jeder der fol-
genden Papierformate erstellt werden.
A3, A4R, B4, LGR (11"
×
17"), LTR (8,5"
×
11", LGL (8,5"
×
14")
2.
Falls die Blätter nicht an der korrekten
Position gefaltet sind, führen Sie den
Wartungsmodus U248 durch, um die
folgenden Justierungen für die einzelnen
Papierformate vorzunehmen.
3.
Wählen Sie den Modus SADDLE ADJUST.
<Bezugswert>
Abstand von der Mittenfaltposition: innerhalb
von ±3 mm
Controllo del funzionamento
1.
Eseguire una copia di prova per controllare
che l’unità per piegatura centrale funzioni
correttamente.
Regolazione della posizione piegatura
centrale
1.
Eseguire una copia di prova in fase pieg-
atura centrale. Eseguire una copia di prova
per ognuno dei seguenti formati carta.
A3, A4R, B4, LGR (11"
×
17"), LTR (8,5"
×
11", LGL (8,5"
×
14")
2.
Se i fogli non vengono piegati in modo
corretto, eseguire la fase di manutenzione
U248, al fine di eseguire le seguenti
regolazioni per ogni formato carta.
3.
Selezionare la fase SADDLE ADJUST
(REGOLA SELLA).
<Valore di riferimento>
Distanza dalla posizione della piegatura
centrale: entro ±3 mm
[ 動作確認 ]
1.
テストコピーを行って、正常に動作するか確
認する。
[ 中折り位置調整 ]
1.
以下の用紙を使用して、中折りモードで 2 枚
折りにてテストコピーを行う。
A3、A4R、B4、LGR(11" × 17")、
LTR
(8.5" × 11")
、LGL
(8.5" × 14")
2.
中折りの位置がずれている場合は、
メンテナ
ンスモード U248 を実行し、用紙サイズ別に
次の調整を行う。
3.
SADDLE ADJUST モードを選択する。
<基準値>中折り位置のずれ:± 3mm 以内
Summary of Contents for TASKalfa 620
Page 1: ...SERVICE MANUAL Published in August 2009 842KP112 2KPSM062 Rev 2 TASKalfa 620 820 ...
Page 4: ...This page is intentionally left blank ...
Page 10: ...This page is intentionally left blank ...
Page 144: ...2KN 2KP 1 3 106 This page is intentionally left blank ...
Page 308: ...2KN 2KP 1 5 88 This page is intentionally left blank ...
Page 412: ...2KN 2KP 2 3 60 This page is intentionally left blank ...
Page 435: ...1 1 INSTALLATION GUIDE INSTALLATION GUIDE FOR SIDE FEEDER ...
Page 442: ...INSTALLATION GUIDE FOR LARGE SIZE SIDE FEEDER ...
Page 460: ...INSTALLATION GUIDE FOR DOCUMENT FINISHER ...
Page 475: ...INSTALLATION GUIDE FOR CENTERFOLD UNIT ...
Page 490: ...INSTALLATION GUIDE FOR MULTI JOB TRAY ...
Page 501: ...INSTALLATION GUIDE FOR PUNCH UNIT ...
Page 512: ...INSTALLATION GUIDE FOR STOPPER GUIDE ...
Page 515: ...INSTALLATION GUIDE FOR PRINTING SYSTEM ...
Page 518: ...INSTALLATION GUIDE FOR SCAN SYSTEM ...
Page 520: ......
Page 521: ......


