


11
でサイドフィーダを選択してテストパター
ンを出力する。
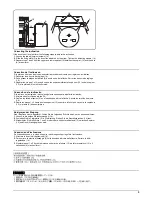
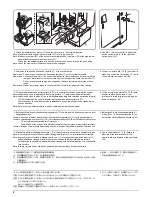
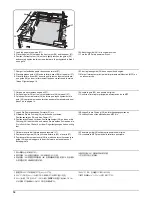
5. 用紙のセンター(25) とテストパターンのセ
ンター(26) の左右ズレ量 (L) が基準値外の
ときは、
次の調整をおこなう。
<基準値>左右ズレ 2.0mm 以下
25
26
L
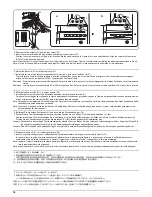
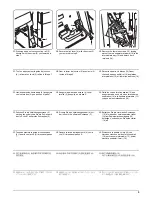
Setting paper size
1. Plug the MFP into a power outlet, and turn
on the main power switch.
2. Enter maintenance mode U208 and set the
size of paper that will be loaded in the side
feeder.
Checking the center line
1. Place paper in the side feeder.
2. Enter maintenance mode U034 (paper
timing setting).
3. Select "CASSETTE".
4. Press [Interrupt]. Select the side feeder for
the test print mode to print a test pattern.
5. Measure the right and left offset (L) between
the paper center (25) and test pattern center
(26). If this value differs from the standard
value, perform the following adjustment.
<Standard value> right and left offset should
be less than 2.0 mm.
Réglage du format de papier
1. Brancher l’imprimante multifonction (MFP)
sur une prise d’alimentation et la mettre sous
tension.
2. Passer en mode de maintenance U208 et
définir le format du papier qui va être chargé
dans le chargeur latéral.
Vérification du centrage du papier
1. Charger du papier dans le chargeur latéral.
2. Passer en mode de maintenance U034
(réglage de synchronisation du papier).
3. Slectionnez "CASSETTE".
4. Appuyer sur la touche [Interrupt].
Sélectionner le chargeur latéral pour une
impression d’un motif de test.
5. Mesurer l’écart (L) à gauche ou à droite entre la
ligne médiane de la feuille (25) et la ligne
médiane du motif de test imprimé (26). Si cette
valeur est supérieure à la valeur standard,
procéder au réglage ci-après.
<Valeur standard> le décalage à droite ou à
gauche doit être inférieur à 2,0 mm.
Cómo establecer el tamaño del papel
1. Conecte la MFP a un receptáculo de pared y
encienda el interruptor principal.
2. Active el modo de mantenimiento U208 y
establezca el tamaño del papel que se
cargará en el alimentador de papel.
Comprobación de la línea central
1. Coloque el papel en el alimentador de papel.
2. Active el modo de mantenimiento U034
(ajuste de tiempo de papel).
3. Seleccione "CASSETTE".
4. Pulse [Interrupt]. Seleccione el alimentador
de papel para el modo de impresión de
prueba para hacer una prueba de impresión.
5. Mida la longitud de la desviación izquierda y
derecha (L) que hay entre el centro del papel
(25) y el centro de la prueba de impresión
(26). Si esta valor es diferente del estándar,
realice el siguiente ajuste.
<Valor estándar> la longitud de la desviación
izquierda y derecha deberá ser inferior a 2,0 mm.
Einstellen des Papierformats
1. Stecken Sie den Netzstecker des MFP in die
Wandsteckdose, und schalten Sie den
Hauptschalter ein.
2. Rufen Sie den Wartungsmodus U208 auf, und
stellen Sie das Format des Papiers ein, das in
den Papiereinzug eingelegt werden soll.
Überprüfen der Mittellinie
1. Legen Sie das Papier in den Papiereinzug.
2. Rufen Sie den Wartungsmodus U034
(Einstellen des Papier-Timings) auf.
3. Whlen Sie "CASSETTE".
4. Drücken Sie [Interrupt]. Wählen Sie den
Papiereinzug für den Testdruckmodus, um
ein Testmuster auszudrucken.
5. Messen Sie den rechten und linken Versatz (L)
zwischen der Mitte des Papiers (25) und der Mitte
des Testmusters (26). Falls dieser Wert vom
Standardwert abweicht, führen Sie die folgende
Einstellung durch.
Der <Standardwert> für den rechten und linken
Versatz sollte weniger als 2,0 mm betragen.
Impostazione del formato della carta
1. Collegare la MFP alla presa di rete e quindi
accenderla premendo l’interruttore principale.
2. Accedere alla modalità di manutenzione
U208 e impostare il formato della carta che
sarà caricata nell’alimentatore laterale.
Controllo della linea centrale
1. Caricare carta nell’alimentatore laterale.
2. Accedere alla modalità di manutenzione U034
(impostazione di sincronizzazione della carta).
3. Selezionare "CASSETTE".
4. Premere il tasto [Interrupt]. Selezionare
l’alimentatore laterale da usare nella modalità
stampa di prova quale sorgente per la stampa
del motivo di prova.
5. Misurare la distanza destra e sinistra (L) tra il
centro della carta (25) e il centro del motivo di
prova (26). Se questo valore differisce da
quello standard è necessario eseguire la
regolazione di seguito illustrata.
<Valore standard> La distanza destra e sinistra
deve essere inferiore a 2,0 mm.
サイズ設定
1. MFP 本体の電源プラグをコンセントに差し込
み、メインスイッチを ON にする。
2. メンテナンスモード U208 を実行し、
サイド
フィーダにセットする用紙のサイズを設定
する。
センターライン確認
1. サイドフィーダに用紙をセットする。
2. メンテナンスモード U034( 用紙タイミング設
定 ) を実行する。
3.「カセット」
を選択する。
4. 割り込みキーを押し、
テストプリントモード
纸张尺寸的设置
1. 将复印机主机的电源线插入电源插座,然后打
开电源。
2. 进入维修保养模式 U208,然后设置将要放入
大容量供纸盒的纸张的大小。
中心线的检查
1. 将纸张放入大容量供纸盒中。
2. 进入维修保养模式 U034(纸张定时设置)。
3. 选择“CASSETTE”。
4. 按插印键,在打印测试模式下选择大容量纸盒
后输出测试图样。
5. 当纸张中心 (25) 和测试图样的中心 (26) 的
左右偏移值 (L) 在基准值以外时,请执行下面
的调整。
< 基准值 > 左右偏移在 2.0mm 以下
Summary of Contents for TASKalfa 620
Page 1: ...SERVICE MANUAL Published in August 2009 842KP112 2KPSM062 Rev 2 TASKalfa 620 820 ...
Page 4: ...This page is intentionally left blank ...
Page 10: ...This page is intentionally left blank ...
Page 144: ...2KN 2KP 1 3 106 This page is intentionally left blank ...
Page 308: ...2KN 2KP 1 5 88 This page is intentionally left blank ...
Page 412: ...2KN 2KP 2 3 60 This page is intentionally left blank ...
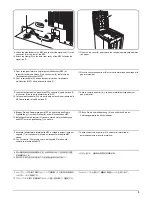
Page 435: ...1 1 INSTALLATION GUIDE INSTALLATION GUIDE FOR SIDE FEEDER ...
Page 442: ...INSTALLATION GUIDE FOR LARGE SIZE SIDE FEEDER ...
Page 460: ...INSTALLATION GUIDE FOR DOCUMENT FINISHER ...
Page 475: ...INSTALLATION GUIDE FOR CENTERFOLD UNIT ...
Page 490: ...INSTALLATION GUIDE FOR MULTI JOB TRAY ...
Page 501: ...INSTALLATION GUIDE FOR PUNCH UNIT ...
Page 512: ...INSTALLATION GUIDE FOR STOPPER GUIDE ...
Page 515: ...INSTALLATION GUIDE FOR PRINTING SYSTEM ...
Page 518: ...INSTALLATION GUIDE FOR SCAN SYSTEM ...
Page 520: ......
Page 521: ......


