


Appendix
E.
Install
a
Hardware
Management
Console
(HMC)
The
Hardware
Management
Console
(HMC)
user
interface
provides
the
functions
needed
to
create
and
maintain
a
single
or
multiple-partitioned
environment.
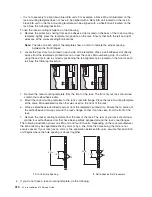
Note:
This
section
refers
to
systems
capable
of
running
multiple
partitions.
The
Model
6C3
and
Model
6E3
cannot
run
multiple
partitions.
However,
your
system
is
considered
a
full
system
partition,
and
a
full
system
partition
allows
you
to
connect
to
an
HMC
and
use
programs
such
as
Service
Focal
Point
and
Inventory
Scout
Services.
When
one
of
the
following
procedures
in
this
section
asks
you
to
select
a
partition
from
a
list
of
partitions,
or
to
configure
additional
partitions,
the
only
partition
that
you
are
concerned
with
is
the
one
you
are
working
on.
Position
the
HMC
and
Monitor
Position
the
HMC
and
monitor
at
or
near
their
desired
location.
v
The
HMC
weighs
between
34
kg
(75
pounds)
and
41
kg
(90
pounds).
Do
not
try
to
lift
the
HMC
by
yourself.
v
Monitors
can
weigh
as
much
as
35
kg
(77
pounds).
Use
caution
when
lifting
or
moving
the
monitor.
v
Leave
enough
space
around
the
HMC
to
safely
and
easily
complete
the
setup
procedures.
v
Observe
standard
ergonomic
guidelines
while
arranging
your
system
unit
so
that
you
can
work
comfortably
and
safely.
For
more
information
on
arranging
your
workstation,
visit
the
Healthy
Computing
Web
address
at:
http://www.pc.ibm.com/us/healthycomputing.
v
Be
sure
to
maintain
at
least
51
mm
(2
inches)
of
space
on
the
sides
of
the
system
unit
and
152
mm
(6
inches)
at
the
rear
of
the
system
unit
to
allow
the
system
unit
to
cool
properly.
The
front
of
the
system
requires
a
minimum
of
76
mm
(3
inches)
of
space.
Blocking
the
air
vents
can
cause
overheating,
which
might
result
in
a
malfunction
or
permanent
damage
to
the
system
unit.
v
Place
the
HMC
in
a
location
where
all
necessary
power
outlets
and
network
connections
can
safely
be
reached.
v
Place
the
display
in
a
stable
and
sturdy
location.
419
Summary of Contents for P 615 series
Page 1: ...pSeries 615 Service Guide SA38 0630 02 ERserver...
Page 2: ......
Page 3: ...pSeries 615 Service Guide SA38 0630 02 ERserver...
Page 12: ...x EserverpSeries 615 Service Guide...
Page 16: ...xiv EserverpSeries 615 Service Guide...
Page 18: ...xvi EserverpSeries 615 Service Guide...
Page 58: ...38 EserverpSeries 615 Service Guide...
Page 72: ...52 EserverpSeries 615 Service Guide...
Page 150: ...130 EserverpSeries 615 Service Guide...
Page 178: ...158 EserverpSeries 615 Service Guide...
Page 284: ...264 EserverpSeries 615 Service Guide...
Page 384: ...364 EserverpSeries 615 Service Guide...
Page 388: ...Model 6C3Parts 5 5 7 6 6 2 3 1 4 368 EserverpSeries 615 Service Guide...
Page 394: ...374 EserverpSeries 615 Service Guide...
Page 418: ...398 EserverpSeries 615 Service Guide...
Page 422: ...402 EserverpSeries 615 Service Guide...
Page 438: ...418 EserverpSeries 615 Service Guide...
Page 448: ...428 EserverpSeries 615 Service Guide...
Page 452: ...432 EserverpSeries 615 Service Guide...
Page 489: ......
Page 490: ...Printed in U S A October 2003 SA38 0630 02...
Page 491: ...Spine information pSeries 615 EserverpSeries 615 Service Guide SA38 0630 02...


