background image

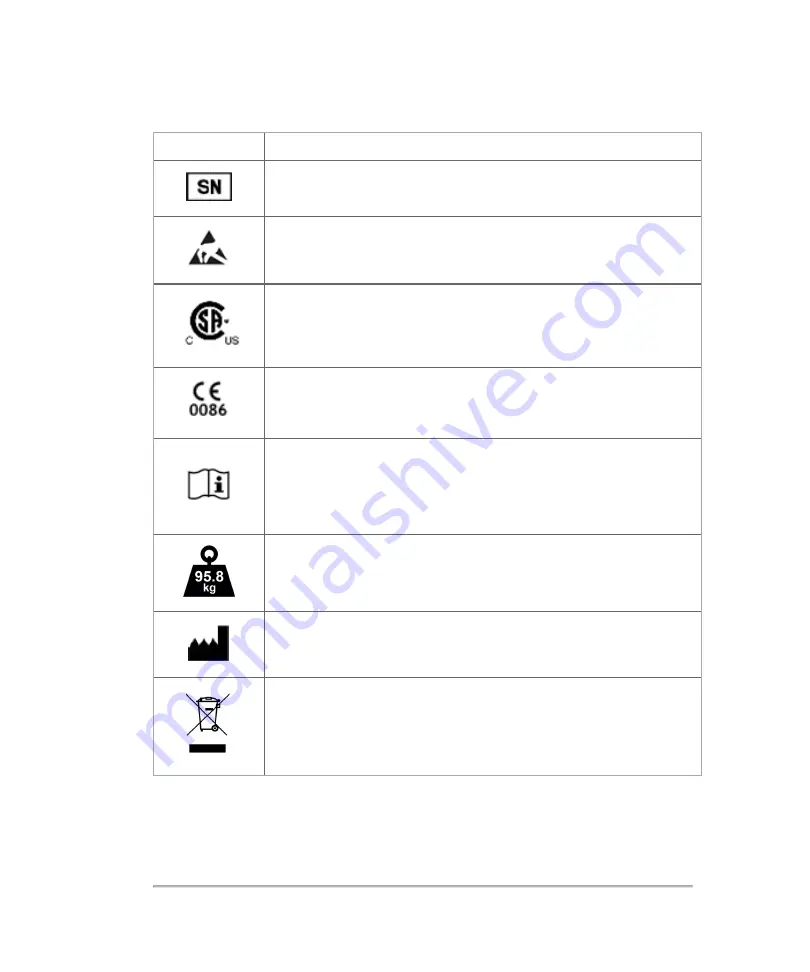
Symbol

Description

Serial number

Electrostatic sensitive device.

Proof of product compliance (electrical, gas and other safety
standards) to North American safety standards.

Conformité Européenne. Product meets the safety requirements of

the European Union.

Read usage instructions. This symbol instructs the user to consult
the instructions of the device for information on how to properly
use it. See the Vevo MD Getting Started Guide, Vevo MD User
Manual or the Vevo MD system's HELP.

Safe working load mass. Includes system at 95 kg, and a UHF
transducer at 0.8 kg.

Manufacturer

European Union WEEE (Waste Electrical and Electronic
Equipment) Directive 96/86/EEC. Identifies the directive on waste
electrical and electronic equipment. Refer to local regulations for
disposal.

Composite safety warning symbols

344

Appendices

Summary of Contents for VisualSonics Vevo MD

Page 1: ......

Page 2: ......

Page 3: ...50246 CN ZL200780016016 X CN ZL200780027688 0 EU 1853169 FR 1465531 FR 1625630 FR 1642154 FR 1715897 FR 1738407 FR 1853169 FR 1952175 FR 2029025 DE 1465531 DE 1738407 DE 1853169 DE 1952175 DE 2029025 DE 602004007521 DE 602004010098 DE 602005021057 HK 1085109 HK 1087316 HK 1129243 HK 1132644 IE 1465531 IT 1465531 IT 1715897 IT 1738407 IT 1952175 JP 4713339 JP 4331720 JP 4805140 JP 4805254 JP 480776...

Page 4: ...the system 18 Starting up and shutting down the system 22 System components 26 Transducers 39 Exam types 55 Using the control panel 57 Indications for use 62 Contraindications 67 System settings 68 Backup and restore 71 Connectivity 75 DICOM 78 Configuring the system for DICOM transfer 79 DICOM configuration pages 82 Associating devices with locations 90 4 ...

Page 5: ...02 Display information 104 Exam types and presets 106 Exam types 106 Customizing exam types 113 Exporting exam types and presets 115 Importing exam types and presets 117 Presets 118 Export 126 USB devices 129 USB memory sticks 129 DICOMDIR 131 Measurements and annotations 132 Annotations 132 General 136 System information 139 System logs 142 5 ...

Page 6: ...ering patient information from the worklist 175 Updating and querying the worklist 178 Ending the exam 181 To end an exam 181 Editing patient information 182 Completed exams 185 Exporting patient exams 190 To export patient exams manually to a USB memory stick 190 To export completed exams 190 To export from the review images page 192 To export from the mode window 192 Export folder structure 193 ...

Page 7: ... 218 Controls in 2D 222 Adding 2D measurements 228 M Mode acquisition and analysis 229 M Mode image acquisition 230 M Mode clinical display 232 M Mode control panel 234 Controls in M Mode 238 Adding M Mode measurements 246 Color Doppler Mode acquisition and analysis 247 Color Doppler Mode image acquisition 248 Color Doppler Mode clinical display 250 Color Doppler Mode control panel 252 7 ...

Page 8: ...elete a measurement 289 Adding a depth measurement 290 Adding a linear measurement 292 To add a linear measurement 292 Adding a time measurement 294 To add a time measurement 294 Adding a traced area measurement 295 To add a traced area measurement 295 Adding a traced distance measurement 298 To add a traced distance measurement 298 Adding a velocity measurement 300 To add a velocity measurement i...

Page 9: ...mining the required cleaning and disinfecting level 316 Step A Semi critical contact cleaning and disinfecting of system and transducer 319 Step B Non critical contact cleaning and disinfecting of the system and transducer 326 Cleaning and disinfecting the foot switch 331 Cleaning and disinfecting level 331 Spaulding classification 331 Before getting started 332 Non critical contact cleaning and d...

Page 10: ...n 367 Support your back during an exam 367 Minimize reaching and twisting 368 Promote comfortable shoulder and arm postures 368 Promote comfortable hand wrist and finger postures 368 Equipment safety 370 Hazardous materials 371 Manufacturer s declaration 371 Acoustic output 377 ALARA principle 378 Acoustic artifacts 379 Guidelines for reducing MI and TI 379 Output display 381 10 ...

Page 11: ...measurement precision and uncertainty 400 Specifications and standards 403 Electromechanical safety standards 405 EMC standards classification 406 DICOM standard 406 HIPAA standard 407 Measurement accuracy 407 Troubleshooting 410 Contact information 415 Related guidance documents 418 Glossary 419 Index 423 11 ...

Page 12: ...12 ...

Page 13: ...g mode you are using The second part of the manual covers image acquisition and the detailed analysis of your images in each imaging mode Document Conventions WARNING Introduces precautions that prevent injury or death Caution Introduces precautions that prevent damage to the equipment Important Introduces important information that you need to be aware of Note Introduces helpful information for y...

Page 14: ...ore Information l Vevo MD Getting Started Guide printable PDF version provided with Vevo MD Imaging System l Technical Support See Contact information on page 415 14 About the Vevo MD Imaging System User Manual ...

Page 15: ...g Steps 1 Connect a transducer See Transducers on page 39 2 Turn on the system See Starting up and shutting down the system on page 22 3 Select an exam type See Exam types on page 55 4 Scan See Scanning on page 197 5 Enter Patient information See Patient on page 165 6 Archive or export exams See Archiving exams on page 95 or Exporting patient exams on page 190 WARNING Use only the power cord provi...

Page 16: ...ing 2D data See Exam types on page 55 4 A new patient exam is created To change the details of the exam see Editing patient information on page 182 5 Refine your image using the various controls see Scanning on page 197 and Controls in 2D on page 222 6 Tap Freeze to stop data acquisition see Freeze on page 268 To re start acquisition tap Unfreeze 7 To place a measurement on a paused clip move to a...

Page 17: ...ystem provides two imaging modes Frame based imaging mode and Time Based imaging mode Frame based imaging mode captures images in frames based on two dimensional 2D data Frame based mode includes l 2D l Color Doppler Mode Time based imaging mode captures images measured in seconds based on unique source data characteristics Time based mode includes l M Mode Vevo MD Imaging System Overview 17 ...

Page 18: ...nd control panel monitors folded until you have reached your destination When moving the system ensure your view is not obstructed WARNING The glass used on the clinical display is very fragile and can shatter upon impact causing cuts to the user Adjust move and position the clinical display monitor with care WARNING Do not modify the attachment plug or use an adapter This could cause an electrica...

Page 19: ...g the system remove the cord from the power outlet and fold both monitors 1 Turn off the system using the power button 2 Turn off the main power switch 3 Unplug the AC power cord from the power outlet at the bottom of the stand base 4 Adjust the control panel angle to the lowest position 5 Grasp the clinical display monitor on both sides and then align it squarely above the control panel 6 Fold th...

Page 20: ...rotate it to adjust its angle 11 Grasp both sides of the control panel and pull it forward or push it backward to the desired angle Setting up the system Ergonomic scanning guidelines are provided in the section Ergonomic safety on page 367 and are intended to assist you in setting up the system so you are comfortable and effective when using the Vevo MD Imaging System Review the warnings and caut...

Page 21: ...to position the Vevo MD Imaging System further from sources of power frequency magnetic fields WARNING Because the only method of completely removing AC power from the system is to disconnect the AC input power cord from the stand base ensure that you place the system in a location in which you can easily remove the AC input power cord if necessary Caution Avoid increasing the system and transduce...

Page 22: ... System ensure that the AC power cord is plugged into the wall outlet using the proper plug and that the main power switch on the back of the bottom of the system base is turned ON Description Symbol ON OFF Location of power cord connection and main power switch 22 Getting started ...

Page 23: ... imaging session 1 Once powered on the system software starts and displays the Login page 2 The user ID defaults to the Administrator If you are not the Administrator tap the Guest button or select your user ID Starting up and shutting down the system 23 ...

Page 24: ...igured by the administrator before it can be used for login See Logging on for the first time on page 147 3 Enter your password and tap Log in The Log in control appears once you enter your password 4 The home screen is displayed 24 Getting started ...

Page 25: ... want to log out and leave the system running in standby tap the Log Out button located at the top of the control panel If the button is not displayed tap the More button to see the other available options or Starting up and shutting down the system 25 ...

Page 26: ...System components Vevo MD Imaging System views Safety warning label The composite safety warning label is located on the top of the system enclosure 26 Getting started ...

Page 27: ...System enclosure with composite safety warning label location highlighted System components 27 ...

Page 28: ...ndards Conformité Européenne Product meets the safety requirements of the European Union Read usage instructions This symbol instructs the user to consult the instructions of the device for information on how to properly use it See the Vevo MD Getting Started Guide Vevo MD User Manual or the Vevo MD system s HELP Safe working load mass Includes system at 95 kg and a UHF transducer at 0 8 kg Manufa...

Page 29: ...Composite safety warning symbols System connections System connectors on bottom of back of stand base Includes Fuse box and AC in Symbol Description Read usage instructions This symbol instructs the user to consult the instructions of the device for information on how to properly use it See the Vevo MD Getting Started Guide Vevo MD User Manual or the Vevo MD system s HELP Stand base labels System ...

Page 30: ... here Fuse label Displays the type of fuses required for the system voltage this example displays fuse requirements for a 125V system System connectors on back of the clinical display Includes HDMI and headphone jack connectors 30 Getting started ...

Page 31: ...System connectors on back of the computer enclosure Includes Ethernet and USB connectors System connectors on side of system Includes USB connectors System components 31 ...

Page 32: ...n the back of the clinical display HDMI video output resolution is 1920 x 1080 at 60 Hz WARNING Do not use a monitor connected through the external HDMI for medical diagnosis Headphone jack Connect a headphone jack for audio left and right output TRS or TRRS plug configuration Located on the back of the clinical display System connectors 32 Getting started ...

Page 33: ...Connect your network data cable here Located on the back of the computer enclosure USB connectors Connect your USB equipped data storage device here 2 located on the back and 2 on the side of the computer enclosure Transducer interface Connect the transducer here Slide the transducer down into the transducer bay and lock into place System connectors With the exception of the Ethernet network cable...

Page 34: ...D Imaging System Cable hooks There are four cable hooks included on the Vevo MD Imaging System Use the front cable hooks to store transducer cables and the back hooks to store Ethernet power and accessory cables Castors Castors allow the Vevo MD Imaging System to be moved easily The four castors can be locked using a lever located above each castor The castors are locked when their levers are down...

Page 35: ...t a connected USB device before removing Network connection The computer unit includes a 100 MB s Ethernet network connection Clinical display monitor The LED monitor features an adjustable mounting arm so you can position the monitor according to your needs The clinical display shows the ultrasound image as well as details about the imaging session and system status To adjust the clinical display...

Page 36: ...on board keyboard Isolation transformer The isolation transformer that powers the system is located inside the system and protects you and the equipment from electrical shock and power surges The Vevo MD Imaging System is designed to operate according to the electrical specifications of the region to which the system has been shipped The composite safety warning label on the top of the system encl...

Page 37: ...See Technical support on page 415 Plug Your Vevo MD Imaging System is equipped with the appropriate plug for a wall outlet Check the power plug to ensure that the plug is suited for the configuration of your wall outlet Important For optimal system performance use a dedicated interference free grounded or earthed wall outlet The power cable is securely connected to the Vevo MD Imaging System with ...

Page 38: ...ove the system when the plug is connected to the power outlet WARNING Before connecting the system ensure that the voltage is correct Ensure the power cable is undamaged before plugging the system directly into the wall outlet Do not connect the system s power supply to an MPSO or extension cord The voltage is specified on the composite safety warning label located on the top of the system enclosu...

Page 39: ...F transducers with the Vevo MD Imaging System The use of other transducers may affect safety and system performance The transducer offers the following features l Designed ergonomically for rapid screening procedures l 256 element linear array detector l Delivers a usable frame rate of more than 500 frames per second depending on the transducer model you use and the field of view you have set for ...

Page 40: ...nter transmit 15 MHz UHF48 20 46 MHz Center transmit 30 MHz UHF70 29 71 MHz Center transmit 50 MHz Vevo MD Imaging System Ultra High Frequency clinical transducers Caution Only use gels with properties similar to Aquasonic 100 Ultrasound Transmission Gel for use with the Vevo MD Imaging System 40 Getting started ...

Page 41: ...top surface of the transducer connector Here is an example of a UHF22 transducer label The following table describes the symbols on the composite safety warning label Symbol Description Catalog number Serial number Manufacturer Composite safety warning symbols Transducers 41 ...

Page 42: ...er to the part of the medical device which comes into physical contact with the patient The UHF transducers is classified as Type BF devices that have conductive contact with the patient or having medium or long term contact with the patient Proof of product compliance electrical gas and other safety standards to North American safety standards European Union WEEE Waste Electrical and Electronic E...

Page 43: ...ers to switch transducers without any negative affect to the current exam or imaging session Caution If damage is evident do not use the transducer and contact FUJIFILM SonoSite or your local representative Transducer interface Transducer connector To connect the transducer to the system 1 Turn the handle on the transducer clockwise to the vertical unlocked position Follow the directional label on...

Page 44: ...lockwise to the horizontal locked position and push down on the handle to lock the transducer To disconnect the transducer from the system 1 Flip the handle up and rotate clockwise to the vertical unlocked position 2 Pull the transducer connector away from the transducer interface 3 Slide the connector up and out of the transducer bay Transducer bay with transducer connected 44 Getting started ...

Page 45: ...rage Transducer connector storage with transducer When you move a transducer from one facility to another always use the supplied packaging Follow these guidelines when you store the transducer in its packaging l Make sure that the transducer is clean and dry before you store it in the supplied packaging l Place the transducer in the supplied packaging carefully so the cable doesn t kink l Don t s...

Page 46: ...n Gel for use with the Vevo MD Imaging System Using other gels can damage the transducer and void the warranty If you have questions about gel compatibility contact FUJIFILM SonoSite or your local representative Sheaths WARNING When performing a vascular line placement or peripheral nerve block procedure FUJIFILM SonoSite recommends using a single use sterile gel and a single use sterile transduce...

Page 47: ...ansducer and cable until the sheath is fully extended 4 Secure the sheath using the bands supplied with the sheath 5 Check for and eliminate air bubbles between the face of the transducer and the sheath Air bubbles between the face of the transducer and the sheath may affect the ultrasound image 6 Inspect the sheath to ensure that there are no holes or tears Transducers 47 ...

Page 48: ...s by mode Transducer Exam type Imaging mode 2D M Mode Color Doppler Mode UHF22 Abdominal Arterial Small Parts Superficial Venous UHF48 Abdominal Arterial Small Parts Superficial Venous Exam types by mode 48 Getting started ...

Page 49: ...Transducer Exam type Imaging mode 2D M Mode Color Doppler Mode UHF70 Abdominal Arterial Small Parts Superficial Venous Exam types by mode continued Transducers 49 ...

Page 50: ... in abdominal organs Abdominal Musculoskeletal conventional You can assess musculoskeletal structures soft tissue structures and surrounding anatomical structures for the presence or absence of pathology Superficial Musculoskeletal superficial You can assess musculoskeletal structures soft tissue structures and surrounding anatomical structures for the presence or absence of pathology Superficial ...

Page 51: ...ernias soft tissue structures and surrounding anatomical structures for the presence or absence of pathology You can detect normal lung motion for the presence or absence of pathology You can demonstrate blood flow in superficial anatomical structures Small parts Interventional department imaging You can use the system for ultrasound guidance in biopsy and drainage procedures vascular line placeme...

Page 52: ...ify your latex and talc sensitive patients and be prepared to treat allergic reactions promptly Use market cleared sterile transducer sheaths and sterile coupling gel Do not apply the transducer sheath and coupling gel until you are ready to perform the procedure After use remove and discard the single use sheath and clean and disinfect the transducer using a FUJIFILM SonoSite recommended high lev...

Page 53: ...y to the patient never perform an Ophthalmic exam with the Vevo MD Imaging System The FDA has established lower acoustic energy limits for ophthalmic use and the Vevo MD Imaging System may exceed these limits Transducers 53 ...

Page 54: ... 78 2 1 98 m 5 UHF70 transducer 78 2 1 98 m 5 Transducer cable lengths Note Cable length is measured between the strain reliefs and includes the length under the strain relief The stated lengths do not include the lengths of cable inside the transducer enclosure or inside the transducer connector 54 Getting started ...

Page 55: ...an quickly get an optimal image to work with The system includes various default system exam types depending on the transducer you are working with When you start the system select the exam type for the work you are doing UHF70 transducer with the Arterial exam type selected Exam types 55 ...

Page 56: ...transducer Important Please be aware that you switch a transducer at any time You can switch transducers during a live scan after acquiring an image and during review of an image The Vevo MD Imaging System software allows for users to switch transducers without any negative affect to the current exam or imaging session 56 Getting started ...

Page 57: ...ove an object from one location to another l Swipe Move your finger quickly across the panel Faster than dragging l Tap Quickly touch the panel for example to activate a control l Double tap Quickly touch the panel twice with one or more fingers l Two finger pinch or spread Slide two fingers together or apart on the panel Use these gestures to perform the following actions Gesture Action Drag l Ad...

Page 58: ...lect a thumbnail in the review images screen to open it for review Double tap l Change keyboard to uppercase via the shift key l Change numbers and symbols to international characters via the shift key l Zoom in when viewing help using two fingers Two finger spread or pinch l Adjust sample volume size l Resize zoom area l Change time scale sweep speed in time based modes Control panel gestures and...

Page 59: ...l panel elements 1 Patient on page 165 2 Review Images see Patient image data on page 166 3 Exam types on page 106 4 More Controls see Customizing controls on page 207 5 Imaging Controls bar see Customizing controls on page 207 6 Save Frame see Saving images on page 269 Using the control panel 59 ...

Page 60: ...he onscreen keyboard To enter text using the onscreen keyboard 1 Tap a text box for example the patient name to display the onscreen keyboard 2 Tap keys as needed 3 Tap Done or anywhere outside of the keyboard and the keyboard disappears Onscreen keyboard 1 Alpha keys Tap and hold the alpha keys to reveal options for selecting alternate versions of the characters alternate versions available depen...

Page 61: ...rd arrow key Advances to next text box 5 Space bar Adds a single space 6 Keyboard toggle Toggles between the alpha keyboard and the numbers and symbols keyboard 7 Hide keyboard key Hides the keyboard 8 Return arrow key Commits current information starts a new line or advances to next text box On the patient form and annotation page this button is displayed as Done and will only hide the keyboard n...

Page 62: ...indications for use with each transducer are listed in the US FDA defined tables on the followings pages and are identified with a checkmark 1 1 The Vevo MD Imaging System uses ultra high frequency UHF series transducers that limit the imaging depth For this reason imaging of abdominal organs or non superficial musculoskeletal structure may be limited to neonatal and small pediatric patients and a...

Page 63: ... M 1 2 Intra operative Abdominal organs and vascular Intra operative Neuro Laparoscopic Pediatric 2D CD 2D M 1 2 Small Organ breast thyroid testicles prostate 2D CD 2D M 1 2 Neonatal Cephalic Adult Cephalic Trans rectal Trans vaginal Trans urethral Trans esoph Non Card Musculo skeletal Convent 2D CD 2D M 1 2 Musculo skeletal Superfic 2D CD 2D M 1 2 Intra luminal Other spec Cardiac Adult Cardiac Pe...

Page 64: ...operative Abdominal organs and vascular Intra operative Neuro Laparoscopic Pediatric 2D CD 2D M 1 2 Small Organ breast thyroid testicles prostate 2D CD 2D M 1 2 Neonatal Cephalic Adult Cephalic Trans rectal Trans vaginal Trans urethral Trans esoph Non Card Musculo skeletal Convent 2D CD 2D M 1 2 Musculo skeletal Superfic 2D CD 2D M 1 2 Intra luminal Other spec Cardiac Adult Cardiac Pediatric Trans...

Page 65: ...erative Abdominal organs and vascular Intra operative Neuro Laparoscopic Pediatric 2D CD 2D M 1 2 Small Organ breast thyroid testicles prostate 2D CD 2D M 1 2 Neonatal Cephalic Adult Cephalic Trans rectal Trans vaginal Trans urethral Trans esoph Non Card Musculo skeletal Convent 2D CD 2D M 1 2 Musculo skeletal Superfic 2D CD 2D M 1 2 Intra luminal Other spec Cardiac Adult Cardiac Pediatric Trans e...

Page 66: ...il you are ready to perform the procedure After use remove and discard the single use sheath and clean and disinfect the transducer using a FUJIFILM SonoSite recommended high level disinfectant See Cleaning and disinfecting on page 316 WARNING Color Doppler Mode images can be used as an adjunctive method not as a screening tool WARNING To prevent injury or misdiagnosis do not use this system for P...

Page 67: ...Contraindications The Vevo MD Imaging System system has no known contraindications Contraindications 67 ...

Page 68: ...sers with Administrator status Additionally not all system settings are available if you log in to the system as a Guest See Logging on for the first time on page 147 To display the system settings page Tap MORE and then tap SYSTEM SETTINGS Tapping a settings tab displays its available settings on the right side The active selection is highlighted 68 System settings ...

Page 69: ...System settings 69 ...

Page 70: ...70 System settings ...

Page 71: ...cking up and restoring data be aware of the following user access permissions and conditions l Standard users and administrators can perform a system backup l Only administrators can restore import export or delete a backup l Guest has no access to the backup and restore page in system settings To display the backup and restore page 1 Tap MORE and then tap SYSTEM SETTINGS 2 Tap the Backup Restore ...

Page 72: ...e stamped item 2 Tap Done to close the settings page To restore from a backup file 1 On the Backup Restore page select the time stamped backup you want to restore Tap System Restore 2 A confirmation screen will be displayed Confirm that the selected backup file is correct Tap Restore to continue or Cancel to exit 72 System settings ...

Page 73: ...tion screen Tap OK Importing Exporting and Deleting Backup Files To export a backup file 1 Select the time stamped backup you want to export and then tap Export 2 On the export page browse and select the folder to which you want to export the file 3 Optional To add a subfolder tap New Folder name the folder and then click Done 4 Tap Export 5 Tap Done to close the settings page Backup and restore 7...

Page 74: ...go 3 Tap Import Tap Yes to confirm the import operation Note The imported files will overwrite the files in your current file location 4 Tap Done to close the settings page To delete a backup file 1 Select one or more backup files from the list 2 Tap Delete and confirm you want to delete the file s 3 Tap Done to close the page and return to your imaging session 74 System settings ...

Page 75: ...t connect to the network you can connect by using a standard Ethernet 10 100 1000 network To connect to the network Devices connected to the system s Ethernet port must comply with the IEC 60601 1 or IEC 60950 standards Plug the Ethernet cable into the Ethernet connector on the back of the computer enclosure See System components on page 26 To display the connectivity page 1 Tap MORE and then tap ...

Page 76: ...way and MAC address fields are populated automatically DICOM setup Use this page to configure your system to archive images and exams to different locations depending on what type of procedure is being performed and if it is billable See DICOM configuration pages on page 82 To display the DICOM setup page 1 Tap MORE and then tap SYSTEM SETTINGS 2 Tap Connectivity in the list on the left 76 System ...

Page 77: ...3 Tap DICOM Setup Connectivity 77 ...

Page 78: ...DICOM Conformance Statement contact FUJIFILM SonoSite for a copy of this statement The Vevo MD DICOM Conformance Statement provides information about the purpose characteristics configuration and specifications of the network connections supported by the system The system connects over a local area network LAN to the following l Picture Archive and Communication Systems PACS archivers l Worklist s...

Page 79: ...ocations on page 90 4 Select your DICOM location See Select your DICOM location below Select your DICOM location Once you have configured your DICOM location you can now select it from the DICOM location list 1 Each DICOM location will list the following l SC Storage commitment l MPPS Modality Performed Procedure Step l Type Archiver MPPS Worklist SC l Device Device used to perform the exam l Stat...

Page 80: ...in the archiver s storage commit SC column 4 Once you have selected your preferred location tap Verify to confirm that the selected servers in the selected location are properly configured and able to communicate as a DICOM device One of the following connection status of the device appears in the status column l Failed DICOM cannot communicate with the device l Success DICOM can communicate with ...

Page 81: ...5 Tap Done 4 Tap OK The system will shutdown to complete the configuration After the system is fully shutdown restart the system by using the power button Configuring the system for DICOM transfer 81 ...

Page 82: ...You can configure up to eight locations See Associating devices with locations on page 90 l Archive Configuration for PACS archivers devices for storing patient exams images and clips Only one archiver per location can receive image transfers at a time You can associate up to four archivers per location l Storage Commit Configuration for storage commitment servers devices that take responsibility ...

Page 83: ...s 1 Tap MORE and then tap SYSTEM SETTINGS 2 Tap Connectivity in the list on the left 3 Tap DICOM Setup 4 Tap Config 5 Select a configuration page Location Archive Storage Commit Worklist or MPPS 6 Tap New DICOM configuration pages 83 ...

Page 84: ...on for network settings Also specifies which devices you want to associate with that network For example configure a location called Office and then associate an archiver with it You can configure up to eight locations See Associating devices with locations on page 90 Each location can support up to four active archivers one active modality worklist server one storage commit server and one MPPS se...

Page 85: ...g System location Cannot be between 127 0 0 0 and 127 0 0 8 l Port Device port number l Subnet Mask Identifies a network subdivision The default value is 255 255 0 0 l Default Gateway IP address where the network connects to another network Cannot be between 127 0 0 0 and 127 0 0 8 2 Archive Configuration for PACS archivers and devices for storing patient exams images and clips Only one archiver p...

Page 86: ...ound l Educational Select this check box to associate the archiver with the Educational routing select See Routing selections on page 100 l Ping Tap to determine whether the IP address is accessible The system displays OK or Failed 3 Storage Commit Configuration for storage commitment servers that take responsibility for and provide receipt of content sent by the ultrasound system Up to eight stor...

Page 87: ... worklist servers that contain scheduled patient procedure data You are allowed to configure up to eight Worklist servers You can perform a manual query from the worklist by filling out certain fields or you can set a worklist query to update automatically See Updating and querying the worklist on page 178 You can also import the data into the patient form See Entering patient information from the...

Page 88: ...Start Time In an automatic query start time for the automatic update displayed in 24 hour time l Ping Tap to determine whether the IP address is accessible The system displays OK or Failed 5 MPPS MPPS or Modality Performed Procedure Step Configuration for MPPS servers that coordinate detailed information about the exam performed You can associate one MPPS server per location You can associate up t...

Page 89: ... Title l IP Address Unique identifier for the MPPS server l Port Device port number l Ping Tap to determine whether the IP address is accessible The system displays OK or Failed To delete a location or device 1 On the proper configuration page select the name from the list of locations or devices 2 Tap Delete 3 Tap Done DICOM configuration pages 89 ...

Page 90: ... data from After you select a location choose which devices you want associated with that location Note Changing the configuration requires a system restart To associate devices with a location The devices must be configured before you can associate them See DICOM configuration pages on page 82 1 Tap MORE and then tap SYSTEM SETTINGS 2 Tap Connectivity in the list on the left 3 On the Connectivity...

Page 91: ... i Select the check box of the MPPS server that you want MPPS servers appear near the end of the list ii Select the check box of the archiver iii Select the check box in the archiver s MPPS column 7 Optional If you want to use the storage commitment service associate the storage commitment server with the archiver Note Only one storage commitment server can be selected for a location i Select the ...

Page 92: ...YSTEM SETTINGS 2 Tap Connectivity in the list on the left 3 On the Connectivity setup page tap DICOM Setup 4 In the Location list select the location 5 Do any of the following l To disassociate an archiver or worklist server deselect its check box 92 System settings ...

Page 93: ... verify the connection status of devices 1 On the Connectivity setup page tap DICOM Setup 2 Select your location from the drop down menu 3 Tap Verify to confirm the associated devices are connected The connection status of the devices appears in the Status column as one of the following l Verifying DICOM is communicating with the device l Failure DICOM cannot communicate with the device Associatin...

Page 94: ... The device does not support the C ECHO for example verify query command Note Unknown is also displayed for locations that have not be checked in this case the meaning of Unknown is to tell you that the device verification has not been done 94 System settings ...

Page 95: ...lips to DICOM devices The system archives images and video clips at the end of the exam You can also manually archive exams To display archive status for an exam 1 From the REVIEW IMAGES or PATIENT page tap Completed Exams 2 Select an exam 3 Do either of the following a Tap the icon in the archive status column for that exam b Tap More Options and select Archive Status A flyout will display applic...

Page 96: ... connection settings may be wrong see Connecting to the network on page 75 or there may be a network or server problem The exam needs to be manually archived see To manually archive exams on the facing page Storage commit for this exam is suspended Storage commit for the exam was successful Archive status icons Additional archive status information is provided as follows l Patient name l Frame or ...

Page 97: ...following l The correct location is selected See Connectivity on page 75 l The system is connected to a network via an Ethernet connection 2 From the REVIEW IMAGES or PATIENT page tap Completed Exams 3 Select the check box next to one or more exams 4 Tap Archive To discontinue MPPS for an exam You can discontinue MPPS for an exam before completing the exam On the patient form tap Discontinue Archi...

Page 98: ...ional Accreditation routing selection are also sent to the procedural billing archiver If an exam is associated with more than one routing selection the system archives it to both the procedural billing archiver and to the educational archiver To specify an educational archiver Note If you specify an archiver as an educational archiver exams that are not associated with an Accreditation routing se...

Page 99: ...tivity 4 On the Connectivity system setup page tap a location 5 Tap DICOM Setup 6 Tap Config 7 From the DICOM list select the Archive configuration page for the archiver 8 Select Educational 9 Tap Done Archiving 99 ...

Page 100: ...ation Educational You can associate the accreditation routing selection with a DICOM archive device See Specifying educational DICOM archivers on page 98 Associating routing selections with exams You can associate an exam with a routing selection during an exam or after ending an exam To associate a routing selection during an exam 1 Tap PATIENT 2 Select one or more routing selections in the Routi...

Page 101: ...page select the check box next to an exam 2 Tap More Options 3 Tap Route Exam 4 Select one or more options in the Routing Selection section Note Procedural and Diagnostics routing selections are billable Accreditation is not To associate a routing selection after an exam has ended 101 ...

Page 102: ...n that cannot be reached Note DICOM log files will be displayed in English only To view DICOM logs 1 Tap MORE and then tap SYSTEM SETTINGS 2 Tap System Logs in the list on the left 3 Select DICOM from the Show log type drop down menu To export DICOM logs 1 Tap MORE and then tap SYSTEM SETTINGS 102 System settings ...

Page 103: ... down menu Note The DICOM log files are embedded within the system log files 4 Tap Export 5 Locate and select your USB device 6 Optional Add an additional folder by tapping New Folder 7 Tap Export A confirmation will be displayed to confirm the export is complete DICOM log files 103 ...

Page 104: ... Display Information from the list on the left Patient Header The patient header contains information about the patient and the person who performed the exam You can choose what to display while scanning and what will be included when you export an image or a report Note If you save an image without the patient header it is not possible to display a patient header in review Select to display betwe...

Page 105: ...etting is used for the current session only so when the exam is ended or another transducer or exam type is selected the exam type default setting is used Note When saving an image the current thermal indices will be saved and will not be editable in review There are three sub indices l TIS Thermal index in soft tissue l TIB Thermal index in bone l TIC Thermal index in the cranium Display informat...

Page 106: ...m displays both system defined and user defined exam types organized by transducer Use the options to change a default transducer exam type or to change a default preset You cannot share user defined exam types among transducers To display the exam types and presets page 1 Tap MORE and then tap SYSTEM SETTINGS 2 Tap Exam Types Presets in the list 106 System settings ...

Page 107: ...urrently connected to the system Note The exam type displayed in blue on each transducer panel is the current default application for that transducer See Transducers on page 39 for the different transducers compatible with the Vevo MD Imaging System To manage exam types 1 On the Exam Types Presets page tap the transducer that includes the exam type you want to manage not necessary for importing an...

Page 108: ...le the default exam types l To create a new exam type tap New l To import an exam type tap Import l To export an exam type tap Export l To edit an exam type tap Edit l To delete the exam type tap Delete 108 System settings ...

Page 109: ... exam types Creating a custom exam type from within the exam types and presets page allows you to copy all of the presets associated with that exam type You can delete factory defined presets only from custom exam types You can also save an exam type during imaging using the Save Exam Type button See Customizing controls on page 207 This allows you to save your current configuration of controls an...

Page 110: ...at contains presets that are similar to what you want to create 4 Type a name for your custom exam type in the Name field 5 Click Done The new exam type appears in the exam types list of the selected transducer Custom exam types and presets are user specific 110 System settings ...

Page 111: ...ype that you want to disable 2 Tap to highlight the exam type 3 Tap Disable Exam Type The exam type is grayed out indicating that it has been disabled To enable the exam type select a disabled exam type and tap Enable Exam Type To delete a custom exam type 1 Tap to select the transducer that contains the custom exam type that you want to delete 2 Tap to highlight the custom exam type Note You cann...

Page 112: ...3 Tap Delete and confirm you want to delete the exam type 4 Tap Done to close the settings page 112 System settings ...

Page 113: ...cer selection lists and also in the exam drop down menu in the patient form You can rename delete export show hide reorder group and import user defined exam types See Exam types and presets on page 106 To customize an exam type 1 Select a transducer and exam type See Exam types and presets on page 106 2 Adjust imaging controls to your favorite settings You can set gain depth dynamic range image o...

Page 114: ...4 Type a name for the exam type Note The exam type must have a unique name 5 Tap Done 114 System settings ...

Page 115: ...t Note When exporting an exam type only the custom presets are exported not the factory default presets 1 Insert a USB memory stick 2 On the Exam Types Presets page select the exam type that you want to export 3 Tap Export 4 On the Export page select the desired USB memory stick 5 Optional To add a subfolder tap New Folder name the folder and then click Done Exporting exam types and presets 115 ...

Page 116: ...6 Select the folder containing the file then tap Export The exam type presets and groupings are added to the selected folder 7 Tap Done to close the settings page 116 System settings ...

Page 117: ...age browse to the folder that contains the exam type and then select it Exam type files appear with a logo 4 Tap Import Tap Yes to confirm the import operation Note The imported files will overwrite the files in your current file location if the exam type being imported already exists for the selected transducer The exam type you imported appears in the selected transducer exam types list in alpha...

Page 118: ...sets for a mode l View the parameters associated with a preset l Link presets between modes while imaging using groups Setting the default preset for a mode A default preset for a mode is the set of acquisition parameters that is applied to the system when a user begins scanning in that mode Note The default preset is indicated in bold black text for each mode To set the default preset for a mode ...

Page 119: ...to set the default preset The system populates the presets list for that mode 4 Tap Make Default 5 Repeat this selection process for the modes that are available for the selected transducer exam type 6 Tap Done to save the new default settings Presets 119 ...

Page 120: ...transducer for which you want to modify the preset 2 Tap Edit 3 In the mode list select the mode for which you want to disable a preset The system populates the presets list for that mode 4 Tap the preset you would like to disable The preset will be highlighted 5 Tap Disable Preset The preset is grayed out indicating that it has been disabled To enable the preset select a disabled preset and tap E...

Page 121: ...transducer and mode specific To create a custom mode settings preset from the system settings 1 On the Exam Types Presets page tap the exam type on the transducer for which you want to create the preset 2 Tap Edit 3 In the mode list select the mode for which you want to create the preset 4 Select the preset from the list that you want to copy 5 Tap the New Preset button 6 In the dialog type the na...

Page 122: ... transducer The Save Preset button is used to save all of the parameters being used in the current mode This allows you to apply these exact parameters again later using the Presets button 1 Begin scanning in the desired mode Adjust the controls to optimize your image 2 Tap Save Preset to save the current settings as a preset 3 Enter the name of your preset in the displayed field and tap Done to s...

Page 123: ...resets page tap the exam type on the transducer for which you want to delete a preset 2 Tap Edit 3 In the Presets list tap the name of the preset you want to delete 4 Tap Delete Preset Note The delete preset button is disabled until you select a preset that can be deleted 5 Tap Yes at the confirmation prompt 6 Optional Tap Back if you want to return to the previous exam type screen Presets 123 ...

Page 124: ...n assign a particular preset to only one group If you need to use a preset in a second preset group create a copy of that preset using the New Preset button and then add that preset to the new group l You can assign only one preset per mode to the same group l You can activate a preset group during an acquisition session by selecting a preset which is part of a group To create a preset group 1 Whi...

Page 125: ...already used in a group it will be removed from its existing group 5 Select the next mode in the group presets and select the required preset from the available options for the corresponding presets list from the top of the window 6 You can change the preset in a group Tap the preset to be replaced and tap to remove it then replace it by selecting the required preset from the available options for...

Page 126: ...the mode l Images from the thumbnails page l Exams from the completed exams list includes all images in the exam You can also review and export reports see Report on page 312 Important A user with Administrator privileges can choose to restrict exports to a USB device See To enable USB export on page 163 To display the export page 1 Tap MORE and then tap SYSTEM SETTINGS 2 Tap Export in the list 12...

Page 127: ...on Uncompressed AVI avi Largest file size provides the original image quality Animated GIF gif Medium file size provides fair image quality MPEG mp4 Smallest file size provides good image quality 3 Select the frame format Option Description TIFF tif Full screen image BMP bmp Full screen image 4 Tap Done to close the page and return to your imaging session To define DICOM export options 1 Select im...

Page 128: ...have less absolute detail than BMP format that don t render identically to the original images WARNING In some circumstances lossy compressed image quality may be reduced and therefore inappropriate for clinical use Note Clips will always be exported as JPEG 2 Tap Done to close the page and return to your imaging session 128 System settings ...

Page 129: ...tem does not support password protected USB memory sticks Make sure that the USB memory stick you use does not have password protection enabled Caution Do not remove the USB memory stick or turn off the ultrasound system while the system is exporting to avoid damaging the USB memory stick and losing patient data from it Caution Do not bump or otherwise apply pressure to the USB memory stick while ...

Page 130: ... system is exporting to it may cause the exported files to be corrupted or incomplete 1 When exporting a message is displayed on the clinical display Wait until the export report is displayed before removing the USB 2 Remove the USB memory stick from the port 130 System settings ...

Page 131: ...mat 2 Go to Completed Exams and select an exam to export 3 Tap Export USB 4 Tap PACS format to USB to export exams in DICOM format to be read on a PACS station or other DICOM viewer 5 Locate and select your USB device 6 Optional Add an additional folder by tapping New Folder 7 Tap Export Once the export is complete a report will be displayed telling you the number of exams exported and if any exam...

Page 132: ...T measurement tools Once enabled users will be able to place IMT measurements on 2D and M Mode images select from IMT and I M in 2D and IMT in M Mode See Adding an IMT measurement on page 302 Tap the Enable IMT measurement tools check box to enable the IMT measurement tools A confirmation dialog will be displayed Before enabling the IMT tools it is suggested to read Adding an IMT measurement on pa...

Page 133: ...n label turn off this feature by enabling the Clear Annotations on Scan selection box To display the annotations page 1 Tap MORE and then tap SYSTEM SETTINGS 2 Tap the Measurements Annotations tab 3 Tap Edit Annotations To add a custom annotation label 1 In the annotations page tap Add New Annotations 133 ...

Page 134: ...Add New again 4 Tap Done to close the page and return to your imaging session 5 Custom annotation labels will be indicated by the edit icon in the upper left corner on the annotation label button To edit an annotation label 1 To edit an annotation label tap to select the annotation label 2 In the annotation label text box edit the text Note You cannot edit the default annotation labels 3 Tap Done ...

Page 135: ...on label 1 To delete an annotation label tap to select the annotation label and tap Delete Label Note You cannot delete the default annotations 2 Tap Done to close the page and return to your imaging session Annotations 135 ...

Page 136: ...ith administrative privileges can change These settings include date and time preferred language and patient ID generation To display the general page 1 Tap MORE and then tap SYSTEM SETTINGS 2 Tap General in the list on the left To set your general preferences After you are done setting your general preferences you must tap Done Note The Vevo MD Imaging System will need to be restarted if the date...

Page 137: ... System Sounds Adjust the volume of system sounds by tapping and dragging the sliders of either the Keyboard Tones or Saving Tones You can also choose to mute the system sounds by tapping the speaker icons to to mute sounds tap again to enable sounds o Keyboard Tones Enable if you want to hear a tone when the keyboard keys are tapped o Saving Tones Enable if you want to hear a tone when saving ima...

Page 138: ... menu select a language English Français Deutsch Italiano and Español The control panel clinical display exports and keyboard will be updated to the chosen language The keyboard will contain alternative options for letters in some languages tap and hold a letter to display the options Note When the language has been changed the system will require you to restart the system l Patient ID The system ...

Page 139: ...n only be completed by a user with administrator privileges To display the system information page 1 Tap MORE and then tap SYSTEM SETTINGS 2 Tap System Information in the list on the left To upgrade your system Before upgrading your system ensure any imaging files are saved To perform a system upgrade you will need the software upgrade file on a USB Note To complete an upgrade a system restart is ...

Page 140: ...low the on screen instructions Note The installation and restart process could continue for up to 30 minutes To update your license Your system license and the enabled features are mapped to your specific machine as identified by the machine ID In order to update your license and enable new features you may need to provide the machine ID to FUJIFILM SonoSite 1 Insert a USB stick 2 On the system in...

Page 141: ...Insert the USB stick with the license file 2 Tap Update License 3 In the file browsing panel on the left navigate to the appropriate location 4 Select the update file and then tap Update The update progress begins and a progress bar is displayed 5 You will be asked to restart the system to complete the upgrade 6 Tap Done to close the page and return to your imaging session System information 141 ...

Page 142: ...l Error Collects errors and events typically to support diagnostics l Exit Collects processor exceptions and software generated assertions to support diagnostics l Terminate Collects errors and events that cause the system to shut down to support diagnostics To display the system logs page 1 Tap MORE and then tap SYSTEM SETTINGS 2 Tap System Logs in the list on the left 142 System settings ...

Page 143: ... memory stick 3 Select the files from the list that you want to export 4 Tap Export 5 In the export page browse and select the folder to which you want to export the file 6 Optional To add a sub folder tap New Folder name the folder and then tap Done 7 Tap Yes to confirm the export Once the export has been completed and confirmed you can safely remove the USB memory stick To delete a log file Note...

Page 144: ...3 Tap Delete to delete the selected files 4 Tap Yes to confirm the deletion 5 Tap Done to close the page and return to your imaging session 144 System settings ...

Page 145: ...ng on for the first time on page 147 2 Create User accounts After creating the initial administrator account the administrator can add more user accounts See Managing user accounts on page 156 3 Turn User Login on or off User login is on by default Only a user with administrative privileges can turn user login on or off When user login is on administrators and standard users are required to enter ...

Page 146: ...2 Tap User Management in the list on the left 146 System settings ...

Page 147: ...maging immediately however any saved data is not associated with a unique user account and some system settings are blocked To configure the administrator account 1 Tap the Administrator button on the log in screen The system directs you to the User Management panel 2 Optional Change the name of the currently logged in user in the Name field 3 Set and confirm the password for the current user who ...

Page 148: ... of the logged in administrator user if the name was changed You can now add other user accounts to the system See Managing user accounts on page 156 Note If you do not create a password for the administrator account the first time you log in you will be prompted to create a password each time you start up and log in to the system 148 System settings ...

Page 149: ...s an administrator where you will be required to define a password User login options The following options are available on the user login screen and are only for a user with administrative privileges Some of the options are only available when user login is set to on Option Availability Login on Login off Enable USB Export if unchecked users are unable to export data to a USB device or memory st...

Page 150: ...scanning l Once logged in the user name is displayed on the bottom right of the clinical display monitor l A log out option is now available in the more drop down menu l Only an administrator can delete other users This is true when user login is both on or off The administrator must confirm the deletion with their password With user login on a non administrator user will be able to l Enable and d...

Page 151: ...tor has allowed this l Restore their own user settings and button configuration l Configure DICOM archives and export l Set the default font size With user login on an administrator can define the above but will also be able to define these additional settings l Enable and disable password changes for users and by users l Enable and disable USB export l Enable and disable patient header on the mod...

Page 152: ...kups l Import and export backups l Delete backups l Set the localization language With user login on a guest user will be able to l Configure button layout l Adjust the monitor brightness and contrast and keyboard sound level l Choose the foot switch configuration l Export system logs l Use Help l View system information l Perform system backup 152 System settings ...

Page 153: ...administrator can delete other users With user login off an non administrator user will be able to l Choose the startup screen used l Configure button layout l Set DICOM locations and servers l Edit create new and delete custom annotations l Change the system date and time monitor brightness and contrast and keyboard sound levels l Choose the foot switch configuration l Perform a system backup l S...

Page 154: ...sers except themselves l Delete system logs l Change their own password l Restore the user settings for anyone l Upgrade the system software l Get the machine ID to update the software license l Restore the system configuration from backups l Import and export backups l Delete backups l Set the localization language With user login off the guest will be able to Note When user login is off the gues...

Page 155: ...new and delete custom annotations l Adjust the monitor brightness and contrast and keyboard sound level l Choose the foot switch configuration l Save and delete custom exam types l Export system logs l Use Help l View system information l Perform system backup User login 155 ...

Page 156: ...ew functionality and can take advantage of the customization features of the system Features such as creating new user accounts defining connectivity settings and some other system settings are not accessible to an account without administrative privileges l Administrator A user account with administrative privileges has access to all system features such as creating and deleting users turning use...

Page 157: ...d and enter the user name 4 Optional Check the Administrator check box to add administrative privileges to this account 5 Enter and confirm the password for the user This can be changed by the user or an administrative user See To change a user account s password on page 161 6 Tap Done to create the user account You are then directed to the user list page To delete a user account Only a user with ...

Page 158: ...f the user account The user account is deleted and you are returned to the User List To modify a user s settings Only a user with administrative privileges can modify a user s settings 1 Open the User Management page from the system settings 2 In the user list select the user you want to modify 3 Tap User Options 4 Tap Settings 158 System settings ...

Page 159: ... the account To restore a user account s settings Restore User restores user account s settings to the system default user profile this includes button configurations and user specific settings for the current user only Data and custom presets are not affected Only a user with administrative privileges can restore any user account s settings Standard users can only restore their own account s sett...

Page 160: ...ccount s more controls settings More Controls Restore restores the location of all customizable controls available during scanning and review to the system default Other system settings data and custom presets are not affected Only a user with administrative privileges can restore a user account s more controls settings 1 Open the User Management page from the system settings 2 In the user list se...

Page 161: ... returned to the log in page To change a user account s password Only a user with administrative privileges can change another user account s password 1 Open the User Management page from the system settings 2 In the user list select the user account for which you want to change the password 3 Tap User Options 4 Tap Change Password Managing user accounts 161 ...

Page 162: ...7 Tap Done to change the password To enable password changes for standard users Only a user with administrator privileges can enable the Enable password changes option to allow a standard user to change their own passwords 1 Open the User Management page from the system settings 2 Check the Enable password changes check box below the user list 3 Tap Done 162 System settings ...

Page 163: ...pen the User Management page from the system settings 2 Check the Enable USB export check box 3 Tap Done To enable patient header Only a user with administrative privileges can enable or disable the patient header If enabled the patient header will be displayed on the clinical display monitor while scanning and will also be included on images and reports when exporting 1 Open the User Management p...

Page 164: ...2 Check the Enable Patient Header check box below the user list 3 Tap Done 164 System settings ...

Page 165: ...efore you save an image See Entering patient information manually on page 173 and Display information on page 104 WARNING To avoid incorrect measurement calculations verify that the patient information and system date and time settings are accurate and correct before beginning an exam WARNING To avoid misdiagnosis or harming the patient outcome start a new patient form before starting a new patien...

Page 166: ...t For more information see DICOM on page 78 If you do not use DICOM networking then FUJIFILM SonoSite recommends that you export patient image data to a USB memory stick after every exam For more information see DICOM on page 78 Reviewing patient image data During an exam or after an exam has ended you can review patient image data that was saved during the exam Reviewing image data from an active...

Page 167: ... Exams and tap the patient exam that you would like to review 2 Tap Review Images Note If you are selecting more than one exam from the completed exams list the Review Images button is not available 3 You can name export or delete any image from an ended exam Note You can only export patient image data via the Report button from an ended exam 4 Double tap the image you want to load into review 5 T...

Page 168: ...Review images screen 1 Next and previous image 2 Scan 3 Export 4 Delete 168 Patient ...

Page 169: ... control panel use the directional arrows on either side of the image area or use the next and previous buttons on either side of the Scan button Tap a control to cycle through the images in the current exam Note These controls are only available for saved images and if there is more than one image in the current exam Patient image data 169 ...

Page 170: ...iss the keyboard tap outside of the patient form Patient l Last First Middle Patient name l ID Patient identification number l Date of Birth l Gender l Accession Enter number if applicable l Indications Enter desired text Exam l Exam The exam types available depend on the transducer that is connected to the system and the drop down list includes both custom and system defined exam types see Exam t...

Page 171: ...g selections in the patient form affects how exams are archived For more information see Routing selections on page 100 and Specifying educational DICOM archivers on page 98 l Procedural l Diagnostics l Educational Accreditation Scheduled Procedure Procedure fields are available only if the DICOM worklist feature is licensed and configured See DICOM on page 78 l Name l Protocol Protocol for the se...

Page 172: ...aning Additional Worklist Query Parameters l Modality Procedure types The modality for the Vevo MD Imaging System is Ultrasound US and cannot be edited l Requested Procedure ID The procedure ID 172 Patient ...

Page 173: ...anually To enter patient information manually 1 End the previous exam See Ending the exam on page 181 2 Tap PATIENT from either a the top menu b the home screen The patient form is displayed Entering patient information manually 173 ...

Page 174: ...3 Tap a text box and fill in the field See Patient form fields on page 170 4 Tap Done 174 Patient ...

Page 175: ...he system to the network l Configure the system for DICOM transfer l Select a worklist server for the active location See DICOM on page 78 To enter patient information from the worklist 1 Tap PATIENT 2 Tap Worklist 3 To sort the worklist tap a column heading to sort by By default the worklist sorts in ascending order 4 Tap a procedure from the worklist Optional To re query the server for an update...

Page 176: ...ecting a procedure tap Back To view scheduled procedures The patient information that you import from the worklist includes scheduled procedures On the patient form see the following lists under Scheduled Procedures l Name Scheduled procedures l Protocol Protocol for the selected procedure l Meaning Definition of the selected procedure 176 Patient ...

Page 177: ... The definition of the procedure appears in the Meaning field 2 If you want to modify the Code list tap Edit and do one of the following Note Required fields are marked with asterisks l Add an item Tap Add New and then fill in the Code Code Scheme Name and Meaning fields and then tap Save l Delete an item Select the item and then tap Entering patient information from the worklist 177 ...

Page 178: ...for worklist queries You set parameters on the worklist configuration page see Connectivity on page 75 You can also query the worklist using any of the available fields within the patient form see To perform a manual query on the facing page Manual Patient Query Manual Update from Worklist Automatic Query Update Patient Data Date Range This Device Only Automatic Query On Off Occurs Every Start Tim...

Page 179: ...or the query Last First Middle Accession or ID Note The query is on the characters you enter For example Smith returns Smith Smithson Smithy b Under Additional Worklist Query Parameters specify a Requested Procedure ID 2 Tap Query The system will indicate if a worklist query is in process Updating and querying the worklist 179 ...

Page 180: ... failed When the worklist is complete the query results quantity and time of the Last Query are displayed below the worklist Note If the query returns more than 200 entries Incomplete Query will be displayed 3 Highlight the patient procedure you want and then tap Select The system imports the information into the patient form 180 Patient ...

Page 181: ...ps to a patient exam on page 188 When you end an exam the system resets imaging settings to the default settings for the selected exam type To end an exam 1 Make sure that you have saved images and other information that you want to keep See Saving images on page 269 2 From the PATIENT or REVIEW IMAGES page or from the mode window tap End Exam 3 A confirmation page is displayed select OK or Cancel...

Page 182: ...st l If the exam is appended and without MPPS configuration To check archive status of a patient exam 1 Select a patient exam from Completed Exams 2 Do either of the following a Tap More Options then Archive Status b Tap the archive column for the exam The archive column will display an archive status icon or nothing at all for either option tap the column 3 Review the archive status See Archiving...

Page 183: ...a Tap New to start a new patient exam using the current data b Tap Modify to change the current patient data c Tap Cancel to do nothing To edit patient information in an ended exam 1 Select a patient exam from Completed Exams 2 Tap More Options 3 Tap Edit Information Editing patient information 183 ...

Page 184: ...Note The Edit Information button is not available for a patient exam that is transferring or is already archived 4 Make changes as desired 5 Tap Done 184 Patient ...

Page 185: ...importing or exporting on page 129 Associating routing selections with exams on page 100 and Archiving exams on page 95 Note From the completed exams list if there is no open exam and you tap SCAN the software will automatically start a new exam and begin acquisition in 2D Column headings of the completed exams indicate l Name Patient name l ID Patient ID l Date Time The date and time of the exam ...

Page 186: ...ms To sort the completed exams By default completed exams are sorted by date and time with the most recent patient listed first You can re sort the completed exam list 1 Tap the column heading that you want to sort by 2 Tap it again to sort in reverse order To select all completed exams 1 In Completed Exams tap Select All 2 To deselect all exams tap Clear All 186 Patient ...

Page 187: ...erring to a DICOM server When an exam is transferring the transfer icon is displayed on the clinical display and in the completed exams list for that exam 1 In the completed exams list select the check box next to one or more exams 2 Tap Delete To review images from completed exams 1 Tap the exam in the completed exams list 2 Tap Review Images Completed exams 187 ...

Page 188: ... to a patient exam that is ended you can automatically start a new patient exam that has the same patient information Note When you have an open exam and select to append to a closed exam the system will close the open exam before appending 1 Tap the exam in the completed exams list 2 Tap More Options 3 Tap Append A new patient form appears the form will have the same information as the exam you s...

Page 189: ...r videos within the exam and any measurements 1 Tap the exam in the completed exams list 2 Tap Report 3 Tap a thumbnail if you wish to load it into review 4 Tap a measurement and the corresponding thumbnail image will be highlighted 5 Tap Export if you want to export the report Completed exams 189 ...

Page 190: ... for temporary storage of images and clips Archive patient exams regularly To export patient exams manually to a USB memory stick Before you begin to export specify the file format for exported images see Export on page 126 and connect a USB memory stick There are several ways to export exams from the REVIEW IMAGES page the Completed Exams page and from the mode window Important Removing the USB m...

Page 191: ... select Multimedia an image summary quantity of images and space available is displayed in the top left corner of the Export USB page similarly when you select PACS an exam summary is displayed 5 Optional Decide if you wish to Hide patient information on exported images when the checkbox is enabled the patient information will not be displayed on exported images 6 Tap Export During export a report...

Page 192: ...de if you wish to hide patient information on exported images when the checkbox is enabled the patient information will not be displayed on exported images 5 Tap Export During export a report will be displayed when export is complete a message confirming a successful export will be shown To export from the mode window 1 Load an image into review or if you are acquiring data Freeze acquisition 2 Ta...

Page 193: ...der name will include the patient name ID and a unique internal identifier ex John Smith 122C597D0 0000027 Within this folder a folder for images will be created this folder is named with the date and time of the exam and contains a file for each image as well as a report if selected to export When you choose to append an exam the patient folder will have an additional image folder created See To ...

Page 194: ...stration Login settings page log in as a user with administrative privileges 2 Toggle User Login to On 3 Tap Done To hide patient information when scanning You can choose not to display the patient name and ID number on the clinical monitor and to remove it from exported images and video clips 1 Log in as a user with administrative privileges 2 In system settings go to User Management 3 Uncheck En...

Page 195: ...de window tap Export 2 On the export page select and check the Hide patient information on exported images option 3 Tap Export Exported images will not include the patient name or ID number To disable export of patient data You can prevent users from exporting patient data to USB memory sticks 1 Log in as a user with administrative privileges 2 In system settings go to User Management 3 Uncheck En...

Page 196: ...rs are ultimately responsible for ensuring the security and protection of all electronic protected health information collected stored reviewed and transmitted on the system The Health Insurance and Portability and Accountability Act Pub L No 104 191 1996 45 CFR 160 General Administrative Requirements 45 CFR 164 Security and Privacy 196 Patient ...

Page 197: ... use and to save images if you need to leave the system for a long period of time Vevo MD Imaging System offers the following scanning modes l 2D l M Mode l Color Doppler Mode Viewing the clinical display While scanning and reviewing images you will view your image data on the clinical display The features on the screen and the image parameters will differ slightly in each scanning mode Scanning 1...

Page 198: ...Clinical display elements 1 Image status area 2 Mode settings panel 3 Display map 4 Image area 5 Transducer orientation indicator 6 Image scale 7 Focal zone indicator 8 Status bar 198 Scanning ...

Page 199: ...tus date and time Note Some of the information displayed is dependent on the patient header options selected in display information within system settings See Display information on page 104 Mode settings panel The mode settings panel displays a unique set of information depending on the current control selections Specific values for image controls are displayed As you modify the settings during i...

Page 200: ...This area is also known as the workspace Transducer orientation indicator The blue dot corresponds to the orientation ridge on the transducer nose and indicates the orientation relative to the anatomy Tap either of the orientation buttons to flip the image between the following options Right Left Up and Down Image scale Indicates in mm the distance from the face of the transducer to the tissue bei...

Page 201: ...tatus bar The following information is shown on the status bar l A message confirmation when saving a frame or clip l Percentage of free space to store image data indicates when you should back up your image data to free up space on the system l Current user name l Current user icon A user with administrative privileges will have displayed and a standard user will have displayed l Current time l V...

Page 202: ...n and management through the control panel A general overview of the interface is provided here and specific details are provided with each scanning mode Control panel elements 1 Patient 2 Review images 3 Exam type 4 More 5 More Controls 6 Imaging controls bar 202 Scanning ...

Page 203: ...his control to switch to another exam type See Exam types on page 106 More Tap this control to access Help system settings or to log out from the system See System settings on page 68 More controls Tap this control to access additional controls that are not displayed in the controls bar See Customizing controls on page 207 Imaging controls bar Controls available in the controls bar depend on the i...

Page 204: ...Tap this control to stop scanning and review or save the clip See Freeze on page 268 General controls bar The controls on either side of the freeze button are the general controls These controls are available during live scanning and review To see the details on each of the available general controls see Customizing controls on page 207 Scanning modes Tap one of these controls to begin scanning in...

Page 205: ...l panel provides the following options Control panel elements 1 Play speed 2 Clip slider 3 Play and pause 4 Unfreeze Play speed Allows control of the playback speed of a clip Tap Play Speed and use the Up and Down buttons to cycle through the available options Scanning 205 ...

Page 206: ...me or time in the clip The arrows at each end of the slider can be used to move in small increments This control is not present when reviewing a single frame Play and pause Allows for the clip to be paused during playback and to resume playback Tap the button to toggle the playback state This control is not present when reviewing a single frame Unfreeze To continue live imaging tap the Unfreeze bu...

Page 207: ...ntrols button By default certain controls are shown on each of the customizable bars The remaining controls are still accessible in the more controls window To customize your controls 1 Tap More Controls 2 Tap the desired tab within the more controls panel When live scanning there is a general tab and a tab for each active mode 3 Drag the desired control from the panel to the bar or vice versa Con...

Page 208: ...the more controls panel by tapping the More Controls button or anywhere else on the control panel General controls General controls are located along the bottom of the control panel on either side of the Freeze Unfreeze button and stay on the control panel regardless of the mode during live scanning and in review 208 Scanning ...

Page 209: ... This control toggles between Retrospective save and Prospective save See Saving images on page 269 This is a shortcut from setting this option in the General tab of the Clip Settings panel Changing the setting in one location will update the other location This control is disabled during review Customizing controls 209 ...

Page 210: ...e clip settings panel Clip Settings Tapping the Clip Settings control opens the clip settings panel You can set various options for saving a clip including the clip length in each mode See Saving images on page 269 Name Image This control allows you to set the name of an image If the Autosave Image on Name Image option is selected in the clip settings panel then this button also triggers a save 21...

Page 211: ...anning stops when you open the report Tap the Scan control to restart scanning Reset Preset If you have selected a preset while scanning and have changed some of the scanning parameters tapping this control will reset the controls to the currently selected preset values This control is disabled during review Customizing controls 211 ...

Page 212: ...e in M Mode this control stores only the data that is visible at the time of using save frame You can change the default save type to either Save Frame or Save Clip see General on page 136 in system settings Split Screen Tap this control to enable split screen viewing This feature allows you to compare two images side by side in the clinical display or to view a stored or acquired image next to a ...

Page 213: ...les to the right image panel on the clinical display Start and stop This button is available while acquiring data in M Mode It provides the same functionality as the start and stop flyout from the mode controls Using this control allows you to position the transducer in a customized location This control toggles between the full 2D image and M Mode This control is disabled during review Customizin...

Page 214: ...he controls bar located on the right side of the control panel Different controls are available when you are scanning or reviewing an image The controls can be customized for both scanning or review for each mode When imaging in duplex modes you can access the available controls from both modes For example you can choose from both 2D and M Mode controls when scanning in M Mode 214 Scanning ...

Page 215: ... signal amplitude If you have seen a conventional ultrasound image then you are already familiar with 2D You will also l Use 2D in other imaging modes as the background image over which the active mode data is applied l Use 2D as a real time orientation window in other imaging modes to visually guide the transducer to the desired location 2D acquisition and analysis 215 ...

Page 216: ... To acquire an image in 2D 1 Tap 2D 2 Adjust the controls as needed See Controls in 2D on page 222 3 Save the image for later review using Save Frame See Saving images on page 269 4 Tap Freeze to stop scanning 216 Scanning ...

Page 217: ...atus area 2 Mode settings panel 3 Display map 4 Transducer orientation indicator 5 Image area 6 Image scale 7 Focal zone indicator 8 Status bar When working in 2D the clinical display is exactly as shown in Scanning on page 197 2D clinical display 217 ...

Page 218: ...here are a number of controls on the control panel that you can use to manipulate in order to optimize your image Image controls 1 Transducer orientation indicator 2 Focal zone 3 Image depth 4 Gain 5 Time gain compensation TGC 218 Scanning ...

Page 219: ...the 2D focal zone on your image by tapping and dragging the arrow up to decrease the depth or down to increase the depth Image depth Adjust the image depth to display how deep you want the ultrasound signal The image depth is displayed in millimeters beside the control as you adjust it Note The available depth is transducer dependent To adjust the image depth 1 You can adjust the image depth in tw...

Page 220: ...tion TGC controls are displayed During image acquisition in any 2D based imaging mode each slider adjusts the ultrasound signal to compensate for minor attenuation as it returns through deeper situated tissue Each slider adjusts the return signal across a specific depth band The top slider adjusts the return signal across the area closest to the transducer face The bottom slider adjusts the return...

Page 221: ...ht The upper slider adjusts the near gain of the 2D image controlling the display intensity in the near field nearer to the transducer The lower slider adjusts the far gain of the 2D image controlling the display intensity in the far field further from the transducer 3 Optional Tap the TGC button in More Controls Once tapped the More Controls page will close and the TGC sliders will be displayed o...

Page 222: ... image is live others only when the image is in review and some appear in both cases Some controls are related to measurements for this mode See Adding 2D measurements on page 228 for details Note If an image is part of an exam that is pending archive or archived you will not be able to adjust any of the image properties brightness contrast display map display layout zoom priority orientation and ...

Page 223: ... image Select the desired text from the annotation page or enter custom text See Annotations on page 276 Indicates the image brightness level Tap the Brightness control and adjust the slider up or down to obtain the required setting The setting is displayed on the button for easy reference and is stored with the image Controls in 2D 223 ...

Page 224: ...ast button to adjust the slider up or down to obtain the required setting The setting is displayed on the button for easy reference and is stored with the image Predefined sets of overlays and image maps that you can apply at any time during live scanning or review Tap the Display Map control to see the available maps for the active imaging mode In 2D you also have the option of choosing a color f...

Page 225: ...he magnification level of the area that is shown when a measurement or annotation is being placed Tap Presets to see the available presets and then select an appropriate set of optimized image acquisition settings This button is active during image acquisition in every mode The list of presets includes the factory default presets as well as any custom presets you have added to the system All prese...

Page 226: ...nning in the desired mode Adjust the controls to optimize your image 2 Tap Save Preset to save the current settings as a preset 3 Enter the name of your preset in the displayed field and tap Done to save the setting The new preset appears in the mode specific flyout when you use the Presets control Create your 2D presets first 2D includes the largest number of controls that can be saved Many other...

Page 227: ... location guide is shown in the image on the clinical display The location guide displays the original image area with a white inner area that represents the visible zoom area You can save an image with the zoom state activated and if you load the image in review you can zoom again using the same control If you wish to return to the image in its original state with no zoom activated tap Default fr...

Page 228: ...a measurement b If you are in Completed Exams tap the patient exam you want to work with tap Review Images then tap your image to open and select Measurements c If there is an open exam and you are in Completed Exams select the active exam displayed in blue text tap Review Images then tap your image to open and select Measurements The following measurements are available for 2D images l Traced Are...

Page 229: ...ts image M Mode is a time based image that uses just one beam So when you have guided your transducer beam to the depth that gives you a proper cross section of a vein or artery you can then set M Mode to lay its single beam across that cross section In effect it is like positioning a tight string through the vein or artery and recording the movement of the structure cross sections along that stri...

Page 230: ...sition you can tap Freeze or tap the M Mode Stop button flyout M Mode acquisition stops the button flyout will change to Start and the system will begin 2D acquisition with the green M Mode sample gate 1 Tap M Mode The system begins acquiring 2D image data while displaying the green M Mode sample gate on the 2D image 2 Position the sample gate and adjust the size See M Mode control panel on page 2...

Page 231: ...ffer and live acquisition data appears in both windows 4 Adjust the controls as needed See Controls in M Mode on page 238 and also Controls in 2D on page 222 5 Save the image for later review using Save Frame See Saving images on page 269 6 Tap the M Mode Stop button to return to 2D acquisition or tap Freeze to stop scanning M Mode image acquisition 231 ...

Page 232: ...imilar to the 2D clinical display but with some differences M Mode clinical display 1 Image status area 2 Mode settings panel 3 Display map 4 Transducer orientation indicator 5 Sample gate 6 2D scout window 7 M Mode window 8 Focal zone indicator 232 Scanning ...

Page 233: ...he 2D scout window 2D scout window The region of interest is located between the sample gate line brackets In this window position your transducer and set the line brackets so you can acquire useful data M Mode window Displays the cross section image data acquired along the sample gate line M Mode clinical display 233 ...

Page 234: ...f controls on the control panel that you can manipulate to optimize your image These controls adjust the image in the M Mode data window Image controls 1 Sample gate 2 2D scout window 3 Focal zone 4 M Mode window 5 Gain 6 M Mode Start Stop flyout button 234 Scanning ...

Page 235: ...fter you change the position or size of the gate the system will pause briefly to apply the new settings and then restarts acquisition To change the gain Gain refers to amplifying the intensity of the returning sound waves on the screen display Increasing the gain brightens the image Decreasing the gain darkens the image Use the gain control to adjust the visual intensity of the signal As you adju...

Page 236: ...the image To increase the 2D image window You can return to 2D at any time by tapping the M Mode Stop flyout button to adjust the image depth of the 2D window for placement or sizing of the sample gate overlay You can increase the 2D window in order to position your transducer and sample gate more precisely To increase the 2D image window 1 Tap the M Mode Stop flyout button to display the full 2D ...

Page 237: ... speed using a horizontal pinch motion in the M Mode data window The Sweep Speed button can also be used See Controls in M Mode on the next page To change the layout of the screen The configuration of the clinical display can be customized to change the relative size of the 2D scout window to the M Mode data window Use the Display Layout button to customize this layout See Controls in M Mode on th...

Page 238: ...ear in both cases Some controls are related to measurements for this mode See Adding M Mode measurements on page 246 for details Note If an image is part of an exam that is pending archive or archived you will not be able to adjust any of the image properties brightness contrast display map display layout zoom orientation and image name Accessing 2D controls While imaging in M Mode certain 2D cont...

Page 239: ...ontrol Live Review Annotation Brightness Clip Settings Contrast Display Layout Display Map Gate Size Magnify Scale Presets Orientation Save Preset Sweep Speed Zoom M Mode controls Controls in M Mode 239 ...

Page 240: ... setting is displayed on the button for easy reference and is stored with the image Tap the Clip Settings button to open the clip settings panel You can set various options for saving a clip including the clip length for each mode See Configuring clip settings on page 272 Indicates the image contrast level Tap the Contrast button to adjust the slider up or down to obtain the required setting The s...

Page 241: ...ect one of the available options Predefined sets of overlays and image maps that you can apply at any time during live scanning or review Tap the Display Map control to see the available maps for the active imaging mode In M Mode you also have the option of choosing a color for the display of the data Controls in M Mode 241 ...

Page 242: ...he magnification level of the area that is shown when a measurement or annotation is being placed Tap Presets to see the available presets and then select an appropriate set of optimized image acquisition settings This button is active during image acquisition in every mode The list of presets includes the factory default presets as well as any custom presets you have added to the system All prese...

Page 243: ... The Save Preset button is used to save all of the parameters being used in the current mode This allows you to apply these exact parameters again later using the Presets button 1 Begin scanning in the desired mode Adjust the controls to optimize your image 2 Tap Save Preset to save the current settings as a preset 3 Enter the name of your preset in the displayed field and tap Done to save the set...

Page 244: ... control Tap the In or Out button or drag the slider The zoom factor is displayed within a range from 1 0x to 8 0x You can also use a two finger spread gesture within the image area to zoom in once activated four arrows will be displayed indicating zoom is on To zoom out use a two finger pinch gesture To view other areas of the zoomed image pan the image by dragging one finger in any direction wit...

Page 245: ...owing l The maximum zoom factor may be less depending on the image size and the minimum physical size of the image that can be displayed l If you change presets while in the zoom state the zoom state will be turned off l If your image contains measurements and annotations the text is not enlarged when zoom is activated Note Zoom is only allowed in the M Mode window zoom is not available for the 2D...

Page 246: ...re acquiring image data tap Freeze then Measurements and select a measurement b If you are in Completed Exams tap the patient exam you want to work with tap Review Images then tap your image to open and select Measurements c If there is an open exam and you are in Completed Exams select the active exam displayed in blue text tap Review Images then tap your image to open and select Measurements The...

Page 247: ...he image of the blood vessel which represents the relative velocity and direction of blood flow through the vessel This mode is useful for blood flow applications such as l Distinguishing non vascular tissue structures from vascular tissue structures l Identifying vascular structures that can be more difficult to identify in other ultrasound modes Color Doppler Mode acquisition and analysis 247 ...

Page 248: ...r box with two handles appears 2 Position the color box as needed by dragging the color box on the control panel either left right up or down 3 Resize the color box by tapping and dragging one of the handles 4 Steer the color box if needed by tapping Beam Steering and selecting an angle 248 Scanning ...

Page 249: ...e 222 Note While scanning toggle between 2D and Color by tapping the image area border or the color box overlay controls displayed will correspond to the current mode 7 Save the image for later review using Save Frame See Saving images on page 269 8 Tap the Color button to return to 2D scanning or tap Freeze to stop scanning Color Doppler Mode image acquisition 249 ...

Page 250: ...milar to the 2D clinical display with some differences Color Doppler Mode clinical display 1 Image status area 2 Mode settings panel 3 Priority indicator 4 Display maps and velocity scale 5 Transducer orientation indicator 6 Color box overlay 7 Image area 8 Image scale 250 Scanning ...

Page 251: ...e 2D display map The right column is the color display map It follows the acronym BART color principle for Doppler imaging Blue Away from the transducer Red Toward the transducer In this principle positive vascular flows are indicated by colors in the red range Negative flows are indicated by colors in the blue range Flow velocities for each direction increase from dark to light In Color Doppler a...

Page 252: ...nel When imaging in Color Doppler Mode there are a number of controls on the control panel that you can manipulate to optimize your image Image controls 1 Color box 2 Focal zone 3 Image depth 4 Color Doppler Mode Gain 252 Scanning ...

Page 253: ...gging the color box left right up or down on the control panel 3 Resize the color box by dragging one of the handles 4 Steer the box if needed Tap Beam Steering and select an angle Note After you change the position or angle of the color box the system pauses briefly to apply the new settings and then restarts acquisition To set the Color Doppler Mode gain The Color Doppler Mode gain is the freque...

Page 254: ...D image The color box will become gray and the gain control bar will switch to 2D gain Slide the gain control left or right to adjust the visual intensity of the signal that returns to the face of the transducer Slide right to add gain and brighten the mode data slide left to reduce gain and darken the mode data 254 Scanning ...

Page 255: ...or this mode See Adding Color Doppler Mode measurements on page 267 for details Note If an image is part of an exam that is being transferred or is already archived you will not be able to adjust any of the image properties brightness contrast display map display layout zoom priority orientation and image name Accessing 2D controls While imaging in Color Doppler Mode certain 2D controls remain ava...

Page 256: ...ol Live Review Annotation Beam Steering Clip Settings Display Layout Display Map Line Density Magnify Scale Orientation Persistence Presets Priority Save Preset Scale Color Doppler Mode controls 256 Scanning ...

Page 257: ...ensitivity Wall Filter Zoom Allows you to add annotations to your acquired or stored image Select the desired text from the annotation page or enter custom text See Annotations on page 276 Controls in Color Doppler Mode 257 ...

Page 258: ...in the transducer These carefully calibrated sequences can effectively steer the ultrasound beam in order to detect very small frequency shifts You can select from the following options depending on the orientation of your transducer This control changes the Color Doppler Mode color box Tap the Clip Settings button to open the clip settings panel You can set various options for saving a clip inclu...

Page 259: ...ed at any time during live scanning or review Tap the button and select one of the available options Predefined sets of overlays and image maps that you can apply at any time during live scanning or review Tap the Display Map control to see the available maps for the active imaging mode Controls in Color Doppler Mode 259 ...

Page 260: ...xamining features in tissue that do not move very much Use this control to change the magnification level of the area that is shown when a measurement or annotation is being placed Sets the image orientation allowing you to align the image with the transducer The blue dot in the corner of the control panel image area and clinical display image corresponds to this setting Tap either of the orientat...

Page 261: ...he faster moving tissue in the image data Persistence reduces distracting artifacts such as shimmering Tap the Persistence button and use the Up and Down buttons to cycle through the available options Off Low Med High and Max Note Options available vary depending on the transducer type Controls in Color Doppler Mode 261 ...

Page 262: ... the system All presets are mode exam type transducer and user dependent Adjusts the priority relationship between the overlay data and the background 2D data so you can eliminate false readings Priority determines the threshold point on the gray scale above which the system does not apply color data The red marker along the left side of the display map indicates the threshold point Tap the Priori...

Page 263: ...ave the setting The new preset appears in the mode specific flyout when you use the Presets control You can customize the preset values to your specific exam type See Exam types and presets on page 106 Use this control to adjust the Pulse Repetition Frequency PRF Higher values apply to faster flow and low values apply to slow flow Tap the scale control and use the Low Medium and High buttons to se...

Page 264: ...he Sensitivity button and use the Up and Down buttons to select the required value Filters out signals that correspond to low velocity axial motion Typically these include vessel wall movements and tissue movements caused by respiration Increase the filter to reduce the lower velocity signals and bring the waveform of the spectral data closer to the baseline Reduce the filter to display more low v...

Page 265: ...display The location guide displays the original image area with a white inner area that represents the visible zoom area You can save an image with the zoom state activated and if you load the image in review you can zoom again using the same control If you wish to return to the image in its original state with no zoom activated tap Default from the zoom controls Please note the following l The m...

Page 266: ...Note When you enable zoom from inside the color box the whole image is zoomed not just the color box area 266 Scanning ...

Page 267: ...select a measurement b If you are in Completed Exams tap the patient exam you want to work with tap Review Images then tap your image to open and select Measurements c If there is an open exam and you are in Completed Exams select the active exam displayed in blue text tap Review Images then tap your image to open and select Measurements The following measurements are available for Color Doppler M...

Page 268: ...ewing a clip or adding measurements you need to stop live imaging by freezing the image To freeze the image Tap FREEZE The buttons on the controls bar will change See Customizing controls on page 207 To continue live imaging Tap UNFREEZE 268 Scanning ...

Page 269: ...e system saves the image a message will be displayed at the bottom of the clinical display as follows Button Message Save Frame Frame stored Save Clip Prospective Prospective saving 100 frames displayed during the save of a Color or 2D image Prospective saving 10 seconds displayed during the save of an M Mode image Clip stored displayed when save is complete Save Clip Retrospective Retrospective s...

Page 270: ...es for the current exam or an ended exam tap Review Images To save an image while scanning An image can be saved during live scanning using the Save Frame or Save Clip controls The Save Frame control is permanently docked in the lower right corner of the control panel If the Save Frame button is not available you can configure the system to display it Tap More Controls and then tap the General tab...

Page 271: ... visible on the clinical display at the time of saving b To save a clip tap Save Clip This button can be used to l save a clip while scanning l save an acquired clip after tapping the Freeze button l re save an already saved clip with adjusted display parameters i e changing the display map or brightness To capture and save a frame 1 Ensure that clip settings are set as desired See Configuring cli...

Page 272: ...t to turn sounds off see General on page 136 Note If Saving Tones are on and you select prospective saving you will hear a tone at the beginning and end of the save Configuring clip settings Note The Clip Settings control is available in the general controls as well as in each imaging mode If this control is not on the controls bar tap More Controls See Customizing controls on page 207 To configur...

Page 273: ...e prospective save begins the save clip button changes to Stop Save if tapped the system will restart scanning and the truncated data will be saved A tone will be heard when saving begins and a different tone when saving has completed Retrospective Captures data from buffered data available before you tap Save Clip The system captures data for the number of frames or seconds you specify in each mo...

Page 274: ... autosave a clip or frame On Scan Completion this happens when you tap the Freeze button 3 Tap any of the mode tabs in the clip settings panel to see the available options For frame based modes you have the following options a Specify a number of Frames in the range 10 to 1000 depending on the exam and preset that you select b Save Maximum Frames and the system will save the highest number of fram...

Page 275: ...a drive and is located in the system status area at the bottom of the clinical display When storage space is at 25 the text turns orange and at 10 the text turns red to alert you if you try to save an image the system prompts you to delete data from the system Saving images 275 ...

Page 276: ...2D scout in M Mode l When saving an M Mode image using save frame any annotations that are visible will be saved with the image even if it is partially displayed l You must save or resave your image after adding editing or deleting an annotation Important You cannot place a new annotation or edit an annotation s properties for an image in a patient exam that is transferring or committed to a DICOM...

Page 277: ...ontrols selecting the mode tab and then tapping the Annotation button for that mode 3 Select a predefined annotation category Abdominal Small Parts Superficial Venous and Arterial Once selected the annotation labels displayed will update 4 Select a predefined annotation label You can select multiple labels for one annotation each label will be separated by a space Note When you select multiple pre...

Page 278: ...ll be shown in the annotation panel on the left of the control panel Use the annotation panel to edit the annotations Expand or collapse the annotation panel to view your list of annotations and to delete edit or change the properties 10 Save your image To change annotation properties Each annotation has its own set of properties that you can modify 1 Tap the annotation that you want to modify in ...

Page 279: ...m settings See Measurements and annotations on page 132 Show Arrow Select whether or not to show an arrow from the text to a location on the image 3 Optional Tap the Clear button to delete all the text 4 Tap Done to add the annotation 5 Save your image To delete an annotation 1 On the annotation panel tap the annotation you want to delete 2 Tap the Delete button displayed below the selected annota...

Page 280: ...ginal state 4 Tap Done 5 Save your image To move an annotation Once an annotation is placed you can move it to a different location on the image 1 Tap the annotation on the image or on the annotation panel The annotation will change color 2 Drag the annotation to the desired location If an arrow is part of the annotation the head of the arrow stays at the initial location on the image while you mo...

Page 281: ...3 When the move is complete lift your finger to commit the change 4 Save your image Annotations 281 ...

Page 282: ...fic imaging mode The following table shows which measurements are available for each frame based imaging mode Measurement 2D Color Traced Area Linear Traced Distance IMT I M The following table shows which measurements are available for M Mode a time based imaging mode Measurement M Mode Time Velocity Depth 282 Measurements ...

Page 283: ...of a clip or if the clip was exported to AVI format l Measurements and their labels will be identified with a unique matching caliper which matches the measurement s listing caliper on the measurement panel l If the unit value includes more than four digits before the decimal point the unit of measure changes so that the value will have less than four digits displayed l You will need to save or re...

Page 284: ...atient form clears the previous patient s data See Entering patient information manually on page 173 WARNING To avoid incorrect measurement calculations verify that the patient information and system date and time settings are accurate and correct WARNING To avoid misdiagnosis or harming the patient outcome do not use single calculations as sole diagnostic criteria Use calculations in conjunction ...

Page 285: ...e magnification factor by tapping the Magnify Scale button and using the Increase or Decrease button A measurement label will be displayed next to the measurement on the image It will display a unique caliper the measurement label number and values associated with the type of measurement placed 5 Measurements on the image will be shown in the measurement panel on the left of the control panel Use ...

Page 286: ...n 1 Tap the measurement on the image or on the measurement panel The measurement will change color 2 Tap and drag one of the calipers to the desired position The measurement will update on the measurement panel Note Moving a caliper for a depth or time measurement will also allow you to change the location of the measurement at the same time 3 Tap Save Clip to save the entire clip or tap Save Fram...

Page 287: ...shown in the measurement panel on the left of the control panel Use the measurement panel to edit the measurements Expand or collapse the measurement panel to view your list of measurements and to delete edit or change properties Important You must pause a clip before you can place a new measurement or interact with previously saved measurements Important For an image in a patient exam that is tra...

Page 288: ...ange is from 6 to 24 l Parameters Select the measurement parameters to be displayed on both the measurement label and in the measurement panel Tap to select the parameters that you want to display The parameters displayed change depending on the type of measurement that is selected 3 Optional Tap Cancel to return to the image with the measurement in its original state 4 Tap Done 5 Tap Save Clip to...

Page 289: ...the measurement you want to delete 2 Tap the Delete button displayed below the selected measurement The measurement will be deleted immediately 3 Tap Save Clip to save the entire clip or tap Save Frame to save a new single frame To delete a measurement 289 ...

Page 290: ...surements 2 Tap Depth The depth measurement is placed on the image 3 Tap and drag either caliper to a desired location on the image As you move the calipers the measurement parameters are updated on the measurement panel See Using the measurement panel on page 287 290 Measurements ...

Page 291: ...nal When a caliper is enabled drag the entire measurement line to a new location on the image 5 Tap Save Clip to save the entire clip or tap Save Frame to save a new single frame Adding a depth measurement 291 ...

Page 292: ... The linear measurement is placed on the image 3 Tap and drag either caliper to a desired location on the image As you move the caliper the measurement parameters are updated on the measurement panel See Using the measurement panel on page 287 Note A linear measurement will only be committed to the image once a caliper has been adjusted 292 Measurements ...

Page 293: ...4 Tap Save Clip to save the entire clip or tap Save Frame to save a new single frame To add a linear measurement 293 ...

Page 294: ...either caliper to a desired location on the image As you move the caliper the measurement parameters are updated on the measurement panel See Using the measurement panel on page 287 4 Optional When a caliper is enabled drag the entire measurement line to a new location on the image 5 Tap Save Clip to save the entire clip or tap Save Frame to save a new single frame 294 Measurements ...

Page 295: ...dit a traced area measurement after being placed In this case delete the measurement and add it again To add a traced area measurement 1 Tap Measurements 2 Tap Traced Area An active caliper is placed on the image 3 Drag the active caliper to the initial point on the image 4 Tap Set Adding a traced area measurement 295 ...

Page 296: ...5 Drag the caliper to trace the area 6 Tap Done to complete the measurement The measurement parameters are updated on the measurement panel See Using the measurement panel on page 287 296 Measurements ...

Page 297: ...7 Tap Save Clip to save the entire clip or tap Save Frame to save a new single frame To add a traced area measurement 297 ...

Page 298: ...You cannot edit a traced distance measurement after being placed In this case delete the measurement and add it again To add a traced distance measurement 1 Tap Measurements 2 Tap Traced Distance An active caliper is placed on the image 3 Drag the caliper to the initial point on the image 4 Tap Set 298 Measurements ...

Page 299: ...omplete the measurement The measurement parameters are updated on the measurement panel See Using the measurement panel on page 287 7 Tap Save Clip to save the entire clip or tap Save Frame to save a new single frame To add a traced distance measurement 299 ...

Page 300: ...city measurement to determine the velocity of vascular flow A velocity measurement is available in M Mode To add a velocity measurement in M Mode 1 Tap Measurements 2 Tap Velocity The velocity measurement is placed on the image 300 Measurements ...

Page 301: ...he velocity parameters are updated on the measurement panel You may also want to display time as an additional parameter see Using the measurement panel on page 287 5 Tap Save Clip to save the entire clip or tap Save Frame to save a new single frame To add a velocity measurement in M Mode 301 ...

Page 302: ...ults should not be used as a sole diagnostic tool All IMT results should be interpreted in conjunction with other clinical information or risk factors WARNING To avoid patient injury associated with misdiagnosis or measurement errors verify that the patient information is accurate before transferring images from the Vevo MD Imaging System before performing any IMT measurements and before every exa...

Page 303: ...d an IMT measurement on a 2D image Note If the IMT measurement is not available ask an Administrator to enable the IMT Measurement Tools see Measurements and annotations on page 132 1 Tap Measurements 2 Tap IMT An active caliper is placed on the image To add an IMT measurement on a 2D image 303 ...

Page 304: ... point on the lumen intima interface 6 Tap Set to place the second caliper 7 Tap Set to place another caliper on the lumen intima interface or tap Done if the trace is complete Note A minimum of two calipers are required for this trace 8 Repeat this process drag and Set for the media adventitia interface 9 When you are finished drawing your measurement tap Done 304 Measurements ...

Page 305: ... it to your desired location 11 Tap Save Clip to save the entire clip or tap Save Frame to save a new single frame To add an IMT measurement to an M Mode image Note If the IMT measurement is not available ask an Administrator to enable the IMT Measurement Tools see Measurements and annotations on page 132 Select your M Mode image and load into review Use the zoom control or pinch on the M Mode win...

Page 306: ...ustments Note When placing an IMT measurement in M Mode the software will restrict repositioning of both calipers to a vertical direction only 1 Tap Measurements 2 Tap IMT An active caliper is placed on the image 306 Measurements ...

Page 307: ... your measurement tap anywhere on the control panel to commit the measurement The measurement parameters are updated on the measurement panel See Using the measurement panel on page 287 Your IMT measurement should look like the following measurement on your image on the clinical display lumen intima interface media adventitia interface To add an IMT measurement to an M Mode image 307 ...

Page 308: ...ave Clip to save the entire clip or tap Save Frame to save a new single frame To add an I M measurement to a 2D image Note If the IMT measurement is not available ask an Administrator to enable the IMT Measurement Tools see Measurements and annotations on page 132 1 Tap Measurements 2 Tap I M 308 Measurements ...

Page 309: ...rst caliper 5 Tap and drag the second active caliper to another point on the lumen intima interface 6 Tap Set to place the second caliper 7 Tap Set if you want to drop another caliper on the lumen intima interface or tap Done if the trace is complete Note A minimum of two calipers are required for this trace To add an I M measurement to a 2D image 309 ...

Page 310: ...adventitia line or tap Done if the trace is complete 11 When you are finished drawing your measurement tap Done The measurement parameters are updated on the measurement panel See Using the measurement panel on page 287 Note An I M trace needs to be placed in order from either top down or bottom up as follows lumen intima interface first intima thickness second and media adventitia interface third...

Page 311: ...intima interface trace intima thickness trace media adventitia interface trace 12 You can edit either of the traces by tapping on a caliper and dragging it to your desired location 13 Tap Save Clip to save the entire clip or tap Save Frame to save a new single frame To add an I M measurement to a 2D image 311 ...

Page 312: ... report includes all measurements and images for that exam l The Report button is not available if more than one patient exam is selected from the completed exams list To create a report 1 Open the Completed Exams list and select the exam that contains the measurements and images you want to compile into a report 2 Tap the Report button The system compiles your selections into a single report Note...

Page 313: ... without measurements 1 Double tap on a measurement row to show the thumbnail of the image that measurement was placed on You can export the thumbnail image from the report page by tapping Export once the measurement row is selected 2 Single tap on a thumbnail to open that image in review To export a report The report includes the date and time software version patient summary and measurement list...

Page 314: ...elect Report under multimedia in the export window 2 The export window appears Browse to and then select the destination folder 3 Optional Tap New Folder to add a sub folder Enter a name for the folder and then tap Done 4 Optional Check Hide patient information on exported images if you do not want the patient information displayed on exported images 314 Measurements ...

Page 315: ...5 Tap Export 6 The report is exported in CSV format and the status is displayed when the export operation completes Tap Done to close the export page To export a report 315 ...

Page 316: ...he system and transducer is dictated by the type of tissue it contacts during use Use the Cleaning and disinfecting guide on the facing page to determine the level of cleaning and disinfecting required Spaulding classifications Spaulding classifications non critical semi critical determine the approach for cleaning and disinfecting medical equipment based on the device the way it has been used and...

Page 317: ...le deterioration such as corrosion discoloration pitting or cracked seals If damage is evident discontinue use and contact FUJIFILM SonoSite or your local representative l Confirm that cleaning and disinfecting materials are appropriate for your facility s use FUJIFILM SonoSite tests disinfectants and disinfectant devices for use with the system and transducer l Verify expiration dates concentrati...

Page 318: ...ent PPE such as protective eye wear and gloves WARNING Ensure that cleaning and disinfecting solutions and wipes are not expired Some cleaners and disinfectants can cause an allergic reaction to some individuals Caution Do not allow cleaning solution or disinfectant into the system or transducer connectors Do not use strong solvents such as thinner or benzene or abrasive cleansers since these will...

Page 319: ...mpatible with the system and transducer Confirm that cleaning and disinfecting materials are appropriate for your facility s use Product System Transducers UHF22 UHF48 UHF70 Wet Contact Time Tristel Sporicidal Wipes 30 seconds Microbac Tissues 1 minutes Cleanisept wipes 2 minutes Sani Cloth AF3 grey top 3 minutes Sani Cloth Bleach orange top 4 minutes Sani Cloth HB green top 10 minutes Compatible ...

Page 320: ...cleaners and disinfectants directly on surfaces or on the connectors of the system and transducer doing so may cause solutions to leak into the system damaging it and voiding the warranty Do not scratch the clinical display Do not attempt to disinfect a transducer using a method or chemical that is not included here This can damage the transducer and void the warranty Use only FUJIFILM SonoSite re...

Page 321: ...ompatible cleaner Compatible cleaning materials are listed in the table Compatible cleaners and disinfectants on page 319 Caution Make sure the solution does not get into any of the connector ports Apply the disinfectant solution to the cloth rather than applying it directly to surfaces if not using a wipe 9 Clean the transducer cable and transducer body to remove any visible gel debris or bodily ...

Page 322: ... surfaces including l clinical display upper monitor l control panel lower monitor l transducer and gel holders l cable hooks l grab bars l all surfaces that may have been touched and or contaminated 14 Ensure the system stays wet with the disinfectant for the wet contact time listed in the table Compatible cleaners and disinfectants on page 319 This may require reapplication to achieve the requir...

Page 323: ...s Do not soak the transducer longer than recommended by the chemical manufacturer Do not immerse the transducer connector in any disinfectant solution Use only FUJIFILM SonoSite recommended disinfectants Using a non recommended disinfecting solution or incorrect solution strength can damage or discolor the transducer and void the transducer warranty Transducer Disinfectant Temperature Disinfectant...

Page 324: ...t manufacturer s instructions for additional information 4 Immerse the transducer into the high level disinfectant solution Refer to the table Compatible high level disinfectants for semi critical contact on the previous page for soak times Ensure that the transducer connector remains out of the fluid Ensure that the scanhead and only 2 in 5 cm are immersed Refer to the figure below 5 Rinse by soa...

Page 325: ...ch as cracks or splitting where fluid can enter If damage is evident discontinue use of the transducer and contact FUJIFILM SonoSite or your local representative DONE Step A Semi critical contact cleaning and disinfecting of system and transducer 325 ...

Page 326: ...isinfecting materials are appropriate for your facility s use Product System Transducers UHF22 UHF48 UHF70 Wet Contact Time Tristel Sporicidal Wipes 30 seconds Microbac Tissues 1 minutes Cleanisept wipes 2 minutes Sani Cloth AF3 grey top 3 minutes Sani Cloth Bleach orange top 4 minutes Sani Cloth HB green top 10 minutes PI Spray II 10 minutes Qualified for use as an intermediate level disinfectant...

Page 327: ...to leak into the system damaging it and voiding the warranty Do not scratch the clinical display Do not attempt to disinfect a transducer using a method or chemical that is not included here This can damage the transducer and void the warranty Use only FUJIFILM SonoSite recommended disinfectants Using a non recommended disinfecting solution or incorrect solution strength can damage the system and ...

Page 328: ... applicable 8 Obtain a compatible cleaner Compatible cleaning materials are listed in the table Compatible cleaners and disinfectants on page 326 Caution Make sure that the solution does not get into any of the connector ports Apply the disinfectant solution to the cloth rather than applying it directly to surfaces if not using a wipe 9 Clean the transducer cable and transducer body to remove any ...

Page 329: ...inical display upper monitor l control panel lower monitor l transducer and gel holders l cable hooks l grab bars l all surfaces that may have been touched and or contaminated 14 Ensure the system stays wet with the disinfectant for the wet contact time listed in the table Compatible cleaners and disinfectants on page 326 This may require reapplication to achieve the required wet time For example ...

Page 330: ...d wet time For example if you are using Sani Cloth Bleach it was a wet contact time of 4 minutes Wipe the transducer cable and body until thoroughly wet If the transducer starts to dry before 4 minutes is reached use a wipe and re wet the transducer Continue the process of re wetting with a new wipe until a total wet time of 4 minutes is reached 19 Allow the transducer to air dry in a clean well v...

Page 331: ...WARNING The foot switch is not intended for use in a sterile environment Caution To avoid damaging the foot switch do not sterilize Cleaning and disinfecting level An intermediate level of cleaning and disinfecting is required for the foot switch Spaulding classification The foot switch is designed for use within the Spaulding classifications of non critical Cleaning and disinfecting the foot swit...

Page 332: ...ial compatibility with the products l Ensure that the disinfectant type and the solution strength and duration are appropriate for the equipment l Follow manufacturer recommendations and local regulations when preparing using and disposing of chemicals l Follow the disinfectant manufacturer s recommendations regarding appropriate personal protective equipment PPE such as protective eye wear and gl...

Page 333: ...dal Wipes 30 seconds Microbac Tissues 1 minutes Cleanisept wipes 2 minutes Sani Cloth AF3 grey top 3 minutes Sani Cloth Bleach orange top 4 minutes Sani Cloth HB green top 10 minutes PI Spray II 10 minutes Qualified for use as an intermediate level disinfectant for mycobacteria Compatible cleaners and disinfectants WARNING Disconnect the system from the power before cleaning to avoid electrical sh...

Page 334: ...t attempt to disinfect the foot switch using a method or chemical that is not included here This can damage the foot switch and void the warranty Use only FUJIFILM SonoSite recommended disinfectants Using a non recommended disinfecting solution or incorrect solution strength can damage the foot switch and void the warranty Follow the disinfectant manufacturer s recommendations 334 Cleaning and dis...

Page 335: ...ble to remove any visible gel debris or bodily fluids Wipe from clean areas to the soiled areas to avoid cross contamination WARNING Do not wipe the USB connector on the foot switch cable 5 Verify that all gel debris and bodily fluids have been removed from the foot switch and cable If necessary repeat Steps 4 with a new wipe 6 Obtain a compatible disinfectant Compatible disinfectant materials lis...

Page 336: ...nutes Wipe the entire system until thoroughly wet If the system starts to dry before the 4 minutes is reached use a new wipe and re wet the system Continue the process of re wetting with a new wipe until a total wet time of 4 minutes is reached 9 Allow the foot switch to air dry in a clean well ventilated space Do not dry with a cloth 10 Examine the foot switch and USB cable for damage such as cra...

Page 337: ...ut information specifications and standards that are specific details required by regulatory agencies Additionally some basic troubleshooting information related guidance documents and technical and customer support information is provided in these appendices Appendices 337 ...

Page 338: ...Safety This section contains general safety information that applies to the ultrasound system transducers accessories and peripherals 338 Appendices ...

Page 339: ...t WARNING High levels of transmitted ultrasound energy can damage tissue Never tamper with or alter the Vevo MD Imaging System in any way such that the acoustic power level is increased WARNING Use ONLY FUJIFILM SonoSite UHF transducers with the Vevo MD Imaging System The use of other transducers may affect safety and system performance Electric shock WARNING Before connecting the Vevo MD Imaging ...

Page 340: ...olation transformer and chassis grounding via a plug to an appropriate power source DO NOT remove the ground wires from any part of the Vevo MD Imaging System for any reason WARNING Ensure that all power sources whether a UPC or a wall outlet are properly grounded or earthed WARNING Disconnect the system from the power source before cleaning the system or performing any maintenance operations WARN...

Page 341: ... during 430kHz 2MHz common mode noise injection on the AC mains FUJIFILM SonoSite recognizes system s sensitivity to this kind of noise and assures users that such a loss of the touch screen capability doesn t affect core ultrasound imaging functionality of the system This phenomenon is qualified as permissible loss of performance for the Conducted Immunity test as per EC 61326 1 2012 Table 1 Caut...

Page 342: ...ories WARNING Do not position the cart and its accessories in a way that makes it difficult to disconnect the plug from the socket WARNING To avoid possible injury from an unexpected clinical display collapse during system transport collapse the clinical display monitor before system transport HDMI video output WARNING The external HDMI video output is intended for non diagnostic use FUJIFILM Sono...

Page 343: ... WARNING The height of the Vevo MD Imaging System is not adjustable Users who find standing at the system uncomfortable may require an adjustable chair or stool Cautionary notes This manual includes a broad range of cautionary notes Radiation Caution The use of controls or adjustments or performance of procedures in ways other than those specified in this manual may result in hazardous radiation e...

Page 344: ...er to consult the instructions of the device for information on how to properly use it See the Vevo MD Getting Started Guide Vevo MD User Manual or the Vevo MD system s HELP Safe working load mass Includes system at 95 kg and a UHF transducer at 0 8 kg Manufacturer European Union WEEE Waste Electrical and Electronic Equipment Directive 96 86 EEC Identifies the directive on waste electrical and ele...

Page 345: ...ype of fuses required for the system voltage this example displays fuse requirements for a 125V system Stand base labels The following table describes the safety symbols used on the transducer Symbol Description Catalog number Serial number Manufacturer Hot surface hazard The International Protection Marking IP Code IEC 60529 rates the degrees of protection provided by enclosures of electrical equ...

Page 346: ...he patient or having medium or long term contact with the patient Proof of product compliance electrical gas and other safety standards to North American safety standards European Union WEEE Waste Electrical and Electronic Equipment Directive 96 86 EEC Identifies the directive on waste electrical and electronic equipment Refer to local regulations for disposal Composite safety warning symbols Phys...

Page 347: ...Caution Watch out for pinching at the bottom of the transducer bay when attaching the transducer connector to the transducer interface on the system Use the transducer handle to push the transducer connector into place and when sliding transducer in or out of the transducer bay Magnetic field sensitivity Caution DO NOT situate the Vevo MD Imaging System close to large clinical magnets as the magne...

Page 348: ...arby electronic equipment Operation of this equipment in a residential area is likely to cause harmful interference in which case the user will be required to correct the interference at their own expense WARNING Changes or modifications not expressly approved by FUJIFILM SonoSite could void the user s authority to operate the equipment 348 Appendices ...

Page 349: ...ying your latex and talc sensitive patients and being prepared to treat allergic reactions promptly WARNING Perform ultrasound procedures prudently Use the ALARA as low as reasonably achievable principle and follow the prudent use information concerning MI and TI WARNING To avoid injury or reduce the risk of infection to the patient observe the following follow Universal Precautions when inserting...

Page 350: ...nitor under Transmit and implement the ALARA principle accordingly For more information on MI and TI see Related guidance documents on page 418 Indirect Controls The controls that indirectly affect output are controls affecting imaging mode freeze and depth The imaging mode determines the nature of the ultrasound beam Freeze stops all ultrasound output but keeps the last image displayed on screen ...

Page 351: ...an Norm Harmonized Standards and Underwriters Laboratories safety standards See Specifications and standards on page 403 Observe the following warnings and cautions WARNING To avoid the risk of injury do not operate the system in the presence of flammable gasses or anesthetics Explosion can result WARNING To avoid the risk of electrical shock or injury do not open the system enclosures All interna...

Page 352: ...isconnected Do not connect the system s power supply to a Multiple Socket Outlet MSO or extension cord Before using the transducer inspect the transducer face housing and cable Do not use the transducer if the transducer or cable is damaged Turn the system off when cleaning Do not use any transducer that has been immersed beyond the specified cleaning or disinfection level See Compatible accessori...

Page 353: ...lectromagnetic compatibility standard IEC 60601 1 2 Electromagnetic compatibility and are certified according to IEC Standard 60950 Information Technology Equipment ITE or IEC 60601 1 WARNING Because the only method of completely removing AC power from the Vevo MD Imaging System is to disconnect the AC input power cord from the stand base ensure that you place the system in a location in which you...

Page 354: ...Caution To avoid increasing the system and transducer connector temperature do not block the airflow to the ventilation holes on the front and back of the system 354 Appendices ...

Page 355: ...asic safety and essential performance l EN 60601 1 2006 A1 2013 Medical electrical equipment Part 1 General requirements for basic safety and essential performance l ANSI AAMI ES 60601 1 2005 R 2012 A1 2012 C1 2009 R 2012 and A2 2010 R 2012 Medical electrical equipment Part 1 General requirements for basic safety and essential performance l JIS T 0601 1 2012 Medical electrical equipment Part 1 Gen...

Page 356: ...ific and medical equipment radio frequency disturbance characteristics limits and methods of measurement l FCC Part 15 Subpart B 2012 Test laboratories CSA Group 178 Rexdale Blvd Toronto Ontario Canada M9W 1R3 Tel 1 416 747 4000 Toll Free 1 800 463 6727 Inquiries Send any questions to FUJIFILM SonoSite Inc 21919 30th Drive SE Bothell WA 98021 USA T 1 888 482 9449 or 1 425 951 1200 F 1 425 951 1201...

Page 357: ...s with Part 15 of the FCC Rules Operation is subject to the following two conditions 1 this device may not cause harmful interference and 2 this device must accept any interference received including interference that may cause undesired operation The Vevo MD Imaging System Class A digital apparatus complies with Canadian ICES 001 Electrical safety 357 ...

Page 358: ...xcept connector IPX 8 Foot switch Non AP APG Ultrasound system power supply system transducer connector and peripherals Equipment is not suitable for use in the presence of flammable anesthetics Safety classification Specifications Value Means of protection Class I Degree of protection IPXO Pollution degree 2 Over voltage category 2 Operating condition Continuous General purpose classification 358...

Page 359: ...l 100V 50 60Hz 6A l 120V 50 60Hz 5A l 240V 50 60Hz 2 5A WARNING Before having the system installed ensure that the electrical service in the facility is adequate Do not modify the attachment plug or use an adapter Doing so may cause an electrical hazard WARNING Use only power cords provided by FUJIFILM SonoSite with the Vevo MD Imaging System 10A rating for 100V 120V 240V supply voltage Electrical...

Page 360: ...nly way to completely remove power is to perform the following procedure To isolate the system from power 1 Press the power button 2 Wait for the system to power down 3 Set the main power switch on the system base to the off position See Starting up and shutting down the system on page 22 4 Disconnect the AC input power cord from the stand base 360 Appendices ...

Page 361: ...r than those specified may result in increased emissions or decreased immunity of the ultrasound system Description Maximum cable length in Maximum cable length m UHF22 transducera 78 2 1 98 5 UHF48 transducera 78 2 1 98 5 UHF70 transducera 78 2 1 98 5 Foot switch 120 3 AC input power cord 120 3 1 aFor transducers maximum cable length is measured between the strain reliefs and includes the length ...

Page 362: ...ite Connection of accessories and peripherals not recommended by FUJIFILM SonoSite could result in malfunctioning of your ultrasound system or other medical electrical devices in the area Contact FUJIFILM SonoSite for a list of accessories and peripherals available from or recommended by FUJIFILM SonoSite See Compatible accessories and peripherals on the previous page Caution Do not stack equipmen...

Page 363: ...urce s Turn equipment in the vicinity off and on to isolate disruptive equipment Relocate or re orient interfering equipment Increase distance between interfering equipment and your ultrasound system Manage use of frequencies close to ultrasound system frequencies Remove devices that are highly susceptible to EMI Lower power from internal sources within facility control such as paging systems Labe...

Page 364: ...ce The Vevo MD Imaging System is intended for use in an electromagnetic environment in which radiated radio frequency RF disturbances are controlled The customer or the user of the Vevo MD Imaging System can help prevent electromagnetic interference by maintaining a minimum distance between portable and mobile RF communications equipment transmitters and the Vevo MD Imaging System ultrasound syste...

Page 365: ...tion distance d in meters m can be estimated using the equation applicable to the frequency of the transmitter where P is the maximum output power rating of the transmitter in watts W according to the transmitter manufacturer Note At 80 MHz and 800 MHz the separation distance for the higher frequency range applies These guidelines may not apply in all situations Electromagnetic propagation is affe...

Page 366: ...ultrasound system and transducers Specifications Value Temperature 10 to 40 C 50 to 104 F Relative humidity 15 to 80 non condensing Altitude Up to 2000 m Vevo MD Imaging System and transducer operating limits Specifications Value Temperature 35 to 50 C 31 to 122 F Relative humidity 15 to 95 Altitude 500 to 1060hPa 0 5 to 1 05 ATM Vevo MD Imaging System shipping and storage limits 366 Appendices ...

Page 367: ...ntrol panel to minimize glare Position yourself Support your back during an exam l Use a chair that supports your lower back that adjusts to your work surface height that promotes a natural body posture and that allows quick height adjustments l Always sit or stand upright and Avoid bending or stooping 1Magnavita N L Bevilacqua P Mirk A Fileni and N Castellino Work related Musculoskeletal Complain...

Page 368: ...tion l Support your arm using a support cushion or pillow or rest it on the bed Promote comfortable hand wrist and finger postures l Hold the transducer lightly in your fingers l Minimize the pressure applied on the patient l Keep your wrist in a straight position Take breaks exercise and vary activities l Minimizing scanning time and taking breaks can effectively allow your body to recover from p...

Page 369: ...ad neck body arm and leg positions l Do targeted exercises to strengthen muscle groups which may help you avoid MSDs contact a qualified health professional to determine stretches and exercises that are right for you Promote comfortable hand wrist and finger postures 369 ...

Page 370: ...clinical monitor Caution Excessive bending or twisting of cables can cause a failure or intermittent operation Caution Improper cleaning or disinfecting of any part of the system can cause permanent damage For cleaning and disinfecting instructions see Cleaning and disinfecting on page 316 Caution Do not use solvents such as thinner or benzene or abrasive cleaners on any part of the system Caution...

Page 371: ...ment specified below Emissions Test Compliance Electromagnetic Environment RF emissions CISPR 11 Group 1 The Vevo MD Imaging System uses RF energy only for its internal function Therefore its RF emissions are very low and are not likely to cause any interference in nearby electronic equipment RF emissions CISPR 11 Class A The Vevo MD Imaging System is suitable for use in all establishments other t...

Page 372: ...1KV line s to lines s 2KV line s to earth Mains power quality should be that of a typical commercial or hospital environment Voltage dips short interruptions and voltage variations on power supply input lines IEC 61000 4 11 5 UT 95 dip in UT for 0 5 cycle 40 UT 60 dip in UT for 5 cycles 70 UT 30 dip in UT for 25 cycles 5 UT 95 dip in UT for 5s 5 UT 95 dip in UT for 0 5 cycle 40 UT 60 dip in UT for...

Page 373: ...quency magnetic field should be measured in the intended installation location to assure that it is sufficiently low Conducted RF IEC 61000 4 6 3 Vrms 150 kHz to 80 MHz 3 Vrms Portable and mobile RF communications equipment should be used no closer to any part of the Vevo MD Imaging System including cables than the recommended separation distance calculated from the equation applicable to the freq...

Page 374: ...xed transmitters such as base stations for radio cellular cordless telephones and land mobile radios amateur radio AM and FM radio broadcast and TV broadcast cannot be predicted theoretically with accuracy To assess the electromagnetic environment due to fixed RF transmitters an electromagnetic site survey should be considered If the measured field strength in the location in which the Vevo MD Ima...

Page 375: ... expressly approved by the part responsible for compliance could void the user s authority to operate the equipment This device complies with part 15 of the FCC Rules Operation is subject to the following two conditions This device may not cause harmful interference This device must accept any interference received including interference that may cause undesired operation Immunity testing requirem...

Page 376: ... of the system was recorded during the tests Indirect Contact discharge on VCP at 4kV 6kV and direct contact discharge on the metal enclosure at 4kV 6kV affected the display and control panel The Vevo MD Imaging System recovered on its own after the test The EUT met the performance level specified by the manufacturer 61000 4 2 2Degradation of the performance of the system was noted during the test...

Page 377: ...ormation about the ALARA as low as reasonably achievable principle the output display standard and acoustic power and intensity tables The information applies to the ultrasound system transducer accessories and peripherals Acoustic output 377 ...

Page 378: ...the exam The variables which affect the way the qualified ultrasound user implements the ALARA principle include patient body size location of the bone relative to the focal point attenuation in the body and ultrasound exposure time Exposure time is an especially useful variable because the qualified ultrasound user can control it The ability to limit the exposure over time supports the ALARA prin...

Page 379: ...tic artifacts An acoustic artifact is information present or absent in an image that does not properly indicate the structure or flow being imaged There are helpful artifacts that aid in diagnosis and those that hinder proper interpretation Examples of artifacts include shadowing through transmission aliasing reverberations and comet tails For more information on detecting and interpreting acousti...

Page 380: ... Color Doppler Mode Settings Focal Depth Box Width Box Height Box Location Focal Depth Optimize UHF22 PRF UHF48 PRF UHF70 PRF Increase or raise setting of parameter to reduce TI For Box Location and Focal Depth move towards transducer surface to reduce TI Decrease or lower setting parameter to reduce TI Adjusting the PRF will affect the TI value Tap and drag the PRF indicator in th control panel A...

Page 381: ... continuous real time display of MI in all imaging modes in increments of 0 1 The system meets the output display standard for TI and provides a continuous real time display of TI in all imaging modes in increments of 0 1 The TI consists of three user selectable indices and only one of these is displayed at any one time In order to display TI properly and meet the ALARA principle the user selects ...

Page 382: ...e or 0 2 of the displayed value whichever value is larger The accuracy result for the TI is stated statistically With 95 confidence 95 of the measured TI values will be within 118 8 to 144 of the displayed TI value or 0 2 of the displayed value whichever value is larger A displayed value of 0 0 for MI or TI means that the calculated estimate for the index is less than 0 05 382 Appendices ...

Page 383: ...ise Limits External Use FUJIFILM SonoSite UHF series transducers pass surface temperature limits however in certain situations temperatures may rise to 41 C 105 8 F WARNING When the transducer scanhead is in contact with the patient special precautions should be considered when using the transducer on children or on other patients who are sensitive to higher temperatures For example Color Doppler ...

Page 384: ...as been measured and calculated in accordance with Acoustic Output Measurement Standard for Diagnostic Ultrasound Equipment NEMA UD2 2004 and Standard for Real Time Display of Thermal and Mechanical Acoustic Output Indices on Diagnostic Ultrasound Equipment NEMA UD3 2004 In Situ derated and water value intensities All intensity parameters are measured in water Since water does not absorb acoustic ...

Page 385: ...m derated is used to qualify it The maximum derated and the maximum water values do not always occur at the same operating conditions therefore the reported maximum water and derated values may not be related by the In Situ derated formula For example a multi zone array transducer that has maximum water value intensities in its deepest zone but also has the smallest derating factor in that zone Th...

Page 386: ...am path is longer than 3 cm and consists largely of fluid When this model is used to estimate maximum exposure to the fetus during transabdominal scans a value of 1 dB cm MHz may be used during all trimesters Existing tissue models that are based on linear propagation may underestimate acoustic exposures when significant saturation due to non linear distortion of beams in water is present during t...

Page 387: ... tissue model and are for devices having ISPTA values greater than 500 mW cm2 The temperature elevations for fetal bone and tissue were computed based on calculation procedures given in Sections 4 3 2 1 4 3 2 6 in Bioeffects and Safety of Diagnostic Ultrasound AIUM 1993 Acoustic output measurement 387 ...

Page 388: ...Mode 2D Mode on the facing page Transducer Model UHF22 Operating Mode Color Doppler Mode on page 390 Transducer Model UHF22 Operating Mode M Mode on page 392 Transducer Model UHF48 Operating Mode 2D Mode on page 393 Transducer Model UHF48 Operating Mode Color Doppler Mode on page 394 Transducer Model UHF48 Operating Mode M Mode on page 395 Transducer Model UHF70 Operating Mode 2D Mode on page 396 ...

Page 389: ...Pa 5 34 deq PIImax cm Focal Length FLx cm 36 FLy cm 1 8 IPA 3 MImax W cm 2 484 6 Operating control conditions Control 1 Focal Zone Depth 14 7 mm 36 mm Control 2 Depth 15 4 mm 38 4 mm a This index is not required for this operating mode value is 1 b This transducer is not intended for transcranial or neonatal cephalic uses No data is reported as the global maximum index value is not reported for th...

Page 390: ... 5 33 deq PIImax cm Focal Length FLx cm 1 8 3 2 FLy cm 1 8 1 8 IPA 3 MImax W cm 2 517 5 Operating control conditions Control 1 Mode Color Color Color Control 2 Focal Zone Depth 11 5 mm 18 0 mm 18 0 mm Control 3 Depth 14 4 mm 18 4 mm 18 4 mm Control 4 Color Scale 107 8 cm s 92 4 cm s 92 4 cm s Control 5 Color Box Position Size Narrow Wide Narrow a This index is not required for this operating mode ...

Page 391: ... No data is reported as the global maximum index value is not reported for the reason listed Data are not applicable for this transducer mode Acoustic output tables 391 ...

Page 392: ...II max MPa 5 34 deq PIImax cm Focal Length FLx cm FLy cm IPA 3 MImax W cm 2 484 6 Operating control conditions Control 1 Focal Zone Depth 14 7 mm Control 2 Depth 16 4 mm a This index is not required for this operating mode value is 1 b This transducer is not intended for transcranial or neonatal cephalic uses No data is reported as the global maximum index value is not reported for the reason list...

Page 393: ...eq PIImax cm Focal Length FLx cm FLy cm IPA 3 MImax W cm 2 Operating control conditions Control 1 Mode Focal Zone Depth Control 2 Depth a This index is not required for this operating mode value is 1 b This transducer is not intended for transcranial or neonatal cephalic uses No data is reported as the global maximum index value is not reported for the reason listed Data are not applicable for thi...

Page 394: ...cm IPA 3 MImax W cm 2 579 9 Operating control conditions Control 1 Mode Color Control 2 Focal Zone Depth 7 2 mm Control 3 Depth 8 5 mm Control 4 Color Scale 91 7 cm s Control 5 Color Box Position Size Narrow a This index is not required for this operating mode value is 1 b This transducer is not intended for transcranial or neonatal cephalic uses No data is reported as the global maximum index val...

Page 395: ...Pa deq PIImax cm Focal Length FLx cm FLy cm IPA 3 MImax W cm 2 Operating control conditions Control 1 Depth Control 2 Focal Zone depth a This index is not required for this operating mode value is 1 b This transducer is not intended for transcranial or neonatal cephalic uses No data is reported as the global maximum index value is not reported for the reason listed Data are not applicable for this...

Page 396: ...max MPa deq PIImax cm Focal Length FLx cm FLy cm IPA 3 MImax W cm 2 Operating control conditions Control 1 Focal Zone Depth Control 2 Depth a This index is not required for this operating mode value is 1 b This transducer is not intended for transcranial or neonatal cephalic uses No data is reported as the global maximum index value is not reported for the reason listed Data are not applicable for...

Page 397: ...PRF Hz Pr PII max MPa deq PIImax cm Focal Length FLx cm 0 8 FLy cm 0 5 IPA 3 MImax W cm 2 Operating control conditions Control 1 Mode Color Control 2 Focal Zone Depth 8 0 mm Control 3 Depth 8 5 mm Control 4 Color Scale 48 1 cm s Control 5 Color Box Position Size Wide a This index is not required for this operating mode value is 1 b This transducer is not intended for transcranial or neonatal cepha...

Page 398: ... No data is reported as the global maximum index value is not reported for the reason listed Data are not applicable for this transducer mode 398 Appendices ...

Page 399: ...m Focal Length FLx cm FLy cm IPA 3 MImax W cm 2 Operating control conditions Control 1 Exam Type Control 2 Optimization Control 3 Depth Control 4 THI a This index is not required for this operating mode value is 1 b This transducer is not intended for transcranial or neonatal cephalic uses No data is reported as the global maximum index value is not reported for the reason listed Data are not appl...

Page 400: ...isplay Standard the following measurement precision and uncertainty values are determined by making repeat measurements and stating the standard deviation as a percentage Quantity Precision of standard deviation Uncertainty 95 confidence Pr 7 3 37 7 to 37 7 Pr 3 7 8 38 4 to 38 4 Wo 10 9 75 1 to 75 2 fc 0 4 3 0 PII 12 2 74 7 to 74 8 PII 3 15 2 76 3 to 76 1 Acoustic measurement precision and uncerta...

Page 401: ... contribute to display uncertainty The net uncertainty of the displayed indices is derived by combining the quantified uncertainty from three sources measurement uncertainty system and transducer variability and engineering assumptions and approximations made when calculating the display values Measurement errors of the acoustic parameters when taking the reference data are the major source of err...

Page 402: ...minal output on which the display estimates are based This variability between systems and transducers introduces an error into displayed value By doing acoustic output sampling testing during production the amount of error introduced by the variability is bounded The sampling testing ensures that the acoustic output of transducers and systems being manufactured stays within a specified range of t...

Page 403: ...ate airflow and cooling Important Do not block the air vents or air filters System Caution The Vevo MD Imaging System is for indoor use only Weight l Weight 95 kg 209 lbs Dimensions Stand l Depth 26 4 in 67 1 cm l Width 21 2 in 53 8 cm l Height with monitor folded 48 in 122 cm Clinical monitor l Length exterior dimension 18 8 in 47 8 cm l Height exterior dimension 10 2 in 25 8 cm Specifications an...

Page 404: ... in 30 7 cm Imaging modes l 2D 256 gray shades l Color Doppler Mode 256 colors l M Mode Additionally the system includes advanced imaging technologies l Vevo HD Image and video clip storage capacity The Vevo MD Imaging System has 700 GB of storage available however the number of images and video clips you can save depends on imaging mode and file format 404 Appendices ...

Page 405: ...e system complies with the following medical equipment standards related to electrical safety as follows l CAN CSA C22 2 No 60601 1 14 Medical electrical equipment Part 1 General requirements for basic safety and essential performance l EN 60601 1 2006 A1 2013 Medical electrical equipment Part 1 General requirements for basic safety and essential performance l ANSI AAMI ES 60601 1 2005 R 2012 A1 2...

Page 406: ...of measurement l FCC Part 15 Subpart B 2012 EMC standards classification Standard Description IEC 60601 1 2 2007 Medical Electrical Equipment General Requirements for Basic Safety and Essential Performance Collateral Standard Electromagnetic Compatibility Requirements and Tests CISPR 11 2004 Industrial Scientific and Medical ISM Radio Frequency Equipment Electromagnetic Disturbance Characteristics...

Page 407: ...d stored reviewed and transmitted on the system The Health Insurance and Portability and Accountability Act Pub L No 104 191 1996 45 CFR 160 General Administrative Requirements 45 CFR 164 Security and Privacy Measurement accuracy The measurements from the system are of a physical property such as distance for evaluation by the clinician The accuracy values require that you can place the calipers o...

Page 408: ...implies the maximum depth of the image 2D Measurement Accuracy and Range System Tolerance Accuracy By Test Method Range Distance 2 plus 1 of full scalea Acquisition Phantom 0 35 5 mm Time 0 2 plus 1 of full scaleb Acquisition Phantom 0 30 sec a Full scale for distance implies the maximum depth of the image b Full scale for time implies the total time displayed on the scrolling graphic image M Mode...

Page 409: ...pixel scale factor application of that factor to the caliper positions on the screen and the measurement display 2 Algorithmic Error The error introduced by measurements which are input to higher order calculations This error is associated with floating point versus integer type math which is subject to errors introduced by rounding versus truncating results for display of a given level of signifi...

Page 410: ...does not power up l Ensure that the main power cable for the system is properly connected to the Vevo MD Imaging System l Ensure that the system is plugged into a grounded or earthed wall outlet Turn the main power switch on l If you still cannot power on the system the fuses may need to be replaced Contact FUJIFILM SonoSite to schedule a visit from a service technician No audio l Adjust the volum...

Page 411: ...cer l Clean the transducer interface on the system using a compressed air duster never use a cloth or wipes as the pins on the connector could be damaged by direct contact Patient data is corrupted l Patient data will not be available to be review archive or export l When exporting or archiving patient data ensure that the USB device or Ethernet cable you are using is not removed before the proces...

Page 412: ...Solution Lack of penetration or sensitivity l Ensure that there is adequate coupling medium for example ultrasound gel between the transducer and the patient l Adjust the position of the TGC sliders l Ensure the appropriate transducer is being used 2D and M Mode troubleshooting Problem Solution Color bands in the image l Adjust wall filter setting l Adjust the priority setting l Adjust line densit...

Page 413: ...on is set to Not Connected select a location and restart the system See Connecting to the network on page 75 l Ask your IT Department if the IP address is correct and if it is in range of the local network l Ensure the services you need are selected with check marks in the DICOM Setup page and that the SC Storage Commit and MPPS columns are also checked for the selected archiver DICOM service veri...

Page 414: ...lution I M parameters are all zero l Placement of the media wall trace is out of order An I M trace needs to be placed in order from either top down or bottom up as follows lumen first intima second and media third Measurement troubleshooting Customer support 1 416 484 5000 414 Appendices ...

Page 415: ...rt contact sales training request Technical support Performing maintenance procedures not described in the user manual may void the product warranty The technical support representative can help you troubleshoot the situation by phone or by e mail For more complex problems FUJIFILM SonoSite may l Send a technical support representative to the location to evaluate the problem l Request that the equ...

Page 416: ...ands Tel Main 31 20 751 2020 Tel Toll free 800 0751 2020 Maintaining the Vevo MD Imaging System The Vevo MD Imaging System requires proper care and cleaning Use the recommendations in this document when cleaning or disinfecting the ultrasound system Performing maintenance procedures not described in the user guide may void the product warranty Disposal This equipment must be disposed of in accorda...

Page 417: ...o MD Imaging System please contact FUJIFILM SonoSite See Technical support on page 415 Cleaning the air filters FUJIFILM SonoSite requires that service technicians clean the Vevo MD Imaging System air filters once every three months See Technical support on page 415 Contact information 417 ...

Page 418: ...nt Standard for Diagnostic Ultrasound Equipment NEMA UD2 2004 Acoustic Output Measurement and Labeling Standard for Diagnostic Ultrasound Equipment American Institute of Ultrasound in Medicine 1993 Standard for Real Time Display of Thermal and Mechanical Acoustic Output Indices on Diagnostic Ultrasound Equipment NEMA UD3 2004 Guidance on the interpretation of TI and MI to be used to inform the ope...

Page 419: ...etely aqueous formaldehyde and spermicide free Produced by Parker Laboratories Inc in situ In the natural or original position Transducer A device that transforms one form of energy into another form of energy Ultrasound transducers contain piezoelectric elements which when excited electrically emit acoustic energy When the acoustic energy is transmitted into the body it travels until it encounter...

Page 420: ...ure dimensions for the azimuthal x and elevational y planes in centimeters fc Center frequency in MHz FL Focal length or azimuthal x and elevational y lengths if different measured in centimeters Ipa 3 MImax Derated pulse average intensity at the maximum MI in units of W cm2 ISPTA 3 Derated spatial peak temporal average intensity in units of milliwatts cm2 ISPTA 3 z1 Derated spatial peak temporal ...

Page 421: ...al index for applications in which the ultrasound beam passes through soft tissue and a focal region is in the immediate vicinity of bone TIB non scan is the bone thermal index in the non autoscanning mode TIC Cranial bone thermal index is the thermal index for applications in which the ultrasound beam passes through bone near the beam entrance into the body TIS Soft tissue thermal index is a ther...

Page 422: ... the location of maximum min W 3 z ITA 3 z x 1 cm2 where z zbp in centimeters zbp 1 69 in centimeters zsp For MI the axial distance at which pr 3 is measured For TIB the axial distance at which TIB is a global maximum for example zsp zb 3 in centimeters 422 Glossary ...

Page 423: ...nical display 217 clip settings control 224 contrast control 224 control panel 218 controls 222 display map control 224 dynamic range control 225 image acquisition 216 imaging 215 magnify scale control 225 orientation 226 presets control 225 save preset 226 troubleshooting 412 Index 423 ...

Page 424: ...MD help system 13 AC plug 37 accessories 361 accuracy measurement 407 acoustic artifacts 379 measurement precision and uncertainty 400 output 377 output measurement 384 output tables 388 acquisition 2D 215 Color Doppler Mode 247 248 M Mode 229 424 Index ...

Page 425: ... 302 linear measurements 292 time measurements 294 traced area measurements 295 traced distance measurements 298 velocity measurements 300 administrator user account 147 ALARA applying 378 principle 378 angle Color Doppler Mode beam steering 258 annotations 2D control 223 Index 425 ...

Page 426: ...ntrol 240 mode adding 276 deleting 279 modifying 280 moving 279 280 properties 278 system settings 132 adding 133 deleting 135 editing 134 appendices 337 archive exam 95 status 182 archivers educational 98 procedural 98 archiving 95 426 Index ...

Page 427: ...trol 258 brightness 2D control 223 control panel display 137 M Mode control 240 C castors 34 caution magnetic field sensitivity 347 physical hazards 346 radiation 343 safety labels 343 cleaning and disinfecting 316 331 compatible cleaners 319 compatible disinfectants 319 guide 317 Index 427 ...

Page 428: ...ons 316 clinical applications 50 clinical display 2D 217 Color Doppler Mode 250 display map 199 focal zone indicator 201 image area 200 image scale 200 image status area 199 M Mode 232 233 B Mode scout window 233 window 233 mode settings panel 199 status bar 201 system component 35 428 Index ...

Page 429: ...de control 240 more controls 210 collapsing clinical display 35 Color Doppler Mode adding measurements 267 annotations 257 beam steering control 258 clip settings control 258 color and velocity scale 251 color box overlay 250 252 control panel 252 controls 255 display layout control 259 Index 429 ...

Page 430: ...gnify scale 260 orientation control 260 persistence control 261 presets control 262 priority control 262 priority indicator 251 save preset control 263 scale control 263 sensitivity control 264 troubleshooting 412 wall filter control 264 zoom review 265 scanning 265 completed exams 185 430 Index ...

Page 431: ...lay 30 rear panel 31 33 system 29 connectivity DICOM setup 76 network status 76 setup 75 connector transducer 43 contact information 415 customer support 415 technical support 415 contraindications 67 contrast 2D control 224 M mode control 240 Index 431 ...

Page 432: ...Doppler Mode 252 display brightness 136 during scanning 203 freeze 204 general controls bar 204 imaging controls bar 203 M Mode 234 more control 203 more controls control 203 overview 57 review images 203 save frame 204 scanning modes 204 using keyboard 60 controls 2D 222 432 Index ...

Page 433: ...07 M Mode 238 save clip mode 269 conventions document 13 creating presets 121 reports 312 customizing controls 207 D date and time setup 136 delete annotations settings 135 custom exam type 111 presets 123 depth measurements 290 Index 433 ...

Page 434: ... location 84 configuring the system 79 connecting to the network 75 delete location or device 89 DICOM setup 76 educational archivers 98 exporting DICOMDIR 131 log files 102 MPPS 88 storage commit 86 troubleshooting 413 worklist 87 DICOMDIR 131 disabling exam type 111 434 Index ...

Page 435: ...ations 104 patient header 104 thermal index 104 display layout Color Doppler Mode control 259 M Mode control 241 display map 2D control 224 Color Doppler Mode control 259 M Mode control 241 disposal 416 dynamic range 2D control 225 E edit annotations mode 280 Index 435 ...

Page 436: ...upply 359 safety 351 safety testing 355 shock warnings 339 electromagnetic emissions 371 electromagnetic interference warning 341 355 enabling IMT measurement tools 132 presets 120 equipment safety 370 Ethernet connection 33 exam append 188 archive 95 436 Index ...

Page 437: ...81 export 190 manually archive 97 reports 189 review images 187 routing 100 routing selections 100 select all 186 exam types 55 changing 55 custom from system settings 109 customizing 113 delete 111 disable 111 export 115 importing 117 managing 107 Index 437 ...

Page 438: ...xam 190 exam types 115 folder structure 193 patient header 163 presets 115 reports 313 settings 126 supported file formats 126 system log files 142 USB export 163 F focal zone indicator 201 font size annotations mode 278 system settings 132 438 Index ...

Page 439: ...9 36 G gain Color Doppler Mode 253 M Mode 234 TGC sliders 221 gate size M Mode control 242 general controls clip setttings control 210 more controls 208 name image control 210 new series control 211 reset preset control 211 save application control 212 save clip control 210 Index 439 ...

Page 440: ...eneral preferences 136 general settings 136 getting started about the system 15 quick start tutorial 16 grab bars 33 guide using this document 13 H hard drive storage 35 HDMI 32 HIPAA 196 407 I image area clinical display 200 image scale 200 image status area 199 440 Index ...

Page 441: ... Doppler Mode 250 controls 207 214 freeze control 268 M Mode 232 modes overview 17 overview 197 immunity testing requirements 375 import exam types 117 presets 117 indications for use 62 initial log in 147 internal storage 35 managing 275 isolation transformer 36 Index 441 ...

Page 442: ... onscreen 60 sound settings 136 L label safety warning system 26 transducer 41 legal 3 license updating 139 line density Color Doppler Mode control 259 linear measurements 292 log files clearing 142 DICOM 102 system 142 442 Index ...

Page 443: ...tations control 240 brightness control 240 clinical display 232 clip settings control 240 contrast control 240 control panel 234 controls 238 display layout control 241 display map control 241 gate size control 242 image acquisition 230 magnify scale control 242 orientation control 243 presets 242 Index 443 ...

Page 444: ...ol 244 magnify scale B Mode control 225 Color Doppler Mode control 260 M Mode Control 242 manage exam types 107 manufacturer s declaration 371 measurements 282 about 282 accuracy 407 adding to 2D 228 adding to Color Doppler Mode 267 adding to M Mode 246 availability 283 depth 290 444 Index ...

Page 445: ...inear 292 measurement panel 287 modifying 286 placing 284 time 294 traced area 295 traced distance 298 troubleshooting 414 using measurement panel 287 velocity 300 mode settings panel 199 more controls general tab 208 imaging tab 214 Index 445 ...

Page 446: ... system 18 MPPS discontinue 97 N name image control 210 network connecting 75 connection 33 connectivity 35 location 75 verify connection 93 O orientation 2D control 226 Color Doppler Mode control 260 M Mode control 243 transducer 200 446 Index ...

Page 447: ...rol panel 57 exam types 55 imaging modes 17 scanning 197 transducers 39 P panel clip settings 273 measurements 287 patient 165 166 archive status 182 edit 182 183 form fields 170 information 166 edit 182 enter from worklist 175 enter manually 173 Index 447 ...

Page 448: ...r Doppler Mode control 261 plug 37 power module 36 isolation 360 power surges 36 presets 2D control 225 Color Doppler Mode control 262 creating 121 deleting 123 disabling 120 enabling 120 groups 124 M Mode control 242 setting default 118 settings 106 448 Index ...

Page 449: ...afety warnings 339 prospective save option 273 Q quick start tutorial 16 R rear panel connections 29 system view 29 related guidance documents 418 reports creating 312 export 313 reset preset control 211 restore system settings 71 retrospective save option 273 Index 449 ...

Page 450: ... output tables 388 ALARA principle 378 applying the ALARA principle 378 clinical 349 compatible accessories 361 peripherals 361 DICOM standard 406 direct controls 350 display uncertainty 401 electrical 351 electrical classification 358 electrical power supply 359 electromagnetic compatibility 362 electromechanical standards 405 450 Index ...

Page 451: ...assification 358 hazardous materials 371 HIPAA standard 196 407 indirect controls 350 isolating system from power 360 labeling and verification 347 product warnings 339 receiver controls 350 separation distance 364 testing 355 warning label system 26 transducer 41 sample gate overlay M Mode 233 save application control 212 Index 451 ...

Page 452: ... Color Doppler Mode control 263 M Mode control 243 saving clip 271 images 269 prospective option 273 retrospective option 273 scale Color Doppler Mode control 263 scanning 2D 215 available imaging modes 197 Color Doppler Mode 247 control panel 203 M Mode 229 overview 197 452 Index ...

Page 453: ...r Doppler Mode control 264 sheaths 46 spaulding classifications 316 speakers 36 stand connections 29 front rear views 29 standards DICOM 406 electromechanical 405 EMC classification 406 HIPAA 196 407 starting system 22 status bar 201 stopping system 22 Index 453 ...

Page 454: ...g transducers 45 sweep speed M Mode control 244 system AC plug 37 air filters 417 castors 34 clinical display 35 exporting log files 142 front rear view 26 grab bars 33 logging on 22 23 maintaining 416 moving 18 setup 18 68 shutting down 22 454 Index ...

Page 455: ...mation 139 update license 140 upgrade system 139 system settings annotations 132 backup and restore 71 DICOM configuration 82 display information 104 exam types presets 106 export 126 general 136 measurements and annotations 132 overview 68 system information 139 user management 145 Index 455 ...

Page 456: ...ng 416 traced area measurements 295 traced distance measurements 298 transducer cable lengths 54 clinical applications 50 connecting 45 disconnecting 45 exam type by mode 48 features 39 gel 46 holder 34 orientation 200 output display 381 overview 39 456 Index ...

Page 457: ...mperature rise 383 switching exam types 55 transducer interface troubleshooting 411 types and uses 39 transformer isolation 36 troubleshooting 2D 412 audio 410 Color Doppler Mode 412 DICOM 413 M Mode 412 measurements 414 patient management 412 system 410 transducer interface 411 Index 457 ...

Page 458: ...license 140 upgrade your system 139 USB connection 33 devices 129 memory stick connect 129 disconnect 129 export to 190 ports 129 user accounts administrator 147 change password 161 creating 157 deleting 157 enable password changes 162 managing 156 458 Index ...

Page 459: ... 159 user login 149 OFF 153 administrator 154 guest 154 non administrator 153 ON 150 administrator 151 guest 152 non administrator 150 options 149 user management settings 145 V velocity measurements 300 W wall filter Color Doppler Mode control 264 Index 459 ...

Page 460: ... interference 341 labeling and verification 347 product safety 339 safety label system 26 transducer 41 worklist manual query 179 manual update 178 patient information 175 query 178 update 178 Z zoom in review 2D control 226 Color Doppler Mode control 265 M Mode 244 460 Index ...

Page 461: ...zoom while scanning 2D control 226 Color Doppler Mode control 265 Index 461 ...

Page 462: ...462 Index ...

Page 463: ...51370 01 1 0 51370 01 ...

Reviews: