Setup & Operation 5.2 Emergency Stop Switch (EMERGENCY Connector)
RC420 Rev.9
35
5.2 Emergency Stop Switch
WARNING
■
Connect input signal wires for Emergency Stop and Safety Door to the
EMERGENCY connector so that the Emergency Stop switch in the operation
unit or the ATTEND (TEACH) control device connected to the OPTIONAL
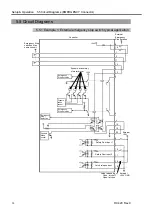
DEVICE connector always functions. (Refer to the typical application diagram
in the
Setup & Operation 5.5 Circuit Diagrams
.)
5.2.1 Emergency Stop Switch
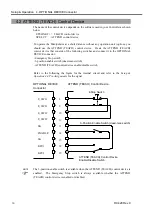
If it is desired to create an external Emergency Stop switch in addition to the Emergency
Stop that an operation unit or ATTEND (TEACH) control device provides, make sure to
connect such Emergency Stop switches to the proper pins on the EMERGENCY
connector.
The Emergency Stop switch connected must comply with the following:
- It must be a push button switch that is “normally closed”.
- A button that does not automatically return or resume.
- The button must be mushroom-shaped and red.
- The button must have a double contact that is “normally closed”.
The signal from the Emergency Stop switch is designed to use two redundant circuits.
If the signals at the two circuits differ by two seconds or more, the system recognizes it as
a critical error. Therefore, make sure that the Emergency Stop switch has double
contacts and that each circuit connects to the specified pins on the EMERGENCY
connector at the Controller. Refer to the
Setup & Operation 5.5 Circuit Diagrams
.
5.2.2 Checking Emergency Stop Switch Operation
Once the Emergency Stop switch is connected to the EMERGENCY connector, continue
the following procedure to make sure that the switch functions properly. For the safety
of the operator, the Manipulator must not be powered ON until the following test is
completed.
(1) Turn ON the Controller to boot the controller software while pressing the Emergency
Stop switch.
(2) Make sure that the “E-STOP” LED on the front of the Controller is ON.
(3) Make sure that “E.Stop” is displayed on the status bar on the main window.
(4) Release the Emergency Stop Switch.
(5) Execute the RESET command.
(6) Make sure that “E-STOP” LED is turned OFF and that “E-Stop” is dimmed on the
main window status bar.
For the emergency condition to work with the peripheral equipment at the input of the
Emergency Stop at the Controller via the EMERGENCY connector, make sure that the
desired equipment is connected to the Emergency Stop output terminals. The relay
contacts at the EMERGENCY connector (#5 & #6) (normally closed) will open at the
input of Emergency Stop state.
)
NOTE
)
NOTE
Summary of Contents for RC420
Page 1: ...Rev 9 EM073C1492F ROBOT CONTROLLER RC420 ...
Page 2: ...ROBOT CONTROLLER RC420 Rev 9 ...
Page 12: ...Setup Operation ...
Page 20: ...Setup Operation 1 Safety 10 RC420 Rev 9 ...
Page 30: ...Setup Operation 2 3 Controller Part Names and Functions 20 RC420 Rev 9 ...
Page 50: ...Setup Operation 5 5 Circuit Diagrams EMERGENCY Connector 40 RC420 Rev 9 ...
Page 58: ...Setup Operation 6 3 Pin Assignments STANDARD I O Connector 48 RC420 Rev 9 ...
Page 114: ...Setup Operation 10 UPS Uninterruptible Power Supply 104 RC420 Rev 9 ...
Page 115: ...97 Maintenance This manual contains maintenance procedures for the RC420 Robot Controller ...
Page 116: ...Maintenance RC420 Rev 9 106 ...
Page 138: ...Maintenance 6 Motor Driver Module 128 RC420 Rev 9 ...
Page 170: ...Maintenance 12 Recovering the HDD 160 RC420 Rev 9 ...


