Maintenance 12. Recovering the HDD
12.3.4 Starting EPSON RC+ Setup Program
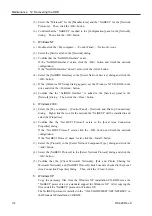
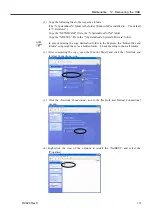
(1) Start Windows in your PC and set the EPSON RC+ setup CD-ROM in the drive.
(2) Start Explorer in the RC420 Controller and open the following folder.
\My Network\Entire Network\Microsoft Windows Network\Workgroup name of
your PC\Name of your PC \Drive name\EPSON RC
If you cannot see the name of your PC in Explorer window, check the NetBEUI
configuration and network cable connection.
)
NOTE
(3) Double-click the “Setup.exe” in the EPSON RC folder.
12.3.5 Installing EPSON RC+
(1) Click the <Next> button in the [Welcome to the EPSON RC+ Installation] dialog.
(2) Confirm that the Name is
“
EPSON RC User
”
and the Organization is
“
SEIKO
EPSON CORP
”
in the [Customer Information] dialog. Then, click the <Next>
button.
(3) Confirm that the destination location drive is “C” in the [Choose Destination
Location] dialog. Then, click the <Next> button.
(4) Check the check box for the option you want to use in the [Select Options] dialog.
Then, click the <Next> button.
(5) When you checked the [Install Vision Guide] check box in the [Select Options]
dialog, the [Select Vision System Type] dialog appears. Select the type you want to
use and click the <Next> button.
(6) Click the <Next> button in the [Start Copying Files] dialog.
(7) The [Information] dialog appears. Click the <OK> button.
(8) Click the <Next> button in the [Acrobat Reader Setup] dialog.
(9) Click the <Next> button in the [Choose Destination Location] dialog.
(10) The [Information] dialog appears. Click the <OK> button.
(11) Select the <Yes, I want to restart my computer now.> option button in the
[InstallShield Wizard Complete] dialog. Then, click the <Finish> button.
(12) After Windows restarts, double-click the <EPSON RC+> icon and confirm that
EPSON RC+ starts.
12.3.6 Reserving Address Resources of EPSON RC+ Options
To use the EPSON RC+ options “Expansion I/O Board” and “Pulse Generating Board”,
reserve address resources of each option.
(1) Double-click the <My computer> - <Control Panel> - <System> icons.
(2) Select the [Hardware] tab in the [System Properties] dialog and click the <Hardware
Wizard> button.
RC420 Rev.9
157
Summary of Contents for RC420
Page 1: ...Rev 9 EM073C1492F ROBOT CONTROLLER RC420 ...
Page 2: ...ROBOT CONTROLLER RC420 Rev 9 ...
Page 12: ...Setup Operation ...
Page 20: ...Setup Operation 1 Safety 10 RC420 Rev 9 ...
Page 30: ...Setup Operation 2 3 Controller Part Names and Functions 20 RC420 Rev 9 ...
Page 50: ...Setup Operation 5 5 Circuit Diagrams EMERGENCY Connector 40 RC420 Rev 9 ...
Page 58: ...Setup Operation 6 3 Pin Assignments STANDARD I O Connector 48 RC420 Rev 9 ...
Page 114: ...Setup Operation 10 UPS Uninterruptible Power Supply 104 RC420 Rev 9 ...
Page 115: ...97 Maintenance This manual contains maintenance procedures for the RC420 Robot Controller ...
Page 116: ...Maintenance RC420 Rev 9 106 ...
Page 138: ...Maintenance 6 Motor Driver Module 128 RC420 Rev 9 ...
Page 170: ...Maintenance 12 Recovering the HDD 160 RC420 Rev 9 ...

