79
Q &$$&$_`
Q &$$&$_+`
Q !& !'+_`
Q !& !'+_+`
Q _`
Q _`
Q _`
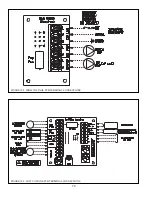
With the exception of the alarm contacts, external power must not be applied to any of the low voltage terminals - doing so
may damage the boiler control. Also note the following:
a) External
Limit$#* &&' #& &&) \#
reset high limit. When an external limit is used, the jumper between these two terminals must be removed. Failure to
remove this jumper will render the external safety devices ineffective.
b) Alarm Contacts - These contacts close when the boiler enters a “hard” lockout (lockout requiring manual reset). They
may be used as an input to a building alarm system. Contact rating is 24VAC, 0.63FLA. Do not use for line voltage ap-
plications.
c) EnviraCOM - Used to connect EnviraCOM thermostat or other EnviraCOM device approved by the boiler manufacturer
for use with this boiler. A Honeywell EnviraCOM connection is also located as labeled on the boiler control itself.
d) Outdoor Sensor - Use only the Tasseron TSA00AA outdoor sensor supplied with the boiler. When this sensor is con-
nected and enabled, the boiler will adjust the target supply water temperature downwards as the outdoor air temperature
increases. This sensor should be located on the outside of the structure in an area where it will sense the average air
temperature around the house. Avoid placing this sensor in areas where it may be covered with ice or snow. In general,
locations where the sensor will pick up direct radiation from the sun should also be avoided. Avoid placing the sensor
#\' \& %# %] #
the boiler using 22 gauge or larger wire. As with the sensor itself, the sensor wiring should be routed away from sources
of electrical noise. Where it is impossible to avoid such noise sources, wire the sensor using a 2 conductor, UL Type
CM, AWM Style 2092 shielded cable. Connect one end of the shielding on this cable to ground. See Section XII of this
manual for information on enabling the outdoor reset sensor.
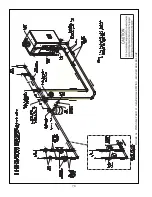
e) Header Sensor - When this sensor is installed and enabled, the boiler will attempt to maintain the target water tempera-
##&## #]##') ' &\##&-
lows the temperature of the water being sent to the radiation to be more accurately controlled. Use only the Honeywell
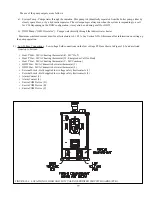
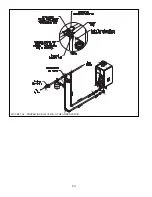
32003971-003 sensor listed above. Locate this sensor immediately downstream of the second primary-secondary Tee
(Figure 10.4). Installation of this sensor in a well, as opposed to on the surface of the header, is highly recommended.
The sensor wiring should be routed away from sources of electrical noise. Where it is impossible to avoid such noise
sources, wire the sensor using a 2 conductor, UL Type CM, AWM Style 2092, 300Volt 60°C shielded cable. Connect one
end of the shielding on this cable to ground. See Section XII for information on enabling the header sensor.
f) MODBUS - Boiler-To-Boiler communication network is used for multiple boiler (“Lead-Lag”) installations. See the
multiple boiler installation supplement for additional information.
"'!$
z
)F?A@)F(+B?(
B))(-(B?(B@(
*E-$+)B+B?((*
A?A)
)?-
z
)B(A$.B(B+BB)*
*)((-")B)((*B<
)
Summary of Contents for PHNTM080
Page 2: ......
Page 9: ...7 Figure 4 1 Minimum Clearances To Combustible Construction...
Page 11: ...9 Figure 5 1 Wall Layout Mounting Hole Location...
Page 12: ...10 Figure 5 2 Boiler Mounting Bracket Installation Boiler Wall Mounting...
Page 39: ...37 FIGURE 7 24 SPLIT VENT SYSTEM FLEX IN ABANDONED MASONRY CHIMNEY VENT OPTIONS 33 38...
Page 63: ...61 This page is intentionally left blank...
Page 68: ...66 FIGURE 9 2 PIPING METHOD 1 NEAR BOILER PIPING HEATING ONLY...
Page 72: ...70 FIGURE 9 6 PIPING METHOD 1 NEAR BOILER PIPING SHADED BOILER LOOP...
Page 82: ...80 FIGURE 10 4 PROPER INSTALLATION OF HEADER SENSOR...
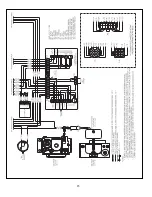
Page 84: ...82 FIGURE 10 6 INTERNAL WIRING CONNECTIONS DIAGRAM...
Page 85: ...83...
Page 92: ...90 Lighting and Operating Instructions...
Page 101: ...99 FIGURE 12 5 SETTINGS MENU SEE PART C FOR ADDITIONAL INFORMATION...
Page 113: ...111 FIGURE 13 2 IGNITION ELECTRODE GAP FIGURE 13 3 CONDENSATE TRAP EXPLODED PARTS VIEW...
Page 125: ...123...
Page 127: ...125 40 33 31 27 28 34 35 37 38 32 39 36 29 30 48 Blower Gas Valve Assembly for 80 100 120...
Page 129: ...127...
Page 131: ...129...
Page 132: ...130...
Page 133: ...131...
Page 135: ...133...
Page 137: ...135 140 141 142 143 144 145...

