NetDoc Tools Accessed from the NetDoc Main Page
Exporting to LabelMark™
The
Export to
LabelMark
tool can be found on the
NetDoc
home page. LabelMark™ is a label
design application that interacts closely with
NetDoc
. By bringing the two applications together,
you conduct the input of information once. By entering identifiers for all areas of your
infrastructure only once, you are able to ensure proper creation of your identifiers and create
labels for those components.
The
Export to LabelMark
tool passes tracked infrastructure components information and created
identifiers along to the LabelMark application. The exceptional feature of this tool is that the
information and identifiers sent to the LabelMark application are completely defined by the end-
user, and once LabelMark acquires these identifiers the user can operate the LabelMark
application as usual, with access to all normal LabelMark functionality for label creation. The
identifiers built within
NetDoc
and viewed within the
NetDoc
application become exclusively
available for exporting into LabelMark through the process outlined below.
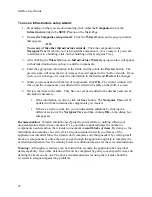
To export to LabelMark
Click on
Export to LabelMark
on the
NetDoc
home page. The
NetDoc – Export to
LabelMark
pop-up window will appear, with numbered steps displayed.
1.
In the
Filter by Object
drop-down field, select what objects your labels will be created
for. In the
Type
drop-down field, select the type of objects to create labels for. You can
keep this as
All
or, depending on the objects you've selected, you can choose from a list
of type options, which will vary based on the objects selected.
2.
Click the
Set Location
button to map through the navigator tree and select the location
where the work is being conducted. Once you select the location, click the
Accept
button.
The Step 2 fields will automatically populate with the selection made.
3.
In the
Space Type
drop-down field, select a space type. You can keep this as
All
or filter
down and select specific space(s). The Step 3 window will automatically populate with
the selection made.
4.
Click the
Preview
button. The Step 4 window will display a list of identifiers for review
before the export is conducted.
5.
In the
Select Fields
area, you may select up to three fields in any order to export into
LabelMark. Highlight a selection and click the
>
button to insert
it into the adjacent field
(the top-most field will appear first on all labels, with the second and third appearing in
descending order).
Note:
Click the
C
button to clear a field and re-enter a selection, or to leave the field
blank.
6.
Click the
Export
button once all five steps above have been completed. This will prompt
NetDoc
to locate LabelMark on your client machine.
43
Summary of Contents for NetDoc
Page 1: ......

