System Overview
Each Services Router has six front panel slots for field-replaceable PIMs. These
slots are numbered from top to bottom and from left to right as shown in
the slot number diagram on the front panel, shown in Figure 8.
Figure 8: Slot Number Diagram on Front Panel
g003823
Gigabit Ethernet and 4-port Fast Ethernet ePIMs can be installed in high-speed slots
only. High-speed slots are indicated by a black triangle containing an
E
in the front
panel slot number diagram. On J4350 Services Routers, the high-speed slots are slot
3 and slot 6. On J6350 Services Routers, the high-speed slots are slots 2, 3, 5, and 6.
Slot 0 is the fixed interface module that contains the built-in Ethernet ports.
Power Button and POWER LED
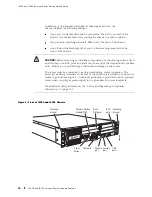
The power button is located on the left side of the front panel (see
Figure 7). You can use the power button to power the Services Router
on and off. When you power on the router, the Routing Engine boots as
the power supply completes its startup sequence.
The
POWER
LED is located to the upper left of the LED dashboard.
Table 7 describes the
POWER
LED.
Table 7: POWER LED
Color
State
Description
On steadily
Power is functioning correctly.
Green
Blinking
Power button has been pressed and quickly released, and
the router is gracefully shutting down.
Unlit
Off
Router is not receiving power.
After the router is powered on, status indicators—such as LEDs on the
front panel and
show chassis
command output—can take up to 60 seconds
to indicate that the power supply is functioning normally. Ignore error
indicators that appear during the first 60 seconds.
If you need to power off the router after the Routing Engine finishes booting, use
the J-Web interface or the CLI to halt the Services Router first. For instructions,
see the
J-series Services Router Administration Guide
.
J4350 and J6350 Services Router Hardware Features
17
Содержание J4350
Страница 14: ...J4350 and J6350 Services Router Getting Started Guide xiv Table of Contents...
Страница 22: ...2 J series Overview...
Страница 68: ...J4350 and J6350 Services Router Getting Started Guide 48 Field Replaceable PIMs...
Страница 75: ...Services Router User Interface Overview Figure 25 J Web Layout Using the J Web Interface 55...
Страница 88: ...J4350 and J6350 Services Router Getting Started Guide 68 Using the Command Line Interface...
Страница 90: ...70 Installing a Services Router...
Страница 100: ...J4350 and J6350 Services Router Getting Started Guide 80 Site Preparation Checklist...
Страница 112: ...J4350 and J6350 Services Router Getting Started Guide 92 Powering a Services Router On and Off...
Страница 144: ...J4350 and J6350 Services Router Getting Started Guide 124 Verifying Secure Web Access...
Страница 160: ...J4350 and J6350 Services Router Getting Started Guide 140 Verifying J series License Management...
Страница 162: ...142 Maintaining Services Router Hardware...
Страница 194: ...J4350 and J6350 Services Router Getting Started Guide 174 Troubleshooting Hardware Components...
Страница 202: ...J4350 and J6350 Services Router Getting Started Guide 182 Packing a Router or Component for Shipment...
Страница 204: ...184 J series Requirements and Specifications...
Страница 220: ...J4350 and J6350 Services Router Getting Started Guide 200 ISDN RJ 45 Connector Pinout...
Страница 267: ...Part 5 Index Index 247...
Страница 268: ...248 Index...

