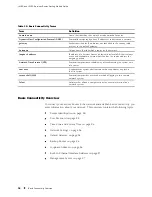
Establishing Basic Connectivity
3.
Select the
COM
port to which the modem is connected (for example,
COM1
).
4.
Configure the port settings as follows:
Bits per second: 9600
Data bits: 8
Parity: None
Stop bits: 1
Flow control: None
5.
In the HyperTerminal window, enter
AT
.
An
OK
response verifies that the modem communicates successfully with
the COM port on the PC or laptop.
6.
To dial the modem that is connected to the console port on the router, enter
ATDT
remote-modem-number
. For example, if the number of the modem connected
to the console port on the router is
0013033033030
, enter
ATDT 0013033033030
.
The router login prompt appears.
7.
Log in as the user “root”. No password is required at initial connection, but you
must assign a root password before committing any configuration settings.
Configuring Basic Settings with J-Web Quick Configuration
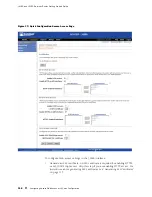
J-Web Quick Configuration allows you to configure basic settings. Figure 25
shows the Quick Configuration page for basic setup.
Before you configure the router, gather the information described
in “Before You Begin” on page 98.
To configure basic settings with J-Web Quick Configuration:
1.
If you have not already done so, connect a management device to the
ge-0/0/0
interface on port 0/0. For instructions, see “Connecting to the J-Web Interface”
on page 99.
2.
If the Set Up Quick Configuration page is not displayed, select
Configuration>Quick Configuration >Set Up
.
3.
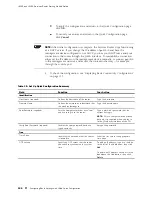
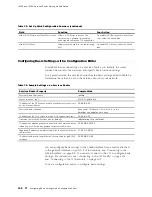
Enter information into the Set Up Quick Configuration page, as described in
Table 35.
4.
Click one of the following buttons:
To apply the configuration and stay in the Set Up Quick Configuration
page, click
Apply
.
Configuring Basic Settings with J-Web Quick Configuration
105
Содержание J4350
Страница 14: ...J4350 and J6350 Services Router Getting Started Guide xiv Table of Contents...
Страница 22: ...2 J series Overview...
Страница 68: ...J4350 and J6350 Services Router Getting Started Guide 48 Field Replaceable PIMs...
Страница 75: ...Services Router User Interface Overview Figure 25 J Web Layout Using the J Web Interface 55...
Страница 88: ...J4350 and J6350 Services Router Getting Started Guide 68 Using the Command Line Interface...
Страница 90: ...70 Installing a Services Router...
Страница 100: ...J4350 and J6350 Services Router Getting Started Guide 80 Site Preparation Checklist...
Страница 112: ...J4350 and J6350 Services Router Getting Started Guide 92 Powering a Services Router On and Off...
Страница 144: ...J4350 and J6350 Services Router Getting Started Guide 124 Verifying Secure Web Access...
Страница 160: ...J4350 and J6350 Services Router Getting Started Guide 140 Verifying J series License Management...
Страница 162: ...142 Maintaining Services Router Hardware...
Страница 194: ...J4350 and J6350 Services Router Getting Started Guide 174 Troubleshooting Hardware Components...
Страница 202: ...J4350 and J6350 Services Router Getting Started Guide 182 Packing a Router or Component for Shipment...
Страница 204: ...184 J series Requirements and Specifications...
Страница 220: ...J4350 and J6350 Services Router Getting Started Guide 200 ISDN RJ 45 Connector Pinout...
Страница 267: ...Part 5 Index Index 247...
Страница 268: ...248 Index...


