366
Item Description
User Address
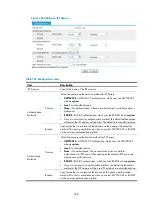
Specify the address pool for assigning IP addresses to users on the
peer end, or assign an IP address to a user directly.
If you have specified an ISP domain in PPP authentication
configuration, the address pools in the ISP domain are listed in the
User Address
list. You can:
•
Click
Add
to add an address pool, as shown in
. For
information about the configuration items, see
•
Select an address pool and click
Modify
to enter the address
pool modification page. For information about the
configuration items, see
•
Select an address pool and click
Delete
to delete the address
pool.
Assign Address
Forcibly
Specify whether to force the peer end to use the IP address
assigned by the local end. If you enable this function, the peer end
is not allowed to use its locally configured IP address.
Advanced
Configuration
Hello Interval
Specify the interval between sending hello packets.
To check the connectivity of a tunnel, the LAC and LNS regularly
send Hello packets to each other. Upon receipt of a Hello packet,
the LAC or LNS returns a response packet. If the LAC or LNS
receives no Hello response packet from the peer within a specific
period of time, it retransmits the Hello packet. If it receives no
response packet from the peer after transmitting the Hello packet
for three times, it considers that the L2TP tunnel is down and tries to
re-establish a tunnel with the peer.
The interval on the LAC end and that on the LNS end can be
different.
AVP Hidden
Specify whether to transfer AVP data in hidden mode.
With L2TP, some parameters are transferred as AVP data. You can
configure an LAC to transfer AVP data in hidden mode, namely,
encrypt AVP data before transmission, for higher security.
This configuration does not take effect on an LNS.
Flow Control
Specify whether to enable flow control for the L2TP tunnel.
The L2TP tunnel flow control function is for control of data packets
in transmission. The flow control function helps in buffering and
adjusting the received out-of-order data packets.
Содержание MSR SERIES
Страница 17: ...xv Documents 835 Websites 835 Conventions 836 Index 838 ...
Страница 20: ...3 Figure 3 Initial page of the Web interface ...
Страница 42: ...25 Figure 13 Firefox Web browser setting ...
Страница 59: ...42 Figure 27 Checking the basic service configuration ...
Страница 73: ...56 Figure 35 Sample interface statistics ...
Страница 156: ...139 Figure 139 Rebooting the 3G modem ...
Страница 168: ...151 Figure 152 Configuring Web server 2 ...
Страница 174: ...157 Figure 158 Configure the URL filtering function ...
Страница 187: ...170 Upon detecting the Land or Smurf attack on Ethernet 0 2 Router outputs an alarm log and drops the attack packet ...
Страница 242: ...225 Figure 233 Enabling the DHCP client on interface Ethernet 0 1 ...
Страница 247: ...230 Figure 236 The page for configuring an advanced IPv4 ACL ...
Страница 255: ...238 Figure 241 Advanced limit setting ...
Страница 298: ...281 e Click Apply 2 Configure Router B in the same way Router A is configured ...
Страница 354: ...337 Figure 339 Configuring a login control rule so Host B cannot access Router through the Web ...
Страница 400: ...383 Figure 387 Verifying the configuration ...
Страница 405: ...388 ...
Страница 523: ...506 Figure 530 Ping configuration page ...
Страница 538: ...521 a Click Device A on the topology diagram b Click Ethernet 0 2 on the panel diagram c Click Port Guard ...
Страница 744: ...727 Verifying the configuration In the case that the IP network is unavailable calls can be made over PSTN ...
Страница 775: ...758 Figure 785 Configuring a jump node ...
Страница 791: ...774 Figure 801 Configuring a jump node ...


