73
Item Description
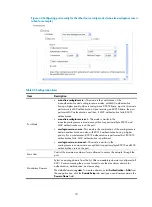
TKIP CM Time
Set the TKIP countermeasure time.
By default, the TKIP countermeasure time is 0 seconds, that is, the TKIP
countermeasure policy is disabled.
If the TKIP countermeasure time is set to a value other than 0, the TKIP
countermeasure policy is enabled.
MIC is designed to avoid hacker tampering. It uses the Michael algorithm and is
extremely secure. When failures occur to MIC, the data may have been
tampered, and the system may be under attack. In this case, TKIP will enable the
countermeasure policy to prevent hackers from attacking. With the
countermeasure policy enabled, if more than two MIC failures occur within the
specified time, the TKIP disassociates all connected wireless clients and no new
associations are allowed within the TKIP countermeasure time.
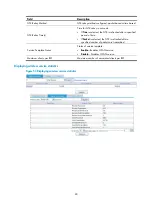
Management Right
Web interface management right of online clients:
•
Disable
—Disables the Web interface management right of online clients.
•
Enable
—Enables the Web interface management right of online clients.
GTK Rekey Method
An AP generates a group transient key (GTK) and sends the GTK to a client
during the authentication process between an AP and the client through group
key handshake/the 4-way handshake. The client uses the GTK to decrypt
broadcast and multicast packets.
•
If
Time
is selected, the GTK is refreshed after a specified period of time.
•
If
Packet
is selected, the GTK is refreshed after a specified number of packets
are transmitted.
By default, the GTK rekeying method is time-based, and the interval is 86400
seconds.
GTK User Down Status
Enable refreshing the GTK when some client goes offline.
By default, the GTK is not refreshed when a client goes off-line.
Configuring security settings for crypto type wireless service
1.
Select
Interface Setup
>
Wireless
>
Access Service
from the navigation tree.
2.
Click the
icon for the target crypto type wireless service.
Figure 47
Configuring security settings for crypto type wireless service
Содержание MSR SERIES
Страница 17: ...xv Documents 835 Websites 835 Conventions 836 Index 838 ...
Страница 20: ...3 Figure 3 Initial page of the Web interface ...
Страница 42: ...25 Figure 13 Firefox Web browser setting ...
Страница 59: ...42 Figure 27 Checking the basic service configuration ...
Страница 73: ...56 Figure 35 Sample interface statistics ...
Страница 156: ...139 Figure 139 Rebooting the 3G modem ...
Страница 168: ...151 Figure 152 Configuring Web server 2 ...
Страница 174: ...157 Figure 158 Configure the URL filtering function ...
Страница 187: ...170 Upon detecting the Land or Smurf attack on Ethernet 0 2 Router outputs an alarm log and drops the attack packet ...
Страница 242: ...225 Figure 233 Enabling the DHCP client on interface Ethernet 0 1 ...
Страница 247: ...230 Figure 236 The page for configuring an advanced IPv4 ACL ...
Страница 255: ...238 Figure 241 Advanced limit setting ...
Страница 298: ...281 e Click Apply 2 Configure Router B in the same way Router A is configured ...
Страница 354: ...337 Figure 339 Configuring a login control rule so Host B cannot access Router through the Web ...
Страница 400: ...383 Figure 387 Verifying the configuration ...
Страница 405: ...388 ...
Страница 523: ...506 Figure 530 Ping configuration page ...
Страница 538: ...521 a Click Device A on the topology diagram b Click Ethernet 0 2 on the panel diagram c Click Port Guard ...
Страница 744: ...727 Verifying the configuration In the case that the IP network is unavailable calls can be made over PSTN ...
Страница 775: ...758 Figure 785 Configuring a jump node ...
Страница 791: ...774 Figure 801 Configuring a jump node ...


