TM 11-6625-3071-14
3478A
respectively. Check the readings, make sure they are
within the specified limits shown in Table 4-5 and the AC
Volts Performance Test Card. Record the readings.
e. (Step #5, 6, and 7.) Set the 3478A to the 3V Range.
Check the 1/10, 1/2, and full scale accuracy of the range
by applying 0.3V at 20KHz, 1.5V at 20KHz, and 3V at
20KHz, respectively. Check and record the readings.
f. (Step #8 and 9.) Set the 3478A to the 30V Range.
Check the 1/10 and full scale accuracy of the range by
applying 3V at 20KHz and 30V at 20KHz, respectively.
Check and record the readings.
g. (Step #10 and 11.) Set the 3478A to the 300V
Range. Check the 1/10 and full scale accuracy of the
range by applying 30V at 20KHz and 300V at 20KHz,
respectively. Check and record the readings.
h. (Step #12, 13, 14, and 15.) Check the full scale
accuracy of the 300mV, 3V, 30V, and 300V Range by
applying 0.3V at 50KHz, 3V at 50KHz, 30V at 50KHz,
and 300V at 50KHz, respectively. Check and record the
readings.
i. (Step #16.) Set the 3478A to the 300mV Range.
Check the full scale accuracy of the range by applying
0.3V at 100Hz. Check and record the reading.
j. (Step #17 and 18.) Set the 3478A to the 3V Range.
Check the 1/10 and full scale accuracy of the range by
applying 0.3V at 100KHz and 3V at 100KHz,
respectively. Check and record the readings.
k. (Step #19 and 20.) Set the 3478A to the 30V
Range. Check the 1/2 and full scale accuracy of the
range by applying 15V at 100KHz and 30V at 100KHz,
respectively. Check and record the readings.
I. (Step #21.) Set the 3478A to the 300V Range.
Check the full scale accuracy of the range by applying
300V at 100KHz. Check and record the reading.
m. (Step #22.) Set the 3478A to the 30V Range.
Check the full scale accuracy of the range by applying
30V at 300KHz. Check and record the reading.
n. (Step #23 and 24.) Set the 3478A to the 3V Range.
Check the full scale accuracy of the range by applying
3V at 50Hz and then 3V at 20Hz. Leave the AC
Calibrator set up for a 3V at 20Hz output. Check and
record the readings.
o. (Step #25.) Set the 3478A to the 4 Digit Display mode
by pressing the blue Shift button and then the Uprange
(4) button. Check and record the reading.
p. Disconnect the AC Calibrator from the 3478A. This
completes the AC Volts Test. If any test fails, try
calibrating the instrument (go to paragraph 4-90). If the
test still fails, go to this manual’s Section VII for
troubleshooting.
4-64. AC Current Test
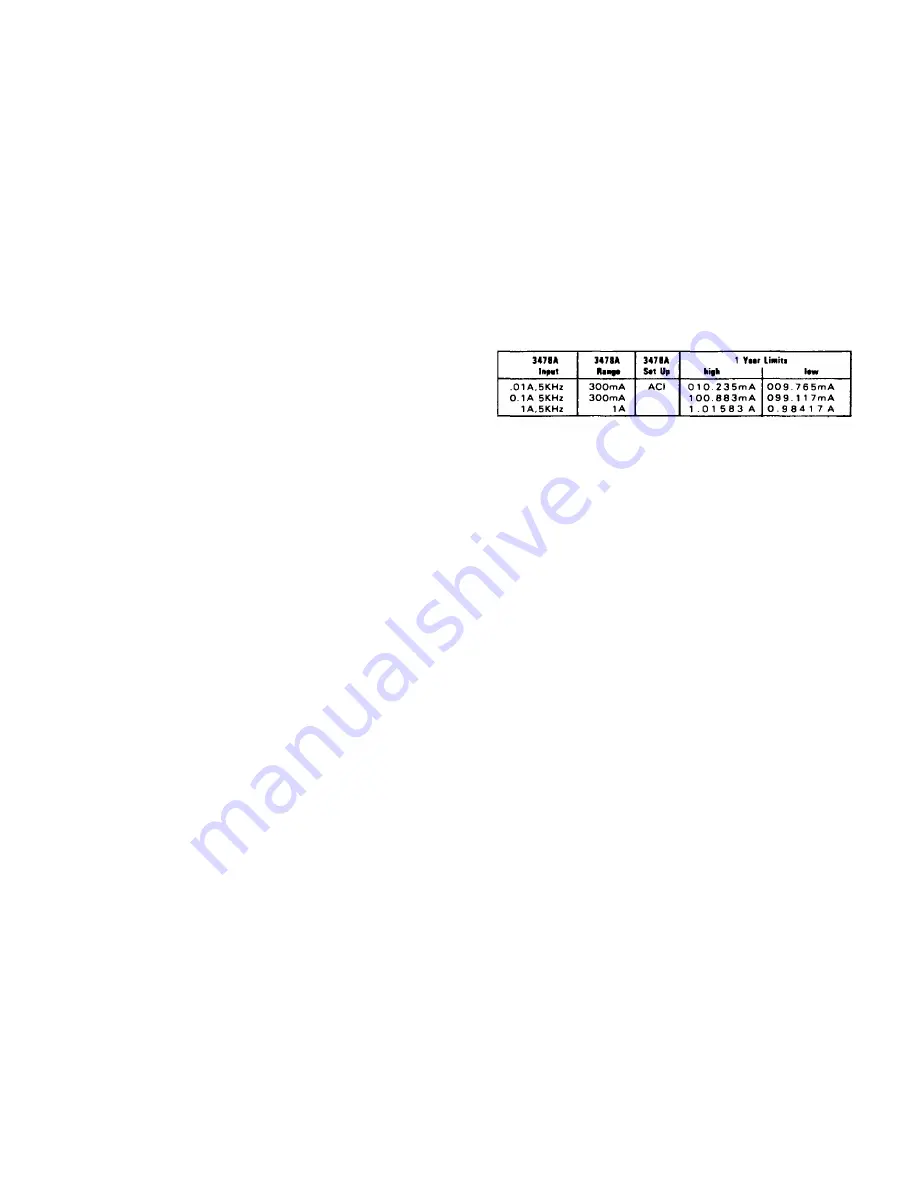
4-65. The AC Current Test limits are printed on the AC
Current Test Card and in Table 4-6. Each step on the
test card also corresponds to a step in the procedure
with each step number shown in parenthesis in the
procedure.
4-66. All test signals are applied to the 3478A’s A
(Amps) and LO INPUT Terminals.
Table 4-6. AC Current Test Limits
quired test equipment for the AC Current Test.
AC Calibrator (Fluke Model 5200A Option 05).
AC-DC Current Calibrator (Valhalla Model 2500)
4-68. Test Procedure. Make sure the AC Volts
Performance Test has been completed, before doing the
AC Current Test. Also make sure the 3478A has been
warmed up for at least one hour, then do the following:
a. (Step #1.) Reset the 3478A by pressing the blue
Shift button and then the SGL/TRIG (TEST/RESET)
button.
b. (Step #2.) Set the 3478A to the AC Current
Function and the 300mA Range.
c. (Step #3.) Set the AC Calibrator for a IV at 5KHz
output.
d. Set the AC-DC Current Calibrator to the 10mA
Range.
e. Connect the AC Calibrator to the AC-DC Current
Calibrator as shown in Figure 4-5.
f. Connect the 3478A to the AC-DC Current Calibrator
as shown in Figure 4-5.
g. Check and record the 3478A’s reading.
h. (Step #4.) Set the AC-DC Current Calibrator to the
100mA Range. Check and record the 3478A’s reading.
i. (Step #5.) Set the 3478A to the 3A Range. Set the
4-9
Содержание 3478A
Страница 2: ...TM 11 6625 3071 14 A ...
Страница 4: ...TM 11 6625 3071 14 C D BLANK ...
Страница 12: ...TM 11 6625 3071 14 Table 1 1 Specification 1 2 ...
Страница 13: ...TM 11 6625 3071 14 Table 1 1 Specifications Cont 1 3 ...
Страница 14: ...TM 11 6625 3071 14 Table 1 1 Specifications Cont 1 4 ...
Страница 53: ...TM 11 6625 3071 14 1 ...
Страница 54: ...TM 11 6625 3071 14 2 ...
Страница 55: ...TM 11 6625 3071 14 3 ...
Страница 56: ...TM 11 6625 3071 14 4 ...
Страница 87: ...TM 11 6625 3071 14 3478A Figure 7 D 3 Flowchart B 7 D 5 ...
Страница 88: ...TM 11 6625 3071 14 3478A Figure 7 D 4 Flowchart C 7 D 6 ...
Страница 91: ...TM 11 6625 3071 14 3478A Figure 7 D 6 Flowchart D 7 D 9 ...
Страница 98: ...TM 11 6625 3071 14 3478A Figure 7 F 2 Simplified Schematic Of The Input Switching Circuitry 7 F 4 ...
Страница 111: ...TM 11 6625 3071 14 Figure 7 F 17 3478A Simplified Reference Circuitry 7 F 16 ...
Страница 122: ...TM 11 6625 3071 14 Table A 2 A 2 HP IB Worksheet A 4 ...
Страница 137: ...TM 11 6625 3071 14 Figure 7 D 2 Flow chart A 7 D 3 ...
Страница 139: ...TM 11 6625 3071 14 Figure 7 G 2 3478A Block Diagram 7 G 3 ...
Страница 140: ...TM 11 6625 3071 14 Component Locator for Input Circuitry and Ohms Current Source 7 G 4 ...
Страница 141: ...TM 11 6625 3071 14 Figure 7 G 3 Input Circuitry and Ohms Current Source 7 G 5 ...
Страница 142: ...TM 11 6625 3071 14 F G 6 ...
Страница 143: ...TM 11 6625 3071 14 2 Figure 7 G 4 AC to DC Converter 7 G 7 ...
Страница 144: ...TM 11 6625 3071 14 Component Locator for A D Converter and Control Logic 7 G 8 ...
Страница 145: ...TM 11 6625 3071 14 3 Figure 7 G 5 A D Converter and Control Logic 7 G 9 ...
Страница 146: ...TM 11 6625 3071 14 7 G 10 ...
Страница 147: ...TM 11 6625 3071 14 4 Figure 7 G 6 Power Supplies 7 G 11 7 G 12 blank ...
Страница 148: ......
Страница 149: ...PIN NO 057444 ...

