3478A
TM 11-6625-3071-14
7-A-19. PROTECTION CIRCUITRY TROUBLE-
SHOOTING
7-A-20. This circuitry consists of E101 and various
diodes in U102. If all ranges fail, try replacing E101. If
the ranges still fail or some ranges fail, the most likely
cause is U102.
7-A-21. INPUT CIRCUITRY TROUBLESHOOTING
7-A-22. The Input Circuitry consists of the Input
Switching Circuitry and the DC/Ohms Input Amplifier.
Before troubleshooting the circuitry, make sure the
failure is not caused by the A/D Converter. Go to
paragraph 7-A-5 to determine the faulty circuitry, if it has
not been done already.
7-A-23. Overload Readings on All Ranges
7-A-24. An overload can be caused when the output of
the DC/Ohms Input Amplifier is too high. This can be
caused by an excessive input to the amplifier, open
feedback, or a defective amplifier. Do the following:
a. Set the 3478A to the DC Volts Function and the
3V Range.
b. Make sure Autozero is turned off (see paragraph
7-A-8 step b).
c. Short the 3478A’s INPUT Terminals.
d. With a high impedance Digital Voltmeter (like the
3456A) measure for zero volts (±1mV) at U101 pin 3
(U102 pin 10).
e. If the reading on the test voltmeter is other than
zero volts (i.e., above I mV), the Input Hybrid is defective.
Replace U102.
f. If the reading is good, connect pin 6 and pin 2
(U102 pin 3 and 9) of U101 to each other. Using the test
voltmeter, measure for zero volts (± 3mV) at pin 6 of
U101.
g. If the reading is good (less than ± 3mV), the
amplifier feedback circuitry is defective. Replace U102.
h. If the reading is wrong (greater than 3mV), the
amplifier is defective. Replace U101.
7-A-25. Constant Zero Readings on All Ranges
7-A-26. A constant zero reading is normally caused
when the input or output of the DC/Ohms Input Amplifier
is shorted to ground. Make sure pin 1 and pin 13 of
U102 and pin 6 of U101 are not shorting to ground. If no
shorts are noted, do the following:
a. Set the 3478A to the DC Volts Function and the
3V Range.
b. Make sure Autozero is turned off (see paragraph
7-A-8 step b).
c. Using an external power supply with a 100K ohm
resistor in series, apply +3V to pin 3 of U101. (Connect
one end of the resistor to pin 3 of U101 and the other
end to the power supply.)
d. Using a high impedance Digital Voltmeter (like
the 3456A), make sure the voltage at the resistor end
connected to pin 3 of U101 is +3V.
e. If the voltage is loaded down, the Input Hybrid is
defective. Replace U102.
f. If the voltage is +3V, measure (using the test
voltmeter) for approxi10V at U101 pin 6.
g. If the voltage is incorrect, the Input Amplifier is at
fault. Replace U101.
h. If the voltage is good, the Input Hybrid (U102)
may be defective. Before replacing U102, make sure the
A/D Controller (U462) is good. Go to paragraph 7-A-33
to check the A/D Controller. If the controller is good,
replace U102.
7-A-27. Floating Reading on All Ranges
7-A-28. A floating reading is normally caused when an
open exists between the DC/Ohms Input Amplifier and
the instrument's INPUT Terminals. Before
troubleshooting the Input Circuitry, make sure the wire
connected from the Front/Rear Switch to J108 is not
open. If the wire is good, then do the following:
a. Set the 3478A to the DC Volts Function and the
3V Range.
b. Make sure Autozero is turned off (see paragraph
7-A-8 step b).
c. Using an external power supply, apply +3V to the
3478A's INPUT Terminals.
d. Connect the 3478A's HI INPUT Terminal to
U101 pin 3 (U102 pin 10).
e. If the displayed reading on the 3478A is still a
floating reading, replace U101.
f. If the displayed reading on the 3478A is + 3V, the
Input Hybrid (U102) may be at fault. Before replacing
U102, make sure the A/D Controller (U462) is good. Go
to paragraph 7-A-33 to check the A/D Controller. If the
controller is good, replace U102.
7-A-29. Noisy Readings on All Ranges
7-A-30. Noisy readings can be caused by the Input
7-A-3
Содержание 3478A
Страница 2: ...TM 11 6625 3071 14 A ...
Страница 4: ...TM 11 6625 3071 14 C D BLANK ...
Страница 12: ...TM 11 6625 3071 14 Table 1 1 Specification 1 2 ...
Страница 13: ...TM 11 6625 3071 14 Table 1 1 Specifications Cont 1 3 ...
Страница 14: ...TM 11 6625 3071 14 Table 1 1 Specifications Cont 1 4 ...
Страница 53: ...TM 11 6625 3071 14 1 ...
Страница 54: ...TM 11 6625 3071 14 2 ...
Страница 55: ...TM 11 6625 3071 14 3 ...
Страница 56: ...TM 11 6625 3071 14 4 ...
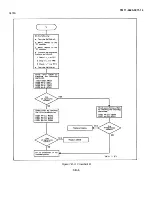
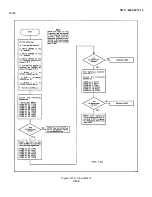
Страница 87: ...TM 11 6625 3071 14 3478A Figure 7 D 3 Flowchart B 7 D 5 ...
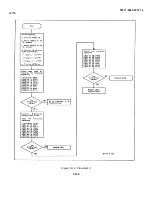
Страница 88: ...TM 11 6625 3071 14 3478A Figure 7 D 4 Flowchart C 7 D 6 ...
Страница 91: ...TM 11 6625 3071 14 3478A Figure 7 D 6 Flowchart D 7 D 9 ...
Страница 98: ...TM 11 6625 3071 14 3478A Figure 7 F 2 Simplified Schematic Of The Input Switching Circuitry 7 F 4 ...
Страница 111: ...TM 11 6625 3071 14 Figure 7 F 17 3478A Simplified Reference Circuitry 7 F 16 ...
Страница 122: ...TM 11 6625 3071 14 Table A 2 A 2 HP IB Worksheet A 4 ...
Страница 137: ...TM 11 6625 3071 14 Figure 7 D 2 Flow chart A 7 D 3 ...
Страница 139: ...TM 11 6625 3071 14 Figure 7 G 2 3478A Block Diagram 7 G 3 ...
Страница 140: ...TM 11 6625 3071 14 Component Locator for Input Circuitry and Ohms Current Source 7 G 4 ...
Страница 141: ...TM 11 6625 3071 14 Figure 7 G 3 Input Circuitry and Ohms Current Source 7 G 5 ...
Страница 142: ...TM 11 6625 3071 14 F G 6 ...
Страница 143: ...TM 11 6625 3071 14 2 Figure 7 G 4 AC to DC Converter 7 G 7 ...
Страница 144: ...TM 11 6625 3071 14 Component Locator for A D Converter and Control Logic 7 G 8 ...
Страница 145: ...TM 11 6625 3071 14 3 Figure 7 G 5 A D Converter and Control Logic 7 G 9 ...
Страница 146: ...TM 11 6625 3071 14 7 G 10 ...
Страница 147: ...TM 11 6625 3071 14 4 Figure 7 G 6 Power Supplies 7 G 11 7 G 12 blank ...
Страница 148: ......
Страница 149: ...PIN NO 057444 ...


