GE H
EALTHCARE
D
IRECTION
FQ091013, R
EVISION
1
V
IVID
I
N
AND
V
IVID
Q
N S
ERVICE
M
ANUAL
Chapter 8 - Replacement Procedures
8-87
8-4-15
Top Shelf Replacement Procedure
8-4-15-1
Tools
Appropriate Phillips screwdrivers, Allen key and open wrench.
8-4-15-2
Preparations
Shut down the Vivid
i
n/ Vivid q N ultrasound unit, as described in
8-4-15-3
Top Shelf Removal Procedure
1) Disconnect the AC adapter and all cables from the Vivid
i
n/Vivid q N portable ultrasound scanner.
2) Disconnect and remove all peripherals from the SafeLock Cart.
3) Remove the Upper Cover (Rear) as described in the
Upper Cover (Rear) Removal Procedure on
4) Remove the Lower Cover (Rear) as described in the
Upper Cover (Rear) Removal Procedure on
5) Remove the USB board as described in the
USB Board Removal Procedure on page 8 - 80
6) Remove the gas spring as described in
Gas Spring Replacement Procedure on page 8 - 82
.
7) Disconnect the two cables (P1 cable and peripheral power cable) from the top of the AC Input
Assembly as described in
AC Distribution Assembly Removal Procedure on page 8 - 72
(refer to
and
).
8) Remove Main Harness, Peripheral power cable and disconnect the LAN cable.
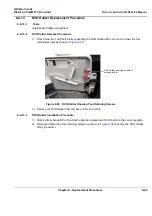
9) Remove the six lower screws that retain the top Shelf - see
.
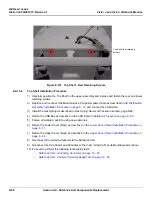
10) Remove the two rear screws that retain the top Shelf - see
.
11) Carefully remove the top shelf assembly.
Figure 8-100 Top Shelf - Lower Retaining Screws
Lower screws retaining the
Top Shelf - 6 shown
Содержание FL000090
Страница 2: ......
Страница 30: ...GE HEALTHCARE DIRECTION FQ091013 REVISION 1 VIVID I N AND VIVID Q N SERVICE MANUAL xxviii ...
Страница 739: ......


