09/2007
xvii
Phaser 8860/8860MFP Service Manual
8860MFP Control Panel Layout
Introduction
Initial Issue
7.
The Down Arrow reduces the reduce/enlarge percentage in one percent increments.
8.
The Up Arrow increases the reduce/enlarge percentage in one percent increments.
9.
Reduce/Enlarge Percentage display indicates the current educe/enlarge setting.
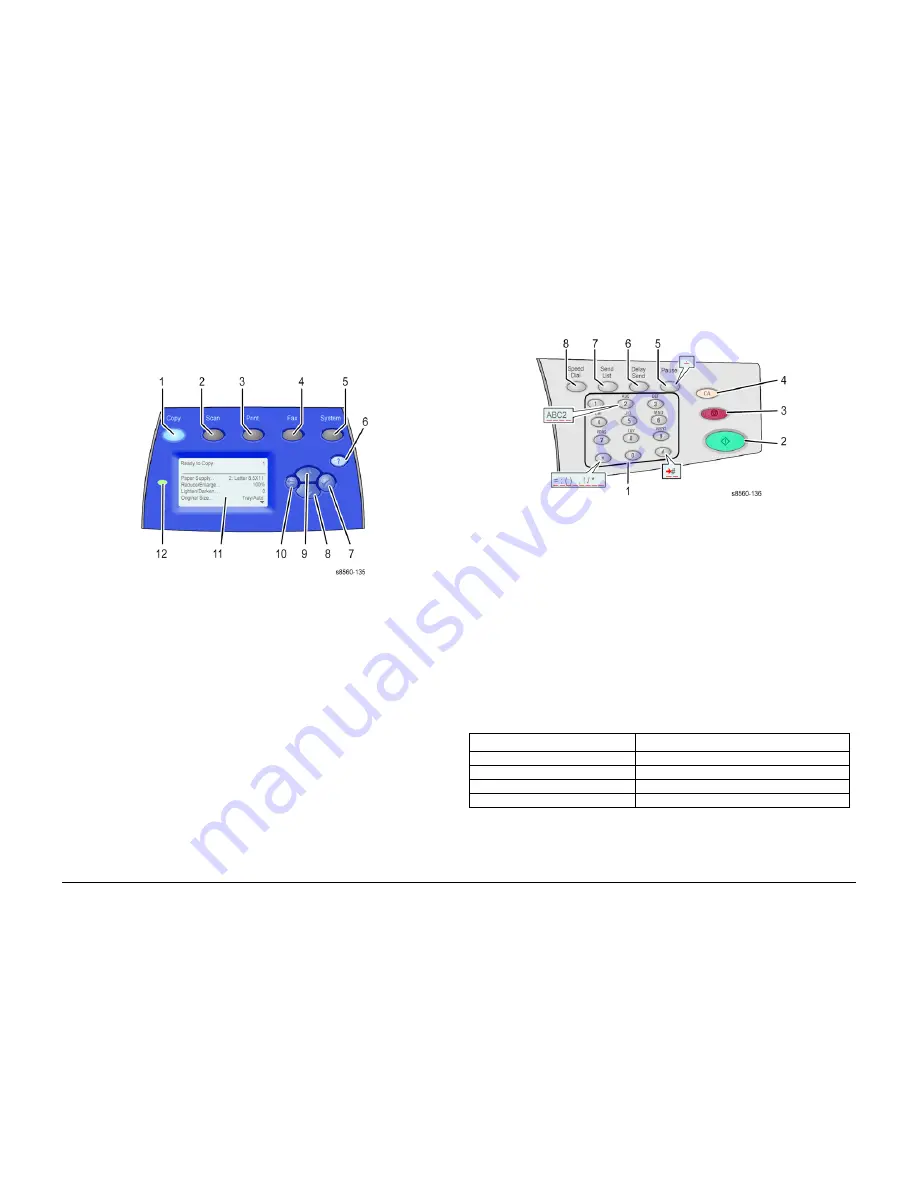
Control Panel Center
The center of the Control Panel contains the display, mode and navigation buttons, as well as
the status LED.
Figure 3
shows each function’s location.
Figure 3 Center Control Panel
1.
Copy displays the Copy menu.
2.
Scan displays the Scan menu.
3.
Print displays the Print menu.
4.
Fax displays the Fax menu.
5.
System displays the System Setup menu.
6.
Help(?) provides additional information about the menu or message displayed.
7.
OK accepts the highlighted menu selection.
8.
Down Arrow scrolls downward through menu selections.
9.
Up Arrow scrolls upward through menu selections.
10. Back returns the previous menu to the display.
11. Control Panel display.
12. Status LED uses color to indicate these states of the current function:
•
Green indicates the system is ready to print, copy, scan, or fax.
•
Yellow indicates a warning condition. The system continues the operation.
•
Red indicates a startup or operational error condition.
•
Blinking indicates a warm-up or busy condition.
Control Panel Right
The right side of the Control Panel contains the numeric keypad, Start, Stop, and Clear but-
tons, as well as Fax control functions.
Figure 4
shows each function’s location.
Figure 4 Right Side Control Panel
1.
Numeric keypad for entering numbers for sending a fax, selecting a number of copies, or
entering a numeric password.
2.
Start initiates the selected function (copy, scan. or fax).
3.
Stop pauses a print, copy, scan, or fax job. To cancel the job, follow the instructions indi-
cated on the display.
4.
Clear All resets all job settings and returns to the top of the default function.
5.
Pause enters a pause in a fax number.
6.
Delayed Send stores a time for fax transmission.
7.
Send List to view or add fax numbers to a list.
8.
Speed Dial accesses directories of groups or individual fax numbers.
Control Panel Shortcuts
NOTE:
To enter Service Diagnostics, press the
BACK and ? buttons before the Xerox logo
stops scrolling and until Beginning Service Mode appears.
Table 2 Short Cuts
Mode
Press this selection at Power On
Skip execution of POST diagnostics
OK
Print Service Diagnostics Map
INFO
Reset PostScript NVRAM
BACK+ON
Password Bypass
UP+DOWN
Summary of Contents for Phaser 8860
Page 1: ...705P01205 September 2007 Phaser 8860 8860MFP Service Documentation...
Page 4: ...09 2007 iv Phaser 8860 8860MFP Service Manual Initial Issue Introduction...
Page 28: ...09 2007 1 2 Phaser 8860 8860MFP Service Manual Initial Issue Service Call Procedures...
Page 34: ...09 2007 2 2 Phaser 8860 8860MFP Service Manual Initial Issue Error Messages and Codes...
Page 94: ...09 2007 3 2 Phaser 8860 8860MFP Service Manual Initial Issue Image Quality...
Page 126: ...09 2007 4 2 Phaser 8860 8860MFP Service Manual Initial Issue Repairs and Adjustments...
Page 208: ...09 2007 5 2 Phaser 8860 8860MFP Service Manual Initial Issue Parts List...
Page 222: ...09 2007 6 2 Phaser 8860 8860MFP Service Manual Initial Issue Diagnostics...
Page 274: ...09 2007 7 2 Phaser 8860 8860MFP Service Manual Initial Issue Wiring Data...
Page 294: ...09 2007 8 2 Phaser 8860 8860MFP Service Manual Initial Issue Theory of Operation...


