81
19. Projection TV RA-5A Chassis Power Supply Board Tests
G Board Tests (RA-5A Chassis)
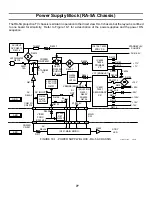
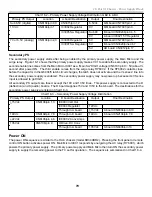
Unlike other Sony projection TV chassis, the power supply in the RA-5A chassis will operate unloaded when
turned ON. There are several ways you can power the G board, depending upon how much time you have: The
first method is the fastest:
A. Power the G board and check output voltages (protection circuits operational).
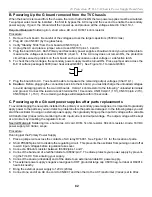
B. Power Up the G board removed (protection circuits operational).
C. Powering up the G board power supplies after parts replacement.
A. Power the G board and check output voltages
Use this procedure to determine if the power supply G board is either being loaded down externally or is defec-
tive. The outputs from the G board can be unplugged and the TV powered ON to see if the G board is OK (can
produce the normal output voltages).
Necessary Materials: 1k ohm resistor, DVM, remote.
Procedure:
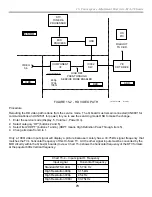
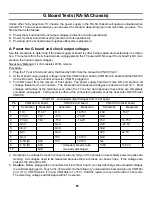
1. Plug the TV set into AC and verify the Standby 5Vdc from the G board at CN6101/pin 1.
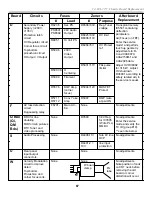
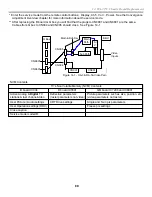
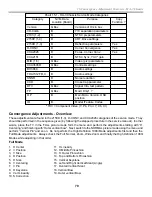
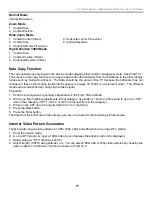
2. At the G board, unplug output voltage connectors CN6104 (to A board), CN6102 (to K board) and the CN6106
(to the D board). Leave control connector CN6101 plugged in.
3. Turn ON power from the remote or front panel. The power supply board will come ON and produce all
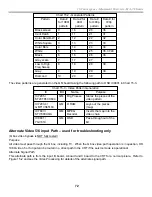
voltages labeled at the connectors. The schematic and measured voltages are listed in Chart 19-1. Most
voltages will remain at the terminals even when the TV is shut down because these lines are completely
unloaded (unplugged). Cold ground is either at the connectors (labeled) or at the heat sink of D6105 near
CN6106.
Chart 19-1 - Unloaded Output Voltages from the G board
Pin
CN6104 to A board
CN6102 to K board
CN6106 (to the D board
#
Schematic
Measured
Schematic
Measured
Schematic
Measured
1
11V
11.3V *
11V
14.75V
-15V
-15V *
2
7V (A)
7.4V *
-15V
-14.2V
Gnd
3
7V (A)
7.4V *
-15V
-14.2V
15V
14.75V
4
Gnd
Gnd
-22V
-22.5V
5
Gnd
Gnd
Gnd
6
N/C
Gnd
22V
22.5V
7
Gnd
15V
14.15V
Gnd
8
6.5V (D)
6.9V
15V
14.15V
N/c
9
6.5V (D)
6.9V
* Unloaded. Needs to be
135V
135.3V
10
Gnd
manually discharged.
4. Sampling one voltage from each connector will only tell you if the primary and secondary power supplies are
working. All voltages need to be measured because there are fuses on various lines. If the voltages are
present, the G board is OK.
5.
Caution
- Before plugging the connectors back into the G board, you must discharge the unloaded voltages
to avoid damaging parts. Touch a 1k-ohm resistor to the following * unloaded terminals and ground: CN6104/
pin 1 (11V), CN6104/pin 2 (7V) and CN6106/pin 1 (-15V). Hold the resistor at each terminal for 10 seconds.
The remaining voltages will dissipate within 10 seconds.
Summary of Contents for KD-34XBR2 - 34" Hdtv Fd Trinitron Wega
Page 77: ...74 RA 5A Chassis Board Layout ...
Page 108: ...APPENDIX ...

