Malfunction and Remedies
Jump starting and charging the battery
511 / 564
Jump starting
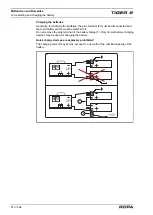
Because, in the past, damage has been caused several times due to improper charg-
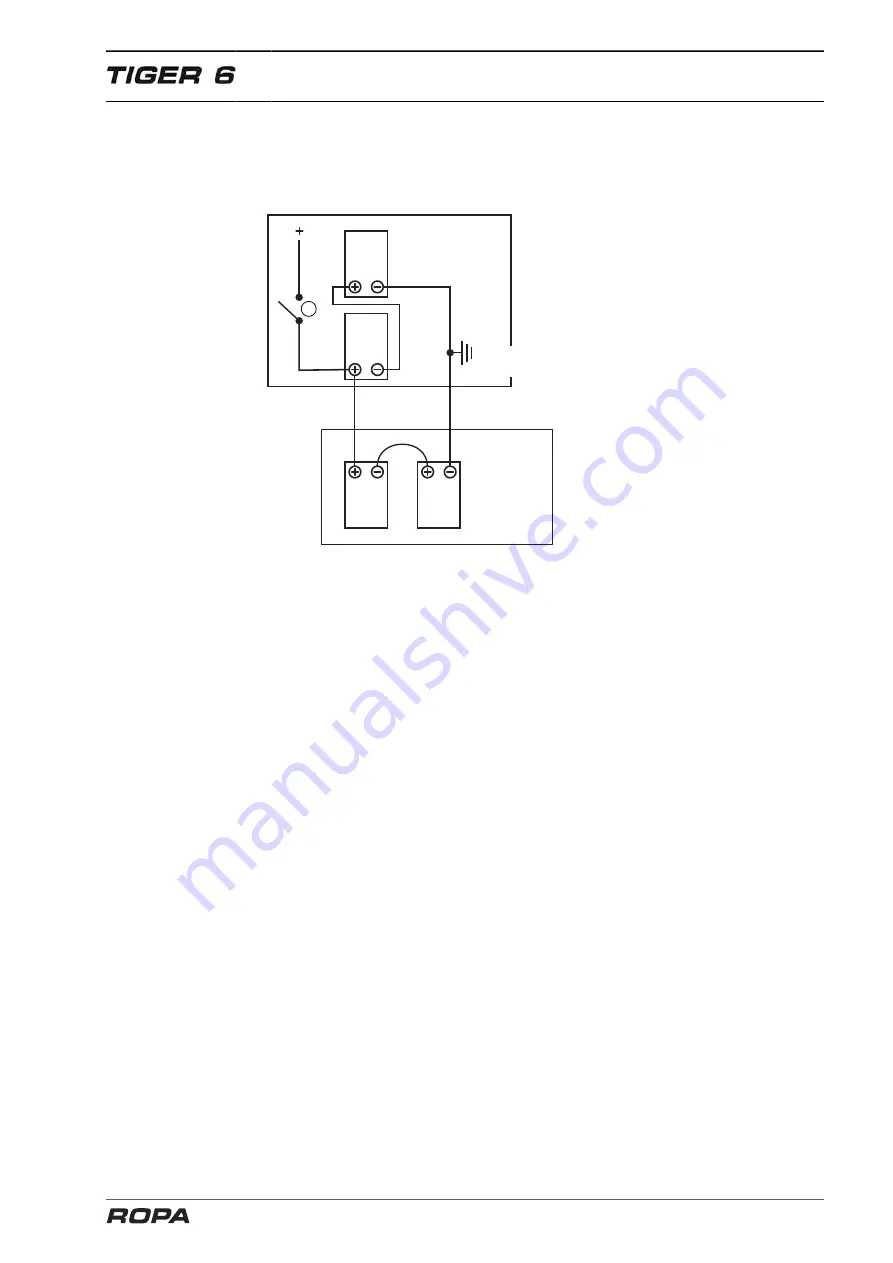
ing of batteries or jump starting, we would like to expressly point out that machine may
only be jump started using the following method.
ROPA machine
Assisting
vehicle
Ground point
3
(3)
Battery disconnect relay
– Exclusively use standardized jump starting cables with actually sufficient cross sec-
tion of the electrical conductors.
– Only use batteries with the same rated voltage (24V).
– Make sure of sufficient battery capacity of the assisting vehicle.
– Switch off the engines and switch off the ignition of both vehicles.
– Switch off the battery main switch on the
ROPA machine
, wait for 6 minutes.
Check that the battery disconnector relay has really opened (green LED on the R-
Touch is off if ignition is switch ON).
– Make sure that the two vehicles do not touch at any point.
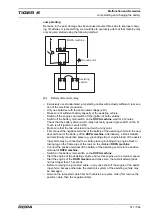
– First connect the negative terminal of the battery of the assisting vehicle to the neg-
ative terminal of the battery of the
ROPA machine
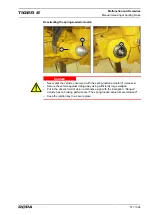
. Alternatively, a blank metallic
and electrically conductive place (e.g. grounding strip or engine block) of the assist-
ing vehicle may be connected to a similar place (grounding strip, engine block or
towing lug on the frame pipe at the rear) on the disabled
ROPA machine
.
– Connect the positive terminal of the battery of the assisting vehicle to the positive
terminal of
ROPA machine
.
– Switch on the battery main switch on the
ROPA machine
.
– Start the engine of the assisting vehicle and rev this engine up to a medium speed.
– Start the engine of the
ROPA machine
and make sure, that a start attempt does
not last longer than 15 seconds.
– Before removing the jump start cable, in any case shut off the engine of the assist-
ing vehicle, because otherwise the electronic system of the assisting vehicle may
be damaged.
– Remove the jump start cable from both vehicles in reverse order (first remove the
positive cable, then the negative cable).
Summary of Contents for Tiger 6
Page 3: ...Contents 3 564 Contents...
Page 4: ...Contents 4 564...
Page 13: ...Preface 13 564 1 Preface...
Page 14: ...Preface 14 564...
Page 22: ...Safety 22 564...
Page 23: ...Safety 23 564 2 Safety...
Page 24: ...Safety 24 564...
Page 41: ...General View and Specifications 41 564 3 General View and Specifications...
Page 42: ...General View and Specifications 42 564...
Page 53: ...General Description 53 564 4 General Description...
Page 54: ...General Description 54 564...
Page 57: ...Operating Components 57 564 5 Operating Components...
Page 58: ...Operating Components 58 564...
Page 98: ...Operation 98 564...
Page 99: ...Operation 99 564 6 Operation...
Page 100: ...Operation 100 564...
Page 226: ...Operation Defoliator 226 564 RIS defoliator RES defoliator...
Page 291: ...Operation Infeed conveyor 291 564 2 1 1 Infeed conveyor control block...
Page 299: ...Operation Strainer wheels turbines 299 564 4 Rpm strainer wheels...
Page 325: ...Operation Bunker unloading 325 564 6 19 Bunker unloading...
Page 361: ...Maintenance and Service 361 564 7 Maintenance and Service...
Page 362: ...Maintenance and Service 362 564...
Page 418: ...Maintenance and Service Defoliator 418 564 Defoliator in the maintenance position...
Page 475: ...Malfunction and Remedies 475 564 8 Malfunction and Remedies...
Page 476: ...Malfunction and Remedies 476 564...
Page 528: ...Lists Tables Plans Diagrams Maintenance Verification 528 564...
Page 558: ...558 564...
Page 559: ...Index 559 564 10 Index...
Page 560: ...Index 560 564...


