background image

How to Use the [Home] Screen (When Using

the Smart Operation Panel)

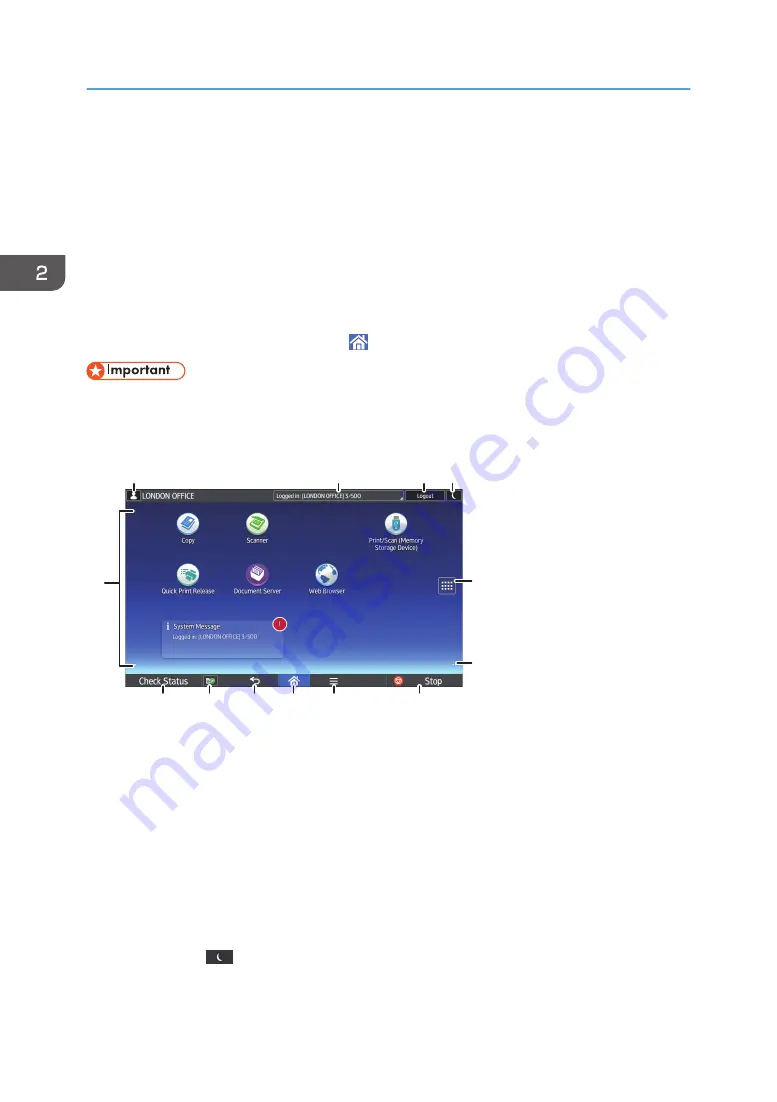
The [Home] screen is set as the default screen when the machine is turned on.
One icon is assigned to each function, and these icons are displayed on the [Home] screen. You can
add shortcuts to frequently used functions or Web pages to the [Home] screen. Also, you can register
widgets such as the Change Langs. Widget to it. The [Home] screen and the screen of each function may
differ depending on the optional units that are installed.
To display the [Home] screen, press [Home] ( ) at the bottom of the screen in the center.

• Do not apply strong impact or force to the screen, or it may be damaged. Maximum force

allowable is approx. 30N (approx. 3 kgf). (N = Newton, kgf = Kilogram force. 1 kgf = 9.8N.)

To switch between screens, flick your finger to the right or left on the screen.

DRC953

5

6

13

1

3

4

7

8

9

10

12

11

2

1. Logged-in user icon

When user authentication is enabled, an icon is displayed that indicates that users are logged in.
Press the icon to show the names of the users that are currently logged in.

2. System message

Displays messages from the machine system and applications.

3. [Login]/[Logout]

These keys are displayed when user authentication is enabled. When you press [Login], the authentication
screen appears. If you have been already logged in to the machine, [Logout] appears. To log out of the
machine, press [Logout].
For details about how to log in and out, see page 87 "Logging In the Machine".

4. [Energy Saver] 

Press to switch to Low Power mode or Sleep mode.

2. Getting Started

56

Summary of Contents for Pro C5200s

Page 1: ...he Safety Information in Read This First before using the machine Information for This Machine Troubleshooting Adding Paper and Toner Web Image Monitor Document Server Scan Print Copy Getting Started What You Can Do with This Machine User Guide ...

Page 2: ......

Page 3: ...ronment 19 Embedding Text Information in Scanned Files 20 Preventing Information Leakage Security Functions 21 Centrally Controlling Scan Conditions and Distribution 21 Monitoring and Setting the Machine Using a Computer 22 Preventing Unauthorized Copying 23 Using the Application Site 24 2 Getting Started Guide to Names and Functions of Components 25 Guide to Functions of the Attention Light 28 Gu...

Page 4: ...el 64 Copy Screen When Using the Smart Operation Panel 65 Scanner Screen When Using the Smart Operation Panel 67 Registering Functions in a Program When Using the Standard Operation Panel 73 Example of Programs When Using the Standard Operation Panel 75 Registering Functions in a Program When Using the Smart Operation Panel 78 Example of Programs When Using the Smart Operation Panel 81 Turning On ...

Page 5: ...pass Tray Classic 112 Procedure for Copying onto Envelopes from the Paper Tray or the Wide LCT Classic 112 Sort 114 Procedure for Sort Classic 115 Changing the Number of Sets 116 Storing Data in the Document Server 118 4 Print Quick Install 119 Displaying the Printer Driver Properties 120 Standard Printing 121 When Using the PCL 6 Printer Driver 121 Printing on Both Sides of Sheets 122 When Using ...

Page 6: ...ing an SMB Folder 137 Deleting an SMB Registered Folder 140 Entering the Path to the Destination Manually 141 Basic Procedure for Sending Scan Files by E mail 143 Basic Procedure for Sending Scan Files by E mail Classic 143 Registering an E mail Destination 145 Deleting an E mail Destination 147 Entering an E mail Address Manually 148 Basic Procedure for Storing Scan File 149 Checking a Stored Fil...

Page 7: ...ner 218 Sending scanned documents when toner has run out 220 Disposing of used toner 220 Menu Items and Functions 222 9 Troubleshooting When a Status Icon Is Displayed 225 When the Indicator Lamp for the Check Status Key Is Lit or Flashing 227 When the Machine Makes a Beeping Sound 230 When You Have Problems Operating the Machine 231 When Multiple Functions Cannot Be Executed Simultaneously 237 Me...

Page 8: ...ems Occur While Logging In 282 When the User Lacks Privileges to Perform an Operation 282 When the LDAP Server Cannot Be Used 282 10 Information for This Machine Information on Environmental Regulations 285 ENERGY STAR Program 285 Energy Saving Functions 285 User Information on Electrical and Electronic Equipment mainly Europe 287 Note for the Battery and or Accumulator Symbol For EU countries onl...

Page 9: ...g user errors This symbol is located at the end of sections It indicates where you can find further relevant information Indicates the names of keys on the machine s display or control panels mainly Europe and Asia mainly Europe or mainly Asia mainly North America Differences in the functions of Region A and Region B models are indicated by two symbols Read the information indicated by the symbol ...

Page 10: ...ion specific Read the information under the symbol that corresponds to the region of your machine mainly Europe If the label contains the following your machine is a region A model CODE XXXX 27 220 240 V mainly North America If the label contains the following your machine is a region B model CODE XXXX 17 208 240 V Dimensions in this manual are given in two units of measure metric and inch If your...

Page 11: ...ine are referred to as follows Auto Document Feeder ADF LCIT RT4020 Large Capacity Tray LCT 81 2 14 PAPER SIZE TRAY TYPE M2 Extension unit LCIT RT4050 Wide Large Capacity Tray Wide LCT Multi Folding Unit FD4000 Multi folding unit Decurler Unit DU5020 Decurler unit 9 ...

Page 12: ...10 ...

Page 13: ...sides of sheets Duplex Copy See Duplex Copying Copy Document Server Printing multi page documents on a single sheet Combine See Combined Copying Copy Document Server Checking how much paper is saved Information screen See Information Screen When Using the Standard Operation Panel Getting Started See Information Screen When Using the Smart Operation Panel Getting Started Reducing electricity consum...

Page 14: ...lder See Basic Procedure When Using Scan to Folder Scan Storing scan files on media See Basic Procedure for Saving Scan Files on a Memory Storage Device Scan Embedding text information in scanned files See Embedding Text Information in Scanned Data Scan Managing and using documents converted to electronic formats Document Server See Relationship between Document Server and Other Functions Copy Doc...

Page 15: ...ing the control panel to register destinations in the Address Book See Procedure for registering a destination in the address book manually classic Scan Operating the Machine More Effectively BQX139S Searching by What You Want to Do 13 ...

Page 16: ...s Print Changing the initial settings of the printer driver to frequently used printing settings See Displaying the Printing Preferences Dialog Box Print Adding shortcuts to frequently used programs See Adding Icons to the Home Screen When Using the Standard Operation Panel Convenient Functions See Adding Icons to the Home Screen When Using the Smart Operation Panel Convenient Functions Changing t...

Page 17: ...nctions and shortcuts that you use You can change the order of the function and shortcut icons For details about the features on the Home screen see How to Use the Home Screen When Using the Standard Operation Panel and How to Use the Home Screen When Using the Smart Operation Panel Getting Started For details about how to customize the Home screen see Customizing the Home Screen When Using the St...

Page 18: ...o detect the original size automatically Also it enables the machine to select an appropriate reproduction ratio based on the paper size you specify If the orientation of the original is different from that of the paper you are copying onto the machine rotates the original image by 90 degrees to match it with the copy paper See Reducing or Enlarging Originals Copy Document Server Copier functions ...

Page 19: ... the Hard Disk Drive and Printing Them Print The finisher allows you to collate staple and punch holes in your prints For details about stapling see Staple Print For details about punching see Punch Print You can print files stored on a removable memory device and specify print conditions such as print quality and print size See Direct Printing from a Memory Storage Device Print Utilizing Stored D...

Page 20: ...see Document Server Copy Document Server For details about the Document Server in printer mode see Saving and Printing Using the Document Server Print For details about the Document Server in scanner mode see Storing and Saving the Scanned Documents Scan Connecting Two Machines for Copying You can connect two machines together with copy connector When you set up a copy job on one machine the main ...

Page 21: ...inue to finish the job See Connect Copying Print Using the Scanner in a Network Environment CJQ607 You can send scan files to a specified destination using e mail Sending scan files by e mail See Basic Procedure for Sending Scan Files by E mail Scan You can send scan files directly to folders Sending scan files by Scan to Folder What You Can Do with This Machine 19 ...

Page 22: ...t in the file without using a computer If you scan a document using this function embedded text can be searched by using the text search function or copied to another document CUL003 To use this function the OCR unit is required You can select a file type from PDF High Compression PDF or PDF A This function can optically recognize characters in various languages and up to approximately 40 000 char...

Page 23: ...ze the risk of information leakage You can limit the usage of functions for each user See Security Guide Centrally Controlling Scan Conditions and Distribution You can use the distributed scan management DSM system in Windows Server 2008 R2 2012 to manage the destinations and scan settings for each individual user in a group and to use the information when distributing scanned data You can also us...

Page 24: ...ver 2008 R2 or later For details about how to deliver files using the distributed scan management system see Managing Scan Conditions and Other Settings in the Block Using Distributed Scan Management Scan Monitoring and Setting the Machine Using a Computer Using Web Image Monitor you can check the machine s status and change the settings CJQ609 1 What You Can Do with This Machine 22 ...

Page 25: ...re grayed out in the copy This can minimize the risk of confidential information being copied If a document protected by unauthorized copy guard is copied on a machine with the Copy Data Security function enabled the machine beeps to notify users that unauthorized copying is being attempted If the document is copied on a machine with the Copy Data Security function disabled the hidden text becomes...

Page 26: ...ions Requiring Optional Configurations Getting Started You can download from the Application Site useful applications that allow you to more conveniently utilize various office equipment such as copiers and printers DQU010 What You Can Do on the Application Site Download and install applications on devices Update the application that has already been installed on the device Uninstall an applicatio...

Page 27: ...ginals placed on the exposure glass If you load a stack of originals in the ADF the ADF will automatically feed the originals one by one The ADF scans both sides of an original simultaneously 2 Exposure glass Place originals face down here 3 Control panel See page 41 Guide to the Names and Functions of the Machine s Control Panel When Using the Standard Operation Panel or page 44 Guide to the Name...

Page 28: ...matically moves to the right when paper there has run out 7 Lower front cover Open to change the waste toner bottle 8 Main power switch To operate the machine the main power switch must be on If it is off open the main power switch s cover and turn the switch on Front and right view DRC107 1 3 4 5 7 2 6 1 Attention light See page 28 Guide to Functions of the Attention Light 2 Getting Started 26 ...

Page 29: ... adhesive labels translucent paper and paper that cannot be loaded in the paper trays 6 Upper right cover Open this cover when a paper jam occurs 7 Vents Prevent overheating Rear and left view 1 DRC108 2 1 1 1 Vents Prevent overheating 2 Anti humidity heater switch Prevents trays from absorbing moisture If humidity is high and temperature is low turn this switch on to have moisture from the paper ...

Page 30: ...user by light when there is a paper jam or no paper is left The colors of the lamp and their meanings are as follows Lamp Status The bottom lamp lights blue Printing The bottom lamp flashes blue Scanning Data in The top lamp lights red Error occurred Example When the service call message appears Paper jam Out of paper Out of toner Memory overflow Read the message on the display panel and then take...

Page 31: ...e toner bottle is nearly full Paper has nearly run out 1 Read the message on the display panel and then take appropriate action For details see When Messages Appear Troubleshooting 1 When Low Paper Indicator Yellow Flashing is set to Active Guide to Names and Functions of Components 29 ...

Page 32: ...opied printed paper is delivered here face down 2 Smart Operation Panel This control panel is provided with advanced operativity 3 Multi bypass banner sheet tray Allows you to load paper that has a horizontal length of 487 8 mm 19 21 inches or longer in the bypass tray 4 Banner sheet guide tray Allows you to load paper that has a horizontal length of 487 8 mm 19 21 inches or longer in the bypass t...

Page 33: ...s copies or prints 13 Twin interposer Inserts cover or slip sheets into copied or printed paper 14 Multi folding unit The Multi folding unit can apply the following folds Half Fold Letter Fold out Letter Fold in Double Parallel Fold Gate Fold and Z fold 15 Interposer Inserts cover or slip sheets into copied or printed paper 16 Booklet Finisher SR5080 Sorts stacks and staples multiple sheets of pap...

Page 34: ...r SR4120 Sorts stacks and staples multiple sheets of paper Consists of the following paper trays Finisher upper tray Finisher shift tray Copies can be punched if the optional punch unit is installed on the finisher 23 Mailbox Sorts printed paper Consists of mailbox output trays 1 9 You cannot install multiple finishers simultaneously To use the twin interposer Finisher SR5070 or Booklet Finisher S...

Page 35: ...R4130 with the cooling fan unit installed Depending on the image you are copying or printing prints might not stack properly If this happens suspend the job remove the prints and then restart the job 1 Press the Suspend Resume key near the paper outlet port DRB286 1 1 1 Suspend Resume key 2 Remove the stack of paper from the finisher shift tray DRB287 Guide to Functions of the Machine s Options 33...

Page 36: ...a print job when using the finisher Depending on the image you are printing prints might not stack properly If this happens suspend the job remove the prints and then restart the job 1 Press the Suspend Resume key DRC113 1 1 1 Suspend Resume key 2 Remove the stack of paper from the finisher shift tray DRC114 3 Press the Suspend Resume key to restart the print You can suspend printing only when the...

Page 37: ...sing paper whose size is other than A5 A6 B6 JIS or special paper attach the Z fold support tray 1 1 1 The back of the Z fold support tray 1 is embossed with 1 DPZ170 Z fold support tray 2 When the paper size is A5 A6 or B6 JIS attach the Z fold support tray 2 2 2 The back of the Z fold support tray 2 is embossed with 2 CNM016 Finisher shift tray Only when using Booklet Finisher SR4130 1 If the fi...

Page 38: ...th 3 Z fold support tray 3 CNM015 Attach the Z fold support tray 3 by inserting the two protrusions on its underside into the holes on the finisher shift tray If the finisher is installed with the cooling fan unit proceed to Step 4 4 Press the Suspend Resume key Multi folding unit 1 Open the front cover of the multi folding unit and take out the Z fold support tray for multi folding unit located a...

Page 39: ...ront cover of the multi folding unit and re attach the tray to its stowage hook When using the Z fold function with Finisher SR5070 or Booklet Finisher SR5080 and Multi folding unit To use the Z fold function you must attach the Z fold support tray Finisher SR5070 and Booklet Finisher SR5080 Finisher shift tray Attach the Z fold support tray 1 by inserting the two protrusions on its underside into...

Page 40: ...tom of the multi folding unit CVF025 2 Attach the Z fold support tray for multi folding unit in the slope of the folding unit tray so that it is flush against the end fence CVF026 3 Close the front cover of multi folding unit When you have finished using the Z fold support tray for multi folding unit open the front cover of the multi folding unit and re attach the tray to its stowage hook 2 Gettin...

Page 41: ... to the finisher shift tray 1 The back of the thin paper support tray is embossed with 4 1 Press the Suspend Resume key 2 Remove the stack of paper from the finisher shift tray 3 Pull the extender of the finisher shift tray out DRC121 4 Attach the thin paper support tray by setting its protrusions onto the back fence of the finisher shift tray DRC122 5 Press the Suspend Resume key to restart the p...

Page 42: ...DRB285 1 1 Guide covers Do not hit the finisher for instance do not hit the surface of the finisher repeatedly to arrange stacks of paper neatly 2 Getting Started 40 ...

Page 43: ...ay panel Displays keys for each function operation status or messages See page 47 How to Use the Home Screen When Using the Standard Operation Panel and page 47 How to Use the Home Screen When Using the Standard Operation Panel 2 Reset key Press to clear the current settings Guide to the Names and Functions of the Machine s Control Panel When Using the Standard Operation Panel 41 ...

Page 44: ... Saver key flashes slowly 7 Login Logout key Press to log in or log out 8 User Tools key Press to change the default settings to meet your requirements See Accessing User Tools Connecting the Machine System Settings You can find out where to order expendable supplies and where to call when a malfunction occurs You can also print these details See Checking Inquiry using the User Tools Maintenance a...

Page 45: ...el Getting Started 20 Data In indicator printer mode Flashes when the machine is receiving print jobs from a computer See Print 21 Check Status key Press to check the machine s system status operational status of each function and current jobs You can also display the job history and the machine s maintenance information 22 Home key Press to display the Home screen For details see page 47 How to U...

Page 46: ...eration Panel 2 Main power indicator The main power indicator goes on when you turn on the main power switch When the machine is in Sleep mode the main power indicator flashes slowly In Low Power mode or Fusing Unit Off mode the main power indicator is lit 3 Status indicator Indicates the status of the system Stays lit when an error occurs or the toner runs out 4 Data In indicator printer mode Fla...

Page 47: ...andard Operation Panel You can change the language used on the display English is set as default 1 Press the Language key until the language you want to display appears CUV112 Changing the Display Language When Using the Standard Operation Panel 45 ...

Page 48: ...anel You can change the language used on the display English is set as default 1 Press Home at the bottom of the screen in the center 2 Press the Change Langs Widget icon on the Home screen 3 Select the language you want to display 4 Press OK 2 Getting Started 46 ...

Page 49: ...e Screen When Using the Standard Operation Panel 1 Press the Home key on the control panel If the Home screen does not appear press the icon at the upper right corner of the screen to switch to the menu screen CUV108 Function or shortcut icons will be displayed on the Home screen For details see page 48 How to Use the Top Screen and the Home Screen When Using the Standard Operation Panel To use a ...

Page 50: ...ons of each function are displayed on the Home screen You can add shortcuts to frequently used programs to the Home screen The program shortcuts appear on the Home screen The programs can be recalled easily by pressing the shortcuts To display the Home screen press the Home key If the Home screen does not appear press the icon at the upper right corner of the screen to switch to the menu screen To...

Page 51: ...to switch between the Home screen and the Top screen 6 Supplies Info Displays the information about supplies such as the remaining amount of toner 7 Tray Paper Settings Press to display the Tray Paper Settings screen 8 Tray Info Interposer Info Displays the status of the paper trays and the interposer 9 Job List Displays current and pending jobs 10 Home screen image You can display an image on the...

Page 52: ...t icon For details about examples of shortcuts that you can program see Example of programs when using the standard operation panel Convenient Functions 17 Address Book Management Press to display the Address Book For details about how to use the Address Book see Address Book Connecting the Machine System Settings When an embedded software application is installed a function icon for the applicati...

Page 53: ... a shortcut to a program to the Home screen when using the standard operation panel You can register up to 72 function and shortcut icons Delete unused icons if the limit is reached For details see Deleting an Icon on the Home Screen When Using the Standard Operation Panel Convenient Functions You can change the position of icons For details see Changing the Order of Icons on the Home Screen When ...

Page 54: ...sing the standard operation panel 1 Start Web Image Monitor For details see Using Web Image Monitor Connecting the Machine System Settings 2 Log in to Web Image Monitor 3 To add icons to the default Home screen point to Device Management and then click Device Home Management Proceed to Step 5 4 To add icons to a user s Home screen point to Customize Screen per User 5 Click Edit Icons 6 Point to Ic...

Page 55: ...1 Press the User Tools key CUV110 2 Press Edit Home 3 Press Add Icon How to Use the Home Screen When Using the Standard Operation Panel 53 ...

Page 56: ...4 Press the Program tab 5 Make sure that Copier Program is selected 6 Select the program you want to add 7 Specify the position where Blank is displayed 2 Getting Started 54 ...

Page 57: ...8 Press OK 9 Press the User Tools key Press on the upper right corner of the screen to check the position on the simple screen How to Use the Home Screen When Using the Standard Operation Panel 55 ...

Page 58: ...llowable is approx 30N approx 3 kgf N Newton kgf Kilogram force 1 kgf 9 8N To switch between screens flick your finger to the right or left on the screen DRC953 5 6 13 1 3 4 7 8 9 10 12 11 2 1 Logged in user icon When user authentication is enabled an icon is displayed that indicates that users are logged in Press the icon to show the names of the users that are currently logged in 2 System messag...

Page 59: ...this key is enabled or not in some applications For details about the settings see Screen Features Connecting the Machine System Settings 11 Media Information Press to remove the inserted SD card or USB flash memory device from the media slot For details see Removing an SD Card or Removing a USB Flash Memory Device Getting Started 12 Check Status Press to check the machine s system status operatio...

Page 60: ...n For details about how to use the copier function see Copy Document Server Scanner Press to display the scanner function s screen For details about how to use the scanner function see Scan Quick Copy Allows you to make settings simply by following the order of the keys left to right so you can make copies easily You can also use the major copy functions such as duplex and combined copying For det...

Page 61: ... your machine For details see How to Use Application Site Getting Started User Tools Press to display the screen for the machine s initial settings System Mes Widget Displays messages from the machine system and applications Change Langs Widget Allows you to change the on screen language Supply Info Widget Displays the remaining amount of toner Embedded software applications When an embedded softw...

Page 62: ...le tapping can also be effective for this operation DNE104 Flick Flick your finger to the right or left on the screen to switch between screens DNE102 Long tap Place your finger on the screen and hold it there until the next screen appears You can display the menu screen of the application you are using 2 Getting Started 60 ...

Page 63: ...and the embedded software applications after you delete them from the Home screen 1 Press Home at the bottom of the screen in the center 2 Press 3 Press the Apps tab to add a shortcut to an application other than the Classic Applications Press the Program tab to add a shortcut to one of the Classic Applications 4 Select the application to which to add a shortcut Other than Classic Applications Pre...

Page 64: ...he shortcut is to be placed on the Home screen is displayed 5 Drag the icon to where you want to place it on the screen 6 Select the bookmark you want to add from the bookmark list Adding shortcuts to programs to the Home screen when using the Smart Operation Panel You can add shortcuts to programs registered on Copier Scanner or quick applications 1 Press Home at the bottom of the screen in the c...

Page 65: ... display language 1 Press Home at the bottom of the screen in the center 2 Press 3 Press the Widget tab 4 Press and hold down the widget icon you want to add The image of where the widget is to be placed on the Home screen is displayed 5 Drag the icon to where you want to place it on the screen How to Use the Home Screen When Using the Smart Operation Panel 63 ...

Page 66: ...ation Screen Functions and settings that are used frequently are shown on the top screen Flick the screen up or down to select a setting item When you select an item the pull down menu appears or the setting item pops up For details about operations on this screen see page 59 Possible Operations on the Screen When Using the Smart Operation Panel For details about how to use the screen see Standard...

Page 67: ...ssic icon are displayed in the Application list For details about how to register them to the Home screen see page 61 Adding Icons to the Home Screen When Using the Smart Operation Panel Copy Screen When Using the Smart Operation Panel You can switch the two screens described in this section by flicking the screen up or down DRC966 7 2 3 4 5 6 1 No Icon Description 1 You can select a color mode 2 ...

Page 68: ... can adjust the density of the overall original in nine steps Specify the density by touching the icon and dragging it right or left DRC150 9 10 8 13 14 12 16 15 11 No Icon Description 8 You can combine two 1 sided originals or one 2 sided original to one side of a sheet The machine selects a reproduction ratio automatically and copies the originals onto a single sheet of copy paper 9 You can sort...

Page 69: ... single document To do this place several pages of the original in the ADF 15 You can specify the size of the original when copying custom size originals 16 You can find other settings Scanner Screen When Using the Smart Operation Panel DRC958 1 4 3 13 5 7 2 10 11 12 6 8 9 No Icon Description 1 Displays the type of scanner destination Press to switch between e mail destinations and folder destinat...

Page 70: ... destinations Register destinations to the Address Book Edit destinations Remove destinations from the destination list 4 Press to display the transmission results screen In the transmission results screen you can do the following Check sent jobs Check error descriptions Cancel transmission of a document in standby Print a list of transmission results 5 Press to clear your current settings 6 Press...

Page 71: ...the folder destination 12 The sections of the Address Book 13 Press to add a destination Destinations can be added as follows Input destinations manually Select from the transmission history Specify a registration number from the Address Book Search for a destination in the Address Book or on the LDAP server Send Settings screen when using the Smart Operation Panel You can switch the four screens ...

Page 72: ...side or both sides 5 Press to select the scanning size of the original 6 Press to specify a file name DRC960 7 8 9 10 11 No Icon Description 7 Press to specify the density to scan the original You can also specify the density by touching the icon and dragging it right or left 8 Press to select the orientation of the original 9 Press to specify the sender 10 Press to enter the subject of the e mail...

Page 73: ...n a large number of originals in several batches and send them together as a single job You can place multi page originals in the ADF 15 Press to scan a large number of originals in several batches and send them together as a single job Place the originals in the ADF one by one 16 Press to divide a multi page original into parts of a specified number of pages each and then send the documents 17 Pr...

Page 74: ...er scanning one side of the last page of a batch of two sided originals using the exposure glass press Change Setting and then press 1 Sided Original You can select this only if Batch or SADF is also selected 19 Press this to notify the sender that the e mail recipient has opened the e mail 2 Getting Started 72 ...

Page 75: ...signate Chapter Edit Stamp 2 Sided Book number of prints Scanner Scan Settings density Original Feed Type Send File Type Name except for Security Settings and Start No Store File except for User Name File Name and Password Preview Destinations selected from the Address Book Text Subject Security Recept Notice File Emailing Method This section explains how to register functions in a program using c...

Page 76: ...ed on See Changing the Default Functions of the Initial Screen Convenient Functions When the paper tray you specified in a program is empty and if there is more than one paper tray with the same size paper in it the paper tray prioritized under Paper Tray Priority Copier will be selected first For details see System Settings Connecting the Machine System Settings Destinations can be registered to ...

Page 77: ... can save paper and toner Dated confidential copy In Edit Color specify CONFIDENTIAL under Preset Stamp and Date Stamp You can increase security awareness by printing CONFIDENTIAL and the date on copies Conference material copy Specify Combine 2 Sides in Dup Combine Series and Staple in Finishing You can copy conference materials efficiently Magazine copy In Dup Combine Series specify Magazine und...

Page 78: ...ings In Send File Type Name select PDF under File Type and enter the business details such as London branch daily report under File Name You can scan documents efficiently High compression PDF scan Select Full Color Text Photo in Scan Settings In Send File Type Name specify PDF in File Type and also specify High Compression PDF in PDF File Setting You can compress the data size of scanned document...

Page 79: ...ned originals as a single job Scan to XXXX replace XXXX by a destination name Select e mail or folder destinations from the list that is registered in the machine s Address Book and then specify the scan settings If you register destinations and scan settings that you use often you can skip the procedures to specify them when sending a scanned file Storage scan XXXX replace XXXX by a folder name S...

Page 80: ...sity Paper Tray 2 Sided Combine Sort Stack Staple Punch Fold Original Size Original Type Batch Other Settings Scanner Destination Preview Send Settings Quick Applications Quick Copy Color mode Paper Tray Quantity Reduce Enlarge 2 Sided Combine Staple Punch Density Original Orientation Quick Scanner Destination Original Type File Type Resolution Original Orientation Original Sides Scan Size Preview...

Page 81: ...ner screen 2 Press Menu at the bottom of the screen in the center 3 Press Reg Current Setting to Progr 4 Press the program number you want to register 5 Enter the program name 6 Select the icon for the program You can select an image stored in the SD card 7 Press Prev Screen When using the quick application press Back 8 Press OK 9 Press Place Even if you select Do not Place you can add shortcuts t...

Page 82: ... characters When a specified program is registered as the default its values become the default settings which are displayed without recalling the program when modes are cleared or reset and after the machine is turned on See Changing the Default Functions of the Initial Screen Convenient Functions When the paper tray you specified in a program is empty and if there is more than one paper tray wit...

Page 83: ...ver mode cannot be registered to the Home screen Example of Programs When Using the Smart Operation Panel Copier Classic Program name Program description Effect Eco copy Specify Combine 2 Sides in Dup Combine Series You can save paper and toner Dated confidential copy In Edit Color specify CONFIDENTIAL under Preset Stamp and Date Stamp You can increase security awareness by printing CONFIDENTIAL a...

Page 84: ... Store File You can use folders to organize stored files by user name or intended use Scanner Classic Program name Program description Effect Easy PDF scan Select Full Color Text Photo in Scan Settings In Send File Type Name select PDF under File Type and enter the business details such as London branch daily report under File Name You can scan documents efficiently High compression PDF scan Selec...

Page 85: ...t the size of the data may be quite large Batch document scan Select Batch in Original Feed Type You can apply multiple scans to a large volume of originals and send the scanned originals as a single job Scan to XXXX replace XXXX by a destination name Select e mail or folder destinations from the list that is registered in the machine s Address Book and then specify the scan settings If you regist...

Page 86: ... Depending on your business details or the type of documents to be scanned registering a program cannot be recommended 2 Getting Started 84 ...

Page 87: ...switch only when necessary Confirm how much power the options draw and then plug them into an outlet that is nearby but separate from the outlet that the main machine is plugged into Turning On the Main Power 1 Make sure the power cord is firmly plugged into the wall outlet 2 Open the main power switch cover and push the main power switch The main power indicator goes on DRC126 Turning Off the Mai...

Page 88: ...damage the hard disk or memory and cause malfunctions 1 Open the main power switch cover and push the main power switch The main power indicator goes out The main power turns off automatically when the machine shuts down If the screen on the control panel does not disappear contact your service representative 2 Getting Started 86 ...

Page 89: ... out of it to prevent unauthorized usage Ask the user administrator for the Login User Name Login Password and User Code For details about user authentication see Configuring User Authentication Security Guide User Code to enter on User Code Authentication is the numerical value registered in the Address Book as User Code User Code Authentication Using the Control Panel If User Code Authentication...

Page 90: ...e Control Panel When Using the Smart Operation Panel This section explains the procedure for logging in to the machine when Basic Authentication Windows Authentication or LDAP Authentication is set 1 Press Login on the top right on the screen 2 Press User Name 3 Enter a Login User Name and then press Done 4 Press Password 5 Enter a Login Password and then press Done 6 Press Login 2 Getting Started...

Page 91: ... you have finished using the machine 1 Press the Login Logout key DRC133 2 Press Yes Logging Out Using the Control Panel When Using the Smart Operation Panel This section explains the procedure for logging out the machine when Basic Authentication Windows Authentication or LDAP Authentication is set To prevent use of the machine by unauthorized persons always log out when you have finished using t...

Page 92: ... 30 degrees Otherwise the size of the original might not be detected correctly 2 Place the original face down on the exposure glass The original should be aligned to the rear left corner Start with the first page to be scanned 1 1 DRC151 1 Positioning mark 3 Lower the ADF Placing Originals in the Auto Document Feeder Be sure not to load the original untidily Doing so may cause the machine to displ...

Page 93: ...uide 1 Adjust the original guide to the original size 2 Place the aligned originals squarely face up in the ADF Do not stack originals beyond the limit mark The first page should be on the top DRC168 1 1 Limit mark Placing Originals 91 ...

Page 94: ...2 Getting Started 92 ...

Page 95: ...ype in Tray Paper Settings according to the weight of the paper you are using For details see Changing Tray Paper Settings Paper Settings When using the standard operation panel For details about how to use this function see page 93 Basic Procedure Classic When using the Smart Operation Panel You can use this function from the Copy Application and Copier Classic Application When Using the Copy App...

Page 96: ...en there are previous settings remaining press the Reset key 3 Place the originals 4 Make desired settings 5 Enter the number of copies with the number keys The maximum copy quantity that can be entered is 9999 6 Press the Start key When placing the original on the exposure glass press the key after all originals are scanned Some functions such as Batch mode may require that you press the key when...

Page 97: ...ginal image by 90 degrees and fits it on the copy paper Rotate Copy For example to reduce A3 11 17 originals to fit onto A4 81 2 11 paper select a paper tray containing A4 81 2 11 paper and then press Auto Reduce Enlarge The image is automatically rotated For details about Rotate Copy see Rotate Copy Copy Document Server The original sizes and orientations you can use with this function are as fol...

Page 98: ...ocedure for Auto Reduce Enlarge Classic When using the Smart Operation Panel You can use this function from the Copy Application and Copier Classic Application When Using the Copy Application About how to use the application s screen see page 65 Copy Screen When Using the Smart Operation Panel When Using the Copier Classic Application For details about how to use the Classic Copier function see pa...

Page 99: ...2 Select the paper size 3 Place the originals and then press the Start key Auto Reduce Enlarge 97 ...

Page 100: ...ded page 2 Sided 2 Sided Copies one 2 sided page on one 2 sided page The resulting copy image will differ according to the orientation in which you place your originals or Original orientation and completed copies To copy on both sides of the paper select the original and copy orientation according to how you want the printout to appear Original Placing originals Original Orientation Orientation C...

Page 101: ...c When using the Smart Operation Panel You can use this function from the Copy Application and Copier Classic Application When Using the Copy Application About how to use the application s screen see page 65 Copy Screen When Using the Smart Operation Panel When Using the Copier Classic Application For details about how to use the Classic Copier function see page 100 Procedure for Duplex Copying Cl...

Page 102: ...To change the original or copy orientation press Orientation 4 Press Original Orientation 5 Select the original orientation and then press OK twice 6 Place the originals and then press the Start key Specifying the Original and Copy Orientation Select the orientation of the originals and copies if the original is two sided or if you want to copy onto both sides of the paper Top to Top 3 Copy 100 ...

Page 103: ...opy Application and Copier Classic Application When Using the Copy Application About how to use the application s screen see page 65 Copy Screen When Using the Smart Operation Panel When Using the Copier Classic Application For details about how to use the Classic Copier function see page 101 Procedure for specifying the original and copy orientation classic Procedure for specifying the original a...

Page 104: ...2 Select Top to Top or Top to Bottom for Original if the original is two sided 3 Select Top to Top or Top to Bottom for Copy 4 Press OK 3 Copy 102 ...

Page 105: ...age by 90 degrees to make copies properly Orientation of the original and image position of Combine The image position of Combine differs according to original orientation and the number of originals to be combined Portrait originals CKN015 Landscape originals CKN016 Placing originals originals placed in the ADF The default value for the copy order in the Combine function is From Left to Right To ...

Page 106: ...ne 1 Sided 2 Originals Combine 1 Side Copies two 1 sided originals to one side of a sheet 1 Sided 4 Originals Combine 1 Side Copies four 1 sided originals to one side of a sheet 1 Sided 8 Originals Combine 1 Side Copies eight 1 sided originals to one side of a sheet 2 Sided 2 Pages Combine 1 Side Copies one 2 sided original to one side of a sheet 3 Copy 104 ...

Page 107: ...n using the Smart Operation Panel You can use this function from the Copy Application and Copier Classic Application When Using the Copy Application About how to use the application s screen see page 65 Copy Screen When Using the Smart Operation Panel When Using the Copier Classic Application For details about how to use the Classic Copier function see page 105 Procedure for one sided combine clas...

Page 108: ...n press OK twice 8 Select the paper size 9 Place the originals and then press the Start key Two Sided Combine Combines various pages of originals onto two sides of one sheet CKN074 There are six types of Two Sided Combine 1 Sided 4 Originals Combine 2 Sides Copies four 1 sided originals to one sheet with 2 pages per side 1 Sided 8 Originals Combine 2 Sides Copies eight 1 sided originals to one she...

Page 109: ...pages per side When using the standard operation panel For details about how to use this function see page 108 Procedure for two sided combine classic When using the Smart Operation Panel You can use this function from the Copy Application and Copier Classic Application When Using the Copy Application About how to use the application s screen see page 65 Copy Screen When Using the Smart Operation ...

Page 110: ...ct Top to Top or Top to Bottom for Original if the original is two sided 7 Select Top to Top or Top to Bottom for Copy and then press OK 8 Under Combine specify the number of originals to be combined 9 Press Original Orientation 10 Select the original orientation and then press OK twice 11 Select the paper size 12 Place the originals and then press the Start key 3 Copy 108 ...

Page 111: ...r that has a horizontal length of 139 7 700 0 mm 5 50 27 55 inches When prints are delivered to the shift tray of Finisher SR5070 or Booklet Finisher SR5080 Horizontal length 139 7 487 7 mm 5 50 19 20 inches vertical length 139 7 330 2 mm 5 50 13 00 inches When the SR5000 series output tray for banner sheet is installed you can copy onto paper that has a horizontal length of 139 7 700 0 mm 5 50 27...

Page 112: ...rocedure for Copying onto Custom Size Paper Classic Procedure for Copying onto Custom Size Paper Classic 1 Load the paper face up in the bypass tray The bypass tray is automatically selected 2 Press the key 3 Press Paper Size 4 Press Custom Size 5 Enter the horizontal size with the number keys and then press 6 Enter the vertical size with the number keys and then press 7 Press OK twice 8 Place the...

Page 113: ... and how to load envelopes see Paper Specifications and Adding Paper for details The Duplex function cannot be used with envelopes If the Duplex function is specified press 1 sided 2 sided TtoT to cancel the setting To copy onto custom size envelopes you must specify the envelope s dimensions Specify the horizontal and vertical length of the envelope CJF005 Horizontal Vertical Be sure to include t...

Page 114: ...ocedure for Copying onto Envelopes from the Bypass Tray Classic 1 Load the envelopes face up in the bypass tray The bypass tray is automatically selected 2 Press the key 3 Press Paper Size 4 Specify the envelope size and then press OK 5 Press Paper Type 6 Select Envelope 7 Press OK twice 8 Place the originals and then press the Start key Procedure for Copying onto Envelopes from the Paper Tray or ...

Page 115: ...1 Select the paper tray where the envelopes are loaded 2 Place the originals and then press the Start key Copying onto Envelopes 113 ...

Page 116: ...set or a job are delivered the next copy is shifted to separate each set or job CKN018 Rotate Sort Every other copy set is rotated by 90 degrees and delivered to the copy tray CKN019 To use the Rotate Sort function two paper trays loaded with paper of the same size and type but in different orientation are required For details see Changing Tray Paper Settings Paper Settings When using the standard...

Page 117: ...ration Panel When Using the Copier Classic Application For details about how to use the Classic Copier function see page 115 Procedure for Sort Classic Procedure for Sort Classic 1 Press Finishing 2 Press Finisher 3 Select Sort or Rotate Sort and then press OK 4 Enter the number of copy sets using the number keys Sort 115 ...

Page 118: ... changing the number of sets classic When using the Smart Operation Panel You can use this function from the Copy Application and Copier Classic Application When Using the Copy Application About how to use the application s screen see page 65 Copy Screen When Using the Smart Operation Panel When Using the Copier Classic Application For details about how to use the Classic Copier function see page ...

Page 119: ...2 Enter the number of copy sets with the number keys 3 Press Continue Copying starts again Sort 117 ...

Page 120: ...nt Server screen For details about the Document Server see page 157 Storing Data 1 Press Store File 2 Enter a user name file name or password if necessary 3 Specify a folder in which to store the document if necessary 4 Press OK 5 Place the originals 6 Make the scanning settings for the original 7 Press the Start key Stores scanned originals in memory and makes one set of copies If you want to sto...

Page 121: ...p member 1 Click Quick Install on the installer screen 2 The software license agreement appears in the License Agreement dialog box After reading the agreement click I accept the agreement and then click Next 3 Click Next 4 Select the machine model you want to use in the Select Printer dialog box 5 Click Install 6 When the port setting screen appears specify a port 7 Configure the user code defaul...

Page 122: ...equired to change the printer settings Log on as an Administrators group member You cannot change the machine default settings for individual users Settings made in the printer properties dialog box are applied to all users 1 On the Start menu click Devices and Printers 2 Right click the icon of the printer you want to use 3 Click Printer properties 4 Print 120 ...

Page 123: ...In the Job Type list select Normal Print 6 In the Document Size list select the size of the original to be printed 7 In the Orientation area select Portrait or Landscape as the orientation of the original 8 In the Input Tray list select the paper tray that contains the paper you want to print onto If you select Auto Tray Select in the Input Tray list the paper tray is automatically selected accord...

Page 124: ... button of the application you are using and then click Print 2 Select the printer you want to use 3 Click Preferences 4 Click the Frequently Used Settings tab You can also click the Detailed Settings tab and then click 2 Sided Layout Booklet in the Menu box 5 Select the method for binding the output pages in the 2 sided list 6 Change any other print settings if necessary 7 Click OK 8 Start printi...

Page 125: ...ecify the method for combining pages in the Page Order list To draw a border line around each page select the Draw Frame Border check box in 2 Sided Layout Booklet in the Detailed Settings tab 6 Change any other print settings if necessary 7 Click OK 8 Start printing from the application s Print dialog box Types of Combine Printing This function allows you to print 2 4 6 9 or 16 pages at reduced s...

Page 126: ...Orientation From Left to Right Top to Bottom From Right to Left Top to Bottom Landscape 4 Pages per Sheet Right then Down Down then Right Left then Down Down then Left 4 Print 124 ...

Page 127: ...n using the Smart Operation Panel 1 Press Home at the bottom of the screen in the center 2 Press the User Tools icon on the Home screen 3 Press Tray Paper Settings 3 Select the paper tray in which the envelopes are loaded 4 Press Manual Paper Settings 5 Press Envelope in the Paper Type area and then select the appropriate item in the Paper Thickness area 6 Press the Paper Size tab 7 Select the env...

Page 128: ... Registering a Custom Paper Paper Settings When using the PCL 6 printer driver 1 Click the menu button of the application you are using and then click Print 2 Select the printer you want to use 3 Click Preferences 4 In the Document Size list select the envelope size 5 In the Input Tray list select the paper tray where the envelopes are loaded 6 In the Paper Type list select Envelope 7 Change any o...

Page 129: ...of stored pages in the machine and the sent data has reached 15 000 It may be fewer depending on the print data The hard disk is full Data stored in the Document Server is specified to be deleted after three days 72 hours by the factory default We recommend you back up the data You can send data created on a client computer to the Document Server Storing Documents in Document Server If the machine...

Page 130: ...the application s Print dialog box You can print the documents stored in the Document Server using the control panel For details see Printing Stored Documents Copy Document Server Managing Documents Stored in Document Server You can view or delete the documents stored in the machine s Document Server using Web Image Monitor from a client computer connected to the network 4 Print 128 ...

Page 131: ...the Home screen 3 Select the user as required 4 If necessary enter the password for the documents The list of both the documents that have not password specified and that matches the entered password is displayed 5 Select documents More than one document can be selected at one time You can perform the following operations on the selected documents Delete Deletes the selected documents Preview Show...

Page 132: ...Storage Device function JPEG TIFF PDF and XPS The scanned data can be saved in JPEG TIFF or PDF format Printing a file in a memory storage device 1 Press Home at the bottom of the screen in the center 2 Press the Print Scan Memory Storage Device icon on the Home screen 3 Press Print from Storage Device 4 Insert a memory storage device in the media slot For details about how to insert a memory stor...

Page 133: ...pecify the location to save the scanned data 7 Place the original 8 If necessary press Scan Settings to change the settings such as the file type or scan resolution 9 To see the scanned image before saving it to a file press Preview 10 Press Start 11 When the confirmation screen appears press Finish Scan after scanning of the original has been completed If there are more originals to be scanned pl...

Page 134: ...sion date and time YYYYMMDDHHMMSSMMM extension tif jpg pdf For example when you send 10 page original in PDF format at 15 30 15 5 on Dec 31 2020 the file name is 20201231153015500 pdf When you save scanned data to a memory storage device use characters which correspond to the ASCII codes for the file name If you use characters which is not correspond to the ASCII codes the machine may not read or ...

Page 135: ...panel For details about how to use this function see page 133 Basic Procedure When Using Scan to Folder Classic When using the Smart Operation Panel You can use this function from the Scanner Application and Scanner Classic Application When Using the Scanner Application About how to use the application s screen see page 67 Scanner Screen When Using the Smart Operation Panel When Using the Scanner ...

Page 136: ...ettings remain If a previous setting remains press the Reset key 3 Press the Folder tab 4 Place originals 5 If necessary specify the scan settings according to the original to be scanned Example Scanning the document in color duplex mode and saving as a PDF file Press Scan Settings press Full Color Text Photo in the Original Type tab and then press OK Press Original Feed Type press 2 Sided Origina...

Page 137: ...firm the name of the computer The computer s name is displayed under Host Name You can also confirm the IPv4 address The address displayed under IPv4 Address is the IPv4 address of the computer 4 Enter the command set user and then press the Enter key Be sure to put a space between set and user 5 Confirm the user name The user name is displayed under USERNAME Step 2 Creating a shared folder on a c...

Page 138: ...missions list select either the Full Control or Change check box Configure the access permissions for each group and user 13 Click OK Step 3 Specifying access privileges for the created shared folder If you want to specify access privileges for the created folder to allow other users or groups to access the folder configure the folder as follows 1 Right click the folder created in Step 2 and then ...

Page 139: ...gement icon on the Home screen 2 Check that Program Change is selected 3 Press New Program 4 Press Change under Name The name entry display appears 5 Enter the name and then press OK 6 Press Next 7 Press the key for the classification you want to use under Select Title The keys you can select are as follows Frequent Added to the page that is displayed first AB CD EF GH IJK LMN OPQ RST UVW XYZ 1 to...

Page 140: ...d 13 Enter the password of the destination computer and then press OK 14 Enter the password again to confirm and then press OK 15 Press Folder 16 Check that SMB is selected 17 Press Change or Browse Network and then specify the folder To specify a folder you can either enter the path manually or locate the folder by browsing the network For details about how to specify the path manually see page 1...

Page 141: ...the name of the destination computer is User and the folder name is Share the path will be User Share If the network does not allow automatic obtaining of IP addresses include the destination computer s IP address in the path For example if the IP address of the destination computer is 192 168 0 191 and the folder name is Share the path will be 192 168 0 191 Share 3 Press OK If the format of the e...

Page 142: ... Press the Home key on the lower left of the control panel 2 Press the Address Book Management icon on the Home screen When using the Smart Operation Panel 1 Press Home at the bottom of the screen in the center 2 Press the Address Book Management icon on the Home screen 2 Check that Program Change is selected 3 Select the name whose folder you want to delete Press the name key or enter the registe...

Page 143: ...tion see page 142 Procedure for entering the path to the destination manually classic When using the Smart Operation Panel You can use this function from the Scanner Application and Scanner Classic Application When Using the Scanner Application About how to use the application s screen see page 67 Scanner Screen When Using the Smart Operation Panel When Using the Scanner Classic Application For de...

Page 144: ...o the computer Press Manual Entry to the right of the user name field to display the soft keyboard 7 Press OK 8 Depending on the destination setting enter the password for logging in to the computer Press Manual Entry for the password to display the soft keyboard 9 Press OK 10 Press Connection Test A connection test is performed to check whether the specified shared folder exists If the message Co...

Page 145: ...sing the Scanner Application About how to use the application s screen see page 67 Scanner Screen When Using the Smart Operation Panel When Using the Scanner Classic Application For details about how to use the Classic Scanner function see page 143 Basic Procedure for Sending Scan Files by E mail Classic Basic Procedure for Sending Scan Files by E mail Classic 1 Display the initial scanner screen ...

Page 146: ...main If a previous setting remains press the Reset key 3 Make sure that the Email tab is selected 4 Place originals 5 If necessary specify the scan settings according to the original to be scanned Example Scanning the document in color duplex mode and saving as a PDF file Press Scan Settings press Full Color Text Photo in the Original Type tab and then press OK Press Original Feed Type press 2 Sid...

Page 147: ...ceive e mail notification when the e mail recipient has opened the e mail 9 Press the Start key Registering an E mail Destination 1 Display the Address Book Management screen When using the standard operation panel 1 Press the Home key on the lower left of the control panel 1 Press the Address Book Management icon on the Home screen When using the Smart Operation Panel 1 Press Home at the bottom o...

Page 148: ... first AB CD EF GH IJK LMN OPQ RST UVW XYZ 1 to 10 Added to the list of items in the selected title You can select Frequent and one more key for each title 8 Press Email 9 Press Change under Email Address 10 Enter the e mail address and then press OK 11 If you want to use Internet fax specify whether or not to use Send via SMTP Server 12 Press OK 5 Scan 146 ...

Page 149: ...e bottom of the screen in the center 2 Press the Address Book Management icon on the Home screen 2 Check that Program Change is selected 3 Select the name whose e mail address you want to delete Press the name key or enter the registered number using the number keys You can search by the registered name user code folder name or e mail address 4 Press Email 5 Press Change under Email Address 6 Pres...

Page 150: ...ation and Scanner Classic Application When Using the Scanner Application About how to use the application s screen see page 67 Scanner Screen When Using the Smart Operation Panel When Using the Scanner Classic Application For details about how to use the Classic Scanner function see page 148 Procedure for entering an e mail address manually classic Procedure for entering an e mail address manually...

Page 151: ...oss of files 1 Display the initial scanner screen When using the standard operation panel 1 Press the Home key on the control panel CUV108 2 Press the Scanner icon on the screen If the Scanner icon does not appear press the icon at the upper right corner of the screen to switch to the menu screen When using the Smart Operation Panel 1 Press Home at the bottom of the screen in the center 2 Press th...

Page 152: ...a file name and then press OK Password Press Password enter a password and then press OK Re enter the password for confirmation and then press OK Select Folder Press Select Folder specify the folder in which to save the stored files and then press OK 7 Press OK 8 If necessary press Scan Settings to specify scanner settings such as resolution and scan size For details see Scan Settings Scan 9 Press...

Page 153: ...ed 3 From the list of stored files select the file you want to check You can select more than one file For details about searching the stored document by user or document name see Searching by user name and Searching by file name Scan 4 Press Preview Basic Procedure for Storing Scan File 151 ...

Page 154: ...ultiple originals scanned pages are combined and sent as a single file Selectable file types differ depending on the scan settings and other conditions For details about file types see Notes about and limitations of file types Scan When using the standard operation panel For details about how to use this function see page 153 Procedure for Specifying the File Type Classic When using the Smart Oper...

Page 155: ...ocedure for Specifying the File Type Classic 1 Press Send File Type Name 2 Select a file type If the File Type is set to PDF configure PDF File Setting as required 3 Press OK Specifying the File Type 153 ...

Page 156: ... the Scanner Application About how to use the application s screen see page 67 Scanner Screen When Using the Smart Operation Panel When Using the Scanner Classic Application For details about how to use the Classic Scanner function see page 154 Procedure for Specifying Scan Settings Classic Procedure for Specifying Scan Settings Classic 1 Press Scan Settings 2 Specify resolution scan size and othe...

Page 157: ...3 Press OK Specifying Scan Settings 155 ...

Page 158: ...5 Scan 156 ...

Page 159: ...operations are ended File Name A file name such as COPY0001 and COPY0002 is automatically attached to the scanned document You can change the file name User Name You can register a user name to identify the user or user group that stored the documents To assign it select the user name registered in the Address Book or enter the name directly Depending on the security setting Access Privileges may ...

Page 160: ...en press OK The user names shown are names that were registered in the Address Book To specify a name not shown in the screen press Manual Entry and then enter a user name 7 Press File Name 8 Enter a file name and then press OK 9 Press Password 10 Enter a password with the number keys and then press OK You can use four to eight digits for the password 11 For double check enter the password again a...

Page 161: ...Print 2 Sided Top to Top 2 Sided Top to Bottom Specify Duplex Pages Booklet Magazine For details about each function see the each section 1 Select a folder 2 Select a document to be printed 3 When printing two or more documents at a time repeat Step 2 Up to 30 documents can be printed 4 When specifying printing conditions press To Printing Screen and then configure print settings 5 Enter the numbe...

Page 162: ...6 Document Server 160 ...

Page 163: ...age of Web Image Monitor appears If the machine s host name has been registered on the DNS or WINS server you can enter it When setting SSL a protocol for encrypted communication under environment which server authentication is issued enter https machine s IP address or host name Web Image Monitor is divided into the following areas 5 4 3 2 1 DRC715 1 Menu area If you select a menu item its conten...

Page 164: ...e Help to view or download Help file contents 4 Basic Information area Display the basic information of the machine 5 Work area Display the contents of the item selected in the menu area 7 Web Image Monitor 162 ...

Page 165: ...nto the paper tray for the first time or when you change the size or type of paper in the paper tray be sure to specify the appropriate paper settings in Tray Paper Settings For details see Changing Tray Paper Settings Paper Settings For details about the paper sizes and types that can be used see page 189 Recommended Paper Sizes and Types You might at times hear a rustling noise from paper moving...

Page 166: ...osen the stack by riffling the sheets CVA068 2 Holding its shorter ends flex the stack back and forth to create space between the sheets Repeat this several times CVA069 CVA070 8 Adding Paper and Toner 164 ...

Page 167: ...tive mainly North America Tray 1 can hold 81 2 11 paper only If you want to print on A4 from Tray 1 contact your service representative When paper loaded in the right side of Tray 1 runs out paper on the left is automatically shifted to the right Do not pull out Tray 1 while the tray is moving paper wait until sounds stop coming from the tray For the right stack align the right edge of the paper w...

Page 168: ...e down Do not stack paper over the limit mark Whole tray pulled out DRC156 Left half of the tray pulled out DRC157 3 Carefully push the paper tray fully in You can load paper even if Tray 1 is in use It is okay to pull out the left half of the tray while Tray 1 is in use 8 Adding Paper and Toner 166 ...

Page 169: ... hold 11 17 paper only If you want to print on A3 A4 B4 JIS 81 2 14 or 81 2 11 contact your service representative Check that the paper edges are aligned at the right side 1 Check that paper in the paper tray is not being used and then pull the tray carefully out until it stops CVA004 2 Square the paper and load it print side down Do not stack paper over the limit mark CVA005 3 Carefully push the ...

Page 170: ... at the right side If a paper tray is pushed vigorously when putting it back into place the position of the tray s side fences may slip out of place When loading a low number of sheets be sure not to squeeze the side fences in too tightly If the side fences are squeezed too tightly against the paper the edges may crease the paper may misfeed or if it weighs between 52 3 65 9 g m2 14 0 17 9 lb Bond...

Page 171: ...essing down the release lever of the side fence slide the side fences outward DRC258 6 While pinching the release lever of the end fence slide the end fence outward DRC259 7 Square the paper and load it print side down Do not stack paper over the limit mark Loading Paper 169 ...

Page 172: ...and side fences gently against the paper you loaded Make sure that there is no space between the paper and the side fences or end fence DRC261 9 Turn the screws slowly to fasten it in place DRC262 8 Adding Paper and Toner 170 ...

Page 173: ... the correct orientation For details see page 205 Envelopes Loading tab stock into Trays 2 and 3 When loading tab stock always use the tab sheet holder DRC253 Load tab stock so that the side with the tab faces the tab sheet holder When loading tab stock adjust the end fence position so that the tab sheet holder will fit the tab stock Loading Paper 171 ...

Page 174: ... back side of the place indicated by the label of the banner sheet guide tray Otherwise your fingers might be caught resulting in injury The maximum number of sheets you can load at the same time depends on paper type Do not stack paper over the limit mark For the maximum number of sheets you can load see page 189 Recommended Paper Sizes and Types 1 Open the bypass tray DRB168 2 Pull the extender ...

Page 175: ...ides and align the paper guides to the paper size If the guides are not flush against the paper images might be skewed or paper misfeeds might occur DRB169 6 While holding the paper guides with your hands lock both of the paper guides again Make sure that the total of the gaps between the paper and the front and rear paper guides does not exceed 0 75 mm 0 03 inches DRB158 Loading Paper 173 ...

Page 176: ...s that can be detected automatically see page 189 Recommended Paper Sizes and Types For details about how to specify sizes see Copying from the Bypass Tray Copy Document Server When copying from the bypass tray see Copying from the Bypass Tray Copy Document Server To load paper whose horizontal length is longer than 487 7 mm 19 20 inches the multi bypass banner sheet tray or banner sheet guide tra...

Page 177: ...rt the paper print side up as far as it will go into the machine 6 Put your fingers on the dimples on the front and rear paper guides and align the paper guides to the paper size If the guides are not flush against the paper images might be skewed or paper misfeeds might occur DRB184 Loading Paper 175 ...

Page 178: ...s not exceed 0 75 mm 0 03 inches Closing the multi bypass banner sheet tray 1 Lightly pull up the extender and then fold it into the machine DRB185 2 Raise the multi bypass banner sheet tray towards the machine until it clicks and then tilt it to the opposite side DRB186 1 2 3 Push the multi bypass banner sheet tray into its original position DRB187 8 Adding Paper and Toner 176 ...

Page 179: ...tative mainly North America The LCT can hold 81 2 11 paper only If you want to print on A4 or B5 JIS from the LCT contact your service representative The extension unit is required to load A4 B4 JIS 81 2 14 or 81 2 11 Check that the paper edges are aligned at the left side 1 Check that paper in the paper tray is not being used and then open the top cover of the LCT CVA023 2 Load paper into the pap...

Page 180: ...and 3 5 Close the top cover of the LCT Loading Paper into the Wide Large Capacity Tray Various sizes of paper can be loaded in the wide LCT by adjusting the positions of side fences and end fence You can change paper sizes as shown below Check that the paper edges are aligned with the left side 8 Adding Paper and Toner 178 ...

Page 181: ...tray carefully out until it stops DRC170 2 Remove paper if loaded 3 Loosen the screws holding the side fences in position DRC182 4 Hold the indents at the bottom of the side fences with your fingers and then slide the side fences outward DRC183 1 1 Indents Loading Paper 179 ...

Page 182: ...re that the paper rest on top of the supporting plates on both sides Set the paper flush against the left fence and align the paper edges 1 1 DRC185 1 Supporting plate 7 Hold the indents at the bottom of the side fences with your fingers and adjust the side fences to the paper size Set the paper flush against the protrusions in the bottom of the inner side fence Make sure that there is no space be...

Page 183: ...ding regular size paper align the screw holes on the side fences to the paper size mark DRC190 8 Hold the inner side fence and then tighten the screws to the inner side fence Fasten the front side fence in the same way DRC187 9 Load additional sheets if necessary Do not stack paper over the limit mark Loading Paper 181 ...

Page 184: ...eight 6 to 9 Coated Paper High Gloss Coated Glossy Coated Matte Label Paper or Transparency in Tray Paper Settings air is blown out automatically to fan the paper loaded in the wide LCT Fan this paper before loading it For details see page 163 Fanning the paper You can load envelopes in the wide LCT When loading envelopes place them in the correct orientation For details see page 205 Envelopes Loa...

Page 185: ...oad paper orderly Do not stack paper over the limit mark DRC172 2 Adjust the side fences to the paper size DRC173 Load paper with its printed side up the front side Load paper in the interposer in the same orientation as paper in the paper tray The staple position or punch hole position will be on the left side of the paper when you are facing the machine To load the paper in the interposer align ...

Page 186: ...rectly scanned or paper jams 1 While pressing the release lever align the side fences with the paper size to be loaded CVA032 2 Load paper orderly Do not stack paper over the limit mark Align the side fences gently against the paper you loaded if necessary CVA033 1 1 1 Paper extenders Load paper with its printed side up the front side 8 Adding Paper and Toner 184 ...

Page 187: ... paper for example letterhead paper punched paper or copied paper might not be printed correctly depending on how the originals and paper are placed Settings for the User Tools Copier mode Specify Yes for Letterhead Setting in Input Output under the Copier Document Server Features menu and then place the original and paper as shown below Printer mode Specify Auto Detect or On Always for Letterhead...

Page 188: ... face up Place or load paper scanned or printed side face down Original orientation Original orientation Exposure glass ADF Readable Direction 90 Degrees Counterclockwise Copy Scanner 180 degrees 90 Degrees Clockwise Copy Scanner 8 Adding Paper and Toner 186 ...

Page 189: ...3 LCT Bypass tray or wide LCT One sided Two sided In copier mode For details about how to make two sided copies see Duplex Copying Copy Document Server In printer mode To print on letterhead paper when Auto Detect is specified for Letterhead Setting you must specify Letterhead as the paper type in the printer driver s settings Loading Paper 187 ...

Page 190: ...ferent direction To ensure all paper is output facing the same direction specify different input trays for one sided and two sided printing Note also that two sided printing must be disabled for the tray specified for one sided printing For details about how to make two sided prints see Printing on Both Sides of Sheets Print 8 Adding Paper and Toner 188 ...

Page 191: ...eets and place them correctly or a misfeed might occur Tray 1 Paper type and weight Paper size Paper capacity 52 3 300 0 g m2 14 0 lb Bond 165 0 lb Index Paper Weight 1 Paper Weight 8 A4 81 2 11 1 250 sheets 2 52 3 300 0 g m2 14 0 lb Bond 165 0 lb Index Paper Weight 1 Paper Weight 8 1 81 2 11 A4 1 250 sheets 2 1 To load paper any of the sizes specified above contact your service representative Tra...

Page 192: ...es Horizontal 8 27 17 28 inches 1 000 sheets 1 To load paper any of the sizes specified above contact your service representative 2 For details about how to load custom size paper contact your service representative Trays 2 and 3 Feed Roller Unit Paper type and weight Paper size Paper capacity 52 3 300 0 g m2 14 0 lb Bond 165 0 lb Index Paper Weight 1 Paper Weight 8 Paper sizes that can be detecte...

Page 193: ...1 2 13 81 2 11 81 4 14 81 4 13 8 13 8 10 71 4 101 2 51 2 81 2 8K 16K 12 18 11 15 11 14 10 15 10 14 13 191 5 123 5 191 5 123 5 181 2 13 18 SRA4 226 310 mm 310 432 mm 81 2 132 5 A3 A4 A5 A6 B4 JIS B5 JIS B6 JIS 81 2 13 81 4 14 81 4 13 8 13 8 10 71 4 101 2 51 2 81 2 8K 16K 11 15 11 14 10 15 10 14 13 191 5 123 5 191 5 123 5 181 2 13 18 SRA3 SRA4 226 310 mm 310 432 mm 81 2 132 5 550 sheets Recommended ...

Page 194: ...2 C5 Env C6 Env DL Env 50 sheets Double flap 15 sheets Single flap 25 sheets 1 For details about how to load custom size paper contact your service representative 2 The tab sheet holder is required Bypass tray Paper type and weight Paper size Paper capacity 52 3 360 0 g m2 14 0 Bond 198 0 lb Index Paper Weight 1 Paper Weight 9 Paper sizes that can be detected automatically A3 A4 A5 A6 B4 JIS B5 JI...

Page 195: ...3 191 5 123 5 191 5 123 5 181 2 13 18 SRA4 226 310 mm 310 432 mm 81 2 132 5 41 5 51 2 A3 A4 A5 A6 B4 JIS B5 JIS B6 JIS 81 2 14 81 2 13 81 4 14 81 4 13 8 13 8 10 71 4 101 2 11 15 11 14 10 15 10 14 13 191 5 123 5 191 5 123 5 181 2 13 18 SRA4 226 310 mm 310 432 mm 81 2 132 5 41 5 51 2 250 sheets Paper Weight 5 100 sheets Paper Weight 6 Paper Weight 7 50 sheets Paper Weight 8 40 sheets Paper Weight 9 ...

Page 196: ... 11 50 sheets Envelopes 1 5 41 8 91 2 37 8 71 2 C5 Env C6 Env DL Env 20 sheets Double flap 7 sheets Single flap 10 sheets 1 Select the paper size For details see Changing Tray Paper Settings Paper Settings 2 Enter the paper size For details see Changing Tray Paper Settings Paper Settings 3 When the multi bypass banner sheet tray or the banner sheet guide tray is installed available paper length is...

Page 197: ...f the sizes specified above contact your service representative Extension unit Paper type and weight Paper size Paper capacity 52 3 216 0 g m2 14 0 lb Bond 79 9 lb Cover Paper Weight 1 Paper Weight 6 A4 81 2 11 2 500 sheets 52 3 216 0 g m2 14 0 lb Bond 79 9 lb Cover Paper Weight 1 Paper Weight 6 1 A4 B4 JIS B5 JIS 81 2 14 81 2 11 A4 B4 JIS B5 JIS 81 2 14 81 2 11 2 500 sheets 1 To load paper any of...

Page 198: ...0 g m2 14 0 lb Bond 198 0 lb Index Paper Weight 1 Paper Weight 9 Paper sizes that can be detected automatically A3 A4 A5 B4 JIS B5 JIS 11 17 81 2 11 8 13 51 2 81 2 SRA3 A3 A4 A5 B4 JIS B5 JIS 11 17 81 2 11 8 13 51 2 81 2 12 18 2 200 sheets 8 Adding Paper and Toner 196 ...

Page 199: ... 13 81 2 11 81 4 14 81 4 13 71 4 101 2 51 2 81 2 8K 16K 12 18 11 15 11 14 10 15 10 14 13 191 5 13 19 123 5 191 5 123 5 181 2 13 18 SRA4 226 310 mm 310 432 mm 81 2 132 5 41 5 51 2 1 A4 A5 A6 1 B5 JIS B6 JIS 1 81 2 14 81 2 13 81 4 14 81 4 13 71 4 101 2 8K 16K 11 15 11 14 10 15 10 14 13 191 5 13 19 123 5 191 5 123 5 181 2 13 18 SRA3 SRA4 226 310 mm 310 432 mm 81 2 132 5 41 5 51 2 2 200 sheets Recomme...

Page 200: ...els A4 B4 JIS 20 sheet Tab stock 2 52 3 360 0 g m2 14 0 lb Bond 198 0 lb Index A4 81 2 14 81 2 11 1 000 sheets Envelopes 3 Select the paper size using the Tray Paper Settings menu 41 8 91 2 1 C5 Env C6 Env 1 DL Env 1 10 sheets 1 The postcard side fences are required to load paper that is between 100 0 and 139 2 mm 3 94 and 5 48 inches 2 The tab sheet fence is required 3 Available paper sizes diffe...

Page 201: ...cally A3 A4 A5 B4 JIS B5 JIS 81 2 13 8K 16K A3 A4 B5 JIS 11 17 81 2 14 81 2 11 71 4 101 2 51 2 81 2 10 14 81 2 132 5 200 sheets 64 0 216 0 g m2 17 1 lb Bond 79 9 lb Cover Paper Weight 1 Paper Weight 6 1 11 17 81 2 11 81 4 13 8 13 12 18 81 2 13 71 4 101 2 12 18 200 sheets 1 If you want to make these sizes detectable contact your service representative Recommended Paper 199 ...

Page 202: ...216 0 g m2 17 1 lb Bond 79 9 lb Cover Paper Weight 1 Paper Weight 6 Paper sizes that can be detected automatically A3 A4 A5 B4 JIS B5 JIS 11 17 81 2 11 8 13 51 2 81 2 SRA3 A3 A4 A5 B4 JIS B5 JIS 11 17 81 2 11 8 13 51 2 81 2 12 18 240 sheets 2 8 Adding Paper and Toner 200 ...

Page 203: ... 5 13 19 123 5 191 5 123 5 181 2 13 18 226 310 mm 310 432 mm SRA4 81 2 132 5 A4 A5 B5 JIS 81 2 14 81 2 13 81 4 14 81 4 13 71 4 101 2 8K 16K 11 15 11 14 10 15 10 14 13 191 5 13 19 123 5 191 5 123 5 181 2 13 18 SRA3 SRA4 226 310 mm 310 432 mm 81 2 132 5 240 sheets 2 64 0 216 0 g m2 17 1 lb Bond 79 9 lb Cover Paper Weight 1 Paper Weight 6 Custom size Vertical 139 7 330 2 mm Horizontal 139 7 487 7 mm ...

Page 204: ...nd 94 1 110 0 lb Cover 141 1 165 0 lb Index Paper Weight 9 300 1 360 0 g m2 80 1 96 0 lb Bond 110 1 132 0 lb Cover 165 1 198 0 lb Index 1 Print quality will decrease if the paper you are using is close to the minimum or maximum weight Change the paper weight setting to thinner or thicker 2 When loading paper of 52 3 65 9 g m2 14 0 17 9 lb Bond the edges may crease or the paper misfeed depending on...

Page 205: ...ings Paper Settings For details about the Auto Tray Switching function see General Features Copy Document Server When loading label paper We recommend that you use specified label paper It is recommended to place one sheet at a time It is recommended to load the paper in orientation When you load paper in orientation label paper may curl after it is printed Select Label Paper for Paper Type in Tra...

Page 206: ...kes a strange noise when feeding stacks of coated paper feed the coated paper from the bypass tray one sheet at a time Thick paper This section gives you various details about and recommendations concerning thick paper When loading thick paper of 127 5 360 0 g m2 47 0 lb Cover 198 0 lb Index follow the recommendations below to prevent misfeeds and loss of image quality When loading paper in the pa...

Page 207: ...em Otherwise the envelopes may stick together because of the glue on them If fanning does not prevent them sticking together load them one by one Note that some types of envelopes cannot be used with this machine Misfeeds might occur depending on the length and shape of the flaps When loading envelopes in the orientation load them with flaps fully open Otherwise they might not feed into the machin...

Page 208: ...Flaps closed Bottom side of envelopes toward the front of the machine Side to be scanned face down Flaps closed Bottom side of envelopes toward the back of the machine Side to be printed face down Flaps closed Bottom side of envelopes toward the back of the machine Side to be printed face up When loading envelopes specify the envelope size and thickness For details see Copying onto Envelopes Copy ...

Page 209: ...envelopes select Envelope as the paper types using both Tray Paper Settings and printer driver and specify the thickness of envelopes For details see page 125 Printing on Envelopes Rotate the print image by 180 degrees using the printer driver when printing on the following paper Envelopes that are loaded with their short edges against the machine body Envelopes that are loaded with their long edg...

Page 210: ...fering thicknesses Print one or two envelopes to check print quality Flatten out prints if they are creased or curled Check the envelopes are not damp High temperature and high humidity conditions can reduce print quality and cause envelopes to become creased Depending on the environment copying or printing on envelopes may wrinkle them even if they are recommended Certain types of envelopes might...

Page 211: ...en a USB cable is connected and the Media Identification Unit is ready to start scanning paper 2 Scanning lamp Lights up when paper is inserted into the scanning area After the paper is removed it flashes while paper is being scanned 3 Error lamp Lights up when an error occurs 4 Paper scanning area Insert the paper you want to scan here Connect the Media Identification Unit 1 Connect the USB cable...

Page 212: ...e Media Identification Unit as Custom Paper Registering a paper from the master library with the Media Identification Unit 1 Display the Tray Paper Settings screen When using the standard operation panel 1 Press the Paper Setting key DRC135 8 Adding Paper and Toner 210 ...

Page 213: ...es of the paper with both hands when inserting the paper Keep the paper flat as you pull it out DFZ009 The list of custom paper whose configurations are similar to those of the scanned paper appears 6 Select the custom paper you want to use and then press OK 7 Press Yes 8 Press Exit twice 9 Close the Tray Paper Settings screen When using the standard operation panel 1 Press the Paper Setting key W...

Page 214: ... Display the Tray Paper Settings screen When using the standard operation panel 1 Press the Paper Setting key DRC135 When using the Smart Operation Panel 1 Press Home at the bottom of the screen in the center 2 Press the User Tools icon on the Home screen 3 Press Tray Paper Settings 2 Press Edit Custom Paper 3 Press New Program 4 Press Scan Value to Program with Media Identification Unit 5 Insert ...

Page 215: ...1 Press the Paper Setting key When using the Smart Operation Panel 1 Press User Tools on the top right of the screen When you register and scan custom paper using the Media Identification Unit following items are automatically specified Paper weight Coated paper other than matte paper For details about custom paper settings see Custom Paper Settings Paper Settings For details about Advanced Settin...

Page 216: ... custom paper whose settings you want to modify Press Previous or Next to scroll through the list to find the paper that you want to modify 4 Press Scan Value to Program with Media Identification Unit 5 Insert paper into the Media Identification Unit and then remove it Hold the edges of the paper with both hands when inserting the paper Keep the paper flat as you pull it out DFZ009 8 Adding Paper ...

Page 217: ...ttings Paper Settings You cannot modify a custom paper that is assigned to a paper tray To modify it cancel the assignment For details about Advanced Settings contact your machine administrator Sheets of custom paper are assigned with a sequential number from 0001 You can change the number on the Change Custom Paper Settings screen Press Scan and Update Value of Media Identification Base Data to r...

Page 218: ... the tray whose paper settings you want to specify 3 Press Paper Type Auto Identification 4 Insert paper into the Media Identification Unit and then remove it Hold the edges of the paper with both hands when inserting the paper Keep the paper flat as you pull it out DFZ009 The list of custom paper whose configurations are similar to those of the scanned paper appears 8 Adding Paper and Toner 216 ...

Page 219: ...ng a custom paper you can check its type and color by pressing Check Settings 6 Close the Tray Paper Settings screen When using the standard operation panel 1 Press the Paper Setting key When using the Smart Operation Panel 1 Press User Tools on the top right of the screen If you want to change the custom paper settings press Change Custom Paper Sett in Step 3 Registering a Custom Paper with the M...

Page 220: ...ing so can cause toner spillage possibly resulting in dirtying of skin clothing and floor and accidental ingestion Store toner new or used toner containers and components that have been in contact with toner out of reach of children If toner or used toner is inhaled gargle with plenty of water and move into a fresh air environment Consult a doctor if necessary If toner or used toner gets into your...

Page 221: ...all and remove toner cartridges This will result in toner leakage Follow the instruction on the screen regarding how to replace a toner cartridge If Toner Cartridge is almost empty appears the toner has almost run out Have a replacement toner cartridge at hand If appears when there is a lot of toner follow the toner replacement instructions that appear on the screen Pull out the cartridge and then...

Page 222: ...ot appear press the icon at the upper right corner of the screen to switch to the menu screen When using the Smart Operation Panel 1 Press Home at the bottom of the screen in the center 2 Press the Scanner icon on the Home screen 2 Press Exit and then perform transmission operation The error message disappears Any reports are not printed Disposing of used toner This section describes what to do wi...

Page 223: ...discard it by yourself treat it as general plastic waste material mainly North America Please see our local company website for information on the recycling of supply products or you can recycle items according to the requirements of your local municipalities or private recyclers Adding Toner 221 ...

Page 224: ...ecify whether or not to automatically execute For Uneven Gloss Short Time for smooth fusing belt Machine Paper Feed Output For details about the following items see Machine Paper Feed Output Paper Settings No Item Description 0106 Criteria for Paper Weight The machine may fail to correctly detect the weight of the paper loaded in the paper tray If this happens adjust the machine so the printing co...

Page 225: ...g Booklet Finisher SR4130 0406 Adjust Folding Speed for Booklet Adjust the folding speed for booklets when using the Booklet Finisher SR4130 0801 Adjust Staple Position Across Feed Direction 1 Adjust the vertical position of the staple applied at an edge when using Finisher SR5070 or Booklet Finisher SR5080 0802 Adjust Staple Position Across Feed Direction 2 Adjust the vertical position of the sta...

Page 226: ...ld For details about the following items see Finishing Fold Paper Settings When using custom paper settings for Z fold Position 1 or Z fold Position 2 in the Advanced Settings for custom paper are prioritized No Item Description 0608 Z fold Position 1 Adjust the width of the bottom end segment of Z folded sheets when using the multi folding unit 0609 Z fold Position 2 Adjust the overall fold size ...

Page 227: ...roubleshooting Load Paper icon Appears when paper runs out For details about loading paper see Loading Paper Paper Specifications and Adding Paper Add Toner icon Appears when toner runs out For details about adding toner see Adding Toner Maintenance and Specifications Add Staple icon Appears when staples run out For details about adding staples see Adding Staples Maintenance and Specifications Was...

Page 228: ...eptacle is full For details about removing staple waste see Removing Staple Waste Troubleshooting Service Call icon Appears when the machine is malfunctioning or requires maintenance Open Cover icon Appears when one or more covers of the machine are open 9 Troubleshooting 226 ...

Page 229: ...g function screen Check the error message displayed on the function screen and take the appropriate action For details about how to resolve the problems described in error messages see When Messages Appear Troubleshooting 3 Messages Displays a message that indicates the status of the machine and each function 4 Status icons The status icons that can be displayed are described below The function is...

Page 230: ...Messages Displays a message that indicates the status of the machine and each function 4 Status icons The status icons that can be displayed are described below The function is performing a job The machine cannot be used because an error has occurred in the machine The function cannot be used because an error has occurred in the function or machine This icon may also appear if the toner is running...

Page 231: ...eir solutions see When Messages Appear Troubleshooting You can use other functions normally The machine is unable to connect to the network A network error has occurred Check that the machine is correctly connected to the network and that the machine is correctly set For details about how to connect the network see Connecting to the Interface Connecting the Machine System Settings For details abou...

Page 232: ... and is ready for use 5 long beeps Soft alert An auto reset was performed through the simple screen of the Copier Document Server function or the Scanner function 5 long beeps repeated four times Soft alert An original has been left on the exposure glass or paper tray is empty 5 short beeps repeated five times Strong alert The machine requires user attention because paper has jammed the toner need...

Page 233: ...eep mode even though the Energy Saver key was pressed In some cases the machine does not enter Sleep mode when the Energy Saver key is pressed Before you press the Energy Saver key check that Sleep mode can be enabled For details about enabling Sleep mode see Saving Energy Getting Started The display is turned off The machine is in Low Power mode When using the standard operation panel Touch the d...

Page 234: ...ntication is enabled see When the Authentication Screen is Displayed Getting Started The Authentication screen appears User Authentication is set See When the Authentication Screen is Displayed Getting Started An error message is still displayed even if misfed paper is removed Paper is still jammed in the tray Remove the jammed paper by following the procedures displayed on the control panel For d...

Page 235: ...lat surface to prevent it from curling and do not lean it against the wall For details about the proper way to store paper see Paper Storage Paper Specifications and Adding Paper Misfeeds occur frequently The tray s side or end fences may not be set properly Remove the misfed paper For details about removing jammed paper see Removing Jammed Paper Troubleshooting Check that the side or end fences a...

Page 236: ...e the misfed paper For details about removing jammed paper see Removing Jammed Paper Troubleshooting Do not place anything on the finisher tray Misfeeds occur frequently The staple cartridge is not set correctly Set the staple cartridge properly For details about how to add staples see Adding Staples Maintenance and Specifications Misfeeds occur when printing to envelopes The envelopes are curled ...

Page 237: ...e that cannot be used for duplex printing In Tray Paper Settings select a paper type that can be used for duplex printing For details about setting Paper Type see Tray Paper Settings Paper Settings The machine does not turn off in 4 minutes after the main power is turned off The machine cannot perform the shutdown procedure Repeat the shutdown procedure If the machine does not turn off contact you...

Page 238: ...s completed before trying again For details about Function Compatibility see page 237 When Multiple Functions Cannot Be Executed Simultaneously The function does not run or cannot be used The function cannot be performed while the Address Book is being backed up from Web Image Monitor or other tools running on the computer Wait a while When the Address Book backup is complete the function will be ...

Page 239: ... Alternatively remove the paper and then reload it in the opposite direction The position of the fold is incorrect when letter fold in is applied to a B5 JIS sheet Multi sheet fold has been specified when only one sheet is being printed In Finishing on the initial copier screen under Folding Unit select Letter Fold in Press Change and then set Multi sheet Fold to Off For details about how to speci...

Page 240: ...For details about Function Compatibility see Function Compatibility Troubleshooting 9 Troubleshooting 238 ...

Page 241: ...tect original size The original placed on the exposure glass is a non standard size Place the original on the exposure glass again Face the original down If the machine cannot detect the size of the original specify the size manually do not use Auto Paper Select mode or the Auto Reduce Enlarge function For details about specifying the settings see Sizes Detectable with Auto Paper Select Paper Spec...

Page 242: ...for Finisher SR5070 or Specifications for Booklet Finisher SR5080 Maintenance and Specifications Check paper size An irregular paper size is set If you press the Start key the copy will start using the selected paper Duplex is not available with this paper size A paper size not available in Duplex mode has been selected Select a proper paper size For details about paper see Specifications for the ...

Page 243: ...or details about Max Copy Quantity see General Features Copy Document Server Memory is full nn originals have been scanned Press Print to copy scanned originals Do not remove remaining originals n is replaced by a variable The number of scanned originals exceed the number of pages that can be stored in memory Press Print to copy scanned originals and cancel the scanning data Press Clear Memory to ...

Page 244: ...lly proceed to scan and to copy the remaining originals In this case the resulting sorted pages will not be sequential For details about Memory Full Auto Scan Restart see Input Output Copy Document Server When Using the Connect Copy Function Message Causes Solutions Cannot connect to the sub machine Check the status of the sub machine The icon is lit The hard disk of the sub machine is malfunction...

Page 245: ... on both machines Sub machine is in Interrupt mode The sub machine is in Interrupt mode Press the Interrupt key on the sub machine to cancel Interrupt mode Sub machine paper settings must be the same to use this tray Paper tray settings on the two machines do not match Make the same settings on both machines The Cover Sheet setting s of the sub machine is different from the main machine Cover Shee...

Page 246: ...sentative Hardware Problem HDD An error has occurred in the hard disk Turn off the power and then back on again If the message appears again contact your service representative Hardware Problem USB An error has occurred in the USB interface Turn off the power and then back on again If the message appears again contact your service representative Hardware Problem Wireless Card A wireless LAN board ...

Page 247: ... can also be changed in User Tools The printer driver settings are incorrect or the tray does not contain paper of the size or type selected in the printer driver Check that the printer driver settings are correct and then load paper of the size selected in the printer driver into the input tray For details about how to change the paper size see Changing the Paper Size Paper Specifications and Add...

Page 248: ...or slip sheets Reset the job Be sure the tray you select for slip sheets is not providing paper for other pages When using direct print from a memory storage device Message Cause Solution Exceeded the limit value for total data size of the selected files Cannot select more files The size of the selected file exceeds 1 GB The total size of the selected files exceeds 1 GB Files or groups of files la...

Page 249: ...e to a command error Check that the data is valid A function which cannot be used with Fold mode was set The job has been cancelled A print job was canceled because a function s not available with Fold was selected Cancel the function s not available with Fold For details about the functions not available with Fold see Fold Print A job via the network that was not printed exists because an error o...

Page 250: ...orized Copy Prevention job Job cancelled In Administrator Tools under System Settings priority was specified to be given to Unauthorized Copy Prevention Printing set on this machine Cancel Unauthorized Copy Prevention Printing for the printer driver For details about how to cancel the settings see the printer driver Help Collate Cancelled Collate was canceled Turn off the power and then back on ag...

Page 251: ...that are to be stapled together and try printing again For details about the number of sheets that can be stapled together see Specifications for Finisher SR4120 Specifications for Booklet Finisher SR4130 Specifications for Finisher SR5070 or Specifications for Booklet Finisher SR5080 in Maintenance and Specifications Error occurred while printing job with Background Numbering Job has been cancell...

Page 252: ... correct paper size other than Auto Detect When there is a problem with the print settings Message Cause Solution Booklet Half Fold Error The job was canceled because you specified invalid settings for saddle stitching or half fold Check the settings for saddle stitching or half fold Classification Code is incorrect The classification code has not been entered or the classification code has been e...

Page 253: ... maximum number of multi sheet fold Half Fold The maximum number of multi sheet folds Half Fold was exceeded For details about the maximum number of multi sheet folds Half Fold see Fold Print Output Tray Changed The output tray was changed because the paper size of the specified output tray is limited Specify the proper output tray Print Overrun Images were discarded while printing Select a lower ...

Page 254: ...ils about using Document Server function contact your administrator For details about how to set permissions see Limiting Available Functions Security Guide Exceeded max capacity of document server Cannot store The hard disk became full after a file was stored Delete some of the files stored in the Document Server or reduce the size that you want to send Exceeded max number of files of document se...

Page 255: ...ile could not be stored Exceeded max files The maximum file capacity of the Document Server was exceeded Delete the files stored in the Document Server Job cancelled because capture file could not be stored Exceeded max pages per file The maximum page capacity of the Document Server was exceeded Delete some of the files stored in the Document Server or reduce the number of pages that you want to s...

Page 256: ...les Delete unneeded files stored on the machine Alternatively reduce the data size of the Temporary Print file and or the Stored Print file When there is not enough memory Message Cause Solution 84 Error There is no work area available for image processing Decrease the number of files sent to the machine 92 Error Printing was canceled because Job Reset or the Stop key was selected on the machine s...

Page 257: ...ion This job has been cancelled The logged in user is not allowed to use the selected function For details about how to set permissions see Configuring User Authentication Security Guide You do not have a privilege to use this function This operation has been cancelled The logged in user does not have the privileges to register programs or change the paper tray settings For details about how to se...

Page 258: ...sage appears frequently contact your service representative 99 Error This data cannot be printed The specified data is either corrupt or it cannot be printed from a memory storage device using the Direct printing function Check that the data is valid For details about the kinds of data that can be printed from a memory storage device using the Direct printing function see Direct Printing from a Me...

Page 259: ...as exceeded Delete unneeded files stored on the machine Exceeded Max Stored Pages While printing a Sample Print Locked Print Hold Print or Stored Print file the maximum page capacity was exceeded Delete unneeded files stored on the machine Reduce the number of pages to print Failed to obtain file system PDF direct printing could not be performed because the file system could not be obtained Turn o...

Page 260: ...time to complete a print job Memory Retrieval Error A memory allocation error occurred Turn off the power and then back on again If the message appears again replace the RAM For details about replacing the RAM contact your service representative Paper Type Error The specified paper type name is not set in the machine Re obtain the latest paper type information set in the machine If printing does n...

Page 261: ...r a firewall is preventing the machine from connecting to your computer Antivirus programs and firewalls can prevent client computers from establishing connection with this machine If you are using antivirus software add the program to the exclusion list in the application settings For details about how to add programs to the exclusion list see the antivirus software Help To prevent a firewall fro...

Page 262: ...antities of documents were stored by the OCR function Up to 100 jobs can be placed on standby by the OCR function Scan the next document after the current jobs have finished being stored File types have been automatically set for some files because multiple files were selected If there are selected stored documents which cannot be converted to a specified file format those documents are automatica...

Page 263: ...name cannot start or end with a period The program is recalled Cannot recall the destination s for which access privileges are required The currently logged in user does not have permission to view the destination that was registered in the program For details about how to set permissions see Limiting Available Functions Security Guide The program is recalled Cannot recall the destination s that i...

Page 264: ... maximum data capacity Specify the scan size and resolution again Note that it may not be possible to scan very large originals at a high resolution For details about the settings for the scanner function see Relationship between Resolution and Scan Size Scan Exceeded max data capacity Check the scanning resolution then reset n original s n in the message represents a variable The scanned original...

Page 265: ...gain If displaying the entire image is not necessary press the Start key to start scanning with the current scaling factor Not all of the image will be scanned Check the ratio and then press the Start key again Using Specify Reproduction Ratio to scale down a large document may cause part of the image to be lost Specify a large size in Specify Size and then scan the original again If displaying th...

Page 266: ...nneeded stored files For details about how to delete stored files see Deleting a Stored File Scan Memory is full Do you want to store scanned file Because there is not enough free hard disk space in the machine for storing in the Document Server only some of the pages could be scanned Specify whether or not to use the data Memory is full Scanning has been cancelled Press Send to send the scanned d...

Page 267: ... Settings Scan Sending the data has failed The data will be resent later A network error has occurred and a file was not sent correctly Wait until sending is retried automatically after the preset interval If sending fails again contact your administrator Transmission has failed Insufficient memory in the destination hard disk To check the current status press Scanned Files Status Transmission has...

Page 268: ...iting to be transmitted Waiting status displayed Cancel transmission Waiting status cleared and then delete the file When data cannot be sent because there are too many documents or pages Message Cause Solution Exceeded max number of pages per file Do you want to store the scanned pages as 1 file The file being stored has exceeded the maximum number of pages for one file Specify whether to store t...

Page 269: ...led Scan Profile is not set on the client computer Set Scan Profile For details about how to do this see Creating a New Scan Profile Scan Cannot start scanning because communication was failed The Take no action setting has been selected on the client computer forcing the client computer to remain inactive when it receives scan data Open scanner properties click the Events tab and then select Star...

Page 270: ...Solution Cannot write on the memory storage device because remaining free space is insufficient The memory storage device is full and scan data cannot be saved Even if the memory storage device appears to have sufficient free space data might not be saved if the maximum number of files that can be saved is exceeded Replace the memory storage device If the document is scanned as single page or divi...

Page 271: ...se the maximum number of pages that can be scanned by this machine was exceeded during the scanned data was written to the memory storage device Reduce the number of documents to be written to the memory storage device and then try again Memory is full Press Write to write the current scanned data to the memory storage device or press Cancel to delete The scan could not be completed because there ...

Page 272: ...The maximum number of modes that can be stored is 100 Delete unneeded modes Cannot detect the paper size of the original Specify the scanning size The set original was misaligned Place the original correctly Specify the scan size When placing an original directly on the exposure glass the lifting lowering action of the ADF triggers the automatic original size detection process Lift the ADF by 30 d...

Page 273: ...ve exceeded the setting range of the machine Check whether the scanning settings made with the application exceed the setting range of the machine Fatal error has occurred in the scanner An unrecoverable machine error has occurred An unrecoverable machine error has occurred Contact your service representative Insufficient memory Close all other applications then restart scanning Memory is insuffic...

Page 274: ...eed occurs you might not scan an original Remove the misfeed and then scan the original again Invalid Winsock version Please use version 1 1 or higher You are using an invalid version of Winsock Install the operating system of the computer or copy Winsock from the operating system CD ROM No response from the scanner The machine or client computer is not connected to the network correctly Check whe...

Page 275: ...ner and the options The ADF cover is open Check whether the ADF cover is closed The name is already in use Check the registered names You tried to register a name that is already in use Use another name When there is a problem connecting to the scanner Message Cause Solution Cannot connect to the scanner Check the network Access Mask settings in User Tools An access mask is set For details about a...

Page 276: ... the previous scan Communication error has occurred on the network A communication error has occurred on the network Check whether the client computer can use the TCP IP protocol Scanner is not available Check the scanner connection status The machine s power is off Turn on the power Scanner is not available Check the scanner connection status The machine is not connected to the network correctly ...

Page 277: ...ot be obtained from the host name If only IPv6 is set to Active the IPv6 address might not be obtained Check whether the machine s host name is specified in the Network Connection Tool For the WIA driver check the Network Connection tab in the properties Use Web Image Monitor to set LLMNR of IPv6 to Active Messages Displayed When You Use the Scanner Function 275 ...

Page 278: ...e was turned on The wireless LAN board was pulled out after the machine was turned on The settings are not updated although the unit is detected Turn off the power and then check the wireless LAN board is inserted correctly After this turn on the power again If the message appears again contact your service representative Failed to read the PDF file There is a possibility that the PDF version is n...

Page 279: ...emperature of the location at which the machine is installed Self checking The machine is performing image adjustment operations The machine may perform periodic maintenance during operations The frequency and duration of maintenance depends on the humidity temperature and printing factors such as number of prints paper size and paper type Wait for the machine to resume operation When There Is a P...

Page 280: ...Follow the instructions in the message that appears and exit the function that is running When the Home Screen Cannot Be Edited When Using the Standard Operation Panel Message Cause Solution The image data size is not valid See the manual for required data The image data size is not valid For details about file size for shortcut image see Displaying an Image on the Home Screen When Using the Stand...

Page 281: ...details about the procedure for excluding an IP address see your operating system s Help Updating the destination list Please wait Specified destination s or sender s name has been cleared The destination list is being updated from the network using Web Image Monitor Wait until the message disappears Do not turn off the power while this message is displayed Depending on the number of destinations ...

Page 282: ...olution The destination cannot be selected because its encryption certificate is not currently valid The user certificate destination certificate has expired A new user certificate must be installed For details about the user certificate destination certificate see Configuring S MIME Security Guide The group destination cannot be selected because it contains a destination with a encryption certifi...

Page 283: ... device certificate PDF with digital signature or PDF A with digital signature must be installed For details about how to install a device certificate PDF with digital signature or PDF A with digital signature see Configuring PDFs with Electronic Signatures Security Guide XXX cannot be YYY because there is a problem with the Digital Signature s device certificate Check the device certificate XXX a...

Page 284: ...permissions see Limiting Available Functions Security Guide The selected file s contained file s without access privileges Only file s with access privileges will be deleted You have tried to delete files without the permission to do so To check your access permission for stored documents or to delete a document you do not have permission to delete see Managing Stored Files Security Guide When the...

Page 285: ... that the correct settings for LDAP server are listed in Administrator Tools of System Settings For details about LDAP server see Programming the LDAP Server Connecting the Machine System Settings LDAP server authentication has failed Check the settings A network error has occurred and connection has failed Configure settings correctly for the user name and the password for LDAP server authenticat...

Page 286: ...9 Troubleshooting 284 ...

Page 287: ...nt computers and other office equipment The program backs the development and dissemination of products that feature energy saving functions It is an open program in which manufacturers participate voluntarily Targeted products are computers monitors printers facsimiles copiers scanners and multi function devices Energy Star standards and logos are internationally uniform For details about the def...

Page 288: ...de 15 minutes 15 minutes Time of switch out from Low Power mode 1 2 31 7 seconds 32 8 seconds Reduced electrical consumption in Sleep mode 1 0 75 W 0 75 W Time of switch into Sleep mode 60 minutes 60 minutes Time of switch out from Sleep mode 1 119 seconds 119 seconds Duplex Function 3 Standard Standard 1 The time it takes to switch out from energy saving functions and electrical consumption may d...

Page 289: ...cations can vary depending on which options are installed on the machine For details about how to change the default interval see Timer Settings Connecting the Machine System Settings The machine enters sleep mode directly in the following situations Low Power Mode Timer and Sleep Mode Timer are set to the same time Sleep Mode Timer is set to a shorter time than Low Power Mode Timer Depending on w...

Page 290: ...f you wish to discard this product please contact your local authorities the shop where you bought this product your local dealer or sales service representatives Note for the Battery and or Accumulator Symbol For EU countries only mainly Europe In accordance with the Battery Directive 2006 66 EC Article 20 Information for end users Annex II the above symbol is printed on batteries and accumulator...

Page 291: ... accepted free of charge from users in accordance with local regulations For details about the return program please refer to the Web page below or consult your service person https www ricoh return com Energy efficiency The amount of electricity a machine consumes depends as much on its specifications as it does on the way you use it The machine is designed to allow you to reduce electricity cost...

Page 292: ...o users in the state of California Notes to Users in USA mainly North America Perchlorate Material special handling may apply See www dtsc ca gov hazardouswaste perchlorate 10 Information for This Machine 290 ...

Page 293: ...stment 16 Color copy 16 Combine 11 16 103 Combine 1 Side 104 Combine 2 Sides 106 Combine printing 123 Computer 269 Control panel 25 41 44 Copier 239 Copy 65 93 Copy connector 31 Copy orientation 100 101 Copy tray 30 Counter key 42 Creating a shared folder 135 Custom size paper 109 110 D Data In indicator 43 44 Data security for copying 23 Decurler unit 31 Destination 280 Display panel 41 44 Distri...

Page 294: ...e 231 239 244 246 247 250 252 253 254 255 256 259 262 264 265 266 267 268 269 273 276 277 278 279 280 282 Model Specific information 8 Multi bypass banner sheet tray 30 Multi folding unit 31 35 37 N Names of Major Features 9 Number keys 43 O OCR unit 20 One Sided combine 104 Options 30 Orientation fixed paper 185 Original orientation 100 101 P Paper capacity 189 Paper guides 27 Paper Setting key 4...

Page 295: ...25 Status indicator 44 Stop key 43 Stored documents 17 159 Stored Print 17 Storing data 118 157 Storing documents 127 Storing scan files 12 149 Symbols 7 T Thick paper 204 Toner 218 220 Translucent paper 189 Tray 26 Tray 1 165 189 Tray 2 168 190 Tray 3 168 190 Turning off the power 85 Turning on the power 85 Twin interposer 31 184 200 Two Sided combine 106 Two sided paper 185 Two sided printing 12...

Page 296: ...MEMO 294 ...

Page 297: ...MEMO 295 ...

Page 298: ...MEMO 296 EN GB EN US D260 7012 ...

Page 299: ... 2016 ...

Page 300: ...D260 7012 US EN GB EN ...

Reviews: