• If you want to use glossy paper, select [Coated: Glossy] for [Paper Type]. If you want to use
matted paper (including silk, dull, and satin paper), select [Coated: Matte] for [Paper Type]. If
you want to use high-gloss paper, select [Coated: High Gloss] for [Paper Type]. For details
about the settings for using coated paper with custom paper, see "Registering a Custom
Paper", Paper Settings.
• You must specify an appropriate paper thickness under [Paper Weight].
• The thickness of available coated paper for each tray is as follows. You cannot load coated
paper into the other paper trays.
• Bypass tray: 73.3–360.0 g/m
2
(19.6 lb. Bond–198.0 lb. Index)
• Feed roller unit: 73.3–300.0 g/m
2
(19.6 lb. Bond–165.0 lb. Index)
• Wide LCT: 73.3–360.0 g/m
2
(19.6 lb. Bond–198.0 lb. Index)
• When loading coated paper or glossy paper, always fan the paper before using it.
• If a paper jam occurs or if the machine makes a strange noise when feeding stacks of coated
paper, feed the coated paper from the bypass tray one sheet at a time.
Thick paper
This section gives you various details about and recommendations concerning thick paper.
When loading thick paper of 127.5–360.0 g/m
2
(47.0 lb. Cover–198.0 lb. Index), follow the
recommendations below to prevent misfeeds and loss of image quality.
• When loading paper in the paper trays, be sure to load at least 20 sheets. Also, be sure to position
the side fences flush against the paper stack.
• When printing on thick smooth paper, be sure to fan the paper thoroughly before loading it. Even if
you fan the paper, it may start to stick together again gradually, and paper jams and misfeeds may
result. If paper continues to become jammed or feed in together even after they are fanned, load
them one by one from the bypass tray.
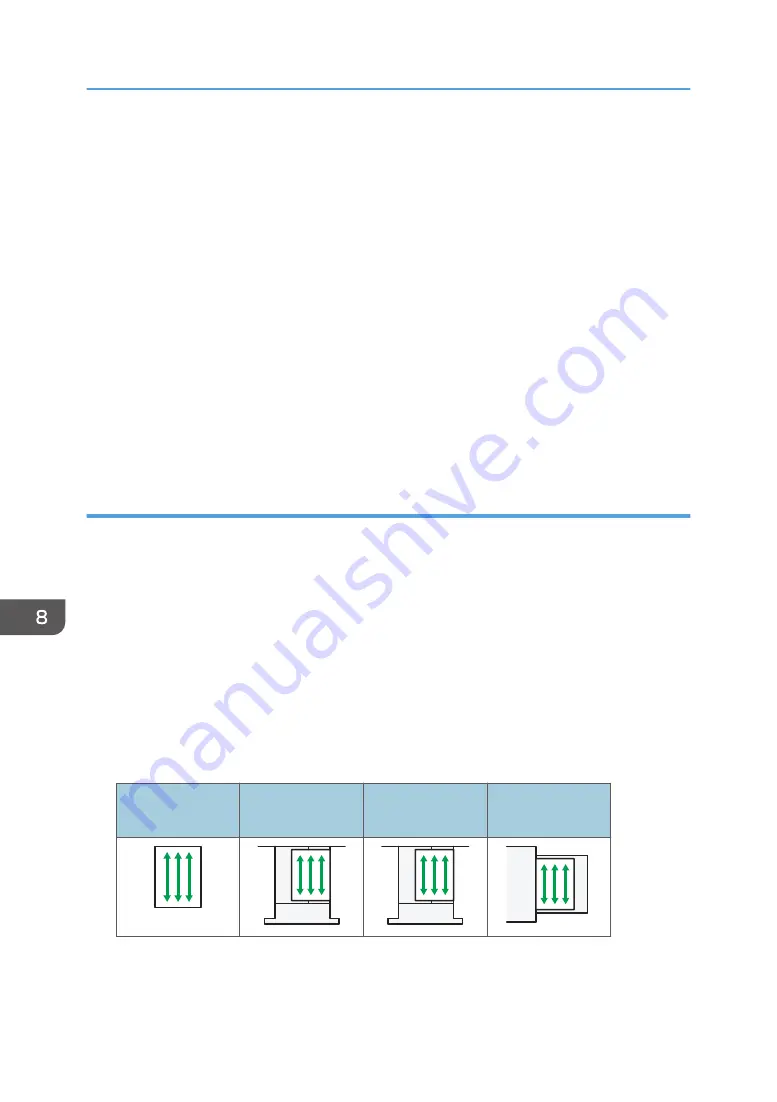
• When loading thick paper, set the paper direction according to its grain, as shown in the following
diagram:
Direction of paper
grain
Tray 1 or LCT
Trays 2–3
Bypass tray or
wide LCT
8. Adding Paper and Toner
204
Summary of Contents for Pro C5200s
Page 2: ......
Page 12: ...10 ...
Page 94: ...2 Getting Started 92 ...
Page 157: ...3 Press OK Specifying Scan Settings 155 ...
Page 158: ...5 Scan 156 ...
Page 162: ...6 Document Server 160 ...
Page 286: ...9 Troubleshooting 284 ...
Page 296: ...MEMO 294 ...
Page 297: ...MEMO 295 ...
Page 298: ...MEMO 296 EN GB EN US D260 7012 ...
Page 299: ... 2016 ...
Page 300: ...D260 7012 US EN GB EN ...


