background image

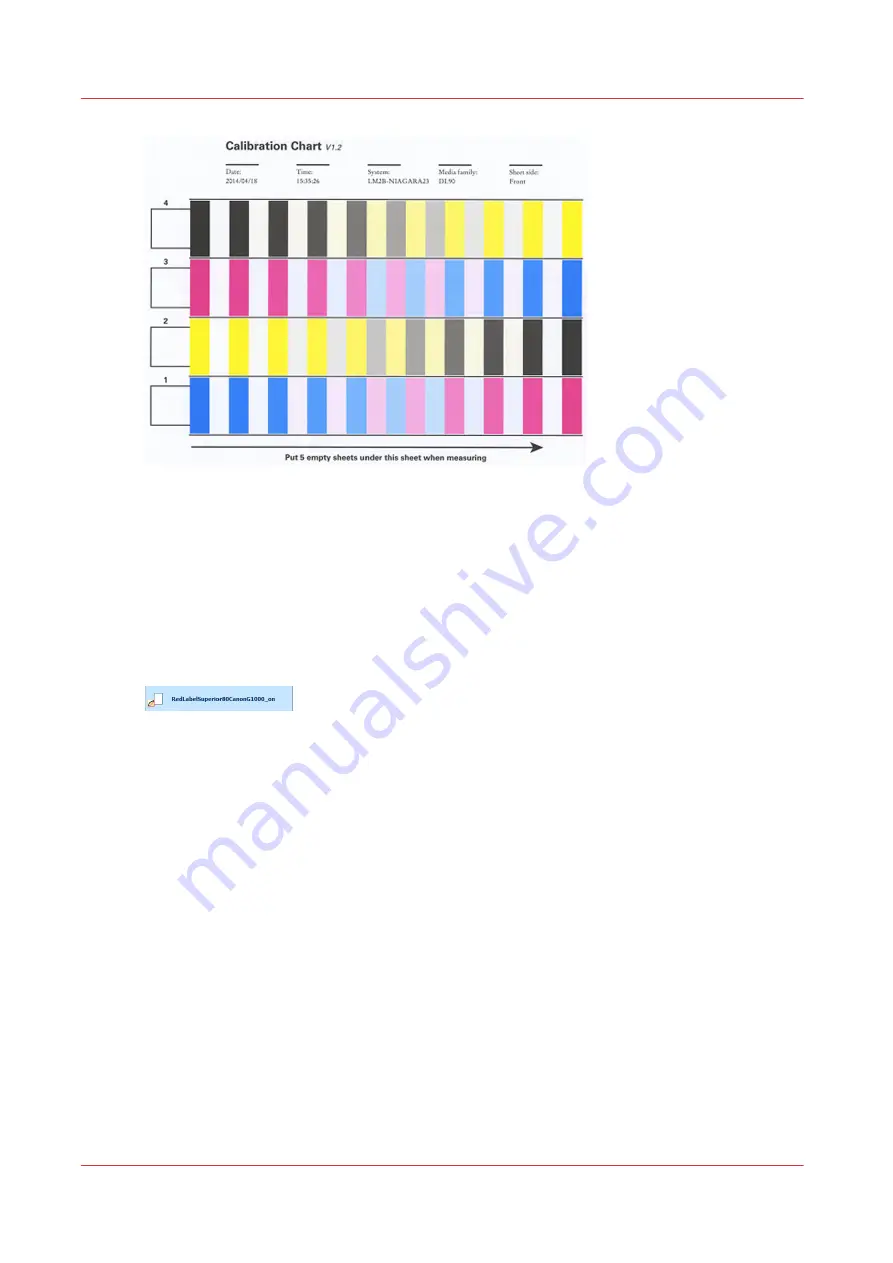
[251] Calibration chart

Calibration schedule

A new media family has the status 

not calibrated. It gets the status calibrated when all media

print modes of this media family have been calibrated. (

Edit a media print mode on page 196

)

The calibration timer of the media family shows how often a media family calibration should
occur. Media in the media catalogue show an icon when the media family needs to be calibrated
according to the timer.

Learn about media family calibration

236

Chapter 10 - Print what you expect

Summary of Contents for VarioPrint i Series

Page 1: ...Operation guide VarioPrint i series ...

Page 2: ...PENSES RESULTING FROM THE USE OF THE CONTENTS OF THIS PUBLICATION Océ reserves the right to revise this publication and to make changes from time to time in the content hereof without obligation to notify any person of such revision or changes Language Original instructions that are in British English Trademarks Océ Océ PRISMA Océ PRISMAproduction and Océ VarioPrint are registered trademarks of Oc...

Page 3: ...ter status 49 Chapter 4 Define defaults 51 Adjust control panel and warning time 52 Define printer defaults 54 Define the accessibility 54 Define the regional settings 55 Define system of measurement 56 Keep few sheets in empty paper tray 57 Define storage of printed jobs 58 Define job defaults 59 Define default font of page numbers 59 Define use of banner pages and trailer pages 60 Define default...

Page 4: ...sources 108 Define default transaction printing settings 110 Chapter 7 Document printing 111 Learn about workflow profiles 112 Choose a workflow profile 114 Job workflow in document printing mode 116 Activate the document printing mode 119 Work with the schedule in document printing mode 120 Work with automated workflows 121 Learn about automated workflows 121 Define an automated workflow 122 Rest...

Page 5: ... output profile 209 Import or export an output profile 210 Create composite output profiles 211 Edit an input profile 213 Import or export input profiles 214 Define colour mapping 215 Attributes of a colour mapping 217 Spot colour management 219 Learn about spot colours 219 Create a spot colour from the control panel 220 Create a spot colour in Settings Editor 224 Read the spot colour patch chart ...

Page 6: ...ner 290 Replace the ColorGrip waste container 292 Replace the waste water container 294 Refill the conditioning liquid in the paper module 297 Replace printer parts 299 Replace the flip rings of the high capacity stacker 299 Replace the tissue cassettes 301 Replace a tissue ribbon 303 Clean printer parts 306 Clean Z sensors 306 Clean the Z sensors in the paper path module 306 Clean the Z sensors i...

Page 7: ...References 359 Specifications 360 Printer specifications 360 Paper input specifications 363 Paper output specifications 364 Settings Editor specifications 365 Media specifications 366 Media sizes 366 Media packaging 367 Media storage 369 Temperature adjustment time of media before printing 370 Prints storage 371 Print room conditions 372 PRISMAsync Print Server RIP raster image processor 373 Overv...

Page 8: ...Contents 8 ...

Page 9: ...Chapter 1 Introduction ...

Page 10: ...product and functionality extensions in future Working with the VarioPrint i series is more than working with the printer alone The most important standard software applications are the following The VarioPrint i series remote printer driver enables you to start and submit print jobs from the desktop applications you use The controller PRISMAsync Print Server ensures you to get the most out of you...

Page 11: ...Aprofiler The VarioPrint i series PRISMAsync Profiler has been developed for inkjet printers like the VarioPrint i series Colour experts can use this profiler to make optimal use of the colour management of the VarioPrint i series PRISMAlytics Dashboard The PRISMAlytics Dashboard is a cloud service that delivers fact based printer information Printers that use the PRISMAsync Print Server send real...

Page 12: ...keep printer parts clean Chapter 12 Chapter 13 has information about solving problems The reference chapter 14 gives you topics with detailed information and specifications about your product and the product supplies Learn about topics This operation guide has Learn about topics to explain PRISMAsync Print Server and VarioPrint i series features Read these topics when you are not complete familiar...

Page 13: ...tion on page 234 Read media family calibration feed back on page 239 Learn about the quality control sheets Learn about quality control sheets on page 251 Learn about the ticket editor Create a JDF ticket on page 133 Log in with your smart card Log in with your smart card on page 43 Use remote assistance Use remote assistance on page 340 Information in this operation guide Chapter 1 Introduction 1...

Page 14: ...thorisation and user authentication The system administrator gives you the rights that correspond with your responsibility Aimgroup of this operation guide This operation guide is developed to support users that are responsible for the job management workflow management colour and media management print quality and validation and printer maintenance The system administrator is responsible for the ...

Page 15: ... PRISMAprofiler guide PRISMAlytics Dashboard guide PRISMAsync Remote Control guide PRISMAsync Simulator guide PRISMAsync administrator guide User authorisation and authentication BLM600 booklet maker guides The following information is part of the application PRISMAsync Remote Manager online help VarioPrint i series printer driver online help Other VarioPrint i series guides Chapter 1 Introduction...

Page 16: ...erning operations that may lead to death or injury to persons if not performed correctly To use the machine safely always pay attention to these warnings CAUTION Indicates a caution concerning operations that may lead to in jury to persons if not performed correctly To use the ma chine safely always pay attention to these cautions This indication can concern hazards that have a specific CAU TION s...

Page 17: ... notes is highly recommended Body protection symbols This manual uses the following body protection symbols to indicate that it is important to protect yourself before performing a specific task or action Symbol Type of symbol Indicates IMPORTANT Hand protection Wear the mentioned type of gloves when you perform this task or action IMPORTANT Eye protection Use the mentioned type of eye protection ...

Page 18: ...Notes for the reader 18 Chapter 1 Introduction ...

Page 19: ...Chapter 2 Explore the printer ...

Page 20: ...ont view Below is an overview of the main parts visible from the control panel of the printer 5 7 10 9 4 3 6 17 12 11 8 13 14 16 15 2 1 1 Front view of the printer Description main hardware parts 1 The operator desk and the control panel are the local communication point for the opera tor 2 PRISMAsync Print Server steers the performance workflow and print quality of the printer 3 Up to three paper...

Page 21: ...forator the DFD Document Finish ing Device interface kit connects the finisher to the high capacity stacker 16 The conditioning module controls the climate in the print module The location of the con ditioning module is in the middle of the printer next to the print module Rear view Below is an overview of the parts visible from the rear side of the printer 8 7 5 3 2 1 6 4 2 Rear view of the print...

Page 22: ...n main hardware parts 7 The fixation module with the fixation drum dries the prints with heated air 8 The power module is responsible for the power management Main hardware parts 22 Chapter 2 Explore the printer ...

Page 23: ...supply 2 The paper path module transports the sheets 3 The sentry inspects the sheets 4 The registration input module purges the sheets that have imperfections 6 4 3 5 1 2 4 Transfer of sheets during the paper input process Description paper path 1 The paper tray uses the air separation technique to separate each sheet before it goes to the paper path 2 The paper path module transports the sheets ...

Page 24: ...o avoid media waviness or tight edges The air separation vacuum technique takes care for a fast and reliable paper feed 4 3 1 2 5 Parts of the paper module Description paper module 1 Paper tray 1 and 2 2 Paper tray 3 and 4 3 The control panel of the paper module has indicators to display the filling level It contains also buttons to open the paper trays 4 The front cover gives access to parts wher...

Page 25: ...1 2 3 4 1 2 6 Open 1 a paper tray and unassign 2 its media Paper input Chapter 2 Explore the printer 25 ...

Page 26: ...unit moves to the maintenance position Learn about printhead maintenance on page 248 Transfer of the media sheets during the print process 1 2 7 Location of the print process Location of the print process 1 The print module prints the sheets 2 The fixation module dries the printed sheets 6 7 4 5 1 2 3 8 Transfer of the sheets during the print process Description 1 The sheets transported on the pap...

Page 27: ...nt process The printhead unit holds four or five printhead arrays black K cyan C magenta M yellow Y and the option ColorGrip Each array contains three printheads The image is built up from four different monochrome bitmaps The ColorGrip printheads eject ColorGrip drops only on the locations where ink comes Benefits of ColorGrip on page 34 K C M Y ColorGrip 9 The CMYK and ColorGrip print process In...

Page 28: ...es when it touches the media The media definition has parameters that determine which drop sizes the print engine must apply while printing these media A B C 13 Drop size modulation the printer adjusts the drop size depending on the media characteristics Media with coating top allow for a larger drop size than media without coating bottom Background spitting Background spitting is the production o...

Page 29: ...e two models of the registration output module Main hardware parts on page 20 1 2 14 Location of paper output process model without system tray 1 2 15 Location of paper output process model with system tray Location of the output process 1 The registration output module transports the prints from the fixation module to the first high capacity stacker 2 One or two high capacity stackers collect and...

Page 30: ... on the top tray can be useful for small jobs 6 When a DFD Document Finishing Device is installed the high capacity stacker transports the prints to the third party finisher Overview of the high capacity stacker The high capacity stacker can stack a large volume of prints The prints are collected on the stack tray When a stack on the stack tray is completed the slide door opens and the eject tray ...

Page 31: ...ct the stack manually 6 The stack tray collects the prints 7 The eject tray presents the finished stack outside the high capacity stacker 8 The top tray collects the prints of small jobs proof prints and error sheets Control panel of the high capacity stacker The table below describes the stacking behaviour of the high capacity stacker For instructions how to change the default stacking behaviour ...

Page 32: ...ion light of the eject button indicates the progress of a stack eject When the attention light is green and blinks slowly the stack ejects at the next set boun dary When the attention light is green and blinks fast the stack ejects as soon as possible at a page boundary When the attention light is red the stack ejects because an error occurred 4 The error location indicator shows the location wher...

Page 33: ...istent colour output each time you use these media Compared to a tray driven workflow the pre defined media settings prevent mistakes and achieve first time right output The look and quality of the prints of the VarioPrint i series are based on three main aspects that strongly influence each other ink media and the print process Inkjet performance is based on the perfect balance between these prin...

Page 34: ...d inkjet treated media However ColorGrip can also improve the print quality on coated media Benefits of ColorGrip Print without and with ColorGrip On uncoated media ColorGrip prevents feathering which means that paper fibers absorb and spread the ink pigments ColorGrip improves the col our gamut of the print On inkjet treated media ColorGrip prevents mottle and so improves the micro uniformity of ...

Page 35: ...Chapter 3 Getting started ...

Page 36: ...ctions and messages So you get informed on all upcoming and immediate tasks Below you find an introduction how to use the VarioPrint i series via remote printer driver the control panel Remote Manager Remote Control and the web based configuration tool the Settings Editor Control panel The control panel is local point to operate the printer and the domain of the operator and the maintenance operat...

Page 37: ...gives access to the paper tray functions and overviews 8 The System button gives access to system and support features maintenance tasks con sumable supplies and workflow preferences 9 The dashboard shows upcoming actions the printer status and error messages 10 The status LED indicates the printer status with a colour Remote printer driver The printer driver is the remote point to prepare a print...

Page 38: ... view 6 Job settings The job settings are equal to the job settings on the control panel 7 Job destination workflow and output delivery settings The Workflow function can be used to submit a job with an automated workflow or with an identification label 8 Job template The template bundles the current job settings Save a tem plate to use later for other jobs 9 Submit job The job is submitted when y...

Page 39: ...u browse the file in a file directory Remote Control The Remote Control app helps the central operator to stay informed about the print production on the available PRISMAsync printers Even at a distance You receive alerts when upcoming actions such as loading media or adding consumables are foreseen Or in case a problem at the printer asks for an immediate action The table below describes four scr...

Page 40: ...Settings Editor uses the same language as the web browser The table below describes the main parts of the Settings Editor 1 2 3 27 Settings Editor Description 1 The settings are grouped in main and sub tabs 2 Use the search box to quickly find a setting 3 Use the link to start PRISMAsync Remote Manager A Settings Editor option can have an icon that provides more information on the usage Setting is...

Page 41: ...ogin Below you find the following instructions 1 Log in with a domain user account 2 Log in with a factory defined user account 3 Log in with a local user account 4 Log in with a smart card 5 See your password during login Log in with a domain user account When there are no configured domains you do not see the domain selection on the login panel When at least one domain has been added a pull down...

Page 42: ...ser account from a list 1 When the domain selection is displayed select the hostname or IP address of the printer 2 Select the factory defined user account from the list 3 Enter the password 4 Touch or click OK The name of the user account is displayed Log in with a local user account When you use a local user account you need to log in with a username Log in to the printer 42 Chapter 3 Getting st...

Page 43: ...n be used for the authentication of one or multiple user accounts 1 Insert your smart card into the reader at the control panel 2 Select your username if the smart card is configured for multiple user accounts 3 Enter your password or PIN to authenticate 4 Touch OK After a successful login the name of your user account is displayed See your password during login The password field where you type y...

Page 44: ...Log in to the printer 44 Chapter 3 Getting started ...

Page 45: ...user account In the Settings Editor click the name of your user account 2 Touch or click Log out Log out at control panel when using a smart card Remove your smart card from the reader Log out in Remote Manager 1 Click Log out Switch roles to change settings When you are in the Settings Editor or on the control panel and you want to change a setting for which you do not have sufficient rights you ...

Page 46: ... does not reflect the password of a domain user account 1 Log in on the control panel and touch the name of your user account Log in on the Settings Editor and click the name of your user account 2 Touch or click Change your password 3 Enter your current password 4 Enter your new password and confirm the new password 5 Touch or click OK Change password 46 Chapter 3 Getting started ...

Page 47: ...t of your user account settings Otherwise the password must be changed in the PRISMAsync user account settings In case you do not have the rights to access the user settings you need to provide your password NOTE This recovery instruction does not apply to the password of a domain user account and the factory defined system administrator account Recover password from control panel 1 Go the control...

Page 48: ...Recover password from Settings Editor or Remote Manager 1 Click Recover password on the login panel 2 Click OK Recover password 48 Chapter 3 Getting started ...

Page 49: ...olour remotely You can change the warning time or disable warnings Choose a warning time that gives you sufficient time to prepare new media or to remove prints to prevent a printing stop Adjust control panel and warning time on page 52 2 1 3 30 The status bar on the dashboard 1 the control panel 2 and the operator attention light 3 Colour Action required Green informs that there is no upcoming ev...

Page 50: ...more you see the upcoming events such as loading paper trays or removing prints from the output trays Work with the schedule in document printing mode on page 120 The orange warning colour informs you about the upcoming actions Required maintenance The dashboard shows messages and symbols when a maintenance action is expected soon or must be done immediately When the printer cannot continue printi...

Page 51: ...Chapter 4 Define defaults ...

Page 52: ...runcate the name When you truncate a name at the beginning you can indicate how many characters are removed before the truncation When you truncate a name at the end you can indicate how many characters are removed after the truncation 1 Touch Job name truncation 2 Use the Show long job name function to indicate that you want to use the long job name 3 Define how you want to truncate the job name ...

Page 53: ...nes how long in advance you are notified about upcoming events 1 Indicate if you want to be notified in advance 2 Touch the or button to increase or decrease the warning time in steps of 1 minute 3 Touch OK Adjust control panel and warning time Chapter 4 Define defaults 53 ...

Page 54: ...ep sound function to enable or disable the beep sound 2 Click OK Adjust the delay time of a button press 35 Delay time 1 Use the Delay time for control panel buttons function to define the time after which a button press takes action 2 Click OK Enable the use of the mouse to operate the control panel 36 Use of mouse 1 Use the Mouse usage function to enable or disable the use of the mouse 2 Click O...

Page 55: ...e zone 1 Open the Settings Editor and go to Preferences System settings Regional settings 37 Location of system settings 2 Click USA to work with US media formats Click Rest of the World to work with ISO European media formats 38 Regional settings 3 Click OK Define the regional settings Chapter 4 Define defaults 55 ...

Page 56: ...m settings 2 Use the System of measurement function Select Metric to work with g m2 and mm Select Imperial to work with lb and inch 40 System of measurement 3 Use the Media weight notation function Select the media weight notation you want to use 41 Media weight configuration Define system of measurement 56 Chapter 4 Define defaults ...

Page 57: ...pful to see which media were loaded 1 Open the Settings Editor and go to Preferences System settings Basic 42 Location of system settings 2 Use the Few remaining sheets in empty paper tray function to indicate if you always want to keep some sheets in a paper tray 3 Click OK Keep few sheets in empty paper tray Chapter 4 Define defaults 57 ...

Page 58: ... time 43 Printed jobs 1 Open the Settings Editor and go to Preferences System settings Printed jobs 44 Location of system settings 2 Use the Store printed jobs function to display the list of printed jobs 3 Use the Storage time printed jobs function to select the storage time of printed jobs one day one week one month or unlimited 4 Click OK Define storage of printed jobs 58 Chapter 4 Define defau...

Page 59: ... job properties You can set the default font in the Settings Editor 45 Font settings 1 Open the Settings Editor and go to Preferences Print job defaults Page numbering 46 Location of print job defaults 2 Select the font and the font size 3 Click OK Define job defaults Chapter 4 Define defaults 59 ...

Page 60: ...a banner page at the beginning of the job 1 a trailer page at the end of a job 2 and separator sheets between sets 3 48 Banner page left and trailer page right 1 Open the Settings Editor and go to Preferences System settings Basic 49 Location of system settings 2 Use the Banner pages function to indicate the use of banner pages 50 Banner pages 3 Use the Trailer pages function to define the use of ...

Page 61: ...anner pages trailer pages tickets separator sheets and covers on page 62 52 Media of banner and trailer pages NOTE You can import and export the media definition of special pages Import and export default definitions of banner pages trailer pages tickets separator sheets and covers on page 64 Define use of banner pages and trailer pages Chapter 4 Define defaults 61 ...

Page 62: ...Banner pages trailer pages and tickets function to select the media for banner pages trailer pages and job tickets 54 Media of banner pages trailer pages and tickets 4 Use the Front covers function to select the media for front covers 55 Media of front covers 5 Use the Back covers function to select the media for back covers 56 Media of back covers 6 Use the Separator sheets function to select the...

Page 63: ... 58 Orientation of separator sheets Define default media for banner pages trailer pages tickets separator sheets and covers Chapter 4 Define defaults 63 ...

Page 64: ...edia catalogue menu Export the definitions of special pages You can export an XML file with the current media definitions of the special pages This XML file can be imported into another PRISMAsync Print Server 1 Click Export 2 Click Special media 3 Browse to the special media zip file 4 Click Export Import the definitions of special pages You can import an XML file with the media definitions of sp...

Page 65: ... PostScript Use the Page timeout function to define a page timeout When the processing time of a PostScript page exceeds the set value the printer prints if enabled an error page Define the default media PDF PostScript PPML 1 Use the Media colour function to define the colour of the default media When you enter the colour name in the English language a sample of the colour is automatically display...

Page 66: ...ion function to define how XObjects are processed Automatic the XObjects of a PDF VT job are cached Enabled the XObjects of every PDF job are cached Disabled the XObjects are re interpreted per page 65 PDF XObjects Define the default delivery of prints PDF PostScript PPML Use the Offset stacking function to define if stacking occurs with or without an offset 66 Offset stacking Use the Tumble funct...

Page 67: ...rinted one or two sided 70 Print sides Define the substitution of a missing font PDF PostScript PPML 71 Font substitution Use the PDF font substitution PPML font substitution and PostScript font substitution functions to define if a missing font is replaced by the Courier font Otherwise a job is stopped and if enabled an error page is printed Define PostScript PDF and PPML job defaults Chapter 4 D...

Page 68: ... define the order of the prints 74 Default sheet order 3 Use the Top tray Face orientation and Stack tray Face orientation functions to define if the front side of the prints points up or down 75 Default face orientation 4 Use the Top tray Header orientation and Stack tray Header orientation functions to define if the header of the prints points to the front side of the printer or to the back side...

Page 69: ...The high capacity stacker ejects the stack as soon as the stack height exceeds the minimum filling rate The minimum filling rate is active in case the high capacity stacker ejects a stack when the stack tray is full 79 Minimum filling level 8 Use the Maximum stack height function to define the maximum stack height in the stack tray The default stack height is 302 mm 11 9 The minimum stack height i...

Page 70: ...rrive in the print queue and before the whole job has been received 82 LPR 2 Click OK Define the processing of jobs that use the socket printing port Socket printing can be enabled and configured by the system administrator 1 Use the Socket printing function to define when the RIP starts to process jobs that use the socket printing port The option Streaming is default and for large jobs The job is...

Page 71: ...older jobs The system administrator can change the processing order of hotfolder jobs Create a hotfolder on page 132 1 Go to Processing of hotfolder jobs 2 Indicate the order of hotfolder job processing 3 Click OK Define default job processing Chapter 4 Define defaults 71 ...

Page 72: ...nt log file valid for one day serial number yyyymmdd CSV 93100020170709 CSV Current account log file valid for one day serial number yyyymmdd ACL 93100020170710 ACL Completed account log file valid for one week serial number yyyy W week number CSV 9310002017W28 CSV Current account log file valid for one week serial number yyyy W week number ACL 9310002017W28 ACL Completed account log file valid fo...

Page 73: ...3 Select one of the available account log files 4 Click Download account log file 5 Click OK Download account log files Chapter 4 Define defaults 73 ...

Page 74: ...Download account log files 74 Chapter 4 Define defaults ...

Page 75: ...Chapter 5 Job media handling ...

Page 76: ...ia assignment and media loading tasks during the job preparation Media storage asks for a series of environmental circumstances to ensure that the media remain in excellent condition Media assignment Media storage Media loading Media definition Media 86 Tasks with media as central attention point Media definition The media definition highly determines the results of the printing process The VarioP...

Page 77: ...need From the schedule you can load media for a scheduled job which is an automatic assignment Work with the schedule in document printing mode on page 120 Work with the schedule in transaction printing mode on page 94 When a paper tray is empty the printer automatically retrieves sheets from the next paper tray that holds the same media As long as you load the same media in a paper tray it is not...

Page 78: ...oad media into the paper module on page 80 5 Close the paper tray 6 Touch Assign to open the media catalogue 7 Select the media and touch OK For a quick search use the search and filter functions 8 Press the paper tray button at the right hand side of the control panel NOTE Use the Unassign function to unassign the media You can also unassign media via a button on the control panel of the paper mo...

Page 79: ...he media are loaded and assigned Work with the schedule in document printing mode on page 120 Work with the schedule in transaction printing mode on page 94 89 Load media for a document print job 1 Touch Schedule 2 Select the media in the Required media pane 3 Touch Load to open the Trays view 4 Select the paper tray in which you want to load the media and touch Open 5 Touch Unassign 6 Load the me...

Page 80: ...nt view NOTE You can leave the media in the paper trays when the printer is in sleep mode Put printer in sleep mode on page 272 Rewrap all loaded media in the original package or other moisture proof material before the printer goes in shut down mode Put printer in sleep mode on page 272 Before you begin Carefully unpack and check one ream of media or a stack of approximately 500 sheets 80 g m 20 ...

Page 81: ...media continue with step 3 When media have a same size as the latest loaded media continue with step 9 3 Turn the knob in anti clockwise direction to move the side sliders away from the loaded stack 4 Squeeze the green handle of the front slider to move the trailer edge sliders away from the stack 5 Remove the stack Carefully rewrap the remaining media in the original package material or other moi...

Page 82: ...n page 88 Paper tray 1 and 2 can hold one ream approxi mately 500 sheets 80 g m 20 lb bond Paper tray 3 and 4 can hold three reams Carefully put the new stack on the already loa ded stack without adjusting the sliders 10 IMPORTANT Ensure the loaded media stack does not exceed the loading limit mark on the back slider Then the loaded media stack is maximum 63 mm 2 48 paper tray 1 and 2 or 181 mm 7 ...

Page 83: ... the paper path The sentry is able to detect these imperfect sheets and purge them to the sentry tray There are guidelines how to prevent sentry tray output Many sheets arrive in the sentry tray on page 344 Load media into the paper module Chapter 5 Job media handling 83 ...

Page 84: ...pacity stacker ejects the first stack of job 1 3 The stack tray of the first high capacity stacker collects the remaining prints of the first job and first prints of the second job 4 The stack tray of the second high capacity stacker collects the remaining prints of the second job because the linking of output s is enabled How to configure this scenario Settings Editor Control panel 1 Define a sta...

Page 85: ...ty stacker collects the remaining sets of the second job because the linking of output trays is enabled How to configure this scenario Settings Editor Control panel 1 Define a stack height Define default stack ing in the high capacity stacker on page 68 2 Set a minimum filling rate for example 80 Define default stacking in the high capacity stacker on page 68 1 Specify in the workflow profile that...

Page 86: ...s is enabled Settings Editor Control panel 1 Define a stack height Define default stack ing in the high capacity stacker on page 68 1 Specify in the workflow profile that a stack eject occurs after each job and enable the linking of output trays Choose a workflow profile on page 114 NOTE Use the control panel of the high capacity stacker to manually eject a stack Control panel of the high capacity...

Page 87: ...ves out The time the high capacity stacker ejects a finished stack depends on the configured stacking behaviour When you do not want to wait until an automatic stack eject occurs do the following Press the eject button once to eject the stack and keep the last set complete The green attention light blinks slowly Press the eject button twice to eject the stack as soon as possible The green attentio...

Page 88: ... trays When you leave the media unpacked for a long period tight edges or waviness can occur Action 1 Carefully remove the moisture proof wrap ping from the pallet Pallets can contain car tons reams wrapped packs or loose sheets Media packaging on page 367 2 Take a carton ream or a stack of approxi mately 500 sheets from the pallet When you have a stack of loose sheets con tinue with step 6 Canon ...

Page 89: ...s that have imperfections bends folds cuts rips crumpled edges wavy edges tight edges After you finish 1 Store remaining media in the original packaging or other moisture proof material Use the original package orientation and do not turn over the stack 2 When the printer is in sleep mode you can leave the media in the paper trays However when the printer is shut down you must remove the media fro...

Page 90: ...e control panel 1 Go to the control panel touch System Media 2 Use the search buttons 1 to filter media with a specific size type weight or name 3 Touch one of the media attributes 2 to change the order of the media in the media catalogue 4 Use the copy function 3 to create a new media entry 5 Use the drop down menu to start a colour validation test 4 Learn about colour validation tests on page 25...

Page 91: ...Chapter 6 Transaction printing ...

Page 92: ...s the transaction print job workflow from job preparation to the delivery of the prints The output and workflow management application PRISMAproduction provides a single point of control to spool manage and monitor transaction print jobs Job preparation Print production Job planning Document design PRISMAproduction IPDS Preflight and make ready Data generation AFP Data input Job scheduling and mon...

Page 93: ...e the job order or edit transaction print jobs from the control panel However if required you can stop the printing of the data stream from the control panel 3 Print production The operator keeps the printer running Correct media are loaded in the paper trays finished output and waste are removed in time and there are sufficient supplies of consumables in the printer In transaction printing mode y...

Page 94: ...ge 24 1 2 3 4 5 6 7 102 The schedule in the transaction printing mode The screen with the schedule provides the following information in transaction printing mode 1 The timeline shows the current job or data stream 2 The required media pane shows the media for the current data stream A data stream can have job separators Then the schedule shows the different job names 3 The Load area shows in whic...

Page 95: ...itch to the transaction printing mode on the control panel To make the transaction printing mode active you also need to bring the transaction printing online You can do this on the control panel or in the Settings Editor Activate transaction printing mode on control panel 103 Activate the transaction printing mode from control panel 1 Ensure the list of scheduled jobs is empty 2 Touch System Tran...

Page 96: ...offline in Settings Editor 1 Open the Settings Editor and go to Transaction printing Settings 2 Use the Switch the printer online or offline function 3 Click Switch the printer online or offline 4 Click OK Activate the transaction printing mode 96 Chapter 6 Transaction printing ...

Page 97: ...a such as names or addresses must be better aligned on the page 104 Change image shift of transaction print jobs on control panel 1 Touch System Transaction The Image shift section shows the image shift as defined in the active transaction setup 2 Bring transaction printing offline Activate the transaction printing mode on page 95 3 Make the changes in the Image shift section 4 Bring transaction p...

Page 98: ...rrupt reprint and monitor transaction print jobs 105 View a job in PRISMAproduction When you want to interrupt or abort the printing of streaming data open PRISMAproduction and go to the job list Indicate the required printer action When you delete jobs in PRISMAproduction these jobs are no longer present in the print queue of the printer For more information on PRISMAproduction see the manuals th...

Page 99: ...setup is automatically loaded for the next data stream Load a transaction setup on control panel 106 Load a transaction setup 1 Touch System Transaction 2 Bring transaction printing offline Activate the transaction printing mode on page 95 3 Touch Active transaction setup and select one of the available transaction setups 4 Click OK 5 Bring transaction printing online Load a transaction setup in S...

Page 100: ...setup can be open 108 Transaction setups 1 Open the Settings Editor and go to Transaction printing Setups 2 Bring transaction printing offline Activate the transaction printing mode on page 95 3 Select the transaction setup 4 Click Open When a transaction setup is marked Opened it can be edited 5 Click the IPDS setup tab 6 Change one or more setup attributes Attributes of a transaction setup on pa...

Page 101: ...on setups but only one setup can be loaded and is active 1 Open the Settings Editor and go to Transaction printing Setups 2 Use the Add or Copy function 3 Define a unique name and a description 4 Define the transaction setup attributes Attributes of a transaction setup on page 102 5 Click OK Define a new transaction setup Chapter 6 Transaction printing 101 ...

Page 102: ...Select the output tray Offset stacking Select if stacking occurs with or without an offset Font capture Indicate if fonts and other resources can be captured to the printer disk Define the resources on page 108 Extend the logical page millipoints When you want to print with a slightly larger page size you can increase the logical page size with the entered number of milli points unit of angle meas...

Page 103: ...e shows the media the job uses 111 Tray to tray settings PDF attributes 112 PDF attributes PDF attributes Description PDF spot colour All PDF data can have a number of pre defined spot colour names The colour name All means that all process colours are used to reproduce the colour black Special spot colours on page 218 4 Attributes of a transaction setup Chapter 6 Transaction printing 103 ...

Page 104: ...on Default CMYK input pro file Default monochrome CMYK input profile De fault RGB input profile Default monochrome RGB input profile Select a default input profile for the four types of input profiles Edit an input profile on page 213 Rendering intent Select the rendering intent that defines the colour conversion strategy for the out of gamut colours Print full colour or black white Use this funct...

Page 105: ... from another tray that holds the same media Error recovery 115 Output recovery When multiple prints for the same source page are not acceptable for example for lotteries and bank accounts set up a secure output recovery in the transaction setup The printer and the IPDS host can be involved in recovering the errors Use the table below to choose the recovery behaviour Error recovery modes Descripti...

Page 106: ...colour numbers are Cyan 1 Magenta 2 Yellow 3 MICR 5 Colour name 1 Names are encoded by UTF 16 Unicode For every colour station 6 names can be specified to enable a colour selection by a name For the cyan magenta and yellow colour stations the default lists of colour names are empty The MICR colour station contains the names MICR micr and Micr The names Gray Cyan Ma genta Yellow Black All None are ...

Page 107: ... the Settings Editor and go to Transaction printing Setups Import transaction setups 1 Click Import 2 Browse to the xml file with transaction setups 3 Select Replace to replace the transaction setups Select Merge to add the transaction setups 4 Click OK Export transaction setups 1 Click Export 2 Click OK The current transaction setup definitions are saved in an xml file Restore transaction setups ...

Page 108: ...ources are visible in the Settings Editor Only when the Font capture function in the loaded transaction setup is enabled the capturing of resources can take place This function also controls whether captured or installed resources are selectable 2 Imported resources Resources can be imported one by one or in a batch Imported resources are visible in the Settings Editor 3 Installed resources Import...

Page 109: ...o No No Delete captured re source Yes No Yes No Yes Capture resources Yes No Yes No Yes Set default resour ces Yes No Yes Yes No A captured bitmap font is related to a specific captured code page When one of these captured resources is deleted the other related captured resource is also deleted You can only perform this task when transaction printing is offline Capturing resources can only take pl...

Page 110: ...rotocol 3 Use the IPDS port function to set the IPDS port 4 Use the External finisher timeout period for end of set signal function to define the timeout period of end of set signal for the external finisher 5 You can import or export SRA configuration files on request of your Service organisation Click Import or Export in the Configuration file zip fields IMPORTANT Only use these functions on req...

Page 111: ...Chapter 7 Document printing ...

Page 112: ...t production Job planning Waiting jobs Scheduled jobs 119 Standard workflow profile The standard workflow profile fits a productive environment with suffi cient control over document print jobs Document print jobs go to the desti nation as defined in the job ticket DocBox jobs go to the list of sched uled jobs The high capacity stacker ejects the stack when the tray is full Job by job workflow pro...

Page 113: ...ne the print priority of the document print jobs Document print jobs go to the list of waiting jobs DocBox jobs go to the list of sched uled jobs The high capacity stacker ejects the stack after each job Unattended workflow profile Print production Job planning Waiting jobs Scheduled jobs 123 Unattended workflow profile The unattended workflow profile fits an environment for which productivi ty is...

Page 114: ...24 Attributes of a standard workflow profile Touch one of the standard workflow profiles Adjust one of the standard workflow profiles The name of a standard workflow profile changes into Custom when you change a default value of an attribute 1 Select the workflow profile 2 Adjust one or more attributes 3 Touch OK Define tray linking Enable the linking of output trays when there are two high capaci...

Page 115: ...ttributes of a workflow profile 1 Select the workflow profile 2 Touch Tray linking 3 Select Never When stacker is full or After each stack 4 Touch OK Choose a workflow profile Chapter 7 Document printing 115 ...

Page 116: ... from the job preparation to the delivery of the prints Print production Job planning Printed jobs Scheduled jobs Waiting jobs DocBox PDF Job preparation PRISMAprepare PDF Hotfolder PRISMAsync driver 1 Job preparation You can use PRISMAprepare the remote printer driver LPR or hotfolders to submit jobs The PDF documents can be created with specific graphical or office applications 2 Job planning Pr...

Page 117: ...g Choose workflow profile Scheduled jobs Waiting jobs Scheduled jobs Waiting jobs Scheduled jobs Waiting jobs Scheduled jobs Waiting jobs Print a job Change a job Printed jobs Scheduled jobs Waiting jobs Load media Remove Prints Replace containers DocBox Job workflow with Remote Manager and Remote Control The following illustration shows the document print job workflow when Remote Manager and PRIS...

Page 118: ...llowing 1 Job preparation across the printer fleet You can add import and export PDF jobs with Remote Manager 2 Job planning across the printer fleet Remote Manager displays the print queues of the PRISMAsync printers The print order across the print fleet can be centrally managed You can change job properties in Remote Manager 3 Print production across the printer fleet With the Remote Control ap...

Page 119: ...not accept transaction print jobs Document printing symbol on the dashboard of the control panel 127 Activate document printing mode from control panel 1 Touch System Transaction 2 Touch Transaction online Off 3 Touch Transaction printing mode Off NOTE To switch back to the transaction printing mode see Activate the transaction printing mode on page 95 Activate the document printing mode Chapter 7...

Page 120: ...des the following information in document printing mode 1 The timeline shows the scheduled jobs and gives a prediction of the job completion times 2 The required media pane shows the media of all scheduled jobs 3 The Load area shows in which paper trays media you select are loaded You can load media for the scheduled jobs Therefore select the media and touch Load 4 The output trays area shows whic...

Page 121: ...e ignored or not The system administrator can create new hotfolders Create a hotfolder on page 132 NOTE A JDF ticket can be created with the ticket editor LPR printing PDF files can be submitted to the printer with an LPR command When you print via LPR the queue name is the name of one of the available automated workflows Jobs submitted via this LPR command take the job properties of the automated...

Page 122: ...kflows 131 Workflow menu 2 Use the Add Edit or Copy function 132 Automated workflow menu 3 Define the attributes Attributes of an automated workflow on page 124 4 Click OK NOTE If needed you can delete one or more automated workflows or restore the factory defined default automated workflow Restore the default automated workflow on page 123 Define an automated workflow 122 Chapter 7 Document print...

Page 123: ...u want to restore the default automated workflow you use the Restore function IMPORTANT Be aware that this function removes all custom automated workflows 133 Automated workflows 1 Open the Settings Editor and go to Workflow Automated workflows 134 Workflow menu 2 Click Restore 3 Click OK Restore the default automated workflow Chapter 7 Document printing 123 ...

Page 124: ... an automated workflow can be identified by the Job label field This names re fers to the name of the automated workflow Description Description of the automated workflow Overrule job ticket The properties of the automated workflow can overrule the prop erties defined in the job ticket This is the default behaviour of an automated workflow When you want to apply a JDF job ticket in a hotfolder ens...

Page 125: ...s on the sheets Tumble Select the binding edge of the output The tumble function rotates the image of the back side 180 degrees Impositioning Define if multiple pages are printed on a sheet for example to cre ate a booklet Impositioning size Select a size for the booklets in case media are unknown Special pages attributes Description Front or booklet cover Select the media for the front cover Prin...

Page 126: ...age smoothing Use this function when you want to apply an anti aliasing algo rithm to smooth images with a low resolution Moiré reduction for im ages Use this function when you want to apply a Moiré reduction algo rithm to enhance photographic images Please note that when im ages have a resolution below 300 dpi the Moiré reduction only takes effect when the image smoothing function is enabled Trap...

Page 127: ...Streaming for small jobs with multiple sets Pages per record Use this function to indicate that PDF jobs are handled as variable data print job Enter the pages in a record Separator sheets Sepa rator sheet after N sets Indicate if sets or a group of sets are separated by a separator sheet N means the number of sets in a group Define use of ban ner pages and trailer pages on page 60 PDF XObject opt...

Page 128: ...e number Indicate if and where page numbers are printed Enter the text that is printed before or behind the page number Indicate if you want to use page numbers The default font and the font size are pre defined Define default font of page numbers on page 59 Attributes of an automated workflow 128 Chapter 7 Document printing ...

Page 129: ... of the automated workflow An automated workflow bundles a series of pre defined job properties Learn about automated workflows on page 121 138 Automated workflows 1 On your workstation make sure the Windows LPR command has been installed 2 Use the LPR command line and the following command format lpr S printer name P automated workflow name pdf name Submit jobs via LPR Chapter 7 Document printing...

Page 130: ...folders 139 Drag drop print files Create a shortcut to a hotfolder on a Windows workstation 1 Start the standard Windows wizard to map a network drive 2 In the dialogue use the link to connect to a website to share documents or files 3 Go to the Hotfolders tab of the Settings Editor There you can read the path to the hotfolder Use the following format http s IPaddress hotfolder name or http s host...

Page 131: ...drop the Default_ticket jdf file on the hotfolder shortcut Drag drop PDF files on a hotfolder 1 Double click the icon to enter the print settings that are defined for the hotfolder 2 Select the PDF files and drag drop them on the hotfolder shortcut After printing the PDF files are removed from the hotfolder Submit jobs via hotfolders Chapter 7 Document printing 131 ...

Page 132: ...that defines the job settings Define an automated workflow on page 122 5 Indicate who is allowed to access the hotfolder Select All authorised users when all authorised user accounts are allowed to access this hotfolder Select Authorised users of a specific user group when only authorised user accounts of a specific user group are allowed to access this hotfolder 6 Use the User group function to s...

Page 133: ...ormat that describes the job ticket the message description and the message interchange The JDF ticket that has the name Default_ticket jdf can be dropped in the hotfolder shortcut to define the properties of the PDF jobs Submit jobs via hotfolders on page 130 1 Open the Settings Editor and go to Workflow Hotfolders 2 Click Ticket editor 3 Define the settings you want to include into the JDF job t...

Page 134: ... be DocBox folders for jobs that must be printed according specific requirements 142 DocBox folders The system administrator creates the DocBox folders The system administrator can protect DocBox folders with a PIN The DocBox folder Public can always be accessed without PIN You use the Lock function to protect DocBox job information 143 DocBox PIN Plan the jobs 134 Chapter 7 Document printing ...

Page 135: ...printed jobs on page 58 Go to the job destinations 144 Queues view 1 Touch Jobs 2 Touch Queues to go to the scheduled and waiting jobs Touch DocBox to go to the DocBox folders Touch Printed jobs to go to the printed jobs View the job queues The waiting and scheduled jobs cannot be displayed in one view Touch or to switch between the two lists Select jobs Select and deselect jobs by tapping the job...

Page 136: ...DocBox All jobs Select all jobs Jobs with loaded me dia Select the jobs that use media that are in the paper trays Job label Select jobs that are submitted with a cer tain automated work flow The job label re fers to the name of the automated workflow Invert selection Select the unselected jobs and unselect the selected jobs 4 Find select and filter jobs 136 Chapter 7 Document printing ...

Page 137: ...r menu is available in all locations 148 Filter options for waiting jobs 149 Select media for job filtering Filter options Description Used media Show only jobs that use certain media Output tray Show only jobs that use a certain output tray Loaded media Show only jobs that use media that are in paper trays Job label Show only jobs that use a certain job label None Remove the filter and show all j...

Page 138: ... jobs 150 Searching jobs according to a search text The search box is available in all locations The search text is searched in all job information Find select and filter jobs 138 Chapter 7 Document printing ...

Page 139: ...elected jobs to a different DocBox folder 151 Move waiting job to DocBox Function Scheduled jobs Waiting jobs DocBox Printed jobs Move to DocBox Move to waiting jobs Move the selected jobs to the waiting jobs 152 Move scheduled job to waiting jobs Function Scheduled jobs Waiting jobs DocBox Printed jobs Move to waiting jobs Make a copy and move Make a copy of the selected jobs and move the copies ...

Page 140: ...nters configured on PRISMAsync Print Server you can forward jobs to these printers Forwarded jobs keep the properties that were defined during the job preparation 154 Forward job to other printer 155 Select another printer Function Scheduled jobs Waiting jobs DocBox Printed jobs Forward Move jobs to another destination 140 Chapter 7 Document printing ...

Page 141: ...can recover the original jobs with the Split function The combined job gets the name of the first individual job Combine waiting jobs 1 Go to the waiting jobs 2 Tap the jobs or use an option from the Select menu Find select and filter jobs on page 135 3 Touch Bundle 156 Bundle jobs 4 If required you can change the job name the job order and other properties 157 Properties of a bundle job 5 Touch O...

Page 142: ...and filter jobs on page 135 159 Create build 3 Touch Build 4 If required you can change the job name the job order and other properties 160 Properties of build job 5 Touch OK 6 The job is in the list 161 Build job Split combined jobs into the original jobs 1 Select the combined job Combine jobs 142 Chapter 7 Document printing ...

Page 143: ...2 Touch Split Combine jobs Chapter 7 Document printing 143 ...

Page 144: ... Print Server after a certain storage period When PRISMAsync Print Server does not remove printed jobs automatically remove these jobs manually to prevent a full system disk Jobs that have not been printed completely and proof prints do not come in the list of printed jobs 162 Delete jobs Function Scheduled jobs Waiting jobs DocBox Printed jobs Delete 1 Go to the location of the job 2 Tap the jobs...

Page 145: ...ate jobs Function Scheduled jobs Waiting jobs DocBox Printed jobs Duplicate 1 Go to the destination of the jobs 2 Tap the jobs or use an option from the Select menu Find select and filter jobs on page 135 3 Select Duplicate 4 If required change the job name and other properties Duplicate jobs Chapter 7 Document printing 145 ...

Page 146: ... either at the control panel or in Remote Manager The preview is based on the current impositioning media and colour settings Use the tour below to explore the realistic preview Tour to explore the realistic preview 1 Go to the properties of a job This view is the sheet view The front side and the back side of the first sheet are displayed 2 Touch to scroll through the document Touch a thumbnail t...

Page 147: ...3 Go to the document view Now you can browse and select a pair of opposite pages 4 Touch to get a closer look at an area Explore the realistic preview Chapter 7 Document printing 147 ...

Page 148: ...lore the options of the pixel precise preview Tour to explore the pixel precise preview 1 Go to the properties of a job and touch Ad just image Touch to hide the CMYK editor Touch to rotate the pages if required Touch to browse the pages of the docu ment Touch the thumbnail of the page you want to examine 2 Touch and the scroll bar to have a closer look at an area of the page You can also use your...

Page 149: ... area The CMYK values are dis played 4 Touch one of the colour channels In this ex ample K and Y are selected 5 Continue with the tour of the CMYK editor Explore the CMYK editor on page 150 Explore the pixel precise preview Chapter 7 Document printing 149 ...

Page 150: ...editor The effects of changing the CMYK values of the shown bitmaps are immediately visible In the pixel precise preview you can use several sliders In the advanced mode you find editable curves to lighten darken and shift document colours In both modes you can also tweak the contrast There are two modes to edit the job CMYK values 1 Basic mode simple CMYK editing with sliders for quick and easy c...

Page 151: ...ve the image around or to go to another page 2 Touch the colour picker tool and then move it to a pixel When you select a black text area it is possible to check if the text colour is pure or rich black 3 Apply a correction with a preset The list of presets contains standard and custom colour adjustments You can also use a preset as a starting point for further adjustments or other presets 1 Exami...

Page 152: ...he anchor point touch the point and then touch the trash icon 7 Move the anchor points 1 To move an anchor point use the and buttons or drag the anchor point up or down When ready the input and output values and the shown bitmap are adjusted 2 Move an anchor point towards the left This adjusts the shadow tones of the col our 3 Move an anchor point towards the right This adjust the highlight tones ...

Page 153: ... the shadow tones and highlight tones 10 Save the adjustments 1 Save the adjustments as a preset for later reuse 2 Touch OK to apply the adjustments 3 Touch Reset to restore the original colour values 4 Touch to undo or redo one adjustment step Explore the CMYK editor Chapter 7 Document printing 153 ...

Page 154: ... with variable data Create a varia ble data job on page 172 Note for operator Print instruction defined during the job submission Job label The Job label name refers to the name of the automated work flow The Default value refers to the default automated workflow General job information In the Original area you find also other general information on the job such as the username the number of pages...

Page 155: ...ob setting What you can define Job name Name of document Number of sets Enter the number of sets maximum 65 000 Check first set This function is available when the workflow profile supports this function Choose a workflow profile on page 114 Indicate that you want to check the first set of the job and print the remaining sets after confirmation 4 Change general print settings Chapter 7 Document pr...

Page 156: ... or records or want to select a print range Separator sheets 168 Separator sheets Indicate if you want to add separator sheets to distinguish individ ual sets Media of the separator sheets are defined in the Settings Editor Change general print settings 156 Chapter 7 Document printing ...

Page 157: ...lains the Media settings for document printing on the control panel 169 Media settings Media settings What you can define Basic mode Indicate the required media from the media catalogue Use the filters to select media with a specific size or weight 4 Change media for the job Chapter 7 Document printing 157 ...

Page 158: ...efine Advanced mode The advanced mode shows the media management overview from where you can search and select media for the job Manage the media from control panel on page 90 Change media for the job 158 Chapter 7 Document printing ...

Page 159: ...w explains the Layout settings for document printing settings on the control panel 170 Print layout settings Layout settings What you can define 1 or 2 sided Indicate if the prints are printed one or two sided Binding edge The orientation of the content is part of the original settings and cannot be changed You can change the binding edge the sheet edge to which the previous page is bound 4 Change...

Page 160: ...ou want to print on one or both sides of the cover Layout Booklet Indicate if you want to print booklets Layout Multiple up Indicate if you want to print multiple pages on a sheet side Layout Same up Indicate if you want to print the same page multiple times on a sheet side 4 Change the print layout 160 Chapter 7 Document printing ...

Page 161: ...fine Zoom Indicate if you want to scale the image according to the page size or set the zoom factor manually 25 400 Align Indicate how you want to align the image on the sheet 4 Change the print layout Chapter 7 Document printing 161 ...

Page 162: ...ding edge with a maximum shift of 100 mm 3 94 Indicate if you want to use an image shift When you adjust the image shift you move the image on the sheet with a maximum shift of 100 mm 3 94 Margin erase Indicate if you want to erase the margins of the image When you adjust the margin erase you erase areas of the image with a maxi mum of 100 mm 3 94 Change the print layout 162 Chapter 7 Document pri...

Page 163: ...ings The Adjust image tile gives access to the pixel precise editor and the CMYK editor Explore the pixel precise preview on page 148 Explore the CMYK editor on page 150 The tables below explain the Print quality settings for document printing on the control panel 171 Print quality settings Print quality settings Change print quality settings for the job Chapter 7 Document printing 163 ...

Page 164: ...ailable colour bars Edit a colour bar on page 203 Information bar When you want to print an information bar select one of the avail able information bars Define an information bar on page 202 Page numbering Indicate if you want to use page numbers The default font and the font size are pre defined Define default font of page numbers on page 59 Edit colour settings settings The colour preset attrib...

Page 165: ...e colour preset touch Save colour preset Input profile Select one of the available CMYK or RGB input profiles The input profile is the reference colour space for the CMYK or RGB data of the objects in the print job Overruling Use this function to overrule the RGB or CMYK embedded profiles and rendering intents 4 Change print quality settings for the job Chapter 7 Document printing 165 ...

Page 166: ... colour Use PDF overprint simula tion Use this function to make opaque objects look transparent Under lying objects become visible If this function is disabled the col ours on top will knock out the underlying colours Use PDF X output intent Use this function to define that PDF files are printed according to their embedded output intent PDF X specifies the printing condi tion for which the PDF X f...

Page 167: ...er performance Quality adjustments settings Quality adjustments set tings What you can define Image smoothing Use this function when you want to apply an anti aliasing algo rithm to smooth images with a low resolution Moiré reduction for im ages Use this function when you want to apply a Moiré reduction algo rithm to enhance photographic images Please note that when im ages have a resolution below...

Page 168: ...rapping When you want to improve the object registration you can select one of the available trapping presets or create a new trapping pre set Create a trapping preset on page 175 Change print quality settings for the job 168 Chapter 7 Document printing ...

Page 169: ...ings When jobs arrive in the list of waiting jobs there is time to check the delivery settings The tables below explain the Print delivery settings for document printing on the control panel 172 Prints delivery settings Print delivery settings What you can define Output tray Define which output tray you want to use 4 Change the prints delivery for the job Chapter 7 Document printing 169 ...

Page 170: ...fine if you stacking occurs with or without an offset Advanced settings Sheet order Define which sheet order is applied in the output tray Advanced settings Sheet orientation Define which sheet orientation is applied in the output tray 4 Change the prints delivery for the job 170 Chapter 7 Document printing ...

Page 171: ...ou can define Advanced settings Print order Define how the sheets are delivered in the output tray Advanced settings Ro tation Indicate if the images are rotated Change the prints delivery for the job Chapter 7 Document printing 171 ...

Page 172: ...a variable data print job it automatically distinguishes the record structure Records are treated as print sets Records do not necessarily contain the same number of pages The number of pages per record depends on the length of the variable data in each personalised document The printing of a variable data job is like the printing of a normal job Print a proof Check the first record Change origina...

Page 173: ...b 1 Select the job you want to convert 2 Touch Edit or double tap the job 3 Use the Job type function to select Variable data 175 Change job type 4 Specify the structure of the job Create a variable data job Chapter 7 Document printing 173 ...

Page 174: ... 176 Variable data print job 5 Touch OK and again OK to start the conversion The icon indicates the new variable data job Create a variable data job 174 Chapter 7 Document printing ...

Page 175: ...ttings for the job on page 163 178 Colour adjustments 1 Touch System Colour adjustment Edit trapping presets 2 Select one of the available trapping presets 3 Define the trapping settings Trap width which controls the overlap for each trap Trap appearance which controls the shape of the trap joins Images options which control the trapping of images Trap thresholds which are conditions to create a t...

Page 176: ...Be aware that an edge can appear at locations where colour planes overlap each other Create a trapping preset 176 Chapter 7 Document printing ...

Page 177: ...Printed jobs Proof Print a job The Print function moves one or more jobs to the list of scheduled jobs where they are printed according to their position in the list Printed scheduled jobs go to the list of printed job Printed DocBox jobs remain in the DocBox folder 181 Print a waiting job Function Scheduled jobs Waiting jobs DocBox Printed jobs Print Print the first set Especially for jobs with m...

Page 178: ...nction Scheduled jobs Waiting jobs DocBox Printed jobs Check first set Print a job ticket You can read the job settings by printing a job ticket The job ticket is printed in the printer language and shows the job properties 183 Print job ticket Print a job 178 Chapter 7 Document printing ...

Page 179: ... Scheduled jobs Waiting jobs DocBox Printed jobs Print job ticket Print now Use the Print now function to print the job immediately 185 Print now Function Scheduled jobs Waiting jobs DocBox Printed jobs Print now Move to top Use the Move to top function to move the job to the first position of the scheduled jobs so that it is printed as soon as possible Print a job Chapter 7 Document printing 179 ...

Page 180: ...e to print the files directly 187 Print files on a USB drive 1 Insert the USB drive into the USB port at the left hand side of the control panel 2 Touch Jobs USB 3 Touch the directory that stores the files if needed 4 Select one or more jobs 5 Touch Print to move the job to the list of scheduled jobs Touch Save to move the job to the list of waiting jobs 6 Touch the eject button and remove the USB...

Page 181: ...he printer stops when the print buffer is empty and a complete set or record has been printed 2 Touch the Resume button to resume printing 189 Resume a job after a print stop Stop as soon as possible 1 Press the Stop button twice The printer stops when the print buffer is empty which means as soon as possible 2 Touch the Resume button to resume printing 190 Resume a job after a print stop Stop pri...

Page 182: ...Stop after job Stop printing after a certain job has been completed 1 Select the job in the list of scheduled jobs 2 Touch Stop after job Stop printing 182 Chapter 7 Document printing ...

Page 183: ...Chapter 8 Manage media definitions ...

Page 184: ...avy Heavy paper can be used for cards and covers Recycled Recycled paper helps to reduce the impact that the paper produc tion has on the envi ronment It is paper made of consumer waste paper Colour Colour paper can be used for cards covers and special media Perforated Perforation is a series of small cuts that al low one part of the pa per to easily tear off from the rest Tabs 5 4 3 2 1 Tab divid...

Page 185: ...Pre punched Pre punched media can be used for man uals handbooks and other documents that are bound at a later moment Learn about media substrates Chapter 8 Manage media definitions 185 ...

Page 186: ... media family includes a reference to a media print mode Media print mode Media print modes group properties that define how the printer must handle and print the media A media print mode includes a reference to an output profile NOTE All VarioPrint i series media families have one media print mode Default Settings of the VarioPrint i series media elements New media that are imported in the media ...

Page 187: ...tion parameters describe how the printer uses and prints the media Some parameters can be changed for example if media are suitable for quality control sheets 3 Calibration media Default media to print the media family calibration charts 4 Output profile The output profile is linked to the media print mode Media packs When the Service organisation has prepared new media definitions you receive a m...

Page 188: ...rinter only imports the elements that are not yet available Learn about media elements on page 186 1 Open the Settings Editor and go to Media Media 194 Media menu 2 Go to the media catalogue 3 Click Import 195 Import option 4 Select Media pack 196 Import media pack 5 Browse to the media pack zip file 6 Confirm the selection 7 Click Import The media elements are added Define media elements 188 Chap...

Page 189: ...197 Media catalogue IMPORTANT The values of all media settings are factory defined and exactly match the properties of the media and the VarioPrint i series printer Only change these default values when you understand what these settings mean and do 1 Open the Settings Editor and go to Media Media To find media touch the Search button and enter a search string You can also use the filters 198 Medi...

Page 190: ...e media family NOTE You can select from media families that have the same media print parameters ranges as the current media family Standard type Select the type of media definition Custom type name This field shows information of the media definition Tab Indicate if the media are tab paper Insert Indicate if the media are inserts Cycle length Enter the cycle length in case the media are tab paper...

Page 191: ...lf A colour sample is shown 201 Pre defined media colour Representation colour When you selected the media colour Custom you can click the colour or enter the RGB value of the media colour A colour sample is shown 202 Define the media colour Define new media in the media catalogue Chapter 8 Manage media definitions 191 ...

Page 192: ...ettings mean and do 1 Open the Settings Editor and go to Media Media 203 Media menu 2 Select the media 3 Click Optimise 204 Optimise option 4 Adjust one or more media optimisation parameters Media optimisation parameters on page 192 205 Media optimisation parameters 5 Click OK NOTE The media optimisation settings also include the media registration parameters Adjust media registration parameters o...

Page 193: ...ntrol Disable this function when the media is coloured preprinted thin punched or with tabs Then the printer will use alternative media instead Learn about quality control sheets on page 251 Enable detection of nozzle failures on front side En able detection of nozzle failures on back side These parameters indicate if the front and back sides of the media are suitable for nozzle failure detection ...

Page 194: ...t these settings mean and do 206 Media families 1 Open the Settings Editor and go to Media Media families To find a media family touch the Search button and enter a search string 207 Media menu 2 Use the Copy media family or the Edit function 208 Media family menu 3 Change one or more media family settings Media family settings on page 194 209 Media family settings 4 Click OK NOTE You can only del...

Page 195: ...e calibration timer of the media family Learn about media family calibration on page 234 Default media for calibra tion Select the default media that are used for the charts of the media family calibration Print a colour reference chart Print a colour reference chart to visually evaluate the print quality on the media of the media family 1 Select the media family 2 Click Print 3 Select the chart m...

Page 196: ...h the properties of the media and the VarioPrint i series printer Only change these default values when you understand what these settings mean and do NOTE It is not possible to add delete or copy media print modes To create a new media print mode you copy the media family 210 Media print modes 1 Open the Settings Editor and go to Media Media families 2 Go to the media family 3 Select the media pr...

Page 197: ...t calibration date This field shows when the last media family calibration has been performed Restore the default cali bration curve Use this option to restore the default calibration curve Restore calibration curves on page 246 NOTE The media print mode also has parameters that define the print process These parameters are not editable Edit a media print mode Chapter 8 Manage media definitions 19...

Page 198: ...Edit a media print mode 198 Chapter 8 Manage media definitions ...

Page 199: ...Chapter 9 Manage colour definitions ...

Page 200: ...disabled the colours on top will knock out all underlying colours 5 Use the Preserve pure black function to apply pure black preservation when possible Pure black preservation means that the colour black is composed of 100 K ink When pure black preservation is not possible or disabled the colour black is composed of a mixture of C M Y and K inks 6 Use the Spot colour matching function to enable or...

Page 201: ...ule the embedded RGB input profile of the source Define Device CMYK input profiles 1 Use the DeviceCMYK input profile function to select the default Device CMYK input profile This defines a reference colour space for the CMYK object data in the source 2 Use the Overrule CMYK profile function to overrule the embedded CMYK input profile of the source 3 Use the Standard rules CMYK saturation intent f...

Page 202: ...on There is one factory defined information bar FOGRA Validation Print You can add more custom information bars 215 Default information bar 1 Open the Settings Editor and go to Colour Colour information bars 216 Location of colour and information bars 2 Use the Add or Edit function 217 Information bar attributes 3 Select for each field the information you want to display Select Custom value for a ...

Page 203: ...fined colour bars FOGRA CMYK Media Wedge 2008 Version V2 2a Proof FOGRA CMYK Media Wedge 2008 Version V3 0a Proof FOGRA CMYK Media Wedge 2008 Version V3 0b Proof IDEAlliance Control Strip 2009 NOTE You cannot create your own colour bars 1 Open the Settings Editor and go to Colour Colour information bars 218 Location of colour and information bars 2 Select the colour bar 219 Default colour bars 3 C...

Page 204: ...olour bars if required Go to the colour bars Open the Settings Editor and go to Colour Colour information bars 220 Location of colour and information bars Import a colour bar 1 Click Import 221 Default colour bars 2 Select the eps file that represents the colour bar 3 Click OK Export a colour bar You can only export previously imported colour bars 1 Select the colour bar 2 Click Export 3 Click OK ...

Page 205: ...reset becomes visible in the list of colour presets Change print quality settings for the job on page 163 There are two factory defined colour presets Office documents This colour preset is optimal for colour reproduction of text and graphical lines in office documents PRISMAsync Print Server converts source colours to more saturated output colours Photographic content This colour preset is optima...

Page 206: ...eRGB rendering in tent Select the Device RGB rendering intent that defines the colour conversion strategy for the out of gamut colours Overruling for RGB Use this function to overrule the embedded RGB input profiles and rendering intents DeviceCMYK input profile Select the Device CMYK input profile that defines a reference col our space for the CMYK data of the objects in the print job DeviceCMYK ...

Page 207: ... this function to define that PDF files are printed according to their embedded output intent PDF X specifies the printing condi tion for which the PDF X file was created The Device CMYK input profile and the job ticket are ignored Overprinting black Use the function to force black text and graphics to print over the background colour The native PDF RIP uses this function to pre vent registration ...

Page 208: ... into PRISMAsync Print Server You can create new output profiles with PRISMAprofiler Rendering intent The output profile knows the range of colours gamut the printer can print and the print behaviour of the media for which the colours are intended The rendering intent specifies the way how source colours are converted to output colours Source colours that fall outside the gamut of the printer are ...

Page 209: ...Edit a media print mode on page 196 224 Output profiles 1 Open the Settings Editor and go to Colour Output profiles 2 Select the output profile 3 Click Edit 225 Edit an output profile 4 Change the name and description 5 Indicate if you want to create a composite output profile Create composite output profiles on page 211 6 Click OK Edit an output profile Chapter 9 Manage colour definitions 209 ...

Page 210: ...put profiles Open the Settings Editor and go to Colour Output profiles Import an output profile 1 Click Import 2 Browse to the required icc file 3 Define a unique name and the description 4 By default a standard output profile is created without device simulation Indicate if you want to create a composite output profile Create composite output profiles on page 211 5 Click OK Export an output profi...

Page 211: ...file 2 Select one of the available input profiles that represents the input profile of the simulated printer or offset press When you select None device simulation is turned off and a normal output profile is created 3 Use the Paper simulation check box to enable paper simulation for the selected simulation profile When paper simulation is enabled the colour of the media on the simulated printer i...

Page 212: ...utput profile with a reference to the simulation profile is in the list of output profiles Create a composite output profile with a DeviceLink profile 1 Open the Settings Editor and go to Colour Output profiles 2 Click Import 3 Browse to the storage location of the DeviceLink profile icc file of the simulated printer 4 In the Import device link dialogue 1 Define a name and description of the compo...

Page 213: ...ailable input profiles Define a colour preset on page 205 You cannot create input profiles in the Settings Editor You can only edit an imported input profile 1 Open the Settings Editor and go to Colour Input profiles In the list you see the available input profiles and if an input profile is in use or factory defined 228 Input profiles menu 2 Select the input profile 3 Click Edit 4 Change the name...

Page 214: ...onnection Space PCS colour space Edit an input profile on page 213 Go to the input profiles 230 Input profiles menu Open the Settings Editor and go to Colour Input profiles Import input profiles 1 Click Import 2 Browse to the required icc file 3 Define a unique name and a description 4 Click OK Export input profiles 1 Click Export 2 Browse to the location to store the icc file 3 Click OK Import or...

Page 215: ...elect another colour mapping group in the job properties Therefore you first indicate that you want to use spot colour matching 231 Colour mappings menu Go to the colour mappings Open the Settings Editor and go to Colour Colour mappings Define a colour mapping group 1 Use the Add group Edit or Copy function 2 Define a name and description 3 Click OK Define a colour mapping 1 Select the colour mapp...

Page 216: ...one or more colour mappings or colour mapping groups 2 Click Delete Move a colour mapping to another group 1 Select the colour mapping 2 Click Move 3 Select the new colour mapping group 4 Click OK Define colour mapping 216 Chapter 9 Manage colour definitions ...

Page 217: ...e Source colour function to define the source colour RGB colour value enter values for the Red Green Blue fields CMYK colour value enter values for the Cyan Magenta Yellow Black fields Spot colour of a spot colour library select the spot colour Spot colour of a custom spot colour library select the spot colour Special spot colour enter Cyan Magenta Yellow Black All None See below NOTE Search in th...

Page 218: ...colours Spot colour Description Cyan Magenta Yellow Black A mapping to one of these exactly spelled spot colour names prints the primary colour instead of the source colour No colour management is ap plied to this target colour All A mapping to this exactly spelled spot colour name prints all primary colours instead of the source colour This results in a rich black None A mapping of this exactly s...

Page 219: ... media family you use a CMYK value You can add more CMYK colour values to a spot colour definition for other media families that print the spot colour When you want to add a spot colour that has the exact colour value of a sample for example in an offset print you measure the spot colour with the i1 spectrophotometer Measure charts with the i1 spectrophotometer on page 247 The measured Lab values ...

Page 220: ...from the control panel Go to the spot colour editor 235 Colour adjustments Touch System Colour adjustment Spot colours To find a spot colour touch the Search button and enter a search string Add a spot colour by entering CMYK values 1 Touch Add 2 Enter a name for the spot colour 3 Use the Input mode function to select CMYK 4 Select the media family Create a spot colour from the control panel 220 C...

Page 221: ...asuring a sample colour With the spot colour measurement procedure you measure three locations of a sample of the spot colour PRISMAsync print server calculates and returns the average Lab value and reports a E to indicate the differences The reported E value is the largest difference between each individual measured value and the average of all measured values A E larger than 3 means a large diff...

Page 222: ...rt Read the spot colour patch chart on page 227 6 Touch OK The spot colour is stored in the custom library Add CMYK values to a spot colour 1 Select the spot colour library and search the spot colour 2 Touch Edit 3 Touch Add to add a CMYK value 4 Select the media family The CMYK value for the media family is displayed 238 Edit a spot colour Create a spot colour from the control panel 222 Chapter 9...

Page 223: ... is the colour rendering of the Lab definition The New colour patch shows the rendering of the CMYK values for the media family 5 Touch OK Create a spot colour from the control panel Chapter 9 Manage colour definitions 223 ...

Page 224: ...nd go to Colour Spot colours Create a new spot colour 1 Open the Settings Editor and go to Colour Spot colours 2 Click Add 3 Enter a name for the spot colour 4 Use the Input mode function to select CIELAB or CMYK 239 Add spot colour value in Lab 240 Add spot colour value in CMYK 5 For CMYK select the media family 6 Enter a CMYK or Lab value 7 Click OK Add CMYK values to a spot colour 1 Click the s...

Page 225: ...r value is displayed for the default media family and 100 tint value 242 CMYK values of a spot colour 4 Click Add CMYK value 5 Select a media family The CMYK value for the media family is displayed Create a spot colour in Settings Editor Chapter 9 Manage colour definitions 225 ...

Page 226: ...valuate the CMYK values print a patch chart Use the Step size function to define the degree of patch variations This step size is from 1 to 20 8 Click OK NOTE You can only delete custom spot colours Create a spot colour in Settings Editor 226 Chapter 9 Manage colour definitions ...

Page 227: ...art on media that belong to the media family of the CMYK values A patch chart shows 39 patches with variations of CMYK values The chosen step size determines the degree of patch variations in percentages 1 20 Patch variations The patches are arranged in three rows All patches of a row all have the same K value The middle row patch es represent the K value of the spot colour The K value is decrease...

Page 228: ...text When a CMYK value comes below 0 or above 100 the value is clipped This new CMYK value is printed in red text and the patch has a dotted line Read the spot colour patch chart 228 Chapter 9 Manage colour definitions ...

Page 229: ... Custom spot colours Imported spot colours The library of custom spot colours contains the spot colours that users have created You can only edit imported spot colour libraries 245 Spot colour libraries 1 Open the Settings Editor and go to Colour Spot colour libraries 2 Select the spot colour library 3 Click Edit 4 Change the name and description 5 Click OK NOTE You can only delete imported named ...

Page 230: ... the ICC International Color Consortium 246 Spot colour libraries Go to the spot colour libraries 1 Open the Settings Editor and go to Colour Spot colour libraries 247 Custom spot colour library Import a spot colour library Named spot colour profiles 1 Click Import 2 Select the file with the spot colour library Export a spot colour library You can only export previously imported named spot colour ...

Page 231: ...dit a spot colour library on page 229 You can only recover the values of spot colours of the pre defined and imported libraries 248 Spot colours 1 Open the Settings Editor and go to Colour Spot colours 2 Select the spot colour library 3 Select one or more spot colours 4 Click Reset Reset spot colours Chapter 9 Manage colour definitions 231 ...

Page 232: ...Reset spot colours 232 Chapter 9 Manage colour definitions ...

Page 233: ...Chapter 10 Print what you expect ...

Page 234: ... media family on page 237 After the completion of the media family calibration procedure the feedback window shows the results of the performed procedure Depending on the feedback information you decide to save the new calibration curves or discard the results and keep the calibration curves of the previous media family calibration Read media family calibration feedback on page 239 249 Media famil...

Page 235: ...alibration curves that the media family calibration creates will compensate for the identified differences Creation of calibration curves on page 379 Calibration charts The media family calibration wizard informs you how you must perform the procedure The media family procedure prints calibration charts on target media The charts represent the actual colour behaviour on the front side and the back...

Page 236: ...his media family have been calibrated Edit a media print mode on page 196 The calibration timer of the media family shows how often a media family calibration should occur Media in the media catalogue show an icon when the media family needs to be calibrated according to the timer Learn about media family calibration 236 Chapter 10 Print what you expect ...

Page 237: ...ferent calibration charts for the front side and the back side of the media The calibration chart can only be printed on media that are equal to or larger than 210 0 x 279 4 mm 8 3 x 11 7 1 Load and assign the target media in one of the paper trays 2 Touch System Colour adjustment Media family calibration 252 Colour adjustments 3 Select the media family and the media print mode 4 Select the target...

Page 238: ...s You are strongly advised to redo the media family calibration When the measurement accuracy results do not improve there can be another problem The heatmap can indicate a possible problem but cannot analyse the problem Similar patterns of reddish patches that appear after several media family calibrations can indicate that there is a structural problem Carefully check your job prints if there is...

Page 239: ...evious calibration deviate Horizontal lines mean that the curves are identical When one or more curves show significant differences the new media family calibration can be considered as necessary Touch the icon in the right hand top corner to switch between the front side and back side NOTE For the first media family calibration there are no reference values and thus no feedback information in thi...

Page 240: ...rences between the measured and the reference values When you touch the summary area you see more information Every measured patch of both calibration charts are represented in the heatmap The heatmap indicates how accurate the measurements of the patches were performed When the feedback shows that the measurements were not accurate enough according to the configured tolerance levels perform the m...

Page 241: ...he measured colours the reference colours and the colour differences 1 Use the zoom symbol to zoom into a detail of the heatmap 2 When you touch a green heatmap patch the colour difference falls within the set tolerance level 254 Meeting tolerance level 3 When you touch a red patch the colour difference 6 11 falls outside the set tolerance level 5 Read media family calibration feedback Chapter 10 ...

Page 242: ... 255 Exceeding tolerance level Read media family calibration feedback 242 Chapter 10 Print what you expect ...

Page 243: ...nce level is also expressed by a Delta value You cannot change or add tolerance levels for the media family calibration Tolerance levels for measurement accuracy To decide if measurements are considered as accurate or not PRISMAsync Print Server uses tolerance levels for chart measurements Tolerance levels for the measured paper white and primary colours To decide if paper white and primary colour...

Page 244: ...3 Click Edit Read tolerance levels for the media family calibration 244 Chapter 10 Print what you expect ...

Page 245: ...o CMYK values on job or media family level IMPORTANT Be aware that the CMYK adjustments affect all media that belong to the same media family To adjust CMYK values of a print job see Explore the CMYK editor on page 150 1 Touch System Colour adjustment 257 Colour adjustments 2 Touch Edit CMYK curves 3 Adjust the curves Explore the CMYK editor on page 150 Adjust CMYK curves of a media family Chapter...

Page 246: ...about media family calibration on page 234 258 Media print modes 1 Open the Settings Editor and go to Media Media families 2 Go to the media family 3 Select the media print mode 4 Click Edit 259 Edit option 5 Click Restore the default calibration curve The status of the media family changes to Not calibrated 6 Click OK Restore calibration curves 246 Chapter 10 Print what you expect ...

Page 247: ... the target media to print the charts 3 Connect the i1 spectrophotometer to the USB port of the control panel 4 Make sure the protective slider shows the white calibration tile of the calibration plate and place the i1 spectrophotometer on the calibration plate 5 Press the measurement button The status indicator lights pulsate white when the i1 spectrophotometer is ready for use Measure charts 1 P...

Page 248: ... 1 261 Location of the printhead unit when maintenance occurs top view Description 1 Printhead unit in print position 2 Printhead unit in maintenance position Automatic printhead maintenance processes There are three automatic processes that clean the nozzles Wet tissue wipe ink residuals that stick on the nozzle plate are removed by a piece of moistened tissue Dry tissue wipe ink residuals that s...

Page 249: ...r the failing nozzles It depends on the configured printer behaviour if the printer starts a printhead maintenance Printhead maintenance to repair extensive nozzle failures on page 253 Printhead maintenance schedule To understand how the printhead maintenance procedures of the printer are organised use the scheme below where six printer scenarios are described F 09 00 10 00 11 00 E 102 µm SRA3 A4 ...

Page 250: ...s example at 15 30 D Non stop printing When the printer prints continuously a wet tissue wipe and purge dry tissue wipe are scheduled 3 5 hours after the previous purge dry tissue wipe The run will be interrupted E Print other media Media print parameters define how media are printed When new media are printed a purge dry tissue wipe can be needed For example when the printer prints on a smaller m...

Page 251: ...dle for more than 19 seconds the first new job is preceded by a nozzle failure detection sheet Media optimisation parameters determine if nozzle failure detection sheets are printed and on which sides Optimise media on page 192 265 Example of a nozzle failure detection sheet Nozzle failure compensation The nozzle failure compensation is a fully automated mechanism When failing nozzles are detected...

Page 252: ...lure detection sheets remain part of the quality control NOTE The job media of the next sheet to print determine if the alternative media are used for a next nozzle failure detection sheet As a consequence when a job has mixed media nozzle failure detection sheets can be printed on job and also on alternative media NOTE The alternative media size in cross feed direction must be equal to or larger ...

Page 253: ...ures that cannot be compensated The printer interrupts printing to perform a printhead maintenance procedure Thereafter the print job continues There is no dialogue to inform the user When you select After confirmation the printer acts when extensive nozzle failures are detected for example when a printhead segment is no longer active An error dialogue appears The printer stops the printing proces...

Page 254: ...detection before you disable the nozzle failure detection 3 Use the Interval between failure detection sheets number of sheets function to define the number of sheets after which a nozzle failure detection sheet is printed 272 Nozzle failure detection interval 4 Use the Paper tray of alternative media for quality control sheets function to select the paper tray where you load alternative media for...

Page 255: ...trol panel to check a single sheet of the current job To enable intermediate check prints and define the print interval see Define usage of intermediate check prints on page 256 Depending on the printer type nozzle failure detection sheets arrive in the top tray of the first capacity stacker or in the system tray 1 2 3 4 5 274 Print an intermediate check print 1 Touch System Setup 2 Touch Intermed...

Page 256: ...eck prints 1 Use the Interval of intermediate check print function to define the interval of intermediate check prints When the value is 0 the printing of intermediate check prints is disabled 276 Enable intermediate check prints 2 Click OK Reset the counter of intermediate check prints 1 Use the Reset intermediate check print counter function to define when the counter is reset Select When enable...

Page 257: ...ts of colour validation tests You can perform a colour validation test for several reasons 1 You want to know if the printer is able to print the colours on the selected media according to a reference printing condition 2 You want to know if the printer is able to print the same colours on the selected media over time 3 You want to check the colour reproduction against FOGRA Print Standard Digital...

Page 258: ...gorithm to compensate for the different white points The SCCA Substrate Corrected Colorimetric Aims evaluation method used by IDEAlliance tests is also based on the media relative evaluation Target charts The colour validation test prints target charts on the selected media that you measure when they are dry The type of target chart belongs to the definition of the colour validation test or the pr...

Page 259: ... patch is a patch printed with 100 C M Y or K Tolerance levels The difference between two colours or two groups of colours can be expressed by a colour metric Learn about colour differences on page 261 Every test definition has a pre defined series of colour metrics Overview of colour validation metrics on page 375 The test definition also includes for every metric a tolerance level to decide if p...

Page 260: ... 281 Example Feedback window of a colour validation test Learn about colour validation tests 260 Chapter 10 Print what you expect ...

Page 261: ...his topic first describes the CIELAB colour spaces and then describes the colour metrics that are derived from them CIELAB colour values The CIELAB colour space has been developed by the Commission Internationale d Eclairage CIE and represents a three dimensional sphere in which every colour is unique by its location The Lab colour value describes the location of the colour in the CIELAB colour sp...

Page 262: ...tance from the lightness axis ranges from 0 at the axes to more than 100 at the edge h the hue angle expressed in degrees where 0 means the location on the a axis and 180 means the location on the a axis E Delta E The most general metric to express the difference between two colours in CIELAB is Delta E The Delta E value predicts how the human eye perceives the colour difference Delta E not always...

Page 263: ...ce information than the total colour difference Delta E the hue error H Delta H is used You can imagine Delta H as which colour difference is left over when the lightness and the chroma differences are ignored L Delta L L Delta L is the lightness difference between the two colours ΔL is the absolute value of L Delta L The weighted L puts more emphasis on the colour differences for light greys wher...

Page 264: ...alance errors The weighted Ch puts more emphasis on the colour differences between composite greys where C is lower than 50 The goal of weighting is to reduce the importance of the grey balance for very dark greys These dark greys errors are difficult to handle and are usually printed with black ink This weighting definition is in accordance with the IDEAlliance G7 specification Learn about colour...

Page 265: ...he test charts 1 Open the Settings Editor and go to Colour Colour validation verification 285 Colour menu 2 Click Configure 286 Select colour validation test 3 Use the Print cleaning sheets before test charts function to indicate if you want to print cleaning sheets before the charts are printed Print the target charts 1 Calibrate the media family of the target media Calibrate a media family on pa...

Page 266: ...et charts on a place to dry Measure the charts When the charts are completely dry you measure the charts with an i1 spectrophotometer Read the instruction in Calibrate a media family on page 237 how to use the i1 spectrophotometer 1 Touch System Media 2 Select the media 3 Select the colour validation test 4 Select Only measure target Perform a colour validation test 266 Chapter 10 Print what you e...

Page 267: ...ophotometer See Measure charts with the i1 spectrophotometer on page 247 6 Finish the procedure 7 Read the feedback information Read colour validation results on page 270 Perform a colour validation test Chapter 10 Print what you expect 267 ...

Page 268: ...ontrol strip drop down list 4 Select the evaluation mode from the Evaluation mode drop down list Evaluation methods on page 258 5 Select the simulation profile from the CMYK simulation profile drop down list Choose the profile that specifies a standard condition or a printer you want to simulate 6 Select the first metric from the Colour metric 1 drop down list Overview of colour validation metrics...

Page 269: ...vels for the pre defined FOGRA and IDEAlliance colour validation tests The profile accuracy test also has fixed tolerance levels that are not editable 1 Open the Settings Editor and go to Colour Colour validation verification 288 Colour menu 2 Select the test 289 Select colour validation test 3 Click Edit 4 Read the metrics and tolerance levels Read tolerance levels for colour validation tests Cha...

Page 270: ...all test details download the colour validation report The following example is not based on a realistic printer and print environment 290 Example feedback of a colour validation test Download the CGATS report The CGATS report lists all test details the printing condition the achieved quality levels and the measured and evaluated colour patch values name CMYK values reference Lab values measured L...

Page 271: ...Chapter 11 Save energy ...

Page 272: ...er 291 Sleep button You can also shut down the printer to further reduce the energy consumption during longer periods that you do not use the printer Shut down the printer on page 273 Prepare printer for a long shut down period on page 277 Warming up time When the printer is shut down the printer needs time to warm up The time the printer needs to warm up depends on the print room temperature If t...

Page 273: ...tched off To save energy during recurring periods that the printer is not productive for example overnight or over the weekend use the energy save timers Configure the energy save timers on page 275 IMPORTANT Do not use the main power switch 292 Shut down the printer 1 Touch System Setup The Controller view also has the shut down option 2 Touch Shut down printer 3 Touch Yes A message indicates whe...

Page 274: ...f It depends on the sleep mode configuration if the printer responds to new print jobs 1 Open the Settings Editor and go to Preferences System settings Energy save modes 293 Location of system settings 2 Use the Sleep mode timer enabled function to enable the sleep mode 294 Sleep mode 3 Use the Sleep mode timer function to set the sleep mode timer 295 Sleep mode timer 4 Use the Wake up when new jo...

Page 275: ... and configure the sleep mode Configure the sleep mode on page 274 2 Use the Automatic wake up function to enable the automatic wake up from sleep mode 297 Automatic awakening 3 Use the Automatic shutdown function to enable the automatic shut down 298 Automatic shut down 4 Set the wake up timers Indicate for each day if an automatic wake up occurs Define the wake up time per day 299 Automatic wake...

Page 276: ... 301 Automatic shut down time Configure the energy save timers 276 Chapter 11 Save energy ...

Page 277: ...e first jobs are scheduled Configure the energy save timers on page 275 When you expect that the shut down period takes more than two days you need to perform several tasks to ensure that the printer functions optimally after awakening Task Remove media from paper trays Load media into the paper module on page 80 Empty and refill conditioning liquid in paper modules Refill the conditioning liquid ...

Page 278: ...Prepare printer for a long shut down period 278 Chapter 11 Save energy ...

Page 279: ...Chapter 12 Maintain the printer ...

Page 280: ...Print i Series Ink Cyan B2 B2 Cyan ink VarioPrint i Series Ink Magenta B2 B2 Magenta ink VarioPrint i Series Ink Yellow B2 B2 Yellow ink VarioPrint i Series Ink Black B2 B2 Black ink VarioPrint i Series Color Grip Liquid B2 ColorGrip liquid VarioPrint i Series Ink Cyan C1 C1 Cyan ink VarioPrint i Series Ink Magenta C1 C1 Magenta ink VarioPrint i Series Ink Yellow C1 C1 Yellow ink VarioPrint i Seri...

Page 281: ...ets an ink cabinet with doors and an ink cabinet with drawers The two models have a different arrangement of containers 302 Location of ink cabinet with doors 303 Location of ink cabinet with drawers The Supplies pane of the control panel displays the status of the stock of inks ColorGrip liquid and PML liquid stock Filling levels of supplies and waste on page 381 Ink ColorGrip and maintenance liq...

Page 282: ...om the containers into buffers From there the printer uses what it needs for printing and maintenance processes The total amount of each available liquid is the sum of the supply in the container and the buffer C M Y CG PML K 4 3 2 1 305 Storage of inks ColorGrip and PML in ink cabinet with doors Ink ColorGrip and maintenance liquid supplies in the printer 282 Chapter 12 Maintain the printer ...

Page 283: ...ly is related to the status information on the control panel Example shows cyan ink but applies to all inks PML and ColorGrip 4 3 2 1 5 307 Filling levels and status information on control panel 1 Buffer is full Container has just been replaced 2 Liquid is currently being used from the buffer To refill the buffer liquid is continuously be ing pumped from container to buffer 3 Container gets empty ...

Page 284: ...o go to the Supplies pane The total supply of one or more liquids is nearly used up The total supply of one or more liquids is used up An action required screen appears and shows how to replace the empty container To learn how the print system processes ink see Ink ColorGrip and maintenance liquid supplies in the printer on page 281 308 Location of the ink cabinet with doors CAUTION 1 Wear nitrile...

Page 285: ...k cabinet 2 1 Take out the empty container The LEDs of containers that are empty are off 2 Place the full container next to the empty container 3 Unscrew swap and fasten the caps of both con tainers 4 Place the full container in the ink cabinet 4 Replace a container in the ink cabinet with doors Chapter 12 Maintain the printer 285 ...

Page 286: ...continues to blink fast there is important information that you need to read on the control panel 6 Close the doors of the ink cabinet After you finish The container package contains a sticker Use this sticker on an empty container to reuse this container as ink waste container Place the sticker over the present sticker Replace a container in the ink cabinet with doors 286 Chapter 12 Maintain the ...

Page 287: ...arly used up The total supply of one or more liquids is used up An action required screen appears and shows how to replace the empty container To learn how the print system processes ink see Ink ColorGrip and maintenance liquid supplies in the printer on page 281 309 Location of the ink cabinet with drawers CAUTION 1 Wear nitrile gloves and safety glasses when you replace containers Notes for the ...

Page 288: ...rew swap and fasten the caps of both con tainers 5 Place the full container in the tray 6 Carefully connect the supply tube 7 Press the green button to confirm that you placed a full container The LED blinks slowly for about 10 seconds while the RFID tag of the container is read Then the LED remains on NOTE When the LED continues to blink fast there is important information that you need to read o...

Page 289: ...lter of the supply tube After you finish The container package contains a sticker Use this sticker on an empty container to reuse this container as ink waste container Place the sticker over the present sticker Replace a container in the ink cabinet with drawers Chapter 12 Maintain the printer 289 ...

Page 290: ...the full container 310 Location of the waste compartment CAUTION 1 Wear nitrile gloves when you replace containers Notes for the reader on page 16 2 Keep full containers tightly closed 3 When you spill any liquid wipe up the drops with disposable towels and transfer the used towels to a sealable container appropriate for disposal Before you begin Take an empty container labelled as waste container...

Page 291: ... caps and fasten them 5 Place the empty container in the tray 6 Press the connector and carefully connect the supply tube to the cap of the empty container 7 Carefully close the door of the waste compartment After you finish Dispose the container according to the safety regulations as delivered with your product Replace the CMYK ink waste container Chapter 12 Maintain the printer 291 ...

Page 292: ...iner 311 Location of the waste compartment CAUTION 1 Wear nitrile gloves and safety glasses when you replace containers Notes for the reader on page 16 2 Keep full containers tightly closed 3 When you spill any liquid wipe up the drops with disposable towels and transfer the used towels to a sealable container appropriate for disposal Before you begin Take an empty container labelled as waste cont...

Page 293: ... caps and fasten them 5 Place the empty container in the tray 6 Press the connector and carefully connect the supply tube to the cap of the empty container 7 Carefully close the door of the waste compartment After you finish Dispose the container according to the safety regulations as delivered with your product Replace the ColorGrip waste container Chapter 12 Maintain the printer 293 ...

Page 294: ... screen appears and shows how to replace a full waste water container 312 Location of the conditioning module with the waste water compartment Before you begin Take an empty container and place the container next to the waste water compartment of the conditioning module Procedure Action 1 Touch System Maintenance Go to mainte nance tasks 2 Touch Container replacement Replace waste water container ...

Page 295: ... the door of the waste water compartment 2 Open the lid 5 Take the cap from the holder and screw it on the full container 6 Remove the full container 7 Place the empty container in the waste water com partment 4 Replace the waste water container Chapter 12 Maintain the printer 295 ...

Page 296: ...o close the lid completely slightly move the funnel backwards and forwards 10 Close the door of the waste water compartment After you finish You can pour out the waste water in a sink or drain Store the empty container for reuse Replace the waste water container 296 Chapter 12 Maintain the printer ...

Page 297: ...ative hu midity Check if you need to refill the conditioning liquid For conditioning liquid use demineralised water 313 Location of the paper module Before you begin Take a container with demineralised water and place the container at the rear side of the paper module Procedure Action 1 1 Push and hold the blue ring of the connector 2 Pull out the air supply tube NOTE You can notice that air escap...

Page 298: ...ly pour the demineralised water into the container IMPORTANT Do not fill above the maximum level mark to prevent wet machine parts 4 1 Place the drop catcher onto the container 2 Fasten the ring to lock the drop catcher 1 2 5 Push the air supply tube into the blue ring of the connector Refill the conditioning liquid in the paper module 298 Chapter 12 Maintain the printer ...

Page 299: ... rings must be replaced in high capacity stacker 1 or 2 314 Location of the high capacity stackers Before you begin You need to have the rights to access the maintenance tasks You need a set of new flip rings Procedure Action 1 1 Touch the maintenance key symbol on the dash board 2 Touch Stacker Replace flip rings Replace flip rings of stacker 1 or Re place flip rings of stacker 2 4 Replace printe...

Page 300: ...he stack tray so that loose flip rings cannot fall into the high capacity stacker 5 Remove the flip rings one by one 6 Place the new flip rings one by one Ensure the flip rings can rotate freely 7 Remove the sheet from the stack tray 8 Close the front cover Replace the flip rings of the high capacity stacker 300 Chapter 12 Maintain the printer ...

Page 301: ...ies and waste on page 381 Only replace the cassettes when the action required screen appears One or two series of tissue ribbons are completely used up An action required screen with an instruction how to replace the cassettes appears Replace the used tissue ribbons soon after you replaced the tissue cassettes so that you keep a stock of cassettes with new tissue ribbons Replace a tissue ribbon on...

Page 302: ...e or four cassettes NOTE Store the used tissue cassettes in a box labelled for short term tis sue ribbon replacement 3 IMPORTANT Place the cassettes in the same holder to prevent contamination between ink and ColorGrip liquid and between ink colours A metal strip is built in to prevent in terchanging of tissue cassettes 1 Use one hand to squeeze the shafts of the first new cassette of the same ser...

Page 303: ... on page 301 Replace the used tissue ribbons soon after you replaced the tissue cassettes so that you keep a stock of cassettes with new tissue ribbons 316 Tissue cassette CAUTION 1 Wear nitrile gloves when you replace tissue ribbons Notes for the reader on page 16 Before you begin You need cleaning cloths Alphawipe pads Texwipe TX1004 You need a bottle with process maintenance liquid PML You need...

Page 304: ...ibbon 1 2 4 Remove the sticker and glue from the core in the cassette 5 1 Put the tissue cassette flat on the table 2 Because of pollution put a large sheet of paper underneath the tissue cassette 3 Moisten a cleaning cloth with PML and clean the top roller thoroughly Pay special attention to the area in between the teeth 4 Replace a tissue ribbon 304 Chapter 12 Maintain the printer ...

Page 305: ... to lock the hold er 1 2 8 1 Guide the beginning of the tissue ribbon be tween the guidance rollers of the tissue cas sette The left hand L and right hand R tissue cassettes have a mirrored guide pattern 2 Glue the tape of the beginning of the tissue rib bon on the core of the empty holder 9 Rotate the empty holder one revolution to tighten the tissue ribbon Replace a tissue ribbon Chapter 12 Main...

Page 306: ...n required window appears on the control panel 317 Location of the paper path module Before you begin You need cleaning cloths to clean the Z sensors Alphawipe pads Texwipe TX1004 Procedure Action 1 Open the front door of the paper path module 2 Use the green handle to open the paper guide 4 Clean printer parts 306 Chapter 12 Maintain the printer ...

Page 307: ...rs 5 Take a new cleaning cloth and move the cloth three times over the upper sensors 6 Gently close the Z sensor unit 7 Close the paper guide by the green handle 8 Close the front doors of the paper path module After you finish Dispose the used cleaning cloths Clean the Z sensors in the paper path module Chapter 12 Maintain the printer 307 ...

Page 308: ...he registration input module Before you begin You need cleaning cloths to clean the Z sensors Alphawipe pads Texwipe TX1004 Procedure Action 1 Open the front door of the registration input module 2 Use the green handle to open the paper guide 3 Use the green handle to open and hold the Z sensor unit 4 Clean the Z sensors in the registration input module Z1 308 Chapter 12 Maintain the printer ...

Page 309: ...the cloth three times over the upper sensors 6 Gently close the Z sensor unit 7 Use the green handle to close the paper guide 8 Close the front door of the registration input module After you finish Dispose the used cleaning cloths Clean the Z sensors in the registration input module Z1 Chapter 12 Maintain the printer 309 ...

Page 310: ...he registration input module Before you begin You need cleaning cloths to clean the Z sensors Alphawipe pads Texwipe TX1004 Procedure Action 1 Open the front door of the registration input module 2 Use the green handle to open the paper guide 3 Use the green handle to open and hold the Z sensor unit 4 Clean the Z sensors in the registration input module Z2 310 Chapter 12 Maintain the printer ...

Page 311: ...f fold the cloths and move the folded cloths three times over the upper sensors NOTE You cannot easily get access to the up per Z sensors 6 Gently close the Z sensor unit 7 Use the green handle to close the paper guide 8 Close the front door of the registration input module After you finish Dispose the used cleaning cloths Clean the Z sensors in the registration input module Z2 Chapter 12 Maintain...

Page 312: ...314 When the Z sensors in the registration output module are polluted an action required window appears on the control panel 320 Location of the registration output module without system tray Before you begin You need cleaning cloths to clean the Z sensors Alphawipe pads Texwipe TX1004 Procedure Action 1 Open the front door of the registration output module 2 1 Turn the green knob to unlock the pa...

Page 313: ...e upper sensors 5 Gently close the Z sensor unit 6 1 Hold the paper guide with one hand and turn the knob to unlock the guide with the other hand 2 Lower the paper guide until the guide is locked 7 Close the front door of the registration output module After you finish Dispose the used cleaning cloths Clean the Z sensors in the registration output module without system tray Chapter 12 Maintain the...

Page 314: ...on page 312 When the Z sensors in the registration output module are polluted an action required window appears on the control panel 321 Location of the registration output module with system tray Before you begin You need cleaning cloths to clean the Z sensors Alphawipe pads Texwipe TX1004 Procedure Action 1 Open the front door of the registration output module 2 Use the green handle to open the ...

Page 315: ...h three times over the upper sensors 6 Gently close the Z sensor unit 7 Use the green handle to close the paper guide 8 Close the front door of the registration output module After you finish Dispose the used cleaning cloths Clean the Z sensors in the registration output module with system tray Chapter 12 Maintain the printer 315 ...

Page 316: ...SZ rollers once a week Dependent on the used media used ink and print production it can be necessary to adjust the clean frequency When the SZ rollers are very polluted registration and image quality problems may occur Clean SZ rollers 316 Chapter 12 Maintain the printer ...

Page 317: ...xwipe TX1004 Bottle of process maintenance liquid PML CAUTION 1 Wear appropriate protection when you perform this maintenance task 2 When you spill any liquid wipe up the drops with disposable towels and transfer the used towels to a sealable container appropriate for disposal Procedure Action 1 Open the front door of the paper path module 2 Squeeze the green handles to open the paper guide 4 Clea...

Page 318: ... the rollers to moisten the complete surface 5 1 Wait for about 10 seconds to let the rollers absorb the PML 2 Clean the upper and lower pair of rollers Rub the moist cloth across the rollers from the side until all pollution is gone Turn the rollers to clean the complete surface NOTE The colour of the roller can change but this can not damage the printer 4 Clean the SZ rollers in the paper path m...

Page 319: ...sure the unit is also locked in place at the rear side 7 Close the paper guide with the green handle 8 Close the front door of the paper path module After you finish Dispose the used cleaning cloths Clean the SZ rollers in the paper path module Chapter 12 Maintain the printer 319 ...

Page 320: ...s Texwipe TX1004 Bottle of process maintenance liquid PML CAUTION 1 Wear appropriate protection when you perform this maintenance task 2 When you spill any liquid wipe up the drops with disposable towels and transfer the used towels to a sealable container appropriate for disposal Procedure Action 1 Open the front door of the registration input module 2 Squeeze the green handles to open the paper ...

Page 321: ... rollers to moisten the complete surface 5 1 Wait for about 10 seconds to let the rollers absorb the PML 2 Clean the upper and lower pair of rollers Rub the moist cloth across the rollers from the side until all pollution is gone Turn the rollers to clean the complete surface NOTE The colour of the roller can change but this can not damage the printer 4 Clean the SZ rollers in the registration inp...

Page 322: ...unit is also locked in place at the rear side 7 Close the paper guide with the green handles 8 Close the front door of the registration input module After you finish Dispose the used cleaning cloths Clean the SZ rollers in the registration input module 322 Chapter 12 Maintain the printer ...

Page 323: ...to the maintenance tasks and the configuration settings Cleaning cloths Alphawipe pads Texwipe TX1004 Bottle of process maintenance liquid PML CAUTION 1 Wear appropriate protection when you perform this maintenance task 2 When you spill any liquid wipe up the drops with disposable towels and transfer the used towels to a sealable container appropriate for disposal Clean the SZ rollers in the print...

Page 324: ... the lower and the upper front doors of the print module 3 To open the paper guide 1 Turn the green knob 1 2 Turn and lift the green knob 2 4 1 Moisten a cleaning cloth with PML 2 Use the cloth to moisten the upper and lower rollers Turn the rollers to moisten the complete surface 4 Clean the SZ rollers in the print module 324 Chapter 12 Maintain the printer ...

Page 325: ...rs to clean the complete surface NOTE The colour of the roller can change but this can not damage the printer 6 Close the paper guide with the green handles 7 Close the upper and the lower front doors of the print module 8 On the control panel touch Lock print module to lock the doors After you finish Dispose the used cleaning cloths Clean the SZ rollers in the print module Chapter 12 Maintain the...

Page 326: ...awipe pads Texwipe TX1004 Bottle of process maintenance liquid PML CAUTION 1 Wear appropriate protection when you perform this maintenance task 2 When you spill any liquid wipe up the drops with disposable towels and transfer the used towels to a sealable container appropriate for disposal Procedure Action 1 Open the front door of the registration output module 2 Squeeze the green handles to open ...

Page 327: ...to moisten the complete surface 5 1 Wait for about 10 seconds to let the rollers absorb the PML 2 Clean the upper and lower pair of rollers Rub the moist cloth across the rollers from the side until all pollution is gone Turn the rollers to clean the complete surface NOTE The colour of the roller can change but this can not damage the printer 4 Clean the SZ rollers in the registration output modul...

Page 328: ...lso locked in place at the rear side 7 Close the paper guide with the green handle 8 Close the front door of the registration output module After you finish Dispose the used cleaning cloths Clean the SZ rollers in the registration output module with system tray 328 Chapter 12 Maintain the printer ...

Page 329: ...hs Alphawipe pads Texwipe TX1004 Bottle of process maintenance liquid PML Socket wrench 5 5 CAUTION 1 Wear appropriate protection when you perform this maintenance task 2 When you spill any liquid wipe up the drops with disposable towels and transfer the used towels to a sealable container appropriate for disposal Procedure Action 1 Open the front door of the high capacity stacker 4 Clean the SZ r...

Page 330: ...e the socket wrench to loosen the screw and open the black cover 3 Open the two retaining clips and disconnect the flat cable 4 Clean the SZ rollers in the high capacity stacker 330 Chapter 12 Maintain the printer ...

Page 331: ...wards the front side and at the same time push the other leaf spring towards the back side to open the SZ unit 6 1 Moisten a cleaning cloth with PML 2 Use the cloth to moisten the upper and lower rollers Turn the rollers to moisten the complete surface 4 Clean the SZ rollers in the high capacity stacker Chapter 12 Maintain the printer 331 ...

Page 332: ...Turn the rollers to clean the complete surface NOTE The colour of the roller can change but this cannot damage the printer 8 Close the registration unit 9 Place the registration unit back The arrows must be on top 10 IMPORTANT Do not twist the flat cable Connect the flat cable and close the two re taining clips 4 Clean the SZ rollers in the high capacity stacker 332 Chapter 12 Maintain the printer...

Page 333: ... use the socket wrench to fasten the screw 12 Close the front door of the high capacity stacker After you finish Dispose the used cleaning cloths Clean the SZ rollers in the high capacity stacker Chapter 12 Maintain the printer 333 ...

Page 334: ...fore you begin You need the following attributes You need to have the rights to access the maintenance tasks and the configuration settings You need the cleaning plate and print belt cleaning cloths You need a bottle with process maintenance liquid PML CAUTION 1 Wear appropriate protection when you perform this maintenance task Notes for the reader on page 16 2 When you spill any liquid wipe up th...

Page 335: ... strips up and slide a cleaning cloth over the cleaning plate 5 Use process maintenance liquid PML to moisten slightly the cleaning cloth at the right hand side 6 1 Lift the print belt 2 Place the cleaning plate with the cleaning cloth underneath the print belt in the middle of the print belt unit The arrow indicates the alignment of the right hand side of the cleaning plate 4 Clean the inner side...

Page 336: ...the print module 10 Turn the two bolts in counter clockwise direction to unlock the cleaning plate 11 Remove the cleaning plate and remove the cleaning cloth from the cleaning plate 12 Repeat step 4 to 11 to clean the print belt again with a new cleaning cloth 13 Close the upper and lower doors of the print module 14 Touch Confirm on the control panel After you finish Dispose the used cleaning clo...

Page 337: ... You need a bottle with cleaning process maintenance liquid PML You need a large sheet of paper CAUTION 1 Wear appropriate body protection when you perform this maintenance task Notes for the reader on page 16 2 When you spill any liquid wipe up the drops with disposable towels and transfer the used towels to a sealable container appropriate for disposal Procedure Action 1 1 Touch System Maintenan...

Page 338: ... print belt aside to clean the entire surface 3 When the print belt is still polluted moisten a new cleaning cloth with PML and clean the print belt surface again 5 Remove the sheet underneath the print belt 6 Close the upper and lower doors of the print module After you finish Dispose the used cleaning cloths Clean the surface of the print belt 338 Chapter 12 Maintain the printer ...

Page 339: ...Chapter 13 Solve problems ...

Page 340: ...with a System configuration setting on the control panel 329 Remote assistance Define the remote assistance session timeout You can only define the session timeout when there is no active remote assistance session 1 Touch System 2 Touch Maintenance 3 Define the timeout in the Remote assistance session timeout hours field The default value is 72 hours The range is 1 168 hours Start a remote assista...

Page 341: ...eshooting 330 Location of troubleshooting On the control panel touch System Setup System configuration Logging and reports 331 Logging and reports on the control panel Reports Below you find an overview of the files your can download and print There are some other files available that you can download on request of your Service organisation Print or download a report Chapter 13 Solve problems 341 ...

Page 342: ... col our configuration of the printer You can print the current report Create or download trace file On request of the Service organi sation you can download or cre ate a trace file Create or download da ta dump file On request of the Service organi sation you can download or cre ate a data dump file Download report of col our validation test See Perform a colour validation test on page 265 Print ...

Page 343: ...it is necessary to restart the printer to implement adjustments The system administrator can restart the printer from the Settings Editor 1 Touch System Setup The Controller window has also the restart function 2 Touch Shut down printer 3 Touch Restart 332 Restart the printer Restart the printer Chapter 13 Solve problems 343 ...

Page 344: ...dvise to prevent sentry rejection This product guide includes several instruction to help you reduce the rejection of sheets by the sentry Follow the packaging and storage guidelines to prevent malformations and damage Only load media from the media catalogue and being assigned to a paper tray Ensure you load the media in the paper tray according to the load instructions Ensure you remove media fr...

Page 345: ...n the sentry tray collects sheets that are one sided printed or blank but already passed the print module The rear side of media is physically different from the front side which can result in small deformations which the sentry is able to detect 1 Stop the job 2 Empty the sentry tray 3 Take the media stack from the paper tray the job uses NOTE If your job uses media from more than one paper tray ...

Page 346: ... tray on page 344 334 Relative humidity of paper modules 1 Open the Settings Editor and go to Preferences System settings Basic 335 Location of system settings 2 Change the relative humidity settings of the paper modules Please note that the paper module needs several minutes until the new relative humidity value is set 3 Click OK Change relative humidity in paper modules 346 Chapter 13 Solve prob...

Page 347: ...r appropriate protection when you perform this maintenance task Notes for the reader on page 16 2 When you spill any liquid wipe up the drops with disposable towels and transfer the used towels to a sealable container appropriate for disposal Procedure Action 1 In the action required screen touch Unlock to unlock the doors of the print module 2 Open the lower and the upper front doors of the print...

Page 348: ...y cleaning cloth to clean the print belt surface 2 Manually move the print belt to the right hand side to clean the entire surface 3 When the print belt is still polluted moisten a new cleaning cloth with PML and clean the print belt surface again 10 Remove the sheet underneath the print belt 11 Close the upper and lower front doors of the print module 12 Touch Confirm on the control panel After y...

Page 349: ...not to touch the fixation drum The fixation drum can be hot Wear heat resistant gloves and body protection when you perform this task Notes for the reader on page 16 Procedure Action 1 1 In the action required screen touch Unlock to unlock the right hand door of the fixa tion module 2 Open the right hand door of the fixation module 2 1 Touch Unlock to unlock the doors of the fixation drum 2 Open t...

Page 350: ...ocations of sheets that are stuck are indicated orange 4 1 Close the two doors that cover the fixation drum 2 Close the right hand door of the fixation module 5 Touch Confirm on the control panel when you have removed all sheets Remove sheets from the fixation drum 350 Chapter 13 Solve problems ...

Page 351: ... RIP units do not communicate with the main controller the orange RIP symbol appears in the warning area of the dashboard The dashboard shows if RIP units do not communicate with the main controller You can hide the warning of the RIP unit that is not responding 338 Status of the RIP units 1 Touch System Controller 2 Check which RIP unit does not respond RIP unit does not respond RIP unit responds...

Page 352: ...ng and fixation process 1 Open the Settings Editor and go to Preferences System settings 339 Location of system settings 2 In the Basic settings use the Productivity level function to decrease the value IMPORTANT Restore the default value 100 before new jobs start Decrease productivity level for a job 352 Chapter 13 Solve problems ...

Page 353: ...stration is not a digital correction of the image on the sheet Do not use the manual media registration settings to shift images for example to create space for binding or cutting Instead use a job setting to align images Change the print layout on page 159 IMPORTANT When several media show the same deviations contact your Service organisation to check the registration parameters of the printer 34...

Page 354: ...th by changing media attributes in the media catalogue Therefore changes are applied to all jobs that use these media Before you perform the registration adjustment ensure the S and SZ rollers have been cleaned and clean the S and SZ rollers Clean printer parts on page 306 IMPORTANT The automatic media registration adjustment optimises the media registration but keep in mind that minor adjustments...

Page 355: ...tomatic adjustment procedure Adjust media registration parameters on page 357 Analyse the verification chart A B A 343 Two sides of the verification chart and the alignment of the circles and dots 1 Keep duplex verification chart against a light source 2 You must see a white area between the solid dot and the circle If the dots touch the circles the media registration is not correct Perform media ...

Page 356: ...ion on Z coordinate cross feed direction Measure the distances between top sheet edge and horizontal marker lines Repeat for the other side B If at least on one side the distances are more than 10 mm or less than 10 mm the media registration is not correct 3 Rotation deviation on S coordinate Measure the distance from left hand top corner of the sheet to the most left hand point of the horizontal ...

Page 357: ...6 IMPORTANT The values of all media settings are factory defined and exactly match the properties of the media and the VarioPrint i series printer Only change these default values when you understand what these settings mean and do 1 Open the Settings Editor and go to Media Media 345 Media menu 2 Select the media 3 Click Optimise 346 Optimise option 4 Adjust the media registration parameters Media...

Page 358: ...d These parameters can be used to adjust the registration on the X coordinate feed direction S adjustment front or back side long edge feed or short edge feed These parameters can be used to adjust the registration on the Z coordinate cross feed direction Z offset front or back side long edge feed or short edge feed These parameters can be used to adjust the registration on the S coordinate rotati...

Page 359: ...Chapter 14 References ...

Page 360: ...two sided printing Print process Specification Value Maximum print width 323 mm 12 71 Maximum print length 496 mm 19 53 Maximum printable area 323 mm x 496 mm 12 7 x 19 5 Distance between edge and image 2 mm 0 0787 in X and Z direction Image to image registra tion Less than approximately 40 µm 0 00157 between two colours Sheet to image registration Less than approximately 1 mm 0 04 Ink Proprietary...

Page 361: ...cker WebDav for SMB hotfolders Encrypted user passwords User authentica tion Spot colour libraries HKS K HKS K 3000 HKS N HKS N 3000 Pantone Goe Uncoa ted Coated Pantone solid Uncoated Coated Pantone solid 336 new Uncoated Coated Standard functionality Schedule Remote monitor Trapping Streaming Automated workflows Hotfolders E shredding Advanced colour manage ment Remote service Remote Manager PPM...

Page 362: ...be configured Default 100 sheets Interruption by printhead maintenance When extensive nozzle failures are detected printhead mainte nance can take place before the job continues This behaviour can be configured Printer specifications 362 Chapter 14 References ...

Page 363: ...coat ed Media types Supported media types are defined in the media catalogue Media sizes All sizes between 203 mm x 203 mm 320 mm x 488 mm 7 99 x 7 99 12 59 x 19 21 Guidance tool to support media with small height 178 mm 203 mm 7 01 7 99 Paper module Flex XL to support 350 mm x 500 mm 13 8 x 19 7 For detailed media size specifications see Media sizes on page 366 Media weight 60 300 g m 16 lb bond ...

Page 364: ...nt feature Default stack height 302 mm 11 89 Paper sizes As specified for the printer Media formats on page 366 Power consumption Maximum 200 W Power requirements 90 264 V 47 63 Hz Device fuse more than 10 A Dimensions unit W x D x H 899 mm x 745 mm x 1 040 mm 35 39 x 29 33 x 40 94 With ejected tray 899 mm x 1 250 mm x 1 040 mm 35 39 x 49 21 x 40 94 Weight unit Empty 120 kg 264 6 lb Full 300 kg 66...

Page 365: ...ur computer screen Minimum 640 x 480 pixels Supported web browsers Microsoft Internet Explorer 8 and higher Mozilla Firefox 10 and higher Google Chrome 17 and higher Apple Safari 6 and higher Language As defined in your browser as long as the printer sup ports this language Settings Editor specifications Chapter 14 References 365 ...

Page 366: ...ize Value Minimum size W x H 203 mm x 203 mm 7 99 x 7 99 Guidance tool to support media with small height 178 mm 203 mm 7 01 7 99 Maximum size W x H With standard paper module 320 mm x 488 mm 12 59 x 19 21 With paper module Flex XL ISO B3 350 mm x 500 mm 13 8 x 19 7 Custom sizes W x H All media sizes between minimum and maximum size with incremental steps of 1 mm 0 04 Media specifications 366 Chap...

Page 367: ...ons and reams Canon Black Label Zero 349 Carton and ream Part of package Attention point Label Most cartons and reams are labelled packs The following in formation is useful to ensure you have the correct media Media type Media supplier Media weight Media size Number of sheets FSC PEFC Chain of Custody code Ream package material Ream package material must be moisture proof NOTE Plastic shrink wrap...

Page 368: ...aximum of 12 g H 2O m 24 hours ISO 2528 5 Use a single pallet for one type of media Use a good quality pallet so that wood splinters or nails do not damage media Place the pallets in a storage room that meets the environmental requirements Do not stack pallets Media storage on page 369 Relative humidity of packaging When the relative humidity of the packaging deviates from the relative humidity of...

Page 369: ...tight edges 3 Your media supplier can provide specific guidelines on media storage Below you find generic specifications and guidelines for media storage Proper storage in the storage room Environmental conditions storage room Value Temperature 18 oC 26 oC 64 4 oF 78 8 oF Keep the temperature as stable as possible Relative humidity 30 60 Keep the relative humidity as stable as possible Storage Att...

Page 370: ...2 oC 28 oC 1 4 hours 8 hours 11 hours 14 hours 17 hours 24 hours 34 hours 5 5 hours 9 hours 12 hours 15 hours 18 hours 25 hours 35 hours 10 8 hours 14 hours 18 hours 22 hours 27 hours 38 hours 51 hours 20 11 hours 16 hours 23 hours 28 hours 35 hours 48 hours 67 hours 40 14 hours 19 hours 26 hours 32 hours 38 hours 54 hours 75 hours Example A pallet with 40 cartons containing 200 reams in total is ...

Page 371: ...n a flat surface Store prints so that the sheets cannot fold or crease Use a binder for storage during a long period of time more than two years Do not wrap prints in PVC material Do not store prints in a location with high temperatures Prints can discolour after a long period of time Adhesive can stick prints only use insoluble adhesive that is completely dry Prints storage Chapter 14 References ...

Page 372: ...min Power consumption Maximum 38 Kw For 80 g m 20 lb bond media 16 Kw Power requirements Europe 230 V 3 phases star 80 A 100 A per phase Device fuse 3 x 100 A Power requirements USA 208 V 3 phases delta 160 A per phase or 240 V 3 phases delta 140 A per phase or 277 V 3 phases star 65 A per phase Device fuse 3 x 191 A 3 x 175 A 3 x 82 A Prevent that the conditions in the print room change suddenly ...

Page 373: ...SRA bundle 16 for IPDS data Adobe PDF Print Engine 4 2 for PDF containers Variable data printing docu ment printing mode PDF VT level 1 PPML GA level 1 v1 5 v2 1 v2 2 Adobe PDF Print Engine 4 2 Adobe PDF Print Engine APPE Adobe PDF Print Engine APPE uses a native PDF imaging model which ensures a very high RIP performance in combination with optimal image quality SRA module for transaction printin...

Page 374: ...dit the jobs as soon as they are listed The full ripping process occurs after the editing and when jobs come in the list of scheduled jobs PRISMAsync Print Server RIP raster image processor 374 Chapter 14 References ...

Page 375: ...ur control strip and the Lab values of the matching patches of the reference printing condition 95th percentile E00 The 95th percentile E00 colour difference between the measured Lab values of the colour patches on the colour control strip and the Lab values of the matching patches of the reference printing condi tion This means that 95 of all measured patches have E00 colour differences smaller t...

Page 376: ...ing condition Maximum E76 CMY solids Highest colour difference in E76 between the measured Lab values of the CMY solid patches on the colour control strip and the Lab val ues of the matching patches of the reference printing condition Maximum E76 RGB overprints Highest colour difference in E76 between the measured Lab values of the RGB overprint patches on the colour control strip and the Lab valu...

Page 377: ...f the composite grey patches on the colour control strip and the Lab values of the matching patches of the reference printing con dition Maximum weighted L composite grays Highest lightness difference in weighted L between measured Lab values of the composite grey patches on the colour control strip and the Lab values of the matching patches of the reference printing con dition Average L K only pa...

Page 378: ...tion Maximum Ch compo site grays Highest colour difference in Ch between measured Lab values of the composite greys on the colour control strip and the Lab values of the matching patches of the reference printing condition Average weighted Ch composite grays Average colour difference in weighted Ch between measured Lab values of the composite greys on the colour control strip and the Lab values of...

Page 379: ... E metric to express a colour difference A value based on a colour difference can be created as follows The difference between the Lab value of a colour and the Lab value of paper white 0 0 0 delivers a E value Learn about colour differences on page 261 The maximum colour value expressed in E refers to the 100 tone value 0 E 100 0 0 0 Max 3 When you perform a media family calibration all measured ...

Page 380: ... will be used as maximum colour value expressed in E for this and the next calibrations 0 M M 0 PRISMAsync Print Server creates different calibration curves for the front and back side of the media The first media family calibration calculates for both sides the maximum value The lowest value becomes the target value of the front and back side for all next calibrations 5 When you restore the calib...

Page 381: ...equired General One or more maintenance tasks are necessary on short term Perform one or more maintenance tasks One of the containers in the ink cabinet is empty Printing can continue until the buffer is empty One of the ink or ColorGrip containers is not available Printing can continue until the buf fer is empty One of the waste containers is not available The printer can continue Place the absen...

Page 382: ...waste water container is almost full Replace the waste water contain er The waste water container is full Re place the waste water container Trays that collect system prints or not prin ted sheets A tray that collect system prints or not printed sheets is almost full Empty the sentry tray or the system tray Not all printers have a system tray A tray that collect system prints or not printed sheets...

Page 383: ... window appears Re place ink container No action required The container icon shows the filling level No action required Liquid is pumped to the buffer Place container Status tissue ribbons Symbol Action required Available supply No action required Available tissue ribbon length 6 000 cm 2 362 2 is more than 400 cm 157 48 4 Filling levels of supplies and waste Chapter 14 References 383 ...

Page 384: ...n needed Replace waste container Action required window appears Replace waste container Place waste container Status waste water container Symbol Action required No action required No action required Replace waste water container Action required window appears Replace waste water container Place waste water container Status paper module conditioning Symbol Action required Climate control in the pa...

Page 385: ...t sheets Not all printers have a system tray Empty the sentry tray or the system tray Sentry tray or system tray is almost full Not all printers have a system tray Action required window appears Empty the sentry tray or the system tray Sentry tray or system tray is almost full Not all printers have a system tray Filling levels of supplies and waste Chapter 14 References 385 ...

Page 386: ...e processing The printer is printing the job The printer is ready to print the job The printer is ripping and printing the job simultaneously The printer has only printed a part of the sets The job contains a note for the operator The job is a variable data printing job The job is a streaming job The job is a proof print The job is a bundle job The job is a build job The job settings do not match ...

Page 387: ...tains media for short edge feeding The paper tray is in used for printing The paper guides are not set correctly The paper tray contains tab sheets The paper tray contains insert sheets Media indicators Icon Description The media is needed for scheduled or waiting jobs The media needs a media family calibration The media is loaded into a paper tray The media is used in a scheduled job and loaded i...

Page 388: ...Status indicators 388 Chapter 14 References ...

Page 389: ...172 B Background spitting description 28 prevent 192 Banner pages configure media 62 enable 60 import and export 64 media 60 workflow profile 113 Beep sound 54 Binding edge 159 automated workflow 124 Black white printing automated workflow 124 change job settings 164 configure job default 200 transaction setup 104 Black Point Compensation BPC change job settings 164 configure colour preset 206 con...

Page 390: ... Colour mapping group change job settings 164 configure 215 Colour preset automated workflow 124 change job settings 164 configure 205 configure name 206 default 205 remote printer driver 37 Colour quality colour validation 257 job settings 163 with ColorGrip 34 Colour reference chart 195 Colour stations 106 Colour validation CGATS report 270 create test 268 metrics 261 overview of metrics 375 tes...

Page 391: ...Alliance Digital Press Certification 257 Drop size modulation 28 Dry tissue wipe 248 E E shredding 144 Eject behaviour choose 84 workflow profile 112 Energy save timers 275 Environmental conditions 372 Extend logical page 102 Extensive nozzle failures configure printhead maintenance 253 F Feedback heatmap 240 media family calibration 239 Fixation drum description 26 remove sheets 349 Fixation modu...

Page 392: ...gs 164 configure colour preset 206 configure job default 200 edit 213 import or export 214 transaction setup 104 Input tray linking transaction printing 105 Intermediate check prints configure 256 delivery 255 description 255 print 255 IPDS configure via Settings Editor 110 port 110 print job workflow 92 specifications 373 J JDF ticket create 133 use in hotfolders 131 Job decrease productivity lev...

Page 393: ...tacking behaviour 84 Media acclimatisation before printing 370 assign media to paper tray 77 attributes 186 189 automated workflow 124 automatic assignment to paper trays 79 before and after import 187 change job media 157 coated and uncoated 184 colour 190 colour validation 265 configure PDF PPML PostScript defaults 65 deformations during storage 369 elements 186 indicators 387 inserts 190 label ...

Page 394: ... 124 change job setting 167 configure job default 200 Move jobs 139 Multiple up 159 N Note for operator 154 Nozzle failure compensation 251 Nozzle failure detection configure 254 media parameters 192 Nozzle failure detection sheets 251 delivery 252 Number of job pages 154 Number of sets automated workflow 124 change job setting 155 O Offset stacking automated workflow 124 change job setting 169 co...

Page 395: ...0 transaction printing 103 PDF spot colour All 103 PDF Xobject 65 124 PDF X output intent change job settings 164 configure colour preset 206 configure job default 200 Piezoelectric technology 27 Pixel precise preview CMYK editor 150 description 148 PostScript default job properties 65 specifications 373 Power module 22 PowerLift 87 PPML job defaults 65 Preserve pure black change job settings 164 ...

Page 396: ...ng level information 381 replace 284 287 supplies in printer 281 Proof print 177 PSD FOGRA Print Standard Digital Certification 257 Purging ink nozzles 248 Q Quality control sheets configure 254 delivery 252 description 251 media 192 252 suitable media 192 Queue name 124 R Realistic preview 146 Ream media packaging 367 unpack 88 Records 172 Recover password 47 Regional settings 55 Registration inp...

Page 397: ...n 208 Separator sheets add 155 automated workflow 124 change job setting 155 configure media 62 import and export 64 Settings Editor language 40 option icons 40 search settings 40 specifications 365 start Remote Manager 40 symbols 40 Sheet cooling 21 Sheet order automated workflow 124 change job setting 169 configure high capacity stacker 68 Sheet view 146 Shut down configure automatic shut down 2...

Page 398: ...ut period external finisher 110 Tissue cassette description 248 replace 301 Tissue ribbon description 248 replace 303 Tolerance 217 Tolerance levels colour validation 269 description 259 media family calibration 243 Trace file 341 Trailer pages configure media 62 enable 60 import and export 64 media 60 Transaction printing Adobe PDF Print Engine APPE 373 code pages 108 colour mapping 108 configure...

Page 399: ...duplicate 145 move 139 print 177 print job ticket 178 proof 177 select 135 view 135 workflow profile 113 Warming up 272 277 Warning time change 52 use of 49 Waste compartment 21 Waste water compartment 294 Waste water container filling level information 381 replace 294 Wet tissue wipe 248 Workflow profile change 114 custom 114 description 112 DocBox 112 select 114 standard 112 Z Z sensors clean in...

Page 400: ...metrics 377 Index 400 ...

Page 401: ......

Page 402: ...da Inc www canon ca Canon Europe Ltd www canon europe com Canon Latin America Inc www cla canon com Canon Australia PTY Ltd www canon com au Canon China Co Ltd www canon com cn Canon Singapore PTE Ltd www canon com sg Canon Hongkong Co Ltd www canon com hk Océ 2015 2018 ...

Reviews: