[
IV
Remote Controller ]
- 45 -
HWE15070
GB
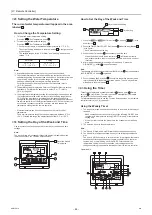
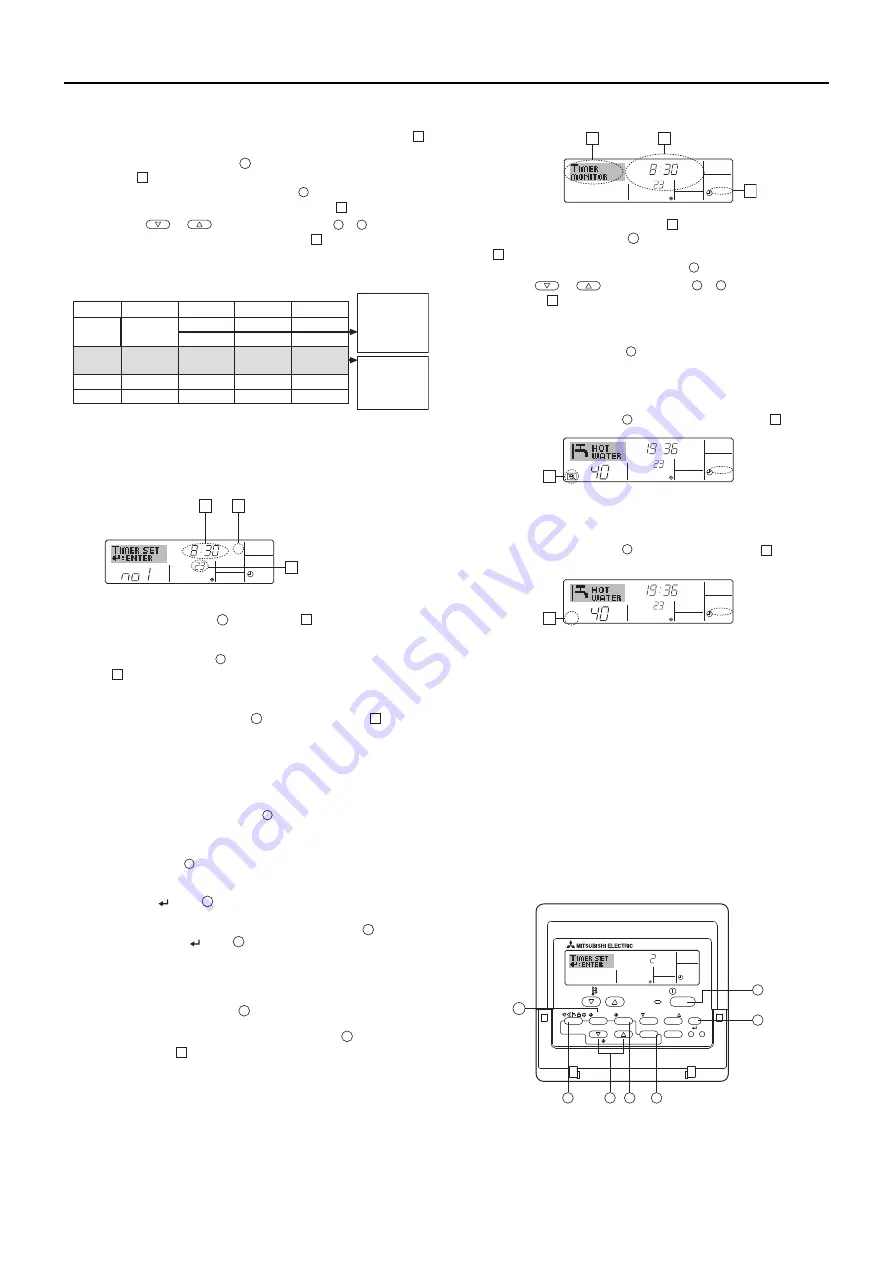
How to Set the Weekly Timer
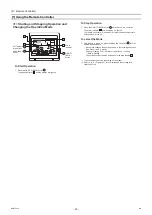
1. On the Normal Operation screen, make sure that the weekly timer icon
is displayed.
2. Press the TIMER MENU button
, so that the “Set Up” appears on the
screen (
). (Each press toggles between “Set Up” and “Monitor”.)
3. Press the TIMER ON/OFF (SET DAY) button
to set the day. Each press
advances the day, which appears in the area labeled
.
4. Press the
or
INITIAL SETTING button (
or
) to select a
desired operation pattern number (1 through 6)
.
* (The remote-controller display on the previous page shows how the
display would appear if operation #1 for Sunday were set to the values
shown below.)
Note:
By selecting the day to “Sun Mon Tues Wed Thurs Fri Sat”, the same action
can be carried out at the same time every day.
(Example: In Operation #2 above, the unit is scheduled to be turned off at
10:00 every day.)
5. Press the Set Time button
to set the time (
).
* Time will first increment in one-minute intervals, then in ten-minute
intervals, and then in one-hour intervals.
6. Press the ON/OFF button
to select the desired operation (ON or OFF),
at .
* Each press toggles through the following options:
No display (no setting) → “ON” → “OFF”
7. Press the Set Temperature button
to set the temperature (
).
* Each press:
No display (no setting) ↔ 5 (41) ↔ 6 (43) ↔ ... ↔ 89 (192) ↔ 90 (194)
↔ No display. (Available temperature range: The temperature display
range is between 5 °C (41 °F) and 90 °C (194 °F). The actual range
which the temperature can be controlled will vary according to the type
of the connected unit.)
8. To clear the current values for the selected operation, press and quickly
release the CHECK (CLEAR) button
once.
* The displayed time setting will change to “―:―”, and the ON/OFF and
temperature settings will disappear.
(To clear all weekly timer settings at once, hold down the CHECK
(CLEAR) button
for two seconds or more. The display will begin
flashing, indicating that all settings have been cleared.)
9. After making the appropriate settings in Steps 5, 6. and 7, press the
CIR.WATER
button
to save the values.
Note:
The changes will not be saved unless the Mode (BACK) button
is pressed
before the CIR.WATER
button
is pressed.
If two or more different operation patterns have been scheduled for exactly the
same time, only the operation with the highest Operation No. will be carried
out.
10. Repeat Steps 3 through 9 as necessary to add more settings.
11. Press the Mode (BACK) button
to return to complete the setting
procedure and return to the Normal Operation screen.
12. To activate the timer, press the TIMER ON/OFF button
, so that the
“Timer Off” icon (
) disappears.
* If no timer settings have been made, the “Timer Off” icon will flash on the
screen.
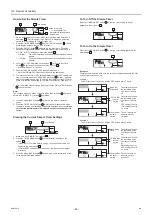
How to View the Weekly Timer Settings
1. Make sure that “WEEKLY” is displayed (
).
2. Press the TIMER MENU button
so that “Monitor” appears on the screen
(
).
3. Press the TIMER ON/OFF (SET DAY) button
to select the desired day.
4. Press the
or
INITIAL SETTING (
or
) to toggle through
the settings (
).
* Each press will advance the display to the next timer operation in order
of time.
5. To close the monitor display and return to the Normal Operation screen,
press the Mode (BACK) button
.
To Turn Off the Weekly Timer
Press the TIMER ON/OFF button
so that “Timer Off” appears at
.
To Turn On the Weekly Timer
Press the TIMER ON/OFF button
so that the “Timer Off” icon (
)
disappears.
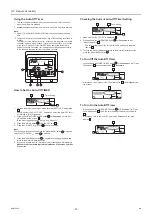
Using the Simple Timer
1. The simple timer can be set in any of the following three ways.
2. The simple timer can be set to start and stop the unit only once each within
a 72-hour period.
The time setting can be made in one-hour increments.
Note:
*1 Weekly, Simple, and AUTO-off timers cannot be used concurrently.
*2 The simple timer will not operate when any of the following conditions is
met. The timer is disabled; the system is in error; a test run is in progress;
the remote controller is performing self-check or remote controller check;
or a function or the timer is being set. If the ON/OFF status and/or the
temperature setting is centrally controlled, their settings cannot be
changed according to the schedule that was set from the remote controller.
1
2
3
4
Op No.
No. 1
No. 2
…
No. 6
Sunday
Monday
…
Saturday
• 8:30
• ON
• 23 °C (73 °F)
• 10:00
• OFF
• 10:00
• OFF
• 10:00
• OFF
• 10:00
• OFF
<Operation 1
settings for
Sunday>
Start the unit at
8:30, with the
temperature set to
23 °C (73 °F).
<Operation 2
settings for every
day>
Turn off the unit at
10:00.
Setup Matrix
˚C
SUN
ON
WEEKLY
5
6
7
Selection operation (ON or OFF)
* Does not appear if actions are scheduled.
Time setting
Temperature setting
* Does not appear if no
temperature changes are
scheduled.
5
6
7
10
• Start time only
The unit starts when the set time has elapsed.
• Stop time only
The unit stops when the set time has elapsed.
• Start & stop times
The unit starts and stops at the respective
elapsed times.
1
8
9
10
˚C
˚C
TIME SUN
WEEKLY
10
10
˚C
˚C
TIME SUN
WEEKLY
10
PAR-W21MAA
ON/OFF
TEMP.
MENU
BACK
DAY
CHECK
TEST
MONITOR/SET
CLOCK
CLEAR
ON/OFF
INITIAL SETTING
CIR.WATER
ON
Hr
AFTER
SIMPLE
4
2
9
10
11
12
1
9
7
8
12
1
11
10
3
10
4
4
2
2
9
9
12
8
7
9
9
˚C
TIMER
SUN
ON
OFF
WEEKLY
1
9
8
Time Settings
2
0000001906.book 45 ページ 2015年11月5日 木曜日 午前11時55分
Summary of Contents for CAHV-P500YB-HPB
Page 1: ......
Page 7: ...CONTENTS HWE15070 GB ...
Page 9: ... 2 HWE15070 GB ...
Page 19: ... 12 HWE15070 GB ...
Page 37: ... 30 II Restrictions GB HWE15070 ...
Page 39: ... 32 HWE15070 GB ...
Page 48: ... 41 HWE15070 GB IV Remote Controller 1 Using the Remote Controller 43 2 Function Settings 48 ...
Page 49: ... 42 HWE15070 GB ...
Page 57: ... IV Remote Controller 50 HWE15070 GB ...
Page 58: ... 51 HWE15070 GB V Electrical Wiring Diagram 1 Electrical Wiring Diagram 53 ...
Page 59: ... 52 HWE15070 GB ...
Page 65: ... 58 V Electrical Wiring Diagram GB HWE15070 ...
Page 67: ... 60 HWE15070 GB ...
Page 71: ... VI Refrigerant Circuit 64 HWE15070 GB ...
Page 73: ... 66 HWE15070 GB ...
Page 111: ... 104 HWE15070 GB ...
Page 117: ... VIII Test Run Mode 110 HWE15070 GB ...
Page 119: ... 112 HWE15070 GB ...
Page 163: ... IX Troubleshooting 156 HWE15070 GB ...
Page 164: ... 157 HWE15070 GB X Attachments 1 R407C saturation temperature table 159 ...
Page 165: ... 158 HWE15070 GB ...
Page 167: ... X Attachments 160 HWE15070 GB ...
Page 168: ......


