background image

Section 9

Appendix

291

MikroScan 7600PRO

   Operator’s Manual

Catalog 11180-94

V15.4F 050406

9.5  MikroScan 7600PRO Specifications

MikroScan 7600PRO  Rev 121905

Mikron reserves the right to change specifications to reflect the latest changes in technology and improvements at any time without notice. These changes will be 

reflected in subsequent editions of our literature when warranted.


FireWire is a trademark of Apple Computer, Inc., registered in the U.S. and other countries.

MikroScan 7600 PRO

Performance

Temperature Range:

Range 1: -40°C  to 120°C

Range 2:  0°C  to 500°C 

Range 3:  200°C  to 2000°C  (Optional) 

Measurement Accuracy:

±2% or 2°C of reading

Field of View:

21.7°(H) x 16.4°(V)

Focus Range:

30 cm to infinity

Instantaneous FOV / Spatial Resolution:

1.2 mrad

Image Update Rate:

60 frames per second

Resolution:

0.06°C (at 30°C 60Hz) or 0.03°C (at 30°C Σ

12)

Detector:

320 x 240 Uncooled Focal Plane Array Microbolometer

Spectral Band:

8.0 to 14.0 µm

Display Functions

B&W/Color Image:

Several palettes available

Thermal/Visual Composite Image Display: Provided

Isothermal Band Display:

Max. 4 bands

Multi-image display:

Replay 12 thermal images

Multi-Sense Display:

Provided

Line Profile:

X, Y line profile (waveform display)

Presentation

A/D Resolution

14 bit

Annotation:

Text and voice annotation (30 sec. per image)

Movie Recording:

Real-time memory (1664 images @ 60Hz)

Image Processing Functions:

Variable level/sense; Multi-point temperature display (10 pts); Multi-point 

emissivity display (10 pts); 

T Display; Max/Min (peak hold) temperature 

display; Alarm (full screen or specified box); 2x and 4x digital zoom (Run/

Freeze); Box setting (max 5 boxes) 

Display:

Viewfinder and 3.5 inch LCD monitor with auto switch

Video Output:

NTSC/PAL composite video signal, S-Video

Image Zoom:

2:1, 4:1 (with spatial filtering)

Visual Camera

Pixels:

0.41 Mega pixels

Effective Image Pixels:

752 (H) x 480 (V) pixels

Field of View:

30.1° (H) x 22.7°(V)

Sensitivity:

1 lux

Focusing distance:

30 cm to infinity

Auto Exposure:

Provided

Video Signal:

NTSC

Measurement

Measuring Functions:

Run/Freeze

S/N improvement:

Σ

2, 

Σ

8, 

Σ

16, and spatial filter ON/OFF

Alarm:

Screen display and alarm sound (ON/OFF)

Interval Measurement:

Recording on memory card: 2 to 3600 sec. interval; trigger function

Emissivity Correction:

0.10 to 1.00 (at 0.01 steps)

Environmental Temperature Correction:

Provided (including interval NUC)

Background Compensation:

Provided

User Setup:

Pre-registration of user setup (max. 10 setups)

Auto Functions:

Full automatic (level, sense, focus); level trace, auto gain control

Interface

Communication:

RS-232/C  

Storage Device:

Compact Flash Memory Card (stores thermal images in .SIT or .BMP 

file format; visible images in .SIT or .JPEG file format; and thermal/visual 

composite images in .BMP file format)

Video Signal Output:

NTSC/PAL composite video signal, S-video

Remote Control Operation:

IEEE1394 (Firewire®) Interface

Environmental

Operating Temperature:

-15°C to 50°C  90% Relative Humidity or less (not condensed)

Storage Temperature:

-40°C to 70°C  90% Relative Humidity or less (not condensed)

Environmental Protection:

IP 54 (IEC60529)

Shock:

30G (IEC60068-2-27)

Vibration:

3G (IEC60068-2-6)

Electrical

Power Supply:

AC adaptor: 100V to 240V, DC 7.2V (nominal)

Power Consumption:

Approx. 6W (typical)

Battery Operation:

Approx. 2 hours 30 minutes

Physical Characteristics:

Camera Dimensions:

4.3” x 4.5”  x 7.4” (excluding projection)

Camera Weight:

2.9 lb (excluding battery and LCD)

3.5 lb. (including battery and LCD)

Summary of Contents for 7600PRO

Page 1: ...MikroScan 7600PRO Thermal Imager Operator s Manual MIKRON INFRARED INC 16 THORNTON ROAD OAKLAND NJ 07436 USA Tel 1 201 405 0900 Fax 1 201 405 0090 URL http www mikroninfrared com...

Page 2: ......
Page 3: ...Construction 8 2 2 Construction 9 2 3 Key Panel Functions 10 2 4 Camera Interfaces 11 2 5 On Board Image Processing Software 12 On Board Image Processing Software Standard Type Menu 13 On Board Image...

Page 4: ...2 1 Selecting a Voice Memo Recording Option 56 3 9 2 2 Selecting the Image Save Format 58 3 9 2 3 Selecting the Visible Save Option 59 3 9 3 Establishing the Analyze Setup Values 61 3 9 3 1 Setting th...

Page 5: ...e Menu 102 4 5 2 2 Using the Classic Type Menu 103 4 6 Adjusting the Focus 104 4 6 1 Using the Focus Indicator Bar with the Standard Type Menu 104 4 6 2 Using the Focus Indicator Bar with the Classic...

Page 6: ...4 Renumbering Files 153 5 4 5 Formatting the Memory Card 154 5 4 6 Working with Memory Card Error Messages 155 Data Analysis 157 6 1 Adjusting for Ambient Compensation 157 6 1 1 Accessing the Ambient...

Page 7: ...a Box 209 6 6 4 Deleting all Boxes 211 6 7 Working with the Max Min Temperature Display 212 6 7 1 Selecting the Max Min Temperature Option Whole Display 213 6 7 2 Setting the Max Min Temperature Optio...

Page 8: ...etting the RS 232C Data Format if necessary 263 7 2 Working with External Video Displays 265 7 2 1 Connecting the Video Display Cable 265 7 2 2 Setting the Video Display Parameters 265 7 2 2 1 Setting...

Page 9: ...s Manual Catalog 11180 94 V15 4F 050406 Appendix 287 9 1 After Use Care 287 9 2 Maintenance 287 9 3 Troubleshooting Symptoms 288 9 4 Troubleshooting Error Messages 290 9 5 MikroScan 7600PRO Specifica...

Page 10: ...viii MikroScan 7600PRO Operator s Manual Catalog 11180 94 V15 4F 050406 To ensure consistent document formatting this page was intentionally left blank...

Page 11: ...cluded together with a guide to care maintenance and troubleshooting 1 2 Conventions 1 Headings of main sections appear in italicized bold type 2 Headings of sub sections appear in bold type 3 Menu or...

Page 12: ...embled it may generate irritating gas or cause the negative electrode to over heat and catch fire 2 Do not short circuit the battery pack or battery 3 Do not expose the battery pack or battery to flam...

Page 13: ...on 3 3 of this manual 1 Do not use the strap around your neck when the instrument is in tran sit between locations 2 Be especially aware of protruding objects on which the strap can become hooked 1 4...

Page 14: ...loss of profit or consequential damages resulting from or attributed to the use of its product or resulting from a defect in design or manufacture of the product The user shall determine the particula...

Page 15: ...Inspection The MikroScan 7600PRO thermal imaging camera is shipped in a rugged and padded carrying case along with two battery packs a battery charger AC Adapter memory card hand grip lens cap and ope...

Page 16: ...r number even if the instrument is under warranty the name and telephone number of the person to contact should questions arise and ship to the address below Within the United States ship via United P...

Page 17: ...d high defi nition 14 bit thermal images with digital visual images It is battery operated comes standard with extensive onboard image processing soft ware and has the ability to store images and data...

Page 18: ...s Front Camera Features Back Viewfinder Video Output Terminal IEEE1394 Interface Key Panel Terminal Cover for AC Adapter Grip Belt Hook Display Terminal Power Switch Compact Flash Memory Card Slot Rem...

Page 19: ...Operator s Manual Catalog 11180 94 V15 4F 050406 2 2 Construction Camera Features Side Camera Features Side Viewfinder Microphone Speaker for Voice Memo Function Rear Cover LCD Display Viewfinder Foc...

Page 20: ...y which allows navigation through menus and selection of certain options 3 S SAVE Saves the current image data in either the run or freeze modes 4 A Auto Automatically optimizes the focus sensitivity...

Page 21: ...rewire interface allows remote camera control image capture and process analysis using software running on a Windows based PC Memory Card Expansion Slot Insert Compact Flash Memory Card for storage an...

Page 22: ...4F 050406 MikroScan 7600PRO Display Screens 2 5 On Board Image Processing Software Main Display with Standard Type Menu Cursor Point Emissivity Date Time Page Color Palette Bar Run Freeze Mode Image D...

Page 23: ...rocessing Software Standard Type Menu MikroScan 7600PRO Display Screens Standard Type Menu MikroScan 7600PRO Display Screens Standard Type Menu Main Display with Measure Sub Menu Main Display with Dis...

Page 24: ...Type Menu On Board Image Processing Software Classic Type Menu Main Display with Cal Sub Menu Main Display with Analyze Sub Menu Main Display with Display Sub Menu Main Display with Measure Sub Menu...

Page 25: ...7 SAVE Allows you to save the thermal image visual image voice memo and annotations 8 switch displayed image Allows you to switch between the thermal image and visible light image 9 EMISSIVITY The mea...

Page 26: ...temperature MAX Displays the maximum temperature and tracks it with the cursor MIN Displays the minimum temperature and tracks it with the cursor MAX HOLD Displays the maximum temperature and holds i...

Page 27: ...udible beep will be heard when the event condition is triggered interval Specifies the time interval to be used for automatically saving the thermal image to the memory card 5 to 3600 seconds The time...

Page 28: ...of frames to auto matically record to the memory card before the instrument enters freeze mode Note the total number of frames saved will be dependent upon the amount of available space on the memory...

Page 29: ...active the cross cursor traces a point temperature signal and always controls for the temperature signal level to be at the center level of the color bar When the cross cursor is not used the temperat...

Page 30: ...g on the application one scale might be more suitable than another for obtaining optimum results COLOR POSI Reverse color settings Shine Fine Rainbow Brightness Hot Iron Medical 256 128 64 32 16 Used...

Page 31: ...FORMAT Allows you to delete all image files and subdirectories from the CF card f DELETE Deletes files contained in the root direc tory or subdirectories stored on the CF card g RENUMBER Renumber the...

Page 32: ...nsation feature is used to compensate for reflectivity background errors c ERSP Cal Adjusts the detected temperature cor responding to the measurement environ ment d lens The MikroScan 7600PRO is ship...

Page 33: ...he focus position utilizing the Focus AUTO mode level sensitivity or level span Automatically sets the optimum values for the temperature level and sensitivity OR the temperature level and span LANGUA...

Page 34: ...kroScan 7600PRO off This option disables the voice annota tion feature of the MikroScan 7600PRO default save format Allows you to choose to save images in either a BMP or a SIT format sit Images are s...

Page 35: ...vity is displayed only when the emissivity of the point is different from the emissivity of the whole screen box temp Used to determine the Max Min and Avg temperatures within a specified area of a th...

Page 36: ...the instrument is in Freeze mode ON Displays the corrected image by spatial filter on FREEZE default OFF The spatial filter correction is not per formed ALL CLEAR Allows you to focus solely on the ima...

Page 37: ...at NON INTERLACE Used to select the non interlace option INTERLACE Used to select the interlace option LCD BRIGHT Sets the brightness level of the LCD display e rs232c Performs RS 232C communications...

Page 38: ...Section 2 Introduction 28 MikroScan 7600PRO Operator s Manual Catalog 11180 94 V15 4F 050406 2 7 Standard Camera Accessories AC Adapter Battery Charger 2 Battery Packs Neck Strap Lens Protection Cap...

Page 39: ...100 minutes per battery NOTE Store battery packs in a cool dark loca tion when not in use Recharge the battery pack every 6 months when in storage Also recharge before and after every use NOTE Store...

Page 40: ...tions supplied with your camera include the AC Adapter and two battery packs This section will cover the steps neces sary for using these standard power supply options 3 2 1 Before You Begin Before ap...

Page 41: ...necting the AC Adapter to your MikroScan 7600PRO it is important that the power switch on the camera be in the off position Step 1 Step 2 DC connector AC connector Step 3 1 Open the terminal cover on...

Page 42: ...ing the instru ment 3 3 1 Removing the Lens Cap 1 Squeeze the clips on both side of the lens cap 2 Pull the lens protection cap off of the camera lens 3 3 2 Attaching the Lens Cap 1 Position the lens...

Page 43: ...memory card it is important that the power switch on the camera be in the off position 3 4 1 Inserting the Memory Card 1 Remove the memory card from the Compact Flash Adapter 2 Turn the memory card s...

Page 44: ...I on position Once the power switch has been turned on the camera will enter an initialization mode During initialization a display will appear show ing the software version the color palette bar and...

Page 45: ...g with the joystick and the joystick e button joystick e button and functionality 3 6 1 Using the Standard Type Navigational Structure 1 Press the joystick e button gain access to the 7600PRO standard...

Page 46: ...o lock the display and gain access to the 7600PRO classic type menu 2 Toggle the Joystick button to the left or right until the MENU option becomes highlighted at the top right hand corner of the dis...

Page 47: ...oystick button down to expose the drop down list of menu functions MENU list exposed 4 Toggle the Joystick button up or down as needed to highlight the desired main menu choices main MENU choice HIGHL...

Page 48: ...ow as shown in Step 1 above 2 Open the LCD Display in the direction of the arrow as shown in Step 2 above 3 Tilt the LCD display as needed to adjust for proper viewing as shown by the arrows in Step 3...

Page 49: ...ristics The lens option is changed as follows 1 Verify the camera is operating in run mode 2 Go to menu cal lens Classic View Menu lens HIGHLIGHTED lens HIGHLIGHTED Standard View Menu 3 Press the joys...

Page 50: ...Scan 7600PRO provides environment setup options which allow you to setup change save and recall different camera configurations based on your selections 3 9 1 Establishing the Initial Setup Values 3 9...

Page 51: ...enu set up initial Classic View Menu initial HIGHLIGHTED initial HIGHLIGHTED Standard View Menu 2 Press the joystick e button to gain access to the Initial Set up Menu 3 Toggle the Joystick up or down...

Page 52: ...name is made up of the following components 4 Character Customizable File Name 4 Digit Auto Assigned Number 3 Character File Format Extension TH91 0001 SIT The first four characters designate the file...

Page 53: ...ded to highlight file name file name highlighted 4 Toggle the Joystick to the right to highlight the first character of the file name file name character highlighted 5 Toggle the Joystick up or down a...

Page 54: ...oystick to the right to highlight the next character of the file name file name character highlighted 7 Repeat steps 5 and 6 until you have selected and or changed all the desired file name values fil...

Page 55: ...ocus position level sens level Span Automatically sets the optimum values for the temperature level and sensitivity OR the tempera ture level and span Note Whether the Auto Mode function affects the L...

Page 56: ...de auto mode highlighted 4 Toggle the joystick to the right to highlight the auto mode option auto mode option highlighted 5 Toggle the joystick up or down as needed to select the desired auto mode op...

Page 57: ...nt languages including English Japanese Portuguese Spanish French German Traditional Chinese Chinese Korean Russian and Italian To set the language 1 Go to menu set up initial Classic View Menu initia...

Page 58: ...ote camera control functionality and real time data acquisition and analysis through the IEEE 1394 interface See Working with Communication Interfaces found in Section 7 3 of this manual for more info...

Page 59: ...l Classic View Menu initial HIGHLIGHTED initial HIGHLIGHTED Standard View Menu 2 Press the joystick e button to gain access to the Initial Set up Menu 3 Toggle the Joystick up or down as needed to hig...

Page 60: ...fault MM DD YY month day year DD MM YY day month year 6 Press the joystick e button to save the setting and to return to the main display 3 9 1 7 Setting the Date 1 Go to menu set up initial Classic V...

Page 61: ...on the date format setting See Section 3 9 1 6 of this manual The variable options appear in the following order YY MM DD year month day Default MM DD YY month day year DD MM YY day month year 6 Toggl...

Page 62: ...ight set time set time highlighted 4 Toggle the Joystick to the right to highlight the first set of variables time variable selected 5 Toggle the Joystick up or down as needed to increase or decrease...

Page 63: ...ck e button to save the setting and to return to the main display 3 9 1 9 Displaying the Date and Time 1 Go to menu set up initial Classic View Menu initial HIGHLIGHTED initial HIGHLIGHTED Standard Vi...

Page 64: ...OFF 6 Press the joystick e button to save the setting and to return to the main display 3 9 1 10 Selecting a Navigational Structure 1 Go to menu set up initial Classic View Menu initial HIGHLIGHTED in...

Page 65: ...eration operation highlighted 4 Toggle the Joystick to the right to highlight the operation option operation option highlighted 5 Toggle the Joystick up or down as needed to select the desired operati...

Page 66: ...played on the MikroScan 7600PRO or transferred along with all other image data to an external computer To select a voice memo recording option 1 Go to menu setup save Classic View Menu save HIGHLIGHTE...

Page 67: ...f menu choices voice memo highlighted 4 Toggle the joystick to the right to highlight the voice memo options voice memo option highlighted 5 Toggle the joystick up or down as needed to select the desi...

Page 68: ...with its visible image counterpart as a single SIT image file When an image is saved with the BMP file extension it is only saved as an image file and does not include data which may be essential for...

Page 69: ...o return to the main display 3 9 2 3 Selecting the Visible Save Option The MikroScan 7600PRO allows visible images to be viewed and saved with their thermal image counterparts These visible light imag...

Page 70: ...assic View Menu save HIGHLIGHTED save HIGHLIGHTED Standard View Menu 2 Press the joystick e button to gain access to the save Set up Menu 3 Toggle the joystick up or down to highlight save visible fro...

Page 71: ...the various points are affected by differences in emissivity settings The Multi Point Temperature Display Options can be used in either the RUN or FREEZE modes The Multi Point Temperature Display off...

Page 72: ...ference T between point a and point b However this mode does not allow the emissivity to be corrected on an individual basis Temp emiss Displays the specified point temperature under the color bar and...

Page 73: ...however allow emissivity settings to be changed or displayed temp emiss Displays the temperature and emissivity of each point near the point cursor Also allows emissivity of each point to be set indiv...

Page 74: ...interest The Box Temperature option offers two mode choices Mode Details on default Displays the box and the box label along with the minimum maximum and average temperature of the area defined by the...

Page 75: ...tick to the right to highlight the box temp options box temp option highlighted 5 Toggle the joystick up or down as needed to select the desired box temp option box temp option highlighted The box tem...

Page 76: ...emperature surface The NUC operation corrects the unevenness of characteristics for all elements of the UFPA by a reference blackbody source while an internal accurate thermometer monitors the tempera...

Page 77: ...ess the joystick e button to gain access to the display Set up Menu display setup menu 3 Toggle the joystick up or down if needed to highlight nuc mode from the list of menu choices nuc mode highlight...

Page 78: ...NUC mode option 1 Follow steps 1 5 for Setting the NUC Non Uniformity Correction Mode in Section 3 9 4 1 of this manual 2 Select Manual from the list of mode options manual nuc mode option highlighted...

Page 79: ...peration has been selected the instrument will perform a non uniformity correction detector stabilization according to the time interval set in Step 4 above 3 9 4 2 Setting the L S Level Sensitivity O...

Page 80: ...wo mode choices Mode Details Level Sensitivity default Sets the intervals of the temperature color bar scale Level SPAN Sets the upper limit temperature value of the color bar Note When the mode is se...

Page 81: ...as needed to select the desired L S option l s option highlighted The Set L S options are LEVEL SENSE DEFAULT LEVEL SPAN 6 Press the joystick e button to lock the setting and to return to the main dis...

Page 82: ...play Classic View Menu display HIGHLIGHTED display HIGHLIGHTED Standard View Menu 2 Press the joystick e button to gain access to the display Set up Menu 3 Toggle the joystick up or down to highlight...

Page 83: ...hlighted The filtering options are OFF Select a threshold from 0 1 C to 5 0 C 32 2 F to 41 F with the step of 0 1 C 1 F 6 Press the joystick e button to lock the setting and to return to the main disp...

Page 84: ...isplay Classic View Menu display HIGHLIGHTED display HIGHLIGHTED Standard View Menu 2 Press the joystick e button to gain access to the display Set up Menu 3 Toggle the joystick up or down to highligh...

Page 85: ...logo Activating the All Clear Option clearing the display 1 Follow steps 1 5 for Clearing Showing Display Elements in Section 3 9 4 4 of this manual 2 Select OFF from the list of mode options all cle...

Page 86: ...Classic View Menu display HIGHLIGHTED display HIGHLIGHTED Standard View Menu 2 Press the joystick e button to gain access to the display Set up Menu 3 Toggle the joystick up or down to highlight all...

Page 87: ...ess the joystick e button to lock the setting and to return to the main display 3 9 4 5 Clearing Showing the Status Bar 1 Go to menu setup display Classic View Menu display HIGHLIGHTED display HIGHLIG...

Page 88: ...the joystick up or down as needed to select the desired option status bar option highlighted The status bar display options are ON DEFAULT OFF 6 Press the joystick e button to lock the setting and to...

Page 89: ...ssic View Menu display HIGHLIGHTED display HIGHLIGHTED Standard View Menu 2 Press the joystick e button to gain access to the display Set up Menu 3 Toggle the joystick up or down to highlight color ba...

Page 90: ...he setting and to return to the main display Although the Color Bar OFF option will clear the color bar and temperature range scale from the display these elements are only hidden and can be accessed...

Page 91: ...ces battery highlighted 4 Toggle the joystick to the right to highlight the battery indicator display option battery option highlighted 5 Toggle the joystick up or down as needed to select the desired...

Page 92: ...480 this means that each image or image frame would include 480 individual rows of pixels The 7600PRO offers two scanning modes The first is the default non interlace mode With the non interlace mode...

Page 93: ...k up or down as needed to highlight lcd bright lcd bright highlighted 4 Toggle the joystick to the right to highlight the LCD Bright option lcd bright option highlighted 5 Toggle the joystick up or do...

Page 94: ...1 Activating the Auto Standby Feature 1 If using the Standard Type Menu go to menu setup auto standby auto standby HIGHLIGHTED Standard View Menu OR If using the Classic Type Menu go to menu standby a...

Page 95: ...he auto STANDBY Mode auto standby mode screen A bar will appear at the bottom of the screen showing the current auto standby setting 3 Toggle the Joystick up or down as needed to select Auto standby O...

Page 96: ...3 9 5 2 Deactivating the Auto Standby Feature 1 If using the Standard Type Menu go to menu setup auto standby auto standby HIGHLIGHTED Standard View Menu OR NOTE When activated the screen will darken...

Page 97: ...standby auto auto standby HIGHLIGHTED Classic View Menu 2 Press the joystick e button to gain access to the auto STANDBY Mode auto standby mode screen A bar will appear at the bottom of the screen sh...

Page 98: ...menu the Save Setup menu the Analyze setup menu and the Display Setup menu 3 10 1 Saving a configuration file 1 Go to menu setup svconfig Classic View Menu svconfig HIGHLIGHTED svconfig HIGHLIGHTED St...

Page 99: ...age bar will appear at the bottom of the display asking if you want to over write the previous configuration file You can either press the Joystick E button to over write the existing file OR You can...

Page 100: ...Standard View Menu 2 Press the joystick e button to gain access to the load configu ration Mode load configuration screen 3 Toggle the joystick up or down to select a configuration file number from 1...

Page 101: ...sion Classic View Menu version HIGHLIGHTED version HIGHLIGHTED Standard View Menu 2 Press the joystick e button to gain access to the version Display Screen version display screen 3 Press the joystick...

Page 102: ...Section 3 Getting Started 92 MikroScan 7600PRO Operator s Manual Catalog 11180 94 V15 4F 050406 To ensure consistent document formatting this page was intentionally left blank...

Page 103: ...button to place the camera into Run Mode 2 Verify run is highlighted at the upper right hand corner of the display and that the time clock has restarted freeze HIGHLIGHTED NOTE Most display and menu...

Page 104: ...standby mode NOTE All camera settings are saved when the instru ment is in standby mode NOTE When activated the screen will darken and the camera will enter standby mode Press any key to cancel the s...

Page 105: ...ge offers a FIXED range mode setting and a L S LINK Level Sens linking mode setting In the FIXED mode the LEVEL and SENSITIVITY can be adjusted to their minimum and maximum levels without affecting th...

Page 106: ...om of the display indicating that the temperature range request is processing OR Press the cancel visible c button to cancel out of the menu mode and to return to the main display NOTE The Maximum Tem...

Page 107: ...Section 4 3 1 of this manual 2 Toggle the Joystick to the right to highlight the temperature range mode range mode selected 3 Toggle the Joystick up or down if needed until the desired tem perature ra...

Page 108: ...de Setting See Section 4 3 2 of this manual In step 3 of Selecting the Temperature Range Mode Setting be sure to select L S Link l S Link range mode selected 2 While in Range 1 Toggle the Joystick up...

Page 109: ...ntarily while the instrument is processing the range change Once the processing has been completed the temperature range scale will reflect the fact that the camera is now operating in Range 1 range 1...

Page 110: ...e of a par ticular palette will depend on the scene being monitored operator comfort and other considerations such as ease of focusing 4 5 1 Choosing a Color Palette 1 Go to menu display color Classic...

Page 111: ...or selections are as follows COLOR POSI 256 DEFAULT COLOR POSI 128 64 32 16 COLOR NEG 256 128 64 32 16 MONO POSI 246 128 64 32 16 MONO NEG 246 128 64 32 16 4 Toggle the joystick to the right to highli...

Page 112: ...1 Using the Standard Type Menu 1 Press and hold the joystick e button to gain access to the MikroScan 7600PRO quick menu functions 2 Press the joystick e button again until the color bar becomes highl...

Page 113: ...n to activate the display functions 2 Toggle the joystick left or right as needed to highlight the palette bar highlighted color palette bar 3 Toggle the joystick up or down as needed to toggle betwee...

Page 114: ...tton to gain access to the MikroScan 7600PRO quick menu functions 3 Press the joystick e button again until the focus indicator bar appears becomes highlighted on the display focus indicator bar near...

Page 115: ...with the Classic Type Menu 1 Verify the display is in Run mode and that no other parameter is highlighted 2 Press the joystick e button to activate the display functions 3 Toggle the joystick left or...

Page 116: ...oggling the joystick upward will move the blue focus indicator bar toward the far focus range of infinity OR Toggle the joystick downward to decrease the focal distance Focusing Indicator Bar Toggling...

Page 117: ...ally displaced about some median temperature in the target area To adjust the temperature level Toggle the Joystick up or down as needed to change the temperature level After Adjustment temperature le...

Page 118: ...imit temperature value OR Toggle the joystick to the left to decrease the upper limit temperature value After Adjustment temperature span temperature span Before Adjustment NOTE If the temperature of...

Page 119: ...small portion of the whole temperature range is used for viewing it is often necessary to increase or decrease the intervals of the temperature scale by adjusting the sensitivity level To adjust the...

Page 120: ...ing the Auto Mode Function See Section 3 9 1 3 of this manual 2 Verify the auto mode option in the initial setup menu is set to Full auto mode full option highlighted 3 Verify the camera is operating...

Page 121: ...ion See Section 3 9 1 3 of this manual 2 Verify the auto mode option in the initial setup menu is set to level sense or level span auto mode level sensitivity option highlighted Note Whether the Auto...

Page 122: ...S N Improvement function that reduces the noise included in the image signals by means of averaging the image This function also improves the minimum detectable size of the image This function allow y...

Page 123: ...ed 4 Press the joystick e button to select the desired setting and to return to the main display OR Press the cancel visible c button to cancel out of the menu mode and to return to the main display 4...

Page 124: ...ottom of the screen allowing you to select the desired image zoom option The digital image zoom options are x2 x4 3 Toggle the Joystick up or down as needed to scroll through the image zoom options 4...

Page 125: ...Utilizes an ASCII file previously stored to a MikroScan 7600PRO formatted memory card In the character input mode characters are entered one by one after being selected from a character symbol list on...

Page 126: ...ursor To enter a space between characters use the box symbol found at the beginning of the character symbol list Once a single character has been entered the input cursor moves to the next position NO...

Page 127: ...ledge that you want to clear the memo and return to the main display NOTE If the camera is turned off and then powered up again the text and location of the memo do not appear on the display and are n...

Page 128: ...play memo Classic View Menu memo HIGHLIGHTED memo HIGHLIGHTED Standard View Menu 2 Press the joystick e button to select the memo option memo Upon completion of step 2 a box will appear on the display...

Page 129: ...o 9 Press the save button to select the character and enter it on the display To enter a space between characters use the box symbol found at the beginning of the character symbol list Once a single c...

Page 130: ...filenames can be up to 8 alpha numeric characters The extension of a file name should be scv or txt One line ending in CR LF code is treated as a memo The number of the characters in one line can be u...

Page 131: ...mo are displayed in list form all memo characters will be displayed on the thermal image once a specific file has been selected 5 Press the joystick e button to attach the file to the image The text o...

Page 132: ...e memo character symbol list 3 Toggle the Joystick button up or down as needed to choose the Input Cursor Movement Label input cursor movement label input cursor 4 Press the save button to enter the c...

Page 133: ...ginning of the character symbol list to delete a character and have it replaced with a space Or you can select another symbol or character from the list to use as a replacement 8 Press the save button...

Page 134: ...display until it is deleted or the camera is turned off OR a Press the cancel visible c button to cancel out of the function and to return to the main display b Press the joystick e button to acknowle...

Page 135: ...ed to choose the Input Cursor Movement Label input cursor movement label input cursor 4 Press the save button to enter the cursor movement mode The highlighted box displayed on the screen can now be m...

Page 136: ...r the cursor input mode 8 Toggle the Joystick button up or down as needed to scroll through the list of characters symbols to select the space designator space designator 9 Press the save button to re...

Page 137: ...ss the joystick e button to acknowledge that you want to clear all memos and return to the main display 4 13 5 2 Deleting all Characters at Once 1 Go to menu display memo Classic View Menu memo HIGHLI...

Page 138: ...Manual Catalog 11180 94 V15 4F 050406 3 Press the cancel visible c button clear memo message A message will appear at the bottom of the screen confirming the deletion request 4 Press the joystick e b...

Page 139: ...anual for information on Selecting an Image Save Format 3 In step 5 select sit sit option selected 4 Aim the camera at a specific target of interest 5 Make any desired adjustments to the temperature r...

Page 140: ...e of the differ ence in the optical axis 3 The viewing field is ob structed by the installation of the optional telephoto lens or wide angle lens therefore the visible image can not be displayed the s...

Page 141: ...installation of the optional telephoto lens or wide angle lens therefore the visible image can not be displayed the same as the infrared image 4 Because the focus distance is fixed it can not focus a...

Page 142: ...he bottom of the display bitmap file Information OR 8b Press the cancel visible c button to select NO cancel Once the cancel visible c button has been selected the camera will cancel out of the save b...

Page 143: ...Verify that the sit Format has been selected in the Save Setup Menu Refer to Section 3 9 2 2 of this manual for information on Selecting the Image Save Format sit option selected 3 Verify that on has...

Page 144: ...ick e button to begin the recording process A single beep will indicate the start of the recording process along with a message at the bottom of the display indicating the recording function is in pro...

Page 145: ...O 5 2 1 Reviewing SIT Images Using the Replay File Feature 1 Follow steps 1 6 of Section 5 4 2 entitled Selecting Directories to select the desired directory 2 If using the Standard Type Menu go to me...

Page 146: ...the Joystick to the left or right to activate the auto page feature The auto play feature can be paused at any time by toggling the Joystick up or down 5 Press the joystick e button to select the ima...

Page 147: ...s Using the Replay File Feature 1 Follow steps 1 6 of Section 5 4 2 entitled Selecting Directories to select the desired directory 2 If using the Standard Type Menu go to menu file bmp file bmp file H...

Page 148: ...or down as needed to scroll through the pages of stored images OR Toggle the Joystick to the left or right to activate the auto page feature The auto play feature can be paused at any time by togglin...

Page 149: ...sing the Thumbnail Feature 1 Follow steps 1 6 of Section 5 4 2 entitled Selecting Directories to select the desired directory 2 If using the Standard Type Menu go to menu file thumbnail thumbnail HIGH...

Page 150: ...button to freeze the display and gain access to the thumbnail Display THUMBNAIL display 4 Toggle the Joystick to the left or right as needed to scroll through the individual thumbnails on the page TH...

Page 151: ...y option works in conjunction with the camera s run mode feature with sequences being captured based on a triggering event For more information on the run mode feature and real time memory see section...

Page 152: ...ents to the temperature level and sensitivity or span You can also work with certain menu functions such as adding temperature points boxes annotations etc 5 Press the r RUN FRZ button to return the c...

Page 153: ...rting and Removing the Memory Card 2 Follow steps 1 6 in Section 3 9 2 2 of this manual for information on Selecting an Image Save Format 3 In step 5 select sit sit option selected 4 Follow steps 1 5...

Page 154: ...oved Compact Flash Memory Card has been inserted into the camera See Section 3 4 of this manual for information on Inserting and Removing the Memory Card 2 Follow steps 1 6 in Section 3 9 2 2 of this...

Page 155: ...unt of data that can be saved to the card will be dependent on the amount of space available on the memory card To use the RTM save all feature 1 Verify that a Mikron approved Compact Flash Memory Car...

Page 156: ...t flash card will be dependent upon the amount of space available on the card 6 Toggle the Joystick up or down if needed to select the desired frame as a start point for saving image data to the compa...

Page 157: ...save only image frames 1 10 then the remaining images 11 end will remain in real time memory You can then repeat the above steps to save additional image groups as desired Note once a range of frames...

Page 158: ...agement Options The MikroScan 7600PRO provides a number of memory card management options which allow you to make directories as well as renumber and delete image files 5 4 1 Making Directories 1 Go t...

Page 159: ...le c button to cancel out of the function and to return to the main display 4 Press the r RUN FRZ button to return the camera to Run Mode 5 4 2 Selecting Directories 1 Go to menu file directory Classi...

Page 160: ...sible c button to cancel out of the select directory mode and to return to the main display 6 Press the r RUN FRZ button to return the camera to Run Mode NOTES When directories are created on the came...

Page 161: ...to cancel out of the function 4 Press the joystick e button to select the yes option access the list of files in the selected directory directory files NOTE The delete feature will only function with...

Page 162: ...ce of the other files in the directory will not change See Section 5 4 4 for more information on Renumbering Files 9a Repeat steps 5 through 8 above to delete additional files OR 9b Press the cancel v...

Page 163: ...mber will generate an error message When you delete indi vidual files the space held by the deleted file will remain open and will create a gap in the numbering sequence The renumbering fea ture allow...

Page 164: ...ck e button to select yes option which will begin reformatting the internal memory card A card formatting message will appear on the bar at the bottom of the screen while the internal memory card is b...

Page 165: ...d DATA MISS MATCH The data is not compatible with the 7600PRO file structure Reformat the memory card using the method described in Section 5 4 5 Formatting the Memory Card full There is no more space...

Page 166: ...Section 5 Images and Image Files 156 MikroScan 7600PRO Operator s Manual Catalog 11180 94 V15 4F 050406 To ensure consistent document formatting this page was intentionally left blank...

Page 167: ...hem 6 1 1 Accessing the Ambient Compensation Mode Settings 1 Verify the camera is operating in run mode 2 Go to menu CAL ambient Classic View Menu ambient HIGHLIGHTED ambient HIGHLIGHTED Standard View...

Page 168: ...e highlighted 5 Toggle the Joystick to the right to highlight the Setup Mode options setup mode option highlighted 6 1 2 Setting Ambient Compensation Using the Parameter Mode 1 Follow steps 1 5 for Ac...

Page 169: ...Temp value atmospheric temp value NOTE When the ambient compen sation mode has been activated the letters AMB appear on the display s sta tus bar This designates that the ambient compensation mode has...

Page 170: ...tmospheric Temp value atmospheric temp value changed The compensation value will automatically reflect the adjust ments made to this parameter 5 Toggle the Joystick to the left to set the atmospheric...

Page 171: ...ly reflect the adjust ments made to this parameter NOTE When the ambient compen sation mode has been activated the letters AMB appear on the display s sta tus bar This designates that the ambient comp...

Page 172: ...stick e button to save the setting and to return to the main display 6 1 2 3 Setting the Object Distance 1 Follow steps 1 3 for Setting Ambient Compensation Using the Parameter Mode See Section 6 1 2...

Page 173: ...sation mode has been activated the letters AMB appear on the display s sta tus bar This designates that the ambient compensation mode has been turned on and that emissivity has been adjusted by the a...

Page 174: ...mbient Compensation Mode Settings See Section 6 1 1 of this manual 2 Toggle the Joystick up or down if needed to highlight value from the list of menu choices value mode option highlighted 3 Toggle th...

Page 175: ...NOTE When the ambient compen sation mode has been activated the letters AMB appear on the display s sta tus bar This designates that the ambient compensation mode has been turned on and that emissivit...

Page 176: ...tick e button to save the setting and to return to the main display 6 1 3 2 Setting the Compensation Value 1 Follow steps 1 3 for Setting Ambient Compensation Using the Value Mode See Section 6 1 3 of...

Page 177: ...on the display s sta tus bar This designates that the ambient compensation mode has been turned on and that emissivity has been adjusted by the ambient compensation value Refer to Deactivating the Amb...

Page 178: ...the camera is operating in run mode ambient mode activated 2 Go to menu CAL ambient Classic View Menu ambient HIGHLIGHTED ambient HIGHLIGHTED Standard View Menu 3 Press the joystick e button to gain a...

Page 179: ...IGHLIGHTED background HIGHLIGHTED Standard View Menu 3 Press the joystick e button to access the background compensation Display background compensation display A bar will appear at the bottom of the...

Page 180: ...ect the desired background compensation temperature value temp value selected Make sure to use a temperature value that falls within the cur rent measuring temperature range 5 Press the joystick e but...

Page 181: ...Menu 3 Press the joystick e button to select the AGC LVT option agc lvt option selected A bar will appear at the bottom of the screen showing the current AGC LVT option NOTE The Gain Control Feature c...

Page 182: ...on the main display screen OR Press the cancel visible c button to cancel out of the menu mode and to return to the main display NOTE The temperature at the new cursor position is displayed at the bo...

Page 183: ...Menu agc lvt HIGHLIGHTED agc lvt HIGHLIGHTED Standard View Menu 3 Press the joystick e button to select the AGC LVT option agc lvt option selected A bar will appear at the bottom of the screen showing...

Page 184: ...Details temp Displays the temperature of the points under the color bar Does not however allow emissivity settings to be changed or displayed temp emiss Displays the temperature and emissivity of eac...

Page 185: ...using the Standard Type Menu go to menu measure P TEMP p temp highlighted Standard View Menu OR If using the Classic Type Menu go to menu analyze P TEMP p temp highlighted Classic View Menu 3 Press th...

Page 186: ...hted Temp Point 6 Toggle the Joystick left or right as needed to move the tempera ture point along the horizontal plane to the desired location on the image display P temp x y coordinates highlighted...

Page 187: ...oint will be labeled a The next tem perature point will be labeled b 4 Press the s save button to establish the temperature point and to highlight the new p temp x y coordinates P Temp label P Temp x...

Page 188: ...ght the new p temp label 8 Follow the previous steps 3 7 to add and place additional tempera ture points P Temp label P Temp x y coordinates p temp position b P temp position a P temp position c The f...

Page 189: ...ighlighted Standard View Menu OR If using the Classic Type Menu go to menu analyze P TEMP p temp highlighted Classic View Menu 2 Press the joystick e button to select the P TEMP option P Temp label P...

Page 190: ...y coordinates p temp position c P temp position b P temp position a 5 Toggle the Joystick up or down as needed to move the tempera ture point along the vertical plane to the desired location on the im...

Page 191: ...onal temperature points P Temp label P Temp x y coordinates p temp position c P temp position b P temp position a 9 Press the joystick e button to set the new temperature point locations and return to...

Page 192: ...abel P Temp x y coordinates p temp position c P temp position b P temp position a The new display will appear showing the temperature point the temperature point label and the temperature point coordi...

Page 193: ...position a When a selected cursor point has been deleted the remaining cursor points are relabeled 5 Follow the previous steps 3 4 to delete additional temperature points P Temp label P Temp x y coor...

Page 194: ...highlighted Standard View Menu OR If using the Classic Type Menu go to menu analyze P TEMP p temp highlighted Classic View Menu 2 Press the joystick e button to select the P TEMP option P Temp label...

Page 195: ...ition of the object and also with temperature variation and wavelength If this value is not accurate then the true temperature cannot be measured In other words a variation or change in emissivity wil...

Page 196: ...splay 5 Press the joystick e button set the new emissivity value and return to main display 6 5 1 2 Using the Classic Type Menu 1 Press the joystick e button to activate the display functions 2 Toggle...

Page 197: ...for more information on Toggling between the Run and Freeze Modes 2 Press and hold the joystick e button to gain access to the MikroScan 7600PRO quick menu functions and highlight the emissivity setti...

Page 198: ...the emissivity value of the display Ambient Temperature Value Emissivity Value 5 Toggle the joystick left or right if needed to highlight the atmo spheric temperature value Ambient Temperature Value...

Page 199: ...reen while the values are being processed Once the values have been processed another message bar will appear at the bottom of the screen asking if you would like to accept or cancel the change in val...

Page 200: ...eeze Modes 2 Press the joystick e button to activate the display functions 3 Toggle the joystick left or right as needed until the emissivity set ting becomes highlighted on the display emissivity val...

Page 201: ...the emissivity value of the display Ambient Temperature Value Emissivity Value 6 Toggle the joystick left or right if needed to highlight the atmo spheric temperature value Ambient Temperature Value...

Page 202: ...reen while the values are being processed Once the values have been processed another message bar will appear at the bottom of the screen asking if you would like to accept or cancel the change in val...

Page 203: ...LIGHTED Standard View Menu 3 Press the joystick e button to gain access to the Emiss table Display emiss table display 4 Toggle the Joystick up or down if needed to highlight the applicable material f...

Page 204: ...the material types material type highlighted 6 Toggle the Joystick up or down if needed to select the desired material type from the list of menu choices material type highlighted 7 Press the joystick...

Page 205: ...on to lock the setting and to return to the main display 4 If using the Standard Type Menu go to menu measure P emiss p emiss highlighted Standard View Menu OR NOTE temp Displays the temperature of th...

Page 206: ...0406 If using the Classic Type Menu go to menu analyze P emiss p emiss highlighted Classic View Menu 5 Press the joystick e button to select the P emiss option point emissivity point temp The new disp...

Page 207: ...sor point Point label point emissivity value Highlighted p Temp position c NOTE temp emiss Displays the temperature and emissivity of each point near the point cursor Also allows emissivity of each po...

Page 208: ...abel Point label highlighted point emissivity value emissivity for p Temp position c 6 Repeat steps 3 5 to change additional cursor point emissivity values 7 Press the joystick e button to lock the se...

Page 209: ...t label point emissivity value p temp emiss position a P temp emiss position c P temp emiss position b The new display will appear showing the points the point temps and the point emissivity values 3...

Page 210: ...nt emissivity value P temp emiss position a 6 Press the joystick e button to set the remaining cursor point location s and return to the main display Pressing Joystick E button will lock the new curso...

Page 211: ...miss highlighted Standard View Menu OR If using the Classic Type Menu go to menu analyze P emiss p emiss highlighted Classic View Menu 2 Press the joystick e button to select the P emiss option point...

Page 212: ...to lock the setting and to return to the main display Pressing the joystick e button will clear all cursor points from the display 6 6 Working with Boxes By using the Box function it is possible to d...

Page 213: ...s upper left corner Box Coordinates lower right corner The new display will appear showing the box the box label the start point box coordinates for the upper left corner of the box and the start poin...

Page 214: ...o move the box along the vertical plane to the desired location point on the image display 5 Toggle the Joystick left or right as needed to move the box along the horizontal plane to the desired locat...

Page 215: ...es highlighted for the upper left corner of the box 8 Toggle the Joystick left or right as needed to move the designated corner along the horizontal plane to the desired location point on the image di...

Page 216: ...to the main display Pressing the Joystick e button will lock the revised box to its current position If the temp on option was selected the display will also show the maximum minimum and average temp...

Page 217: ...s upper left corner Box Coordinates lower right corner The new display will appear showing the box the box label the start point box coordinates for the upper left corner of the box and the start poin...

Page 218: ...size and location of the box 5 Follow the previous steps 4 and 5 to add and place additional boxes Box a max min and avg Temps for boxes a through e box label HIGHLIGHTED Box b Box c Box e Box d The f...

Page 219: ...g the Standard Type Menu go to menu measure box box highlighted Standard View Menu OR If using the Classic Type Menu go to menu analyze box box highlighted Classic View Menu 2 Press the joystick e but...

Page 220: ...b Box c Box e Box d 4 Press the c cancel visible button to delete the selected box Box a max min and avg Temps for boxes a through d box label HIGHLIGHTED Box b Box d Box c When a selected box has bee...

Page 221: ...If using the Standard Type Menu go to menu measure box box highlighted Standard View Menu OR If using the Classic Type Menu go to menu analyze box box highlighted Classic View Menu 2 Press the joysti...

Page 222: ...mum and Minimum temperatures on a thermal image for the whole display or for a defined box The Max Min Temperature Display Options can be used in either the RUN or FREEZE modes The Max Min Temperatur...

Page 223: ...Type Menu go to menu measure max min max min highlighted Standard View Menu OR If using the Classic Type Menu go to menu analyze max min max min highlighted Classic View Menu 2 Press the joystick e b...

Page 224: ...o select whole from the highlighted box option labels 6 Press the joystick e button to return to the main display MAX OR MIN Point MAX OR MIN TEMP The new display will appear showing the MAX or MIN te...

Page 225: ...re boxed regions of interest on the display pre defined boxes Refer to Section 6 5 entitled Working with Boxes for more information on creating and modifying a defined box 2 If using the Standard Type...

Page 226: ...ON LABEL The new display will appear showing the MAX MIN OPTION LABEL as well as the MAX MIN BOX OPTION LABEL 4 Toggle the Joystick up or down as needed to select OFF max min max hold or min hold from...

Page 227: ...ay will appear with the cursor point located at the defined MAX or MIN temperature point of the defined box 6 7 3 Canceling the Max Min Temperature Option 1 If using the Standard Type Menu go to menu...

Page 228: ...w Menu 2 Press the joystick e button to select the max min temp option MAX MIN option LABEL BOX OPTION LABEL The new display will appear showing the MAX MIN OPTION LABEL as well as the MAX MIN BOX OPT...

Page 229: ...hich allows you to set a temperature zone and create a thermal visual composite image for a more detailed analysis 6 8 1 Creating a Composite Image 1 Go to menu display comp Classic View Menu comp HIG...

Page 230: ...nge symbols NOTES 1 Make sure to focus on the measuring object BE FORE setting the com posite image function If the object is out of focus the composite image will be misaligned 2 A composite image ca...

Page 231: ...n allows you to fit the size of the thermal image to the visual image when a composite image is displayed 1 Verify the camera is operating in FRZ mode 2 Go to menu setup fit comp Classic View Menu fit...

Page 232: ...des a Multi Sense Display feature that will adjust the color palette to allow you to focus on the details surrounding the center temperature on the display or on the high and low temperatures of the d...

Page 233: ...ck up or down as needed to select the desired multi sense option multi sense middle selected multi sense high low selected 5 Press the joystick e button to save the setting and to return to the main d...

Page 234: ...D A bar will appear at the bottom of the screen showing the ISO Band Label and the corresponding band 3 Press the save button to access the ISO change symbols ISO THERMAL BAND iso change symbols 4 Tog...

Page 235: ...button to set the ISO band and to return to the ISO Band Labels 7 Add additional ISO bands See Section 6 9 2 for more information OR Press the joystick e button to return to the main display 6 10 2 A...

Page 236: ...IGHLIGHTED A bar will appear at the bottom of the screen showing the ISO Band Label and the corresponding band 3 Toggle the Joystick button up to add an additional ISO Band to the Temperature Range Sc...

Page 237: ...Band 7 Press the save button to set the ISO band and to return to the ISO Band Labels 8 Repeat steps 3 7 to add the remaining ISO Bands ISO THERMAL BAND a ISO BAND Labels ISO THERMAL BAND b ISO THERMA...

Page 238: ...will appear at the bottom of the screen showing the ISO Band Label and the corresponding band 3 Toggle the Joystick up or down as needed to select the desired ISO Thermal Label ISO THERMAL BAND a ISO...

Page 239: ...nd 7 Press the save button to set the ISO band and to return to the ISO Band Labels 8 Repeat steps 3 7 to change the remaining ISO Bands ISO THERMAL BAND a ISO BAND Labels ISO THERMAL BAND b ISO THERM...

Page 240: ...MAL BAND a ISO BAND Labels ISO THERMAL BAND b ISO THERMAL BAND c ISO THERMAL BAND d A bar will appear at the bottom of the screen showing the ISO Band Label and the corresponding band 3 Toggle the Joy...

Page 241: ...RMAL BAND a ISO BAND Labels ISO THERMAL BAND b ISO THERMAL BAND c 5 Repeat steps 3 4 to clear additional ISO Bands from the display ISO THERMAL BAND a ISO BAND Labels ISO THERMAL BAND b 6 Press the jo...

Page 242: ...MAL BAND b ISO THERMAL BAND c ISO THERMAL BAND d A bar will appear at the bottom of the screen showing the ISO Band Label and the corresponding band 3 Toggle the Joystick button down as needed to sele...

Page 243: ...des a waveform line profile function that provides temperature data To set the image zoom 1 Verify the display is in freeze mode and that no other parameter is highlighted 2 If using the Standard Type...

Page 244: ...ll appear at the bottom of the screen allowing you to select the desired waveform line profile option The waveform line profile options are X Y X Y OFF 3 Toggle the Joystick up or down as needed to sc...

Page 245: ...occurs the instrument has the ability to display an alarm message sound an audible alarm and or freeze the image for a closer view of the triggering event The instrument also provides the option of r...

Page 246: ...etting SELECTED If a threshold value is not specified an event condition will be triggered according to the maximum or minimum temperature values of the thermal image 5 Toggle the Joystick up or down...

Page 247: ...hen the temperature rises above the threshold value 7 Toggle the Joystick up or down as needed to select the desired threshold temperature condition 8 Toggle the Joystick to the right to set the optio...

Page 248: ...sic View Menu run mode HIGHLIGHTED run mode HIGHLIGHTED Standard View Menu 2 Press the joystick e button to access the run mode menu 3 Toggle the Joystick up or down as needed to select box from the l...

Page 249: ...shed threshold value or the minimum maximum temperature of the entire image 5 Toggle the Joystick up or down as needed to select the desired box range option from the displayed options run mode box ra...

Page 250: ...oystick up or down as needed to select alarm msg from the list of menu options run mode alarm message option highlighted 4 Toggle the Joystick to the right to highlight the alarm message settings run...

Page 251: ...ition 6 Toggle the Joystick to the right to set the option and return to the list of displayed options 7 Proceed through the list of additional menu choices OR Press the joystick e button to return to...

Page 252: ...un mode alarm sound option highlighted The alarm sound options are off there will be no audible warning when the event condition is triggered on an audible beep will be heard when the event condition...

Page 253: ...Classic View Menu run mode HIGHLIGHTED run mode HIGHLIGHTED Standard View Menu 2 Press the joystick e button to access the run mode menu 3 Toggle the Joystick up or down as needed to select freeze fro...

Page 254: ...will enter freeze mode as soon as an event condition is triggered See section 6 11 1 for more information on Setting the Event Condition 6 Toggle the Joystick to the right to set the option and retur...

Page 255: ...nu 3 Toggle the Joystick up or down as needed to select save from the list of menu options run mode save option highlighted 4 Toggle the Joystick to the right to highlight the save settings run mode s...

Page 256: ...additional menu choices OR Press the joystick e button to return to the main display 6 12 6 2 Selecting the PC Card Interval Option 1 Go to menu measure run mode Classic View Menu run mode HIGHLIGHTE...

Page 257: ...highlighted 5 Toggle the Joystick up or down as needed to select the desired interval delay time from the list of save settings run mode interval option highlighted 6 Toggle the Joystick to the right...

Page 258: ...ode Classic View Menu run mode HIGHLIGHTED run mode HIGHLIGHTED Standard View Menu 2 Press the joystick e button to access the run mode menu 3 Toggle the Joystick up or down as needed to select delay...

Page 259: ...gle the Joystick to the right to set the delay time value and return to the list of displayed options 7 Proceed through the list of additional menu choices OR Press the joystick e button to return to...

Page 260: ...save visible from the list of menu options run mode save visible option highlighted 4 Toggle the Joystick to the right to highlight the visible save settings run mode save visible option highlighted 5...

Page 261: ...on Setting the Event Condition 6 Toggle the Joystick to the right to set the save visible option and return to the list of displayed options 7 Proceed through the list of additional menu choices OR P...

Page 262: ...mode save option highlighted 5 Toggle the Joystick up or down as needed to select rtm from the list of save settings run mode rtm option highlighted 6 Toggle the Joystick to the right to set the rtm o...

Page 263: ...s FREEZE mode when an event condi tion has been triggered See section 6 11 1 for more information on Set ting the Event Condition OFF MAX FRAME 1664 The camera automatically enters FREEZE mode when th...

Page 264: ...k up or down as needed to select freeze from the list of menu options run mode freeze option highlighted 4 Toggle the Joystick to the right to highlight the first set of freeze conditions run mode fre...

Page 265: ...freeze conditions run mode freeze condition 2 highlighted 7 Toggle the Joystick up or down as needed to select the desired condition from the list of menu options run mode freeze condition 2 highlight...

Page 266: ...list of additional menu choices OR Press the joystick e button to return to the main display 6 12 7 3 Selecting the RTM Interval Option 1 Go to menu measure run mode Classic View Menu run mode HIGHLI...

Page 267: ...highlighted 5 Toggle the Joystick up or down as needed to select the desired interval delay time from the list of save settings run mode interval option highlighted 6 Toggle the Joystick to the right...

Page 268: ...e Classic View Menu run mode HIGHLIGHTED run mode HIGHLIGHTED Standard View Menu 2 Press the joystick e button to access the run mode menu 3 Toggle the Joystick up or down as needed to select delay fr...

Page 269: ...needed to select the desired frame delay from the list of save settings run mode delay option highlighted 6 Toggle the Joystick to the right to set the frame delay value and return to the list of dis...

Page 270: ...Section 6 Data Analysis 260 MikroScan 7600PRO Operator s Manual Catalog 11180 94 V15 4F 050406 To ensure consistent document formatting this page was intentionally left blank...

Page 271: ...tor from the display terminal located on the side of the camera 3 Connect the display cable connector for the external LCD to the S Video RS 232C Port on the camera 4 Turn the power switch on the came...

Page 272: ...et up Menu 3 Toggle the Joystick up or down if needed to highlight RS baud Rate RS baud rate highlighted 4 Toggle the Joystick to the right to highlight the RS baud rate option rs baud rate option hig...

Page 273: ...0 300 600 1200 2400 4800 9600 19200 38400 6 Press the joystick e button to save the setting and to return to the main display 7 1 4 Setting the RS 232C Data Format if necessary 1 Go to menu set up RS2...

Page 274: ...aud rate option highlighted 5 Toggle the Joystick up or down as needed to select the desired baud rate from the list of menu options The variable options appear in the following order Data Length Stop...

Page 275: ...Verify that the power switch is in the off position on both the camera and the Video Monitor 2 Open the cover on the back side of the camera 3 Connect the display cable connector to the video output t...

Page 276: ...HIGHLIGHTED Standard View Menu 2 Press the joystick e button to gain access to the display Set up Menu 3 Toggle the joystick up or down to highlight tv system from the list of menu choices tv system h...

Page 277: ...e process continues until the entire scene has been scanned and displayed Because the 7600PRO offers a resolution of 640 x 480 this means that each image or image frame would include 480 individual ro...

Page 278: ...play Classic View Menu display HIGHLIGHTED display HIGHLIGHTED Standard View Menu 2 Press the joystick e button to gain access to the display Set up Menu 3 Toggle the joystick up or down to highlight...

Page 279: ...ctionality and real time data acqui sition and analysis 7 3 1 Connecting the communication cable Before connecting the communication cable to your MikroScan 7600PRO it is impor tant that the power swi...

Page 280: ...ch on the remote computer to the on position 6 Follow the instructions outlined in the MikroSpec RT Manual 7 3 2 Activating the IEEE 1394 Functionality To activate the IEEE 1394 Functionality 1 Go to...

Page 281: ...me other source that cannot be shielded or compensated for by use of the emissivity setting To correct for the error the MikroScan 7600PRO is first aimed at the ambient or other source of error It the...

Page 282: ...sp cal HIGHLIGHTED Standard View Menu 3 Press the joystick e button to begin the ref cal function The task bar will display PUT THE LENS CAP ON In both the REF CAL and the ERSP CAL procedures the inst...

Page 283: ...Once the power switch has been turned on the camera will enter an initialization mode As this process begins a condi tion initial message will appear on the display offering you the choice of returni...

Page 284: ...50406 OR 2 Press the cancel c button to select NO cancel Once the MODE button has been selected the camera will con tinue through the initialization process Once the initialization process has been co...

Page 285: ...gamma rays All these forms which collectively make up the electromagnetic spectrum are similar in that they emit energy in the form of electromagnetic waves traveling at the speed of light The major d...

Page 286: ...transmit infrared When the temperature of the material equals that of its surroundings the amount of thermal radiation absorbed by the object equals the amount emitted by the object The figure above s...

Page 287: ...absorptivity transmissivity reflectivity 1 Energy radiated from the blackbody is described as follows Planck s Law In order to obtain total radiant emittance of the blackbody integrate the equation 1...

Page 288: ...is shown by logarithmic scale and b is shown by linear scale The graphs show that wavelength and spectral radiant emittance vary with the tempera ture They also show that as the temperature rises the...

Page 289: ...be measured by using a blackbody type source which is closest to an ideal blackbody as possible The black body type source can be designed to meet the conditions pointed out by Kirchoff where the rad...

Page 290: ...the constants may not usable In such cases the literature should be used only for reference 2 Determination by ratio Option 1 A contact type thermometer is used to confirm that the measured object is...

Page 291: ...shows examples of blackbody paint 8 6 Background Noise When measuring the temperature of an object by a radiation thermometer it is impor tant to take into consideration the above mentioned emissivit...

Page 292: ...issivity If a hole cannot be made as in method 1 then apply black high emissivity paint and carry out the same procedures to obtain the emissivity Since the black paint will not provide a perfect blac...

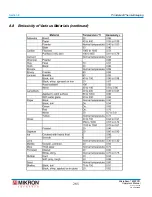
Page 293: ...Principle of Thermal Imaging 283 MikroScan 7600PRO Operator s Manual Catalog 11180 94 V15 4F 050406 8 8 Emissivity of Various Materials From Infrared Radiation a Handbook for Applications by Mikael A...

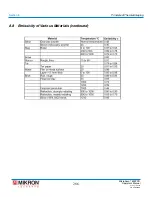
Page 294: ...Section 8 Principle of Thermal Imaging 284 MikroScan 7600PRO Operator s Manual Catalog 11180 94 V15 4F 050406 8 8 Emissivity of Various Materials continued...

Page 295: ...Section 8 Principle of Thermal Imaging 285 MikroScan 7600PRO Operator s Manual Catalog 11180 94 V15 4F 050406 8 8 Emissivity of Various Materials continued...

Page 296: ...Section 8 Principle of Thermal Imaging 286 MikroScan 7600PRO Operator s Manual Catalog 11180 94 V15 4F 050406 8 8 Emissivity of Various Materials continued...

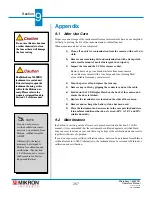
Page 297: ...ed black body source at least once a year and that a log be kept of the calibration date and results together with hours of operation If you do not possess a certified calibration source units can be...

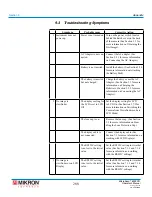
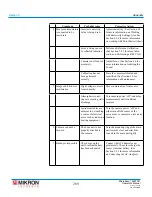
Page 298: ...more information on Connecting the AC Adapter 2 No image in viewfinder The display seeting for the LCD is set to LCD Off Set the display setting for LCD to LCD On See Section 3 7 2 for more informati...

Page 299: ...ied See Section 9 2 for information on Maintenance 5 Image exhibits noise interference High voltage source is located nearby Move camera away from source Atmospheric condi tions are creating static di...

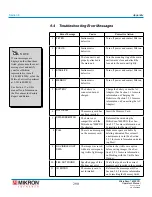
Page 300: ...ormat the card using the MikroScan 7600PRO See Sec tion 5 3 7 for more information on Formatting the Memory Card 8 full There is no more space on the memory card Make more space available by deleting...

Page 301: ...ng max 5 boxes Display Viewfinder and 3 5 inch LCD monitor with auto switch Video Output NTSC PAL composite video signal S Video Image Zoom 2 1 4 1 with spatial filtering Visual Camera Pixels 0 41 Meg...

Page 302: ...Section 9 Appendix 292 MikroScan 7600PRO Operator s Manual Catalog 11180 94 V15 4F 050406 To ensure consistent document formatting this page was intentionally left blank...

Page 303: ...Auto Focus Function 111 Performing the Auto Sensitivity Function 111 Performing the Full Auto Function 110 Using the Auto Processing Functions 110 Auto Standby 27 84 85 86 87 88 89 90 94 See also Setu...

Page 304: ...Date and Time Options Accessing the date and time menu functions 50 Setting the time 51 Date Format 23 See also Initial menu Default Values Returning all Settings to Default Values 273 Delete 21 Dire...

Page 305: ...34 91 H I IEEE 1394 23 See also Initial menu Initial menu 22 See also Setup Menu Interlace See TV Scan Introduction 7 Isothermal 20 See also ISO Thermal Function ISO Thermal Function Adding Multiple I...

Page 306: ...d 33 Using the Memory Card 129 Memos 15 21 24 56 57 58 115 116 117 118 119 120 121 122 124 125 126 127 128 130 132 133 143 Accessing the Memo Function 115 121 Applying a Memo Designation using the Fil...

Page 307: ...6 Returning all Settings to Default Values 273 RS 232 27 See also Setup Menu Setting the RS 232C Baud Rate 263 Setting the RS 232C Data Format 263 RT Memory 21 Run Freeze 15 See also Run Mode Run Mod...

Page 308: ...justing the Temperature Level 107 108 109 Temperature Ranges Selecting the Temperature Range 95 Selecting the Temperature Range Mode Setting 97 Switching between Range 1 and Range 2 98 148 Temp Unit 2...

Page 309: ...mage 19 58 130 131 136 138 Voice Adding a Voice Memo to a New Image 132 Voice Memo 15 24 56 57 58 130 132 133 143 See also Save Menu W Warranty 4 Waveform 21 233 234 Working with Images Stored to Real...

Reviews: