


Entering Setup
While the BIOS is in control, the “Setup” utility can be activated in one of
two ways:
1. By pressing the <Del> key immediately after switching the system “On.”
2. By pressing the <Del> key when the following message appears briefly at
the bottom of the screen during the POST.
If the message disappears before you respond and you still wish to enter
“Setup,” you can restart the system by simultaneously pressing the <Ctrl>
<Alt> and <Del> keys. If you do not press the keys at the correct time and the
system does not boot, an error message will be displayed and you will again
be asked to do the following:
1. Press the <F1> key to continue
2. Press the <Del> key to enter Setup
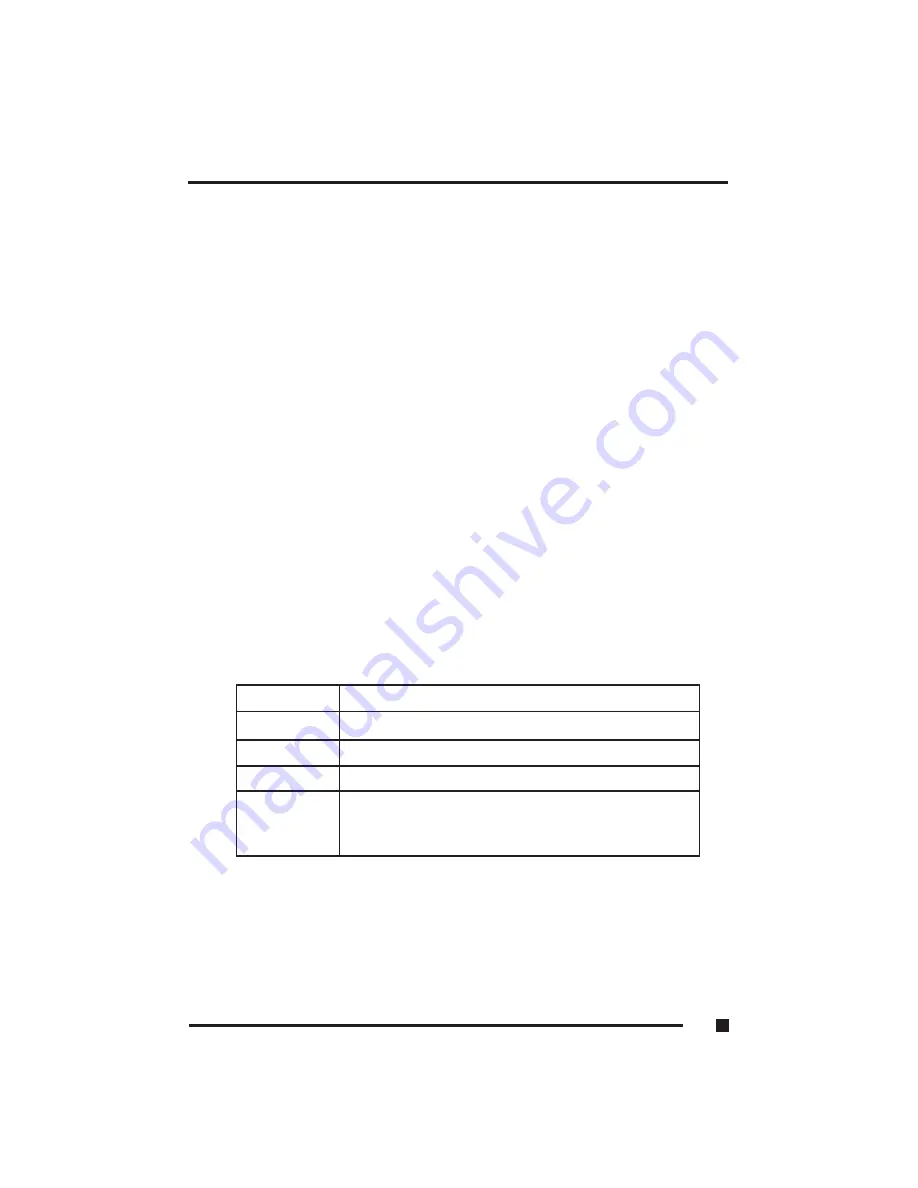
Using Setup
Use the arrow keys to highlight one of the displayed options, press <Enter> to
select it, use the Page Up <PgUp> and Page Down <PgDn> keys to scroll
through the entries, press <F1> for help and press <Esc> to quit. The
following table provides additional details about how to navigate in the
“Setup” utility by use of the keyboard.
Up Arrow
Scroll up to the previous item
Down Arrow
Scroll down to the next item
Left Arrow
Move to the item on the left
Right Arrow
Move to the item on the right
Esc Key
Main Menu: Quit and not save changes to CMOS
Status Page Setup & Option Page Setup menu’s: Exit
current page and return to “Main” menu
3
■
Configuration
3.2
Summary of Contents for FlexPAC
Page 1: ...FlexPAC Portable Add In Computer Document Revision 1 0...
Page 12: ......
Page 13: ...1 Getting Started...
Page 37: ...Figure 1 12 External Audio Jacks 1 Getting Started 1 24...
Page 38: ...2 System Description...
Page 48: ...3 Configuration...
Page 79: ...4 Display Drives...
Page 83: ...Figure 4 1 Removable Hard Disk Drive Option 4 Display Drives 4 4...
Page 87: ...Figure 4 4 Loading a CD 3 Inserted CD 4 Loading Tray 4 Display Drives 4 8...
Page 90: ...5 Expanding the FlexPAC...
Page 101: ...6 Maintenance Troubleshooting...
Page 107: ...Figure 6 1 Removable Fan Cover Grills 6 Maintenance Troubleshooting 6 6...
Page 125: ...6 Maintenance Troubleshooting 6 24...
Page 126: ...6 Maintenance Troubleshooting 6 25...
Page 127: ...A Appendix...


