background image


M-2000® Hardware Manual 

©2023 J.A. Woollam Co. 

31 


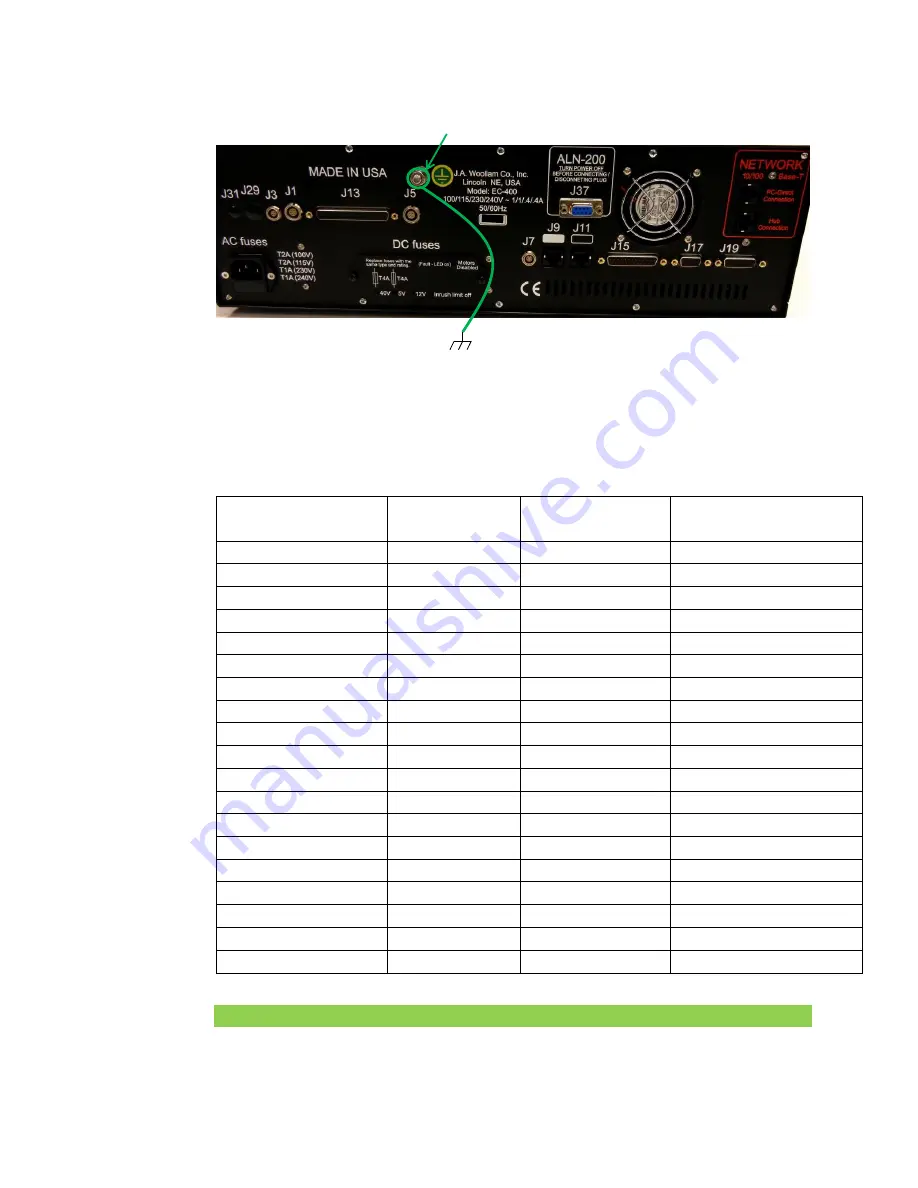
Figure 3-13.  EC Earth Ground Connection. 

Cabling  

Connect cables as directed in Table 3-1 and shown in Figure 3-14 (some options 
may not be available or applicable). 

SYSTEM JACK 
LOCATION 

CABLE PLUG 
LABEL 

CABLE PLUG 
LABEL 

SYSTEM JACK 
LOCATION 

J1 (EC) 

P1 

P2 

J2 (Source Unit) 

J3 (EC) 

P3 

P4 

J4 (Source Unit) 

J5 (EC) 

P5 

P6 

J6 (Receiver Unit) 

J7 (EC) 

P7 

P8 

J8 (M-2000) 

J9 (EC) 

P9 

P10 

J10 (M-2000) 

J11 (EC) 

P11 

P12 

J12 (M-2000) 

J13 (EC) 

P13 

P14 

J14 (Base Option) 

J15 (EC) 

P15 

P16 

J16 (Base Option) 

J17 (EC) 

N/C 

N/C 

Optional Aux. Port 

J19 (EC) 

P19 

P20 

J20 (Base Option) 

J21 (EC) 

RJ-45 

RJ-45 

Network Card in PC 

J23 / J33 (M-2000) 

P23 / P33 

P24 / P34 

J24 / J34 (Source Unit) 

J25 (M-2000) 

P25 

P26 

J26 (Receiver Unit) 

J29 (EC) 

P29 

P30 

J30 (System Option) 

J31 (EC) 

P31 

P32 

J32 (System Option) 

J37 (EC) 

P37 

P38 

J38 (System Option) 

Computer USB 

USB 

P46 

J46 (System Option) 

UV (M-2000) 

UV FIBER 

UV FIBER 

SMA UV (Receiver Unit) 

IR (M-2000) 

IR FIBER 

IR FIBER 

SMA IR (Receiver Unit) 

Table 3-1.  Cabling diagram. 

Note: 

The IR fiber is only required for the NIR extension. 

6mm Grounding Stud Location

Building Earth Ground

Summary of Contents for M-2000

Page 1: ...M 2000 Spectroscopic Ellipsometer Hardware Manual Auto Angle ESM 300 Base CompleteEASE Software...

Page 2: ...2 2023 J A Woollam Co M 2000 Hardware Manual...

Page 3: ...titute a commitment on the part of J A Woollam Co Every effort has been made to ensure the accuracy of this document However due to ongoing product improvements and revisions J A Woollam Co cannot gua...

Page 4: ......

Page 5: ...21 Auto Angle ESM 300 Base Unit 21 Power Control Module Optional 22 3 Installation 23 3 1 System Assembly 23 Preliminary 23 Base Assembly 25 AC Wiring 29 Cabling 31 Computer 33 Rack Mount Table Option...

Page 6: ...ibration Results 87 4 10 Instrument Shutdown 88 5 Data Acquisition 89 5 1 Acquiring Ellipsometric Data 89 5 2 Recipes 92 Prompt for Recipe Components 93 Creating New Recipes 94 Creating New Acquisitio...

Page 7: ...lation Replacement 139 Lamp Alignment 141 10 2 Xe Lamp M 2000X XI X 210 XI 210 in FLS 860 141 Lamp Installation Replacement 142 Lamp Alignment 145 Arc Lamp Disposal 147 Mirror Replacement 147 10 3 QTH...

Page 8: ...nication Problems 167 12 3 General Problems 168 12 4 Software Problems and Error Messages 169 12 5 Calibration Problems 169 12 6 Signal Screen Problems 169 12 7 Lamp and Light Problems 170 12 8 USB Ca...

Page 9: ...M 2000 Hardware Manual 2023 J A Woollam Co ix...

Page 10: ......

Page 11: ...user that an incorrect operation or procedure could cause damage to the equipment Note This box contains tips hints and useful information relating to the procedure in which it is located 1 2 General...

Page 12: ...en working around operating lamps Permanent eye damage can result from looking directly into the beam It is best to view the beam using a piece of paper or business card Before servicing this equipmen...

Page 13: ...90 nm 75W Xenon arc M 2000U I 245 1000 1690 nm 30W Deuterium and 20W QTH M 2000V I 370 1000 1690 nm 50W QTH Table 2 1 M 2000 models spectral range and lamp s 2 2 System Components The M 2000 spectrosc...

Page 14: ...mps Power for the lamps is supplied through highly regulated switching DC power supplies located in the M 2000 XLS light source The Source Unit also contains the beam collimation optics a fixed polari...

Page 15: ...ning The D2 and QTH lamps get extremely hot during operation Always allow them to cool adequately before replacing them FLS 860 Source Unit Figure 2 4 FLS 860 Source Unit M 2000X I ellipsometers use t...

Page 16: ...mp gets extremely hot during operation Always allow it to cool adequately before replacing the lamp Neutral Density Filter Wheel Optional The Source Unit may include an optional neutral density ND fil...

Page 17: ...20 4 10 5 5 6 3 7 Yellow Long Pass filter at 530nm Table 2 2 Manual Filter Wheel positions Rotate the filter wheel to select the amount of light intensity needed for the sample under measurement Figu...

Page 18: ...housing Warning The QTH lamp gets extremely hot during operation Always allow it to cool adequately before replacing the lamp Receiver Units The following receiver units are used for M 2000 ellipsome...

Page 19: ...c Cables Figure 2 12 Optical fiber Fiber Optic Cables are used to couple the beam from the Receiver Unit to the Detector s located in the M 2000 Detector and Lamp Power Supply Module The fibers have a...

Page 20: ...e a tool to tighten the fiber it should only be finger tight Detector Lamp Power Control Module Figure 2 13 M 2000 Detector and Lamp Power Supply Module The M 2000 Detector and Lamp Power Supply Modul...

Page 21: ...an optional high resolution USB color camera This camera comes with a multi element lens attached or alignment optics The CompleteEASE software allows the user to view and capture color images from t...

Page 22: ...nclude an Emergency Power Off Module This module allows the user to Power Off the entire system by pressing one button in an emergency situation It also acts as a centralized location for the system s...

Page 23: ...are present Use a forklift to lift the ESM 300 base onto the supplied table The fork must be rated to lift 300 lbs and meet the requirements detailed in Figure 3 1 Position the forklift properly unde...

Page 24: ...24 2023 J A Woollam Co M 2000 Hardware Manual Figure 3 1 Forklift details for lifting the ESM 300 Base Figure 3 2 ESM 300 dimensions with respect to forklift placement...

Page 25: ...3 Forklift placement with respect to the ESM 300 base Base Assembly 1 Remove the base from the shipping container DO NOT LIFT THE BASE USING THE ARMS and set it the table Figure 3 4 Lifting locations...

Page 26: ...e using a 4mm metric Allen wrench Figure 3 5 Angle of incidence locking screw 3 Hold the arms at the center of the base to support the weight of the tower lift slightly and remove the Z stage locking...

Page 27: ...ly Remove the sample chuck assembly by loosening the 4 black thumb screws 2 are at the front of the sample stage and 2 are at the back of the sample stage Figure 3 7 Vacuum disconnect and thumb screw...

Page 28: ...ch the source unit to the source tilt stage on the base using 4 M3 socket head screws with the cable connectors pointing to the rear of the base Figure 3 9 Source unit mounting FQTH 100 Light Source s...

Page 29: ...nergize the equipment and put it in a safe state 1 Ensure all components are turned off before attaching AC power cords 2 Attach the computer and monitor AC power cords to the surge suppressor 3 Attac...

Page 30: ...small leakage current ensure the protective earth conductor is properly secured to the building earth ground DO NOT in any case bypass this ground conductor It is essential to the safety of the equipm...

Page 31: ...M 2000 J13 EC P13 P14 J14 Base Option J15 EC P15 P16 J16 Base Option J17 EC N C N C Optional Aux Port J19 EC P19 P20 J20 Base Option J21 EC RJ 45 RJ 45 Network Card in PC J23 J33 M 2000 P23 P33 P24 P...

Page 32: ...4 Connector locations Figure 3 15 Lookdown Camera option Note If the Camera s is USB 3 0 USB C connector it MUST be connected to USB 3 0 or higher port on the PC Camera Illumination Front of System 12...

Page 33: ...ector and Lamp Power Supply Module Rear View example Computer 1 Attach the monitor cable to the computer 2 Attach keyboard to the computer 3 Attach the mouse to the computer Rack Mount Table Option 1...

Page 34: ...the keyboard mouse and monitor post onto the arm bracket 4 Route the monitor power monitor video and USB hub cables through the cable ties on the arm bracket and plug into the appropriate location on...

Page 35: ...tected by a 15 Amp breaker to the Power Control Module This power cord may not be supplied and must have an IEC 320 C 13 plug on one end The cord must be rated for at least 12A continuous 3 Attach the...

Page 36: ...to assemble integrate 1 Uncrate the entire system Transport to final location 2 Open the front door by lifting upwards by the handles as indicated Power source Computer Monitor EC 400 To Surge Supp 2...

Page 37: ...erclockwise at the corners of each panel using a flat screwdriver Note The latch only needs to be rotated 1 turn to lock unlock Further rotation will change the latch depth and it may not catch the pa...

Page 38: ...d Status Monitor Arm Adjustment Note May vary based on model This is setup for safe and convenient use at the Factory If adjustments are desired below are brief descriptions More detailed instructions...

Page 39: ...M 2000 Hardware Manual 2023 J A Woollam Co 39 Figure 3 29 Monitor Tilt Adjustment Figure 3 30 Arm height position tension Figure 3 31 Arm swing tension...

Page 40: ...er cord protected by a 15 Amp breaker to the Power Control Module by routing through the Power Feed thru port This power cord may not be supplied and must have an IEC 320 C 13 plug on one end The cord...

Page 41: ...lignment be sure to re install top 2 side access panels Figure 3 35 Assembled System control summary Lamp Installation if applicable The Xenon lamp housing requires the Xenon lamp to be removed during...

Page 42: ...ssary Contact J A Woollam Co if assistance is needed 1 With the power off press and hold the up and down arrows while turning the power on 2 Release the buttons when the screen displays Select Control...

Page 43: ...fault Mask is 255 255 255 000 In order to establish proper communications between EC and the operator s PC the network card in the PC must be set correctly also TCP IP address in the hardware cnf file...

Page 44: ...is connected via TCP IP communication to the Windows Operator Computer It is recommended that the instrument s computer be independent of any existing network However if it is necessary for the compu...

Page 45: ...Network Card adapter and then select Properties Figure 3 44 Select Properties 3 Disable all items except Internet Protocol Version 4 TCP IPv4 Figure 3 45 NIC Properties 4 With Internet Protocol Versio...

Page 46: ...Properties USB Camera BIOS C States Control If equipped with a USB Camera s the C States Control must be disabled in the PC BIOS Note All computers are different and evolve over time Consult the manuf...

Page 47: ...trol example USB 3 0 Camera Driver If the Camera Imaging and or Alignment Camera is a USB 3 0 Camera USB C connector the Drivers must installed to run 1 Run the ids_peak_x x x x exe installer from the...

Page 48: ...equired Figure 3 50 Installation completed restart required 3 There may be a shortcut created on the Desktop Figure 3 51 IDS software shortcut Note It is a good idea to remove this to avoid launching...

Page 49: ...are Manual 2023 J A Woollam Co 49 High Performance Mode It is also recommended to set the Windows Power Options to High Performance Hard Disk Sleep and Hibernate settings as shown below Figure 3 52 Po...

Page 50: ......

Page 51: ...o be adjusted or replaced This information can be found in Chapter 10 Scheduled Maintenance Note Allow the lamp to warm up for at least 15 minutes 2 Turn on the EC box 3 Turn on the monitor and the co...

Page 52: ...such as Parameter Uniqueness which are found in the Model panel will be written in bold underlined red letters FIT MODEL and OTHER Options found in the Model panel will be written in bold black lette...

Page 53: ...eir own directories A more extensive discussion of the CompleteEASE file structure as well methods to save and manipulate files can be found in the CompleteEASE Data Analysis Manual Section 1 4 The Co...

Page 54: ...t with Filter Wheel Option When performing the system alignment using a filter wheel there are some factors to consider Since the straight through position is included in the calibration the signal ne...

Page 55: ...M 2000 Hardware Manual 2023 J A Woollam Co 55 Figure 4 5 Filter position 4 with iris closed to avoid overloading the spectrometer Figure 4 6 Overloaded spectrometer...

Page 56: ...ceiver unit iris The MQD Dual may be equipped with a manual ND filter wheel option that has four 4 detent positions for each fiber coupler to optimize the Intensity for each Detector POSITION INTENSIT...

Page 57: ...performed every time the M 2000 hardware is re mounted on the ex situ base or in situ chamber This is required to determine the azimuthal angles of the polarizer compensator and analyzer optical eleme...

Page 58: ...90 the white light beam should be centered on both the Receiver Unit aperture and the 4 quadrant alignment detector that is located inside the Receiver Unit This alignment is easily tested using the f...

Page 59: ...t Stage to manipulate the beam direction The source beam alignment is verified in the straight through position to ensure that it is aligned on the Receiver Unit aperture 1 Select Hardware Controls Sy...

Page 60: ...step of operation Figure 4 13 Z Stage button 3 Move your eye close to the Source Unit to view along the same path as the beam This will allow you to see the beam entering the Receiver Unit aperture as...

Page 61: ...er Unit The tip tilt of the Receiver Unit controls its optical axis and makes sure it is collinear with the beam as it travels through the Receiver Unit To verify alignment a 4 quadrant alignment dete...

Page 62: ...n shows gray areas to represent the intensity reaching each of the 4 quadrants of the detector with a cross hair to show the position of the light beam inside the Receiver Unit a If the Receiver Unit...

Page 63: ...eceiver aperture repeat Source Unit and Receiver Unit alignment 4 Press Escape or click Cancel Alignment when finished Verify Signal Inside the Receiver Unit the light is directed into a fiber optic c...

Page 64: ...ntensity distribution of all channels please refer to the system test report A hard copy is shipped with each system and a soft copy is included on the backup CD 4 If part of the UV VIS signal optiona...

Page 65: ...M 2000 Hardware Manual 2023 J A Woollam Co 65 Figure 4 22 Optional NIR spectrometer overloaded on M 2000 system Figure 4 23 MQD Single iris operation Detector Overloaded...

Page 66: ...o exit the screen 4 6 System Alignment with Automated Tip Tilt Note Automated Tip Tilt alignment is an optional accessory that may or may not have been purchased with your system If your purchase did...

Page 67: ...te A System Alignment should only be performed when the instrument is first delivered after mounting the Light Source and Receiver components onto a base or chamber or if the integrity of the alignmen...

Page 68: ...on the Receiver Unit aperture 1 Select Hardware Controls System Angle Choose an Angle of 90 The base will move to the straight through position Figure 4 26 Angle button Figure 4 27 Move Angle dialog b...

Page 69: ...e Figure 4 29 Centering the beam on Receiver Unit aperture Receiver Unit Alignment After the Source Unit alignment has been verified the light beam will be centered on the front aperture of the Receiv...

Page 70: ...report for your specific intensity values Figure 4 32 Alignment Screen 2 The alignment screen shows gray areas to represent the intensity reaching each of the 4 quadrants of the detector with a cross...

Page 71: ...h until the cross hair is centered on the alignment screen Now the beam should be aligned at both the front aperture and throughout the Receiver Unit If the beam is no longer centered on the receiver...

Page 72: ...at the top of the signal intensity screen In the straight through position the gain should be either 1 or 2 Otherwise the system is not aligned properly or the lamp needs to be replaced and or aligne...

Page 73: ...see Neutral Density Filter Wheel section page 16 Note The following signal screen is a generic screen shot Refer to the system test report for your specific intensity values Figure 4 37 Optional NIR...

Page 74: ...ave aligned the Source and Receiver Units to the Variable Angle Base Next we need to align the Sample Stage to the Measurement Beam Once we have the sample stage aligned to the system we will align th...

Page 75: ...ontrols System 4 Select Hardware Controls General Align Sample The software will ask Would you like to perform a full sample alignment Select No There are two alignment detectors on this system In the...

Page 76: ...e Up Down Left Right Arrow keys on keyboard Tip and tilt the sample stage until the cross hair is centered on the screen You will have to adjust the Tilt Stage Motor Increment to reduce the steps to g...

Page 77: ...before it is moved There are two options for Lookdown Detectors Quad Detector standard Camera Detector fast Note It is very important that the sample remains in its aligned condition from the previous...

Page 78: ...ous section Adjust the Lookdown Detector adjustment screws see Figure 4 48 on the tilt stage that holds the Lookdown Detector to center cross hair on the screen Note The adjustment screws should never...

Page 79: ...will use automated alignment Camera Detector Lookdown Alignment The Camera Lookdown is used for fast automated sample alignment It is equipped with a Z Camera and an optional Tilt Camera The Z Camera...

Page 80: ...Z Align check box to verify the Z LED is working 4 Select the Tilt Align check box to verify the Tilt LED is working Note For collimated beam unfocused measurements the alignment spot positions do no...

Page 81: ...ndow and calibrate the Camera Alignment Offset s a Calibrate Z Alignment Camera b Calibrate Tilt Alignment Camera Figure 4 53 Camera Calibration 7 Select Yes to the message box for each selected calib...

Page 82: ...be used for sample tilt positioning cross hair position 4 7 Sample Alignment with Manual Tip Tilt Note Automated Tip Tilt alignment is an optional accessory that may or may not have been purchased wit...

Page 83: ...Enter the sample thickness into the box Cal Wafer 0 55mm The Alignment Angle should be 65 Press Ok Figure 4 58 Sample Alignment dialog box 6 Adjust the sample tilt stage knobs until the cross hair is...

Page 84: ...le tip tilt alignment The sample surface must be positioned such that the light is reflected into the Receiver Unit aperture sample height alignment 4 8 Sample Alignment with Automated Tip Tilt Note A...

Page 85: ...e for systems with automated tip tilt stage Simply select Manual when prompted for tip tilt or Z alignment if desired i e for low reflecting samples Use the Up Down Left Right Arrow keys on keyboard t...

Page 86: ...is in question 1 Select Hardware Controls General System Check 2 Click Yes to start the System Check Figure 4 62 System Check message box 3 When prompted mount the calibration wafer 25nm SiO2 on Si s...

Page 87: ...ful the following message will appear Figure 4 66 System Check successful Take a quick look at the spectroscopic data graph to verify that the data fit is good Figure 4 67 If the model generated Psi a...

Page 88: ...greater than 40 try reducing the intensity by half and calibrating again This will prevent the detector from being overloaded with light at certain analyzer positions during calibration Read Chapter...

Page 89: ...ction is generic Options vary based on System Configuration 1 Place sample on the sample stage 2 Select Prompt for Acquisition Parameters from Measurement Measurement Controls Recipe Figure 5 1 Prompt...

Page 90: ...5 3 Acquisition Parameters Setup window 6 Under Data Acquisition Parameters select Data Type and enter Acq Time in seconds With High Accuracy Mode checked data is collected with input polarizer set to...

Page 91: ...thickness is not known if the sample was not previously aligned or if a sample with similar thickness was not last aligned o The Pinhole Camera option is the fastest alignment and works well if the o...

Page 92: ...1 Analyze data using procedures described in the CompleteEASE Data Analysis manual 5 2 Recipes Data acquisition and analysis can be completed in one step by using a Recipe A Recipe combines Data Acqui...

Page 93: ...Recipe Components The Measurement Controls panel will update to reflect Prompt At Measurement Time for Acq Scan and Model Click Measure to open the Choose Recipe Components dialog box Figure 5 8 Prom...

Page 94: ...ill be required for specific sample types To create a new Recipe using previously saved Acquisition Parameters and Analysis Model select Create Edit Recipe shown in Figure 5 7 to open the Create Edit...

Page 95: ...creen after entering desired measurement parameters Saved Acquisition Parameters will now be available for Prompt for Recipe Components or creating a new Recipe Figure 5 12 Save Parameters example Cre...

Page 96: ...he Data Acquisition Parameters 3 After the measurement is completed the data will be analyzed using the Model contained in the Recipe Notice that Model fit results are now displayed in Measurement Fit...

Page 97: ...ller Matrix or Reflection Intensity Data Acquisition for each Data Type is briefly discussed here Figure 5 16 Data Types To view Acquisition Parameters select Create Edit Recipe shown in Figure 5 7 th...

Page 98: ...ontrols Calibration DC Offset The software can be configured to automatically perform DC offset after a specified time period in the Hardware Configuration file Figure 5 17 DC Offset correction Muelle...

Page 99: ...display Figure 5 20 Mueller Matrix Element Selection window Reflection Intensity This Data Type measures the reflected intensity of the light beam Baseline intensity is measured from a reference samp...

Page 100: ...sample The system will then acquire a baseline measurement from the reference sample Figure 5 23 System Status acquiring baseline When the baseline measurement is completed follow the prompts to mount...

Page 101: ...2 Create a folder called Routine Test Measurement in the CompleteEASE Recipe folder and copy the recipe and parms files created in step 1 into this folder The model created in step 1 should be placed...

Page 102: ...least two routine test measurements the user will be able to view the results by pressing the Show Results button in the Routine Test Measurement section see Figure 5 26 The results are displayed on...

Page 103: ...t stages are used to translate the position of each lens that is mounted in the end of the cone shaped lens mounts Each tilt stage contains a fine adjustment screw for the vertical position VS and VR...

Page 104: ...The focusing lenses and their coatings can easily be damaged Be careful when handling the lens mounts so that nothing touches the lenses 6 2 Installation Focusing optics should not be installed durin...

Page 105: ...igure 6 4 Probe alignment message box 3 Each probe is labeled as Source or Receiver CompleteEASE will prompt for attaching each probe This procedure may vary if the Alignment Camera is present in the...

Page 106: ...get 3 Observe the ellipsometer beam on the Alignment Target For better visibility reduce the ambient light if possible 4 Carefully center the beam on the Alignment Target by translating the target wit...

Page 107: ...ble 7 Carefully center the beam on the Alignment Target by translating the Source side lens with the Vertical Source VS and Horizontal Source HS adjustment screws MOVE THE SOURCE LENS NOT THE TARGET O...

Page 108: ...crews attach the Source focusing probe to the Source probe tilt stage Click OK when finished Figure 6 13 Focus probe mounting 3 Carefully center the cross hair by translating the Source side lens with...

Page 109: ...robe Using the three captive thumb screws attach the Receiver focusing probe to the Receiver probe tilt stage Click OK when finished Figure 6 16 Attach Receiver probe 5 Lastly adjust ONLY the RECIEVER...

Page 110: ...by the focusing lenses These offsets will be written to the Configuration as mentioned earlier Figure 6 18 S T data example Psi and Delta 3 After the focusing probes are installed the AOI will move to...

Page 111: ...med carefully 1 Place a 25nm SiO2 Si calibration wafer on the sample stage 2 Select Hardware Controls General Align Sample When prompted to perform a full system alignment select Yes Figure 6 20 Sampl...

Page 112: ...fer 6 In the Sample Alignment dialog box select Automatic Quick under the Sample Height Alignment drop menu If the calibration wafer has already been aligned click Current Position to enter the curren...

Page 113: ...hould be minimized 6 5 Data Acquisition with Focusing Optics With Focusing Probes installed very small changes in Z sample height can cause the reflected beam to miss the Detector Even an Angle of Inc...

Page 114: ...To remove the Focusing Optics select Hardware Controls System Remove Focus Probes The base will move to the maximum Z height position maximizing the space between the Focusing Optics and sample stage...

Page 115: ...lation which is an optional accessory that may or may not have been purchased with your instrument This is a generic section options may vary 7 1 General Operation General translator controls are loca...

Page 116: ...ing the Translator will move Angle and Z height to a position safe for translation The X and Y Translators will then move to their maximum range trip hard or soft sensor limits and reset the software...

Page 117: ...must be entered Scan Patterns for rectangular substrates can be easily set with 0 0 position at the center of the sample or at the corner of the sample Figure 7 5 Options for Substrate Dimensions Figu...

Page 118: ...point appears blue in the diagram Figure 7 8 Highlighted point in point list Use Edit Point to change selected point coordinates Figure 7 9 Edit Point Use Move Up and Move Down to move selected point...

Page 119: ...Cartesian Grid Fill the Grid Spacing Grid Margin and Grid Style i e Square or Hexagonal must be specified Figure 7 10 Cartesian Grid Fill For a Polar R Theta Grid Fill the Radius and Theta values must...

Page 120: ...serve the translator movement before committing to a full measurement Use Move to Next Point to step through all points in the scan Figure 7 13 Scan Pattern Test Note A 180 Pattern Offset may be requi...

Page 121: ...ments on a flat semiconductor wafer with uniform film and normal light beam no focusing optics full alignment at the center location only may be adequate o For measurements on a wedged substrate full...

Page 122: ...low for the sample to rotate during measurement The sample tilt is manual Note The Lookdown Detector option is always included with the Rotation Stage to allow for wobble correction and can be used fo...

Page 123: ...Section Error Reference source not found Error Reference source not found with the theta position at 0 2 Select Hardware Controls System Translator or Rotator and move the theta position to 180 Figure...

Page 124: ...confirm the cross hair position has not changed 6 Repeat until the position is stable typically within 2 units 7 Loosen the tilt stage lockdowns 2 on front and 2 on back and adjust the tilt plate so t...

Page 125: ...are assuming focusing lenses are attached in order to view the measurement beam on the sample Figure 8 1 Standard Camera example may vary based on model Illumination Control There are 2 types of illum...

Page 126: ...side is facing up or use a glossy business card recommended If the business card is used place it on sample stage Then perform an intensity based Automatic Quick Z height alignment be sure to SKIP th...

Page 127: ...d camera to center the beam on the screen Use the diagonal adjustment screws of the camera tilt stage shown in Figure 8 5 If the camera image is not in focus adjust the Z height of the camera by turni...

Page 128: ...adjustment screw Tighten the lock downs Figure 8 6 Z Align Imaging Camera Z position adjustment i If necessary translate the Z Imaging Camera to center the beam on the screen Remount the business card...

Page 129: ...remains as it was in Step 1 Perform the Sample Height Alignment only but selecting Hardware Controls General Align Sample When prompted to perform a full system alignment select Yes Figure 8 9 Sample...

Page 130: ...ra Alignment Offset s a Calibrate Z Alignment Camera b Calibrate Tilt Alignment Camera Figure 8 11 Camera Calibration 4 To re open the Set Beam Position dialog if necessary select Hardware Controls Mi...

Page 131: ...m 1 Align the 25nm calibration wafer on the standard sample stage The Sample Tilt position is now set 2 Flip the sample over so the rough side is facing up or use a glossy business card recommended If...

Page 132: ...Figure 8 14 Tilt Align Beam on business card not centered 5 Adjust the Camera Position to the Tilt Align Beam using the Imaging Camera Translation left side access holes to center Figure 8 15 Camera F...

Page 133: ...heck box Adjust the Z LED Adjust right side access holes see Figure 8 15 to center Figure 8 17 Z Alignment Beam centered on Imaging Camera 7 Unblock the Measurement Beam Repeat the previous section Ma...

Page 134: ...be verified before performing the calibration 1 The previous section Marking the Measurement Beam Position should be completed before proceeding 2 Select Hardware Controls Misc Additional Camera Funct...

Page 135: ...inate and click on the feature again Use a fine tip marker to create a feature if necessary See Figure 8 19 5 Press OK when finished Note If not performed correctly or not sure just press Cancel and s...

Page 136: ...136 2023 J A Woollam Co M 2000 Hardware Manual 7 Click on the feature and the translator should move it to the Beam Position Figure 8 21 Field of View calibration test result...

Page 137: ...e hardware cnf file to allow this function AllowInsitu Yes If present the user can specify that the instrument is to be used in situ on the next initialization This is done to avoid the error messages...

Page 138: ...to the process chamber 3 If ex situ operation is desired the In Situ Mode must be deactivated Select Hardware Controls System Deactivate In Situ Mode to start the function A message will be displayed...

Page 139: ...ctuate and spectral intensity can be reduced both may result in poor or noisy data LAMP VENDOR MODEL COLOR TEMP RATING TYPICAL LIFETIME QTH ILT L9404 2900 K 2000 hours 3000 hours D2 Hamamatsu L10804 N...

Page 140: ...6 Remove the D2 lamp by sliding out of the mount 7 To remove the QTH lamp press the lever slowly down and the QTH lamp will slide up out of its base Caution Do not touch the quartz portion of the lamp...

Page 141: ...LS 200 no lamp adjustment is necessary 1 Turn on the lamp power supply Allow the lamp to warm up for at least 20 minutes 2 Ensure the Base is in the 90 straight through position and the Z position is...

Page 142: ...Installation Replacement 1 Turn off the M 2000 Detector and Lamp Power Supply Module Allow lamp s to cool for 2 hours 2 Put on latex gloves and safety goggles 3 Loosen the captive screws Flat screwdr...

Page 143: ...If you do get a fingerprint on the lamp clean the fingerprint off with alcohol Figure 10 5 Typical arc lamp 7 While pulling the lamp release lever carefully insert the cathode of the lamp into the ca...

Page 144: ...positioned different It is important to ensure lamp life that it is positioned properly 9 When the lamp is in position release the lever and the lamp will be secured Note Ensure the cathode is comple...

Page 145: ...e measurement The optimal position should not change much from lamp to lamp but fine adjustment is needed to achieve best results Lamp Alignment 1 Turn on the lamp power supply and ignite the arc lamp...

Page 146: ...mity and intensity 5 Once the beam is visually bright use the ellipsometer to perform the final alignment of the lamp Open the alignment screen by selecting Hardware Controls General Align Sample Choo...

Page 147: ...lacement The reflective mirror can be contaminated over time which could cause loss in signal intensity This can be monitored by the Ellipsometer and or visually checked when the lamp is changed The m...

Page 148: ...ust be replaced after a certain period of time As a lamp approaches the end of its useful life power levels can fluctuate and spectral intensity can be reduced both result in bad or inaccurate data LA...

Page 149: ...re 10 12 QTH mount 4 While holding the QTH bulb lift up and pull it out of the socket A slight side to side rocking motion may facilitate this 5 Remove the new lamp from its protective packaging Cauti...

Page 150: ...change much from lamp to lamp but fine adjustment is needed to achieve best results Lamp Alignment 1 Turn on the lamp power supply Allow the lamp to warm up for at least 20 minutes 2 Ensure the Base i...

Page 151: ...r maximum light throughput This is achieved by slightly loosening the fiber and slowly rotating it while monitoring the Display Signal Screen for maximum intensity When this is achieved tighten the fi...

Page 152: ...152 2023 J A Woollam Co M 2000 Hardware Manual...

Page 153: ...rement The quickest way to verify ellipsometer operation is to measure the calibration wafer and take a straight through measurement of air A thermal oxide SiO2 on Si calibration wafer is included wit...

Page 154: ...acquisition parameters setup 2 Evaluate the straight through measurement Confirm that Psi and Delta meet the following specifications Psi 45 0 075 for 95 of the measured wavelengths Delta 0 0 05 for...

Page 155: ...ple alignment If the sample is misaligned measured data and results will not be accurate The Sample Alignment must be performed for each sample that is mounted on the ellipsometer prior to acquiring d...

Page 156: ...er tube located on Receiver Unit or the ND Filter Wheel if available Detector overloading can be a sample phenomenon If the ellipsometer is used for highly reflective samples i e metallic substrates a...

Page 157: ...gles from 45 to 85 every 10 degrees After the measurement the system will automatically update the hardware cnf file with the new offset values This correction may also be done with the Focusing Optic...

Page 158: ...2nm 10nm 25nm and 1000nm oxide samples are available Certain systems will also require the 60nm oxide sample System Calibration Note The System Alignment and Sample Alignment must be correct and under...

Page 159: ...ware Config from the Hardware tab Figure 11 5 Example of configuration settings for a multi angle system 3 Press Perform System Calibration and follow instructions to complete the System Calibration I...

Page 160: ...ght through position is included in the calibration the signal needs to be optimized throughout the entire spectrum If a higher density filter is selected the DUV signal is lower with respect to the o...

Page 161: ...M 2000 Hardware Manual 2023 J A Woollam Co 161 Figure 11 9 Filter 6 with iris open Figure 11 10 Filter 4 with iris closed to avoid overloading the spectrometer...

Page 162: ...llam Co M 2000 Hardware Manual Figure 11 11 Overloaded spectrometer Figure 11 12 Source unit filter wheel option Figure 11 13 MQD Single Receiver unit iris operation Filter shown at the 100 light thro...

Page 163: ...nge items in Wvl Cal Model section unless given instructions to do so Figure 11 15 Wavelength calibration model 2 Press Perform Wavelength Calibration and follow the instructions When the process is c...

Page 164: ...000 Hardware Manual choose Yes A System Calibration must be performed again after the software finishes reinitializing the system Figure 11 16 Performing wavelength calibration Figure 11 17 Wavelength...

Page 165: ...Spectrometer power LED Figure 12 2 EC Module power LEDs Debug File To facilitate a quicker response start by sending a debug file along with a detailed description of the problem and any related sympt...

Page 166: ...caused by one of the following 1 RCE motor Source side motor is not running 2 Phase sensor malfunctions inside the Source motor control module has electronic problems motor driver etc 3 Electrical co...

Page 167: ...lectronic problems motor driver etc User key points Listen feel Is the Receiver side motor turning Spectrometer Is Not Scanning Figure 12 6 Spectrometer error message Examine the cables and cable conn...

Page 168: ...ignment or Sample Alignment Misalignment Perform System Alignment or Sample Alignment procedures described in this manual The cross hair becomes stable only if there is signal If there is no light hit...

Page 169: ...sample Signal intensity is weak on some channels due to sample reflection properties Detector s Overloaded Use the standard SiO2 on Si reference sample supplied with the instrument for calibration Clo...

Page 170: ...s Table 12 6 M 2000 Lamp Indicator LEDs M 2000DI UI Lamp Interlock Overtemp indicates that the lamp housing cover is not installed completely and or the lamp power cable is not connected and or the te...

Page 171: ...rate properly Windows Device Manager is an easy tool to confirm it is connected and operating properly Figure 12 7 Windows Device Manager Figure 12 8 USB 3 0 Imaging Camera Status USB 2 0 camera 149xx...

Page 172: ......

Page 173: ...on request Below are the most commonly used components 13 1 Components All AC Mains components are European Type approved CE marked and UL listed All AC Mains components are connected with 600V rated...

Page 174: ...174 2023 J A Woollam Co M 2000 Hardware Manual Detector Lamp Power Supply Modules Input Voltage 100 115 230 240VAC Frequency 50 60Hz Current 1 2A 1 2A 0 6A 0 6A Fuses 2 T2A T2A M 2000D I M 2000U I...

Page 175: ...M 2000 Hardware Manual 2023 J A Woollam Co 175 M 2000V I M 2000X I...

Page 176: ...176 2023 J A Woollam Co M 2000 Hardware Manual Power Control Module Input Voltage 100 120 200 240VAC Frequency 50 60Hz Current 5A MAX 10A for EPM 221 Circuit Breaker UL489 5A 10A for EPM 221...

Page 177: ...M 2000 Hardware Manual 2023 J A Woollam Co 177...

Page 178: ...M 2000 Hardware Manual Surge Suppressor Supplied by manufacturer Computer Supplied by manufacturer Monitor Supplied by manufacturer 13 2 Environmental Operating Range Temperature 10 C to 35 C Humidity...

Reviews: