14. Character Setting
14-4
2) How to edit the characters of BARS TITLE
㸯㸬࣓࣓ࣥࢽ࣮ࣗࡽ
BARS TITLE
ࢆ㑅ᢥࡋࠊ
BARS TITLE
ENTRY
⏬㠃ࢆ
PM
ୖ⾲♧ࡉࡏࡲࡍࠋ
㸰㸬
Select
ࡘࡲࡳࢆᅇࡋࠊ͇
TITLE EDIT”
ࢆ
㑅ᢥࡋࡲࡍࠋ
㸱㸬
Enter
ࢫࢵࢳࢆᢲࡍࠊ⦅㞟࣮ࣔࢻධࡾࠊ⏬㠃ࡀษࡾࢃࡾࡲࡍࠋ
㸳㸬
Enter
ࢫࢵࢳࢆᢲࡍྛࠎḟࡢືస࡞ࡾࡲࡍࠋ
㻻㻯㻼㻙㻞㻜㻜
㸲㸬ࡇࡢࡁࠊ
Select
ࡘࡲࡳࠊ
Next
ࡘࡲࡳ࠾ࡼࡧᾮᬗ⏬㠃ୖࡢ
Enter
ࢫࢵࢳࡢᶵ⬟ࡣୗグࡢ
ࡼ࠺࡞ࡾࡲࡍࠋ
࣭
Select
ࡘࡲࡳ
࣭
Next
ࡘࡲࡳ
࣭
Enter
ࡘࡲࡳ
ධຊࡍࡿᩥᏐࡢ㑅ᢥࠋ
ධຊࡍࡿᩥᏐࡢ᱆⨨ࡢᣦᐃࡲࡓࡣ
"[QUIT]", "[CLR]","[ENTRY]"
ࡢ
㑅ᢥࡀྍ⬟ࠋ
IRIS
ࢥࣥࢺ࣮ࣟࣝࡼࡾ
"[QUIT]", "[CLR]", "[ENTRY]"
ࡢ࠸ࡎࢀࢆ
㑅ᢥࡋ࡚࠸ࡿࡁ᭷ຠ࡞ࡿࠋ
㸸
㸸
㸸
࣭
[QUIT]
࣭
[CLR]
࣭
[ENTRY]
㸸
㸸
㸸
ධຊ࣭⦅㞟ࡋࡓ
BARS TITLE
ࢆ↓ຠࡋࠊ⦅㞟࣮ࣔࢻࡽᢤࡅࡿ
(BARS TITLE
ࡣ௨๓ࡢ≧ែࡀಖࡓࢀࡿ
)
ࠋ
ධຊࡋࡓ
BARS TITLE
ࢆࡍ࡚ࢡࣜࡍࡿࠋ
ධຊ࣭⦅㞟ࡋࡓ
BARS TITLE
ࢆ᪂つⓏ㘓ࡋࠊ⦅㞟࣮ࣔࢻࡽᢤࡅ
ࡿࠋ௨ᚋࠊ
BARS TITLE
࡛⾲♧ࡍࡿᩥᏐࡣࠊࡇࡇ࡛᪂つⓏ㘓ࡋࡓෆ
ᐜ࡞ࡿࠋ
㻿㼑㼘㼑㼏㼠䛴䜎䜏
㻱㼚㼠㼑㼞䝇䜲䝑䝏
㻺㼑㼤㼠䛴䜎䜏
Next knob
Select knob
Enter switch
OCP-300
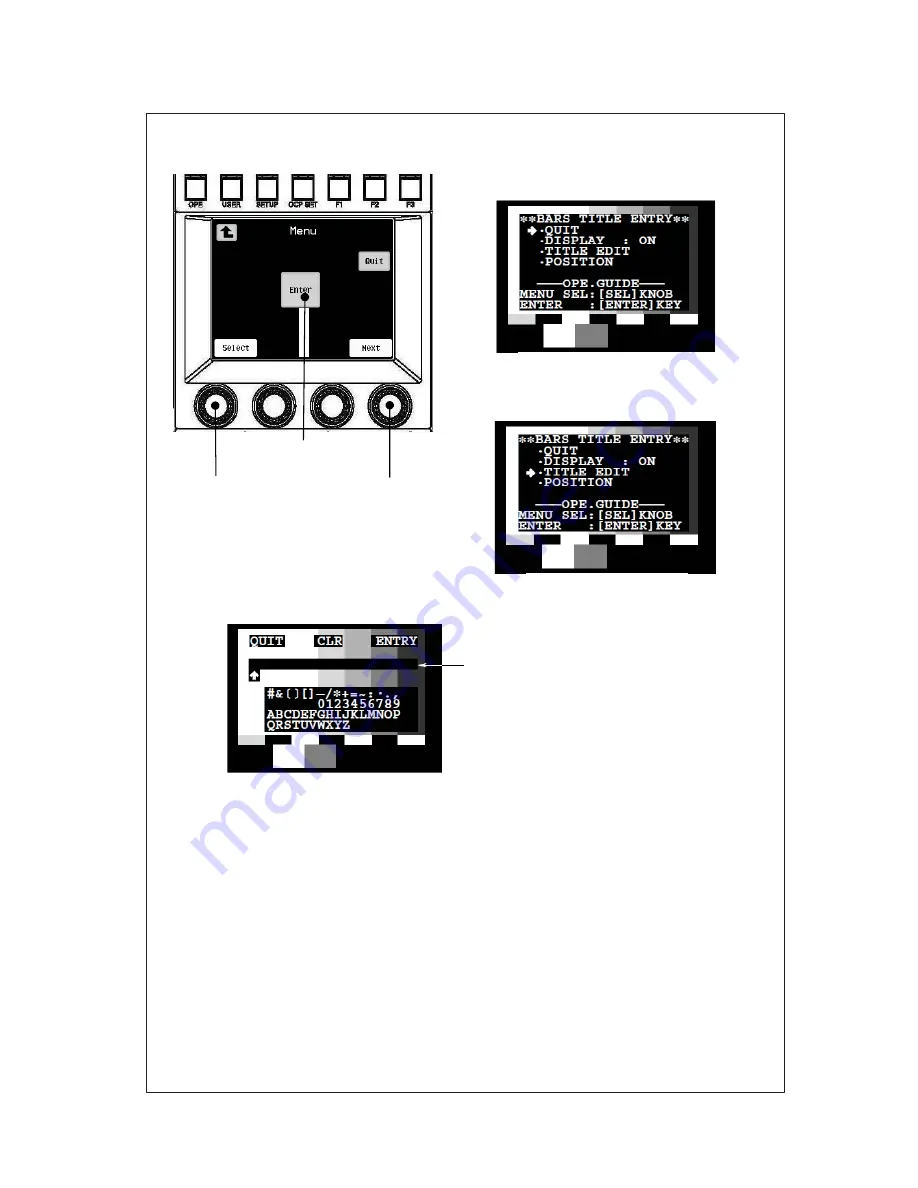
1. Select BARS TITLE from the main
menu, and display the BARS TITLE
ENTRY screen on the PM.
2. Turn the Select knob and select ”TITLE
EDIT”.
BARS TITLE ENTRY screen
TITLE EDIT selection
3. If Enter switch is pressed, it will turn into the edit mode and the screen will be switched.
4. The following shows the functions of Select knob, Next knob, and Enter switch on the top
of the LCD screen.
࣭
Select knob
:
Used to select the characters to enter.
࣭
Next knob
:
Used to specify the digit position of the characters to be entered
or select "[QUIT]", "[CLR]", or "[ENTRY]".
࣭
Enter knob
:
Enabled when either one of "[QUIT]", "[CLR]", "[ENTRY]" is
selected by IRIS control.
5. If Enter switch is pressed, the following operation is performed.
࣭
[QUIT]
: Used to disable the BARS TITLE that has been input and edited
and cancel the edit mode (BARS TITLE remains in the previous
status).
࣭
[CLR]
: Used to clear all of the BARS TITLES that have been input.
࣭
[ENTRY]
: Used to register new BARS TITLE that has been input and edited
and cancel the edit mode. Then, the characters displayed in the
BARS TITLE from this point will be the newly registered title.
BARS TITLE input area
Edit mode
Summary of Contents for OCP-300
Page 1: ...OCP 300 Operation Control Panel Products conforming to RoHS directive...
Page 2: ......
Page 3: ...OCP 300 Operation Control Panel Products conforming to RoHS directive 1406 1st Edition U E...
Page 9: ...SAFETY PRECAUTIONS v...
Page 10: ...vi SAFETY PRECAUTIONS...
Page 12: ......
Page 19: ...1 Overview 1 3 1 3 External view 1 VR TYPE...
Page 20: ...1 4 1 Overview 2 JOYSTICK TYPE...
Page 46: ...3 5 3 Network Example OCP 300 JOYSTICK TYPE CPH 200...
Page 59: ...4 LCD Menu 4 9 A gray item is adjusted by the rotary encoder knob...
Page 60: ...4 10 4 LCD Menu A gray item is adjusted by the rotary encoder knob...
Page 61: ...4 LCD Menu 4 11 A gray item is adjusted by the rotary encoder knob...
Page 62: ...4 12 4 LCD Menu A gray item is adjusted by the rotary encoder knob...
Page 64: ...4 14 4 LCD Menu A gray item is adjusted by the rotary encoder knob...
Page 66: ...4 16 4 LCD Menu...
Page 67: ...4 LCD Menu 4 17 A gray item is adjusted by the rotary encoder knob...
Page 68: ...4 18 4 LCD Menu A gray item is adjusted by the rotary encoder knob...
Page 75: ...4 LCD Menu 4 25 A gray item is adjusted by the rotary encoder knob...
Page 76: ...4 26 4 LCD Menu A gray item is adjusted by the rotary encoder knob...
Page 77: ...4 LCD Menu 4 27 A gray item is adjusted by the rotary encoder knob...
Page 160: ...12 3 12 Operation Range Setting Function...
Page 163: ...12 Operation Range Setting Function 12 6...
Page 167: ...13 Standard Function 13 2...
Page 168: ...13 3 13 Standard Function...
Page 257: ...23 Specification 23 4 Camera select input signal Camera select output...
Page 262: ...23 9 23 Specification...
Page 271: ...KDQJLQJ WKH QIRUPDWLRQ 25 Changing the Information...
Page 272: ......


