9. How to Use the Memory Card
9-2
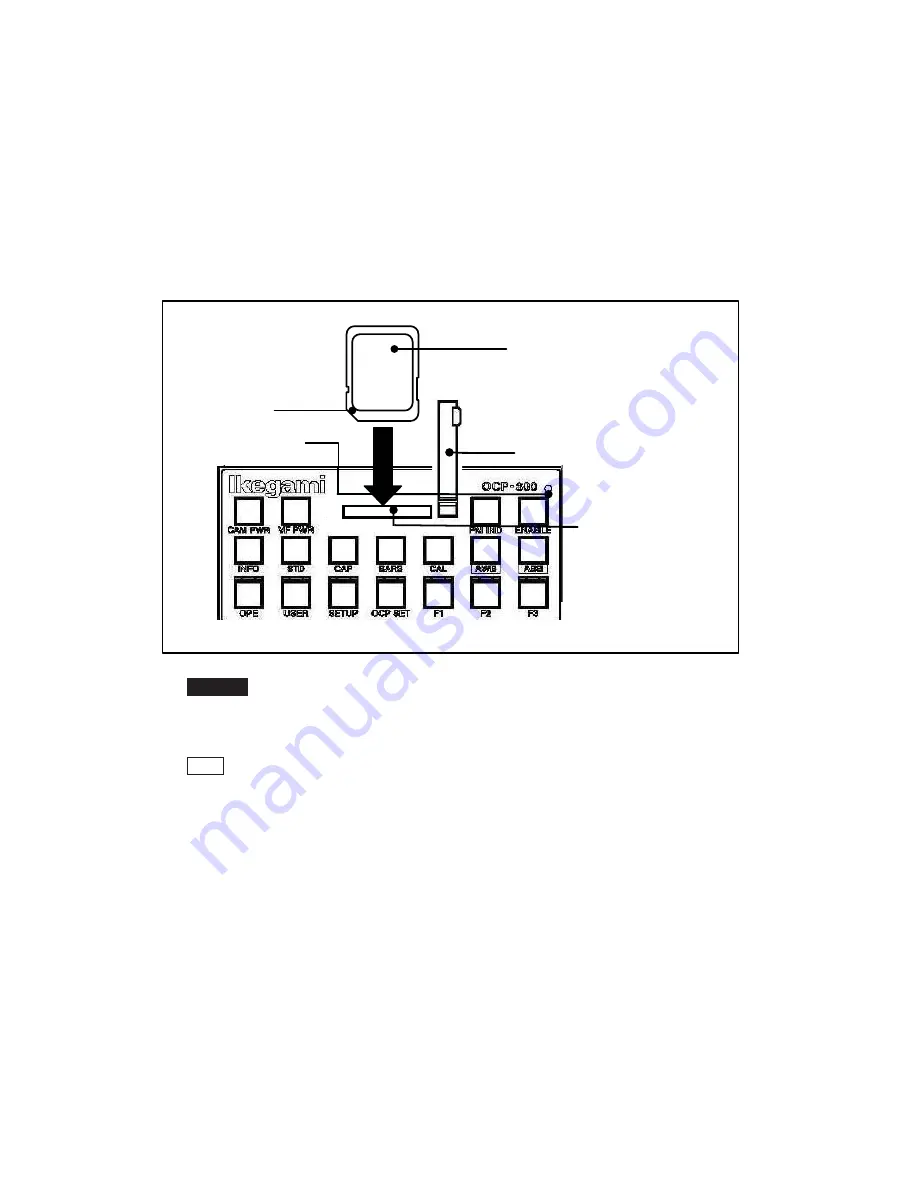
9.2 Inserting and Removing the Memory Card
When using the memory card, raise the left side of the slot cover and turn clockwise.
Carefully insert the memory card to the memory card slot with the correct direction
(terminal side facing the back side with a n at the lower left side) until a clicking sound
is made. A buzzer is output.
When removing the memory card from the card slot, lightly push the card upper section
until a clicking sound is heart. The card is pushed out. Slowly draw out the card until
the removal detection buzzer sounds. After usage, attach the slot cover in order to
prevent foreign objects such as dust from entering the slot.
ࢡࢭࢫ
ࣥࢪࢣ࣮ࢱ࣮
࣓࣮࣮ࣔࣜ࢝ࢻ
ࢫࣟࢵࢺ࣓࣮࣮ࣔࣜ࢝ࢻ
ࢆṇࡋ࠸ྥࡁ࡛ᤄධࡍࡿࠋ
➃Ꮚ㠃ࡣഃ࡛ษࡾࡁࡀᕥୗ
ษࡾࡁ
࣓࣮࣮ࣔࣜ࢝ࢻ
ࢫࣟࢵࢺ࢝ࣂ࣮
࣓࣮࣮ࣔࣜ࢝ࢻࢫࣟࢵࢺ
Caution
Never remove the memory card from the slot while the access indicator next
to the memory card slot is lighted on or while saving or invoking the data to
the memory card. The internal data or the card itself may get damaged.
Note
:
When "Click Volume" of the panel configuration is set to "OFF," be careful
that the removal detection buzzer does not sound.
Memory card
Insert the memory card to the
memory card slot with the
correct direction (terminal
side facing the back side with
a notch at the lower left side)
Notch
Access indicator
Slot cover
Memory card slot
Summary of Contents for OCP-300
Page 1: ...OCP 300 Operation Control Panel Products conforming to RoHS directive...
Page 2: ......
Page 3: ...OCP 300 Operation Control Panel Products conforming to RoHS directive 1406 1st Edition U E...
Page 9: ...SAFETY PRECAUTIONS v...
Page 10: ...vi SAFETY PRECAUTIONS...
Page 12: ......
Page 19: ...1 Overview 1 3 1 3 External view 1 VR TYPE...
Page 20: ...1 4 1 Overview 2 JOYSTICK TYPE...
Page 46: ...3 5 3 Network Example OCP 300 JOYSTICK TYPE CPH 200...
Page 59: ...4 LCD Menu 4 9 A gray item is adjusted by the rotary encoder knob...
Page 60: ...4 10 4 LCD Menu A gray item is adjusted by the rotary encoder knob...
Page 61: ...4 LCD Menu 4 11 A gray item is adjusted by the rotary encoder knob...
Page 62: ...4 12 4 LCD Menu A gray item is adjusted by the rotary encoder knob...
Page 64: ...4 14 4 LCD Menu A gray item is adjusted by the rotary encoder knob...
Page 66: ...4 16 4 LCD Menu...
Page 67: ...4 LCD Menu 4 17 A gray item is adjusted by the rotary encoder knob...
Page 68: ...4 18 4 LCD Menu A gray item is adjusted by the rotary encoder knob...
Page 75: ...4 LCD Menu 4 25 A gray item is adjusted by the rotary encoder knob...
Page 76: ...4 26 4 LCD Menu A gray item is adjusted by the rotary encoder knob...
Page 77: ...4 LCD Menu 4 27 A gray item is adjusted by the rotary encoder knob...
Page 160: ...12 3 12 Operation Range Setting Function...
Page 163: ...12 Operation Range Setting Function 12 6...
Page 167: ...13 Standard Function 13 2...
Page 168: ...13 3 13 Standard Function...
Page 257: ...23 Specification 23 4 Camera select input signal Camera select output...
Page 262: ...23 9 23 Specification...
Page 271: ...KDQJLQJ WKH QIRUPDWLRQ 25 Changing the Information...
Page 272: ......


