


Note:
At
this
time,
the
load
source
disk
is
the
only
configured
disk
unit
in
the
system.
The
following
steps
ensure
that
the
destruction
of
customer
data
and
programs
will
not
occur.
Continue
with
the
next
step.
5.
Select
Start
the
Dedicated
Service
Tools
.
6.
Sign
on
to
DST.
Use
22222222
as
both
the
used
ID
and
password.
If
the
customer
has
changed
the
ID
or
password,
ask
the
customer
for
the
correct
values.
7.
Select
Work
with
disk
units
—>
Work
with
disk
unit
recovery
.
8.
Select
Recover
Mirrored
Load
source
.
This
function
checks
the
disk
units
that
are
attached
to
the
system.
If
remote
mirroring
became
enabled
and
a
mirror-protected
load-source
disk
unit
is
located,
a
confirmation
display
appears.
If
a
mirror-protected
load-source
disk
unit
is
not
located,
an
error
display
appears.
9.
After
the
confirmation
display
appears,
press
F10
to
confirm
the
selection
and
begin
the
recover
function.
While
the
Recover
remote
load
source
function
is
running,
SRC
C6xx
4205
(xx
represents
the
percentage
of
recovery
completed)
displays
on
the
system
control
panel.
When
the
Recover
remote
load
source
function
completes,
the
system
will
automatically
perform
an
IPL
from
disk
to
the
IPL
or
Install
the
System
display.
All
of
the
system
data,
user
data,
and
user
ASPs
are
now
available
to
the
system.
This
ends
the
procedure.
Copy
the
contents
of
the
LIC
log:
1.
From
the
Use
Dedicated
Service
Tools
(DST)
display,
select
Start
a
Service
Tool
—>
Licensed
Internal
Code
log
.
2.
Select
either:
v
Dump
entries
to
tape
from
the
LIC
log
v
Dump
entries
to
diskette
from
the
LIC
log
3.
At
the
bottom
of
the
Dump
entries
to
tape
(or
diskette)
from
LIC
log
display,
type
a
3
to
dump
entry
header
and
complete
entry.
4.
Then,
press
Enter
.
The
system
will
prompt
you
through
the
remainder
of
the
displays
that
are
used
in
this
procedure.
When
the
copy
of
the
LIC
log
contents
finishes,
a
message
appears
indicating
that
the
dump
(copy)
completed.
5.
Press
Enter
.
Then,
select
End
Licensed
Internal
Code
.
Attention:
The
file
does
not
close
until
you
select
End
Licensed
Internal
Code
.
If
you
remove
the
tape
or
diskette
before
selecting
this
option,
do
not
use
the
information
that
is
on
the
tape
or
diskette.
This
ends
the
procedure.
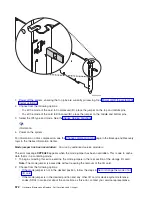
Verify
the
repair
For
use
by
authorized
service
providers.
Choose
from
the
following:
v
If
you
were
sent
here
after
completing
a
concurrent
maintenance
procedure,
then
follow
the
instructions.
v
If
you
were
sent
here
after
completing
a
dedicated
maintenance
procedure,
then
follow
the
instructions.
Verify
concurrent
repair:
Use
this
procedure
to
verify
a
repair
that
was
performed
using
concurrent
maintenance.
1.
Was
concurrent
maintenance
just
performed
on
an
optical
storage
unit?
v
No
:
Continue
with
the
next
step.
558
Hardware
(Remove
and
Replace;
Part
Locations
and
Listings)
Summary of Contents for 270
Page 2: ......
Page 12: ...x Hardware Remove and Replace Part Locations and Listings...
Page 279: ...Figure 3 CCIN 2881 with pluggable DIMM Analyze hardware problems 267...
Page 281: ...Figure 6 Models 830 SB2 with FC 9074 HSL and SPCN locations Analyze hardware problems 269...
Page 283: ...Figure 1b Model 840 SB3 processor tower dual line cord Analyze hardware problems 271...
Page 294: ...01 gif port and LED locations 282 Hardware Remove and Replace Part Locations and Listings...
Page 295: ...s src rzaq4519 gif locations Analyze hardware problems 283...
Page 483: ...Table 1 Cover assembly FC 5095 Expansion I O Tower Analyze hardware problems 471...
Page 614: ...602 Hardware Remove and Replace Part Locations and Listings...
Page 618: ...606 Hardware Remove and Replace Part Locations and Listings...
Page 621: ......
Page 622: ...Printed in USA SY44 5917 02...


