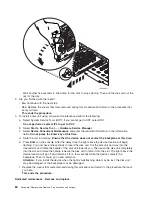
1.
To
remove
a
disk
unit
using
dedicated
maintenance
perform
the
following:
a.
Power
off
the
system.
See
b.
Disconnect
the
power
cord.
c.
To
remove
the
disk
unit,
pinch
the
two
surfaces
of
the
latching
mechanism
together
and
pull
the
handle
towards
you
to
release
the
disk
unit
from
the
slot.
d.
Remove
the
unit.
See
Figure
1.
Disk
unit
removal,
Models
830/SB2
and
840/SB3
(concurrent)
(See
page
above.
2.
Are
you
finished
with
the
repair?
v
No
:
Continue
with
the
next
step.
v
Yes
:
Replace
the
covers
that
were
removed
during
this
procedure
and
return
to
the
procedure
that
sent
you
here.
This
ends
the
procedure.
3.
To
install
a
disk
unit
using
dedicated
maintenance
perform
the
following:
a.
Power
off
the
system.
See
b.
Disconnect
the
power
cord.
c.
Put
the
disk
unit
part
way
into
the
desired
slot
and
rotate
the
handle
of
the
disk
unit
towards
you.
d.
Push
the
disk
unit
completely
into
the
slot
and
rotate
the
handle
towards
the
disk
unit
to
latch
it
into
the
slot.
e.
Replace
the
covers
that
were
removed
during
this
procedure
and
return
to
the
procedure
that
sent
you
here.
This
ends
the
procedure.
Models
840
or
SB3
external
battery
power
unit
For
use
by
authorized
service
providers.
Use
this
procedure
to
remove
the
external
battery
power
unit
from
the
Models
840
or
SB3.
1.
Look
to
see
if
the
panel
backlight
is
on
to
verify
that
ac
power
is
applied.
2.
If
the
system
is
either
powered
off
or
running
on
battery
power,
you
must
apply
ac
power
to
the
AC
module
before
continuing
with
this
procedure.
3.
Remove
the
rear
cover
(see
and
then
perform
the
next
step
from
the
***
REAR
***
of
the
system.
Attention:
Removing
the
external
battery
power
unit
charger
or
cable
while
the
system
is
running
on
battery
power
causes
the
system
to
fail
and
may
damage
the
external
battery
power
unit
and
the
card
enclosure.
If
the
console
will
accept
system
commands,
the
system
is
not
running
on
battery
power.
4.
To
remove
the
battery,
unplug
the
cable
from
the
battery
charger
connector
J3.
This
ends
the
procedure.
CAUTION:
The
weight
of
this
part
or
unit
is
more
than
55
kilograms
(121.2
pounds).
It
takes
specially
trained
persons
with
a
lifting
device
to
safely
lift
this
part
or
unit.
(RSFTC206)
CAUTION:
The
battery
is
a
lead-acid
battery.
To
avoid
possible
explosion,
do
not
burn.
Exchange
only
with
the
IBM-approved
part.
Recycle
or
discard
the
battery
as
instructed
by
local
regulations.
In
the
United
States,
IBM
has
a
process
for
the
collection
of
this
battery.
For
information,
call
1-800-426-4333.
You
will
need
to
have
the
IBM
part
number
for
the
battery
unit
available
when
you
call.
(RSFTC225)
Models
840/SB3
system
unit
-
Power
subframe
assembly
(PB1)
For
use
by
authorized
service
providers.
Use
this
procedure
to
remove
or
replace
the
power
subframe
assembly
(PB1)
in
the
Models
840/SB3.
Analyze
hardware
problems
85
Summary of Contents for 270
Page 2: ......
Page 12: ...x Hardware Remove and Replace Part Locations and Listings...
Page 279: ...Figure 3 CCIN 2881 with pluggable DIMM Analyze hardware problems 267...
Page 281: ...Figure 6 Models 830 SB2 with FC 9074 HSL and SPCN locations Analyze hardware problems 269...
Page 283: ...Figure 1b Model 840 SB3 processor tower dual line cord Analyze hardware problems 271...
Page 294: ...01 gif port and LED locations 282 Hardware Remove and Replace Part Locations and Listings...
Page 295: ...s src rzaq4519 gif locations Analyze hardware problems 283...
Page 483: ...Table 1 Cover assembly FC 5095 Expansion I O Tower Analyze hardware problems 471...
Page 614: ...602 Hardware Remove and Replace Part Locations and Listings...
Page 618: ...606 Hardware Remove and Replace Part Locations and Listings...
Page 621: ......
Page 622: ...Printed in USA SY44 5917 02...


