– IF YOU ARE NOT FAMILIAR with use of the
brush cutter, practise the procedures with
the engine switched off and the switch in
the OFF «STOP» position.
– ALWAYS FREE THE WORK AREA of objects
such as cans, bottles, stones, etc.. Hitting
these objects can cause serious injury to
the operator or others present and damage
the brush cutter. If you accidentally knock
against an object, SWITCH OFF THE
ENGINE IMMEDIATELY and inspect the cut-
ter. Never work with a damaged or faulty
brush cutter.
– ALWAYS CUT OR MOW AT FULL SPEED.
Never work at low speed, either at the start
of or during operations.
– DO NOT USE the brush cutter for purposes
other than to cut grass. DO NOT CUT above
knee level.
– DO NOT USE the brush cutter with other
people or animals nearby. Keep a minimum
distance of 15 metres between the operator
and other people or animals when cutting
or moving around. During more difficult
mowing operations keep a minimum dis-
tance of 30 metres between the operator
and other people or animals.
– IF THE BRUSH CUTTER IS USED ON
SLOPES remain below the cutting unit. DO
NOT USE THE BRUSH CUTTER if there is
even the minimum risk of slipping or over-
balancing.
– DO NOT USE the brush cutter CONTINU-
OUSLY, for lengthy times. PAUSE NOW AND
AGAIN, switching off the engine.
METAL DISKS
When using the metal disk it
is necessary to mount on the machine the spe-
cific front safety guard, which is supplied with
the machine packaging, without the line-cutter
blade.
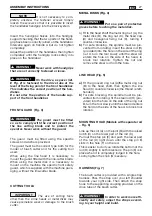
The 4-pointed disk is suitable for cutting tough
grass over wide areas. To cut grass, use the
brush cutter as you would a manual scythe: cut
the grass by moving the brush cutter from right
to left, then bring it back to the right, keeping it
out of the vegetation, and so on. Cut the grass
with circular sweeping movements of about 60°
- 90° (fig. 14).
The 3-pointed disk is suitable for cutting scrub
and small shrubs up to a diameter of 2 cm.
In this case, start cutting the vegetation from
!
WARNING!
!
WARNING!
above and bring the cutting head downwards in
order to cut the branches into little pieces (fig.
15).
When using metal tools
there is a risk of recoil when the equipment
comes into contact with solid objects (trunks,
branches, stones, etc.). Never bring the rotat-
ing blade into contact with the ground.
LINE HEAD
DO NOT USE lines other
than nylon (i.e. metal wire, plasticated metal
wire) and/or that are unsuitable for the head
in use. This could cause serious injuries and
lesions.
When you use the line
head, the front guard must be fitted with a
line-cutting blade. Fit the bottom band pro-
vided with the line-cutting blade to the guard.
Do not use very worn heads: some compo-
nents could become detached and endanger
the operator.
The brush cutter you have purchased is
equipped with a “Tap & Go” head.
To release new line: with the engine at full speed,
tap the line head against the ground (fig. 16).
Line is automatically released. The blade cuts
excess line.
Periodically remove any
grass wound around the brush cutter to prevent
overheating of the drive shaft. Grass caught
around the shaft can become wound under the
guard of the grass cutting head, reducing the
tool rotation speed (fig.17). Remove any grass
caught up using a screwdriver or other similar
tool to allow the shaft to cool correctly and the
tool to rotate freely.
CUTTING TECHNIQUES
When the brush cutter is correctly equipped with
the guard and line head, it can eliminate tall
grass and unsightly weeds in front of fences,
IMPORTANT
!
WARNING!
!
WARNING!
!
WARNING!
CUTTING INSTRUCTIONS
31
EN
CUTTING INSTRUCTIONS
Summary of Contents for BJ 250
Page 2: ......
Page 5: ...3 19 21 22 24 25 28 29 17 23 18 20 26 A 27 E...
Page 6: ...4...
Page 119: ...EL 117...
Page 122: ...1 2 3 4 15 5 6 B 1 2 3 120 EL...
Page 123: ...3 4 5 STOP 6 7 C 1 2 3 4 5 6 7 8 3 4 9 10 15 11 15 12 13 14 121 EL...
Page 124: ...15 16 D 1 2 3 4 5 6 7 8 9 10 11 122 EL MONO 1 barrier DUPLEX 2 2...
Page 125: ...A E 2 3 2 4 a C D b H A 5 a C b H A 6 A B C D E D E F D E G 7 123 EL...
Page 126: ...60 2 50 1 2 2 di olio SYNTETIC OIL 2T 4 25 1 4 124 EL...
Page 127: ...8 stop START 9 1 2 3 9 4 10 6 7 5 10 2 CLOSE RUN I CLOSE 10 11 RUN I 10 125 EL...
Page 128: ...12 STOP 13 T 126 EL...
Page 129: ...OFF STOP 15 30 4 60 90 14 3 2 cm 15 Tap Go 16 17 127 EL...
Page 130: ...18 19 20 30 21 15 22 128 EL...
Page 131: ...3 4 23 24 25 A B C 3 4 26 1 A 2 3 4 27 1 0 6 mm 025 2 3 12 15 Nm 28 STOP 1 E 29 2 129 EL...
Page 132: ...1 2 3 4 5 5 6 7 1 8 1 2 3 4 5 130 EL...
Page 133: ...EL 131...
Page 263: ...RU 261...
Page 266: ...A A 1 1 2 2 3 3 4 4 15 5 5 6 6 1 1 2 2 3 3 264 RU...
Page 269: ...A E E 2 2 3 3 4 4 a a A B C D E A 5 5 a a A B C A 6 6 D D F D E G 7 7 267 RU...
Page 271: ...8 START 9 1 2 K K K 3 9 4 10 6 7 5 10 2 K I K 10 K 11 I 10 K 269 RU...
Page 272: ...1 12 2 STOP 13 270 RU...
Page 273: ...S ST TO OP P 1 15 5 3 30 0 4 60 90 14 2 15 Tap Go 16 17 271 RU...
Page 274: ...18 1 19 9 2 20 0 30 2 21 1 1 15 5 2 22 2 272 RU...
Page 275: ...3 3 4 4 23 24 25 3 4 2 26 6 1 A 2 3 4 2 27 7 1 0 6 2 3 12 15 Nm 2 28 8 STOP 1 29 2 273 RU...
Page 276: ...1 2 3 4 5 5 6 7 1 8 1 2 3 4 5 274 RU...
Page 295: ......


