3-7.1.9 Preset Scan (if equipped)
The analyzer provides a preset scan function in
which the preset monitor frequencies stored in
the RF memory are continually scanned. The
analyzer scans through the preset frequencies,
stopping and dwelling on a channel whenever the
receiver squelch is broken. When the receiver
becomes squelched again, scanning resumes. All
30 preset monitor frequencies, or a subset
consisting of a continuous block of frequencies,
can be scanned. When no signals are detected, the
analyzer scans through all 30 preset frequencies
in less than 1/2 second. If the number of
frequencies is reduced, the scanning process is
faster. RF signals to be scanned can be input from
either the ANT or RF I/O ports.
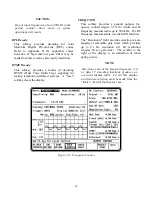
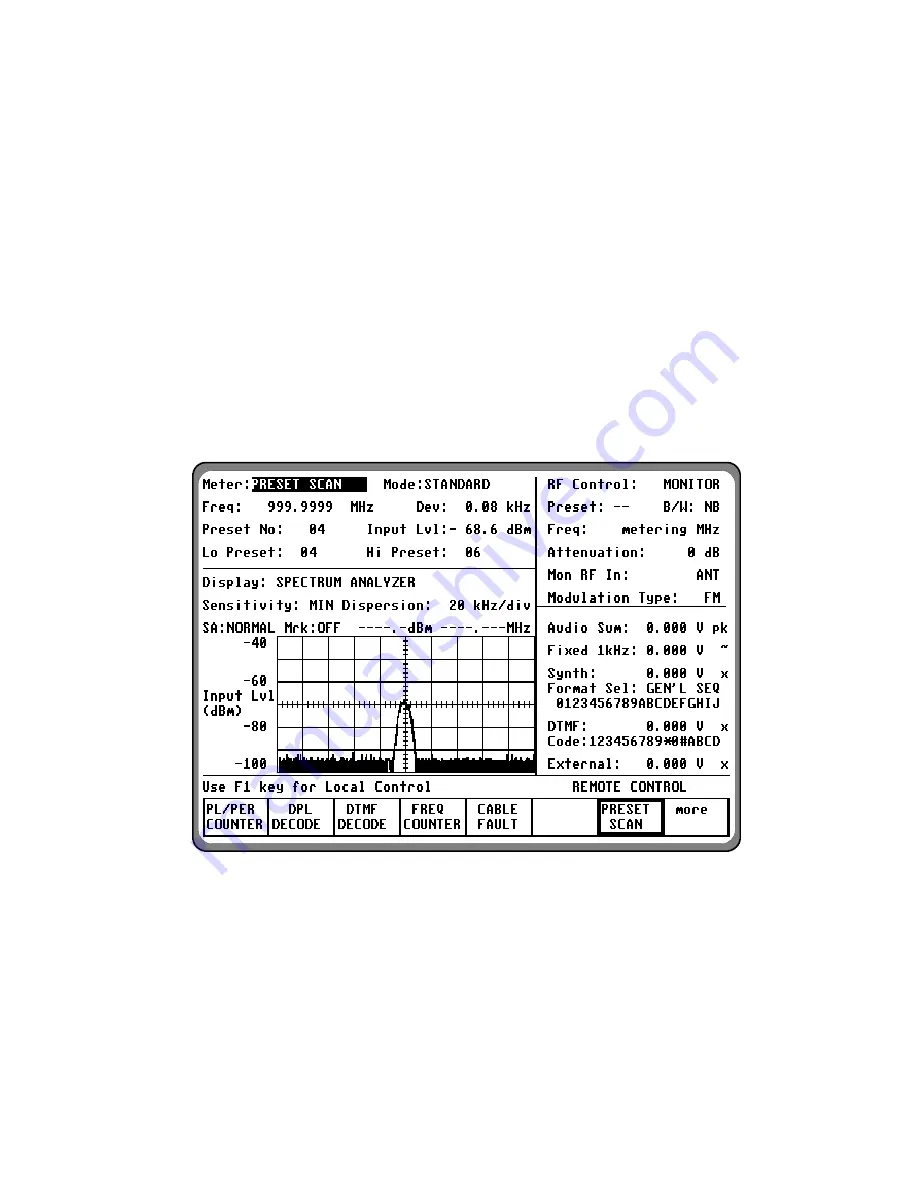
To activate the Preset Scan function, press the
PRESET SCAN
softkey (figure 3-17). This key
not only begins the preset scanning but also
serves as a "continue key" to temporarily skip
past a channel with heavy radio traffic. When the
analyzer is locked on a preset frequency and you
wish to continue scanning, although the signal is
preset, press the
PRESET SCAN
softkey again.
This continues the scanning with the next preset
frequency in the memory table. Pressing the
PRESET SCAN
softkey only skips over the
frequency once; if radio traffic is still present on
that frequency the next time that it is scanned, the
analyzer will stop and dwell once again.
Figure 3-17. Preset Scan
The number of preset frequencies to be scanned
can be limited by using the Low Preset and High
Preset fields in the meter zone. Entries in these
fields will cause the analyzer to only scan from
the low preset number to the high preset number.
By carefully arranging the preset frequencies in
the RF memory into related groups, you can
make maximum use of the Low Preset and High
Preset scan limiters. For example, a particularly
busy preset frequency which is causing the
analyzer to stop scanning and dwell for long
periods of time can be removed from the scan list
47
Summary of Contents for R2600 Series
Page 8: ...3 7 1 3 AC DC Voltmeter 41 3 7 1 4 INT DIST EXT DIST Meter 43 v...
Page 46: ...This Page Intentionally Left Blank xxxvi...
Page 66: ...DISPLAY ZONE RF ZONE AUDIO ZONE Figure 3 1 Screen Zone Arrangement 20...
Page 68: ...Figure 3 2 System Help 22...
Page 83: ...Figure 3 11 General Sequence Mode Select 37...
Page 85: ...39 Figure 3 12 RF Display Zone...
Page 88: ...Figure 3 14 Digital Voltmeter Screens 42...
Page 102: ...Figure 3 22 Bar Graphs 56...
Page 107: ...Figure 3 24 Memory Screens 61...
Page 128: ...This Page Intentionally Left Blank 82...
Page 202: ...This Page Intentionally Left Blank 156...
Page 205: ...Figure 11 1 R 2670 with SECURENET Option Housing 159...
Page 206: ...This Page Intentionally Left Blank 160...
Page 218: ...Figure 13 8 Test Key Programming Display Figure 13 9 External Key Programming Display 172...
Page 225: ...Figure 13 12 Duplex Mode Display Zone 179...
Page 234: ...VOICE Figure 13 17 CLEAR SCOPE Markers 188...
Page 236: ...This Page Intentionally Left Blank 190...
Page 249: ...Figure 14 8 SECURENET CLEAR SCOPE Display of Output Modulation 203...
Page 252: ...This Page Intentionally Left Blank 206...
Page 256: ...210 This Page Intentionally Left Blank...
Page 267: ...Figure 17 7 Encryption Select Display Figure 17 7 Encryption Select Display 221 221...
Page 286: ...This Page Intentionally Left Blank 240...
Page 291: ...Figure 18 1 Radio BER Test Mode Audio Zone Figure 18 2 Radio BER Test Mode BER Meter 245...
Page 293: ...Figure 18 4 Receive BER 247...
Page 298: ...Figure 18 6 ASTRO CLEAR SCOPE Display of Output Modulation 252...
Page 304: ...Figure 21 1 PROJ 25 Version Screen Figure 21 2 PROJ 25 Options Screen 258...
Page 309: ...Figure 21 6 SET UP Display Screen Figure 21 7 Encryption Select Display 263...
Page 335: ...Figure 22 4 PROJ 25 CONV CLEAR SCOPE Display of Output Modulation 289...
Page 339: ...Figure 24 1 PROJ 25 Version Screen Figure 24 2 PROJ 25 Options Screen 293...
Page 354: ...Figure 25 3 Encryption Select Display Figure 25 4 Algorithm Select Display 308...
Page 369: ...B 6 This Page Intentionally Left Blank...
Page 379: ...This Page Intentionally Left Blank F 4...
Page 383: ...This Page Intentionally Left Blank H 2...
Page 389: ...J 4 This Page Intentionally Left Blank...
Page 393: ...This Page Intentionally Left Blank K 4...


