background image

Garmin G1000 NXi Cockpit Reference Guide for the Cessna NAV III

190-02178-02  Rev. A 

Abnormal Operation

170

Flight

Instruments

EIS

Nav/Com/

XPDR/Audio

Flight


Management

Hazar

d

Avoidance

AFCS

Additional

Featur

es

Abnormal

Oper

ation

Annun/Alerts

Appendix

Index

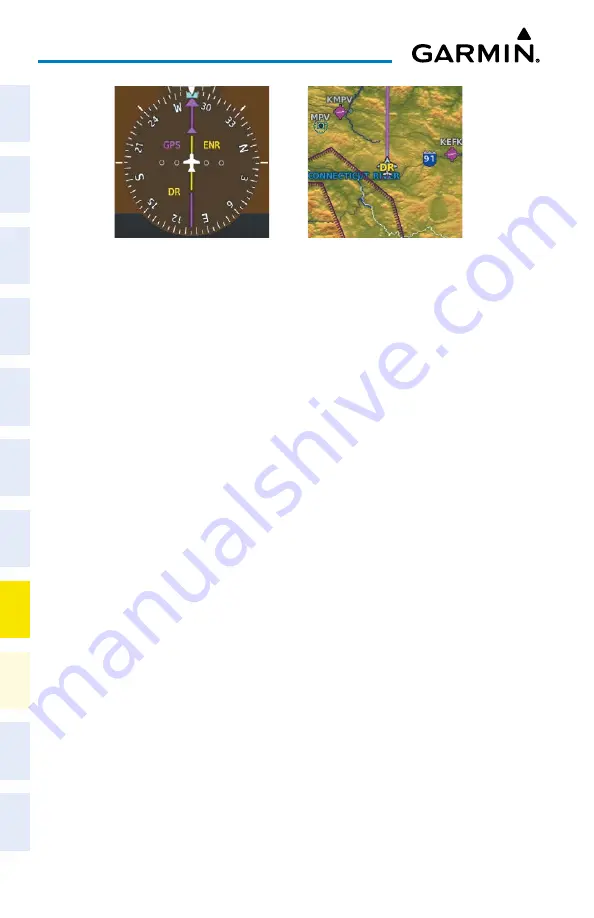
Dead Reckoning Indications

Symbolic Aircraft

(Map pages and Inset Map)

CDI ‘DR’ Indication on PFD

As a result of operating in DR Mode, all GPS-derived data is computed based upon 

an estimated position and is displayed as yellow text on the display to denote degraded 
navigation source information.  This data includes the following:

•  Navigation Status Box fields except Active Leg, TAS, and DTK
•  GPS Bearing Pointer
•  Wind data and pointers in the Wind Data Box on the PFD
•  Current Track Indicator
•  All Bearing Pointer Distances
•  Active Flight Plan distances, bearings, and ETE values

Also, while the system is in DR Mode, the autopilot will couple to GPS for up to 20 

minutes.  TAWS are also disabled.  Additionally, the accuracy of all nearest information 
(airports, airspaces, and waypoints) is questionable.  Finally, airspace alerts continue to 
function, but with degraded accuracy.

Summary of Contents for G1000 NXi

Page 1: ...Cockpit Reference Guide Cessna NAV III System Software Version 2501 09 or later...

Page 2: ......

Page 3: ...ENTS ENGINE INDICATION SYSTEM EIS NAV COM TRANSPONDER AUDIO PANEL FLIGHT MANAGEMENT SYSTEM HAZARD AVOIDANCE AUTOMATIC FLIGHT CONTROL SYSTEM ADDITIONAL FEATURES ABNORMAL OPERATION ANNUNCIATIONS ALERTS...

Page 4: ......

Page 5: ...revision to this manual onto a hard drive or other electronic storage medium to be viewed for personal use provided that such electronic or printed copy of this manual or revision must contain the com...

Page 6: ...cies in the information Some jurisdictions do not allow the limitation or exclusion of implied warranties or liability for incidental or consequential damages so the above limitations or exclusions ma...

Page 7: ...ed navigation data sources and should be considered only an aid to enhance situational awareness WARNING Do not rely solely upon the display of traffic information to accurately depict all of the traf...

Page 8: ...rely on the autopilot to level the aircraft at the MDA DH when flying an approach with vertical guidance The autopilot will not level the aircraft at the MDA DH even if the MDA DH is set in the altitu...

Page 9: ...ditions relieve the pilot s responsibility to see and avoid other aircraft WARNING Do not use TAWS information for primary terrain or obstacle avoidance TAWS is intended only to enhance situational aw...

Page 10: ...or Air Traffic Control NOTE The United States government operates the Global Positioning System and is solely responsible for its accuracy and maintenance The GPS system is subject to changes which co...

Page 11: ...consider their impact on the intended aircraft operation The database alerts can be viewed at flygarmin com by selecting Aviation Database Alerts NOTE The FAA has asked Garmin to remind pilots who fl...

Page 12: ...l paper charts or an additional electronic display necessary on the aircraft and available to the pilot If the secondary source of aeronautical charts is a Portable Electronic Device PED its use must...

Page 13: ...of performing the necessary recovery procedures due to encounters with adverse flight conditions and environments NOTE Interference from GPS repeaters operating inside nearby hangars can cause an int...

Page 14: ...Garmin G1000 NXi Cockpit Reference Guide for the Cessna NAV III 190 02178 02 Rev A Warnings Cautions Notes Blank Page...

Page 15: ...Garmin and or its third party providers You acknowledge that the Software is the property of Garmin and or its third party providers and is protected under the United States of America copyright laws...

Page 16: ...Garmin G1000 NXi Cockpit Reference Guide for the Cessna NAV III 190 02178 02 Rev A Software License Agreement Blank Page...

Page 17: ...ion Other clerical updates 190 02178 01 A May 2018 All Production release at GDU 20 83 Updated EIS Information Added WireAware Added Visual Approaches Added Baro QFE Altimeter settings Added Connext W...

Page 18: ...Garmin G1000 NXi Cockpit Reference Guide for the Cessna NAV III 190 02178 02 Rev A RR 2 Record of Revisions Blank Page...

Page 19: ...ge Navigation Sources 5 Enabling Disabling the HSI Map on the PFD 5 Adjusting the Selected Heading 5 Adjusting the Selected Course 5 Changing the navigation angle true magnetic setting 5 Selecting Bea...

Page 20: ...ion Map Orientation 39 Enabling disabling Auto North Up and selecting the minimum switching range 39 Configuring Automatic Zoom 40 Panning The Map 40 Reviewing Information For An Airport NAVAID Or Use...

Page 21: ...isplaying and Removing Airspace Altitude Labels 52 Turning An Airspace Alert On Or Off 52 Changing the Altitude Buffer Distance Setting 52 Selecting And Viewing An Airspace Alert With Its Associated I...

Page 22: ...At An Active Flight Plan Waypoint 66 Creating A User Defined Hold At The Aircraft Present Position 67 Creating A User Defined Hold At A Direct To Waypoint 67 Exiting A User Defined Hold Inserted Into...

Page 23: ...Plan From The WPT Departure Information Page 83 Loading A Departure Procedure Into a Stored Flight Plan 84 Removing A Departure Procedure From The Active Flight Plan 84 Removing a Departure From a St...

Page 24: ...sabling SBAS 97 HAZARD AVOIDANCE 99 Customizing the Hazard Displays on the Map Navigation Map Page 99 STORMSCOPE Optional 99 Data Link Weather 100 Weather Product Age 101 Displaying Data Link Weather...

Page 25: ...n 167 Hazard Displays with Loss of GPS Position 167 Unusual Attitudes 168 Dead Reckoning 168 ANNUNCIATIONS ALERTS 171 System Annunciations 171 CO Guardian Messages 173 Relative Point Obstacle Symbols...

Page 26: ...ceWatch Alerts 186 AFCS Alerts 187 Voice Alerts 188 Warning CAS Annunciations 189 Caution CAS Annunciations 189 Advisory CAS Annunciations 190 Safe CAS Annunciations 190 System Message Advisories 190...

Page 27: ...S Knob clockwise to On or counterclockwise to Off 6 To remove the window press the CLR Key or the TMR REF Softkey ENABLING DISABLING VSPEED REFERENCE BUGS AS A GROUP OR RESTORING ALL DEFAULT SETTINGS...

Page 28: ...ALT Knob ENABLING ALTITUDE UNITS OVERLAYS 1 Press the PFD Opt Softkey to display the second level softkeys 2 Press the ALT Units Softkey 3 Press the Meters or Feet Softkey to enable disable the altitu...

Page 29: ...l be shown in the BARO QFE Box Verify this information is correct 8 The On Off Field will automatically highlight turn the small FMS Knob to change the selection from Off to On 9 Push the FMS Knob to...

Page 30: ...e the FMS Knob to select the Aux System Setup 1 Page on the MFD 2 Press the FMS Knob to activate the cursor 3 To enable disable the Baro Transition Alert based on altitude turn the large FMS Knob to h...

Page 31: ...MAP ON THE PFD 1 Press the Map HSI Softkey 2 Press the Layout Softkey 3 Press the HSI Map Softkey to enable the HSI Map Or Press the Map Off Softkey to disable the HSI Map 4 Press the Back Softkey twi...

Page 32: ...play the bearing pointer with GPS as the source 5 Press the bearing softkey again to display the bearing pointer with the optional ADF as the source 6 To remove the bearing pointer and information win...

Page 33: ...hlighted 5 Turn the small FMS Knob to display the Up Dn Window 6 Turn the small FMS Knob to select Up or Dn 7 Press the ENT Key Start is now highlighted 8 Press the ENT Key to start the timer The fiel...

Page 34: ...2 Push the FMS Knob to activate the cursor 3 To enable disable the Baro Transition Alert based on altitude turn the large FMS Knob to highlight the On or Off field for the BARO Transition Alert Altit...

Page 35: ...or the TMR REF Softkey SYNTHETIC VISION WARNING Use appropriate primary systems for navigation and for terrain obstacle and traffic avoidance SVT is intended as an aid to situational awareness only an...

Page 36: ...pt Softkey 2 Press the SVT Softkey 3 Press the HDG LBL Softkey Toggling Pathways depiction 1 Press the PFD Opt Softkey 2 Press the SVT Softkey 3 Press the Pathways Softkey Toggling WireAware depiction...

Page 37: ...ication System Flight Instruments EIS Nav Com XPDR Audio Flight Management Hazard Avoidance AFCS Additional Features Abnormal Operation Annun Alerts Appendix Index ENGINE INDICATION ENGINE DISPLAYS En...

Page 38: ...178 02 Rev A 12 Engine Indication System Flight Instruments EIS Nav Com XPDR Audio Flight Management Hazard Avoidance AFCS Additional Features Abnormal Operation Annun Alerts Appendix Index Engine Sys...

Page 39: ...t F 5 Exhaust Gas Temperature Indicator EGT Displays exhaust gas temperature in degrees Fahrenheit F 6 Vacuum Pressure Indicator VAC Displays standby vacuum pump pressure 7 Calculated Fuel Used GAL Us...

Page 40: ...178 02 Rev A 14 Engine Indication System Flight Instruments EIS Nav Com XPDR Audio Flight Management Hazard Avoidance AFCS Additional Features Abnormal Operation Annun Alerts Appendix Index Engine Sys...

Page 41: ...t F 5 Exhaust Gas Temperature Indicator EGT Displays exhaust gas temperature in degrees Fahrenheit F 6 Vacuum Pressure Indicator VAC Displays standby vacuum pump pressure 7 Calculated Fuel Used GAL Us...

Page 42: ...78 02 Rev A 16 Engine Indication System Flight Instruments EIS Nav Com XPDR Audio Flight Management Hazard Avoidance AFCS Additional Features Abnormal Operation Annun Alerts Appendix Index Engine Syst...

Page 43: ...Engine Hour Indicator ENG HRS Displays a numeric readout for the time in hours hrs the engine has been in service 7 Vacuum Pressure Indicator VAC Displays standby vacuum pump pressure 8 Cylinder Head...

Page 44: ...8 02 Rev A 18 Engine Indication System Flight Instruments EIS Nav Com XPDR Audio Flight Management Hazard Avoidance AFCS Additional Features Abnormal Operation Annun Alerts Appendix Index Engine Syste...

Page 45: ...ngine Hour Indicator ENG HRS Displays a numeric readout for the time in hours hrs the engine has been in service 7 Vacuum Pressure Indicator VAC Displays standby vacuum pump pressure 8 Cylinder Head T...

Page 46: ...78 02 Rev A 20 Engine Indication System Flight Instruments EIS Nav Com XPDR Audio Flight Management Hazard Avoidance AFCS Additional Features Abnormal Operation Annun Alerts Appendix Index Engine Syst...

Page 47: ...Engine Hour Indicator ENG HRS Displays a numeric readout for the time in hours hrs the engine has been in service 7 Vacuum Pressure Indicator VAC Displays standby vacuum pump pressure 8 Cylinder Head...

Page 48: ...8 02 Rev A 22 Engine Indication System Flight Instruments EIS Nav Com XPDR Audio Flight Management Hazard Avoidance AFCS Additional Features Abnormal Operation Annun Alerts Appendix Index Model T206H...

Page 49: ...ngine Hour Indicator ENG HRS Displays a numeric readout for the time in hours hrs the engine has been in service 7 Vacuum Pressure Indicator VAC Displays standby vacuum pump pressure 8 Cylinder Head T...

Page 50: ...Index ENGINE PAGE In all cases green indicates normal operation amber indicates caution and red indicates warning Pressing the ENGINE Softkey makes available the LEAN and SYSTEM softkeys that provides...

Page 51: ...e Lean page The Engine Lean page also displays the numerical temperature in degrees of Fahrenheit F Turbine Inlet Temperature TIT Horizontal Bar Indicator TIT Numerical Indicator EXHAUST GAS TEMPERATU...

Page 52: ...through the cylinders the selected cylinder number is dis played in cyan The CYL SLCT Softkey is disabled during warning or caution condi tions or when the ASSIST Softkey is pressed Monitoring the de...

Page 53: ...lated from the last time the fuel was reset Fuel used GAL Used and range in nautical miles are calculated based on the displayed fuel remaining GAL REM and the fuel flow totalizer The calculated range...

Page 54: ...decreased range in that direction is indicated by the Fuel Range Ring shifting toward the tail of the Aircraft Symbol The amount of reserve fuel only for purposes of the Fuel Range Ring is set on the...

Page 55: ...gine System is displayed Oil pressure is shown in pounds per square inch psi and temperature in degrees of Fahrenheit F If the oil pressure pointer enters the amber band a caution is issued If the oil...

Page 56: ...Guide for the Cessna NAV III 190 02178 02 Rev A 30 Engine Indication System Flight Instruments EIS Nav Com XPDR Audio Flight Management Hazard Avoidance AFCS Additional Features Abnormal Operation Ann...

Page 57: ...select the next field 4 Turn the small FMS Knob to enter the next desired character 5 Repeat steps 3 and 4 until the desired Flight ID is entered 6 Press the ENT Key to update the Flight ID Do not pe...

Page 58: ...been entered the transponder code becomes active SELECTING A COM RADIO Transmit Receive Press the COM1 MIC or COM2 MIC Key on the audio panel Receive Only Press the COM1 or COM2 Key on the audio pane...

Page 59: ...to the COM Frequency Box from pages in the NRST or WPT page group by highlighting the frequency and pressing the ENT Key Auto tuning a COM frequency from the NRST and WPT Pages 1 From any page the COM...

Page 60: ...ys the last recorded memory block and then returns to normal operation Each subsequent PLAY Key press while recorded audio is playing will play the previously recorded block The PLAY annunciation rema...

Page 61: ...gers MUSIC INPUT 2 OFF ON Selected radios aural alerts pilot passengers MUSIC INPUT 1 Copilot Selected radios aural alerts pilot passengers MUSIC INPUT 2 ON ON Selected radios aural alerts pilot copil...

Page 62: ...rts Pilot MIC Passenger MIC Selected Radios Aural Alerts Pilot MIC Copilot MIC Passenger MIC 3D AUDIO GMA 1360 3D Audio is useful when multiple COM audio sources are present By using dif ferent respon...

Page 63: ...ciators over the PILOT ICS COPLT ICS and PASS ICS buttons may be blue Select the desired button to turn the blue annunciator on or off to distribute the telephone audio to selected crew passenger posi...

Page 64: ...rsist through Bluetooth audio connection disruptions NOTE The Bluetooth audio can only be assigned to one source at a time Once the Bluetooth audio is assigned to an audio source the remaining enterta...

Page 65: ...Pressing the Defaults Softkey returns all fields to the default setting USING MAP DISPLAYS CHANGING THE NAVIGATION MAP ORIENTATION 1 With the Map Navigation Map Page displayed press the MENU Key The c...

Page 66: ...he ENT Key The Map Settings Menu is displayed 3 Turn the small FMS Knob to select the Map group 4 Press the ENT Key 5 Turn the large FMS Knob to highlight the Auto Zoom On Off Field and select Off or...

Page 67: ...1 Place the Map Pointer on the boundary of an airspace 2 Push the Joystick to remove the Map Pointer and center the map on the aircraft MEASURING BEARING AND DISTANCE BETWEEN ANY TWO POINTS 1 Press th...

Page 68: ...ge all navigation data is presented on a black background DISPLAYING REMOVING TOPOGRAPHIC DATA USING THE MAP NAVIGATION MAP PAGE MENU WINDOW 1 Press the MENU Key with the Map Navigation Map Page displ...

Page 69: ...o highlight the Topo Scale Field 5 Turn the small FMS Knob to select On or Off 6 Press the FMS Knob to return to the Map Navigation Map Page SETTING UP THE LAND AVIATION OR AIRSPACE GROUP ITEMS 1 Pres...

Page 70: ...again to remove High Altitude Airways No airways are displayed AWY Off SELECTING AN AIRWAY RANGE LOW ALT AIRWAYS OR HIGH ALT AIRWAYS 1 Press the MENU Key with the Map Navigation Map Page displayed Th...

Page 71: ...Page Info 1 Softkey press the FMS Knob 2 Use the FMS Knobs and enter an identifier facility name or location within the Airport Box 3 Press the ENT Key 4 Press the FMS Knob to remove the cursor SELECT...

Page 72: ...key to close the PFD Nearest Airports Window VIEWING INFORMATION FOR A NEAREST AIRPORT ON THE MFD 1 Turn the large FMS Knob to select the NRST Page Group 2 Turn the small FMS Knob to select the NRST N...

Page 73: ...the Nearest Airport Box 6 Use the FMS Knob to enter the minimum runway length zero to 25 000 feet and press the ENT Key 7 Press the FMS Knob to remove the flashing cursor VIEWING NON AIRPORT WAYPOINTS...

Page 74: ...s 3 Press the ENT Key The current aircraft position is the default location of the new waypoint 4 If desired define the type and location of the waypoint in one of the following ways Select RAD RAD us...

Page 75: ...ng selection of active flight plan nearest recent user or airway waypoints 5 Enter the name of the new user waypoint a waypoint that does not match any existing waypoint in the database and press the...

Page 76: ...ed position 3 Enter a user waypoint name up to six characters 4 Press the ENT Key to accept the selected name 5 If desired define the type and location of the waypoint in one of the following ways Sel...

Page 77: ...HANGING THE USER WAYPOINT STORAGE DURATION DEFAULT SETTING 1 With the WPT User WPT Information Page displayed press the MENU Key 2 Move the cursor to select Waypoint Setup and press the ENT Key 3 Sele...

Page 78: ...ey 4 Turn the large FMS Knob to select the Airspace ALT LBL Field 5 Turn the small FMS Knob to select On to display labels and Off to remove labels 6 Press the FMS Knob to return to the Map Navigation...

Page 79: ...placed in the Airspace Alerts Box 3 Select the desired airspace 4 Press the FMS Knob to remove the flashing cursor TURNING SMART AIRSPACE ON OR OFF 1 Use the FMS Knob to select the Map Navigation Map...

Page 80: ...TO DESTINATION 1 While navigating an active flight plan press the Direct to Key The Direct To Window is displayed with the active flight plan waypoint as the default selection 2 Turn the small FMS Kno...

Page 81: ...Softkey on the PFD or turn the FMS Knob to display the NRST Nearest Airports Page on the MFD and press the FMS Knob 2 Use the FMS Knob to select the desired airport the nearest one is already selecte...

Page 82: ...ed on Activate 6 Press the ENT Key again to activate the direct to CANCELLING A DIRECT TO 1 Press the Direct to Key to display the Direct To Window 2 Press the MENU Key 3 With Cancel Direct To NAV hig...

Page 83: ...active flight plan leg press the Sync Softkey DISPLAYING THE FLIGHT PLAN MAP ON THE FPL ACTIVE FLIGHT PLAN PAGE IN SPLIT SCREEN MODE 1 Press the FPL Key for the MFD to display the FPL Active Flight Pl...

Page 84: ...b 2e 4 Select the enroute waypoints a Highlight the location to insert the waypoint using the FMS Knob If the enroute header is selected the new waypoint is placed following the header If an enroute w...

Page 85: ...ahead of the selected item b Use the FMS Knob or the waypoint submenu to enter the identifier facility or city name of the waypoint c Press the ENT Key The stored flight plan is modified as each wayp...

Page 86: ...nob to activate the cursor 2 Highlight the desired flight plan 3 Press the EDIT Softkey or press the ENT Key turn the large FMS Knob clockwise to select EDIT and press the ENT Key The FPL Stored Fligh...

Page 87: ...d turn the FMS Knob to highlight the flight plan to be edited 4 Press the Edit Softkey or press the MENU Key select Edit Flight Plan and press the ENT Key The FPL Stored Flight Plan Page is displayed...

Page 88: ...waypoint in the flight plan one must be entered first 4 Turn the small FMS Knob for the MFD one click clockwise and press the LD AIRWY Softkey or press the MENU Key for the and select Load Airway PFD...

Page 89: ...igh altitude airways 7 Turn the FMS Knob to highlight the desired airway exit point from the list and press the ENT Key Load is highlighted 8 Press the ENT Key The system returns to editing the flight...

Page 90: ...he Flight Plan Window PFD 2 Press the MENU Key highlight Collapse Airways or Expand Airways and press the ENT Key The airways are collapsed expanded ACTIVATING A FLIGHT PLAN LEG 1 Press the FPL Key to...

Page 91: ...ept the altitude constraint if the selected waypoint is an airport without a runway selected an additional choice is displayed Turn the small FMS Knob to choose MSL or AGL and press the ENT Key to acc...

Page 92: ...oint and press the ENT Key The system displays the bearing BRG and distance DIS to the closest point along the flight plan to the selected reference waypoint and creates a user waypoint at this locati...

Page 93: ...nob to select Inbound or Outbound course direction and press the ENT Key 5 Use the small FMS Knob to select Time or Distance length mode and press the ENT Key 6 Use the FMS Knobs to edit the length an...

Page 94: ...INSERTED INTO THE ACTIVE FLIGHT PLAN Press the SUSP Softkey The system will provide guidance to follow the holding pattern to the inbound course and resume automatic waypoint sequencing REMOVING A US...

Page 95: ...s been initiated from a mobile device a PENDING FLIGHT PLAN pop up alert appears in the lower right corner of the MFD and an Connext annunciation appears to the right of the MFD page title 2 Press the...

Page 96: ...elete Softkey The Delete Flight Plan XX window is displayed 6 With OK highlighted press the ENT Key to delete the pending flight plan The pending flight plan is removed from the FPL Flight Plan Catalo...

Page 97: ...sired select CANCEL using the FMS Knob press the ENT Key select another flight plan slot and press the Import Softkey again 7 Turn the small FMS Knob to highlight the desired flight plan for importing...

Page 98: ...the Active Flight Plan Window PFD 2 Press the MENU Key highlight Delete Flight Plan and press the ENT Key The Delete all waypoints in flight plan window is displayed 3 With OK highlighted press the EN...

Page 99: ...ob to activate the cursor and turn the FMS Knob to highlight the desired flight plan 3 Press the Activate Softkey or press the ENT Key twice or press the MENU Key highlight Activate Flight Plan and pr...

Page 100: ...he ENT Key to copy the flight plan To cancel the request press the CLR Key or highlight CANCEL and press the ENT Key DELETING A STORED FLIGHT PLAN 1 Press the FPL Key and turn the small FMS Knob to di...

Page 101: ...activate the cursor not required on the PFD and turn the large FMS Knob to highlight the comment field 3 Use the FMS Knobs to edit the comment 4 Press the ENT Key to accept the changes 5 Press the FMS...

Page 102: ...Key on the MFD to display the FPL Active Flight Plan Page 2 Press the ENBL VNV Softkey or press the MENU Key highlight Enable VNV and press the ENT Key Vertical navigation is enabled and vertical guid...

Page 103: ...waypoints to give guidance for vertical navigation These altitudes are depending on the specific in stance manually entered or retrieved from the published altitudes in the navigation database Displa...

Page 104: ...nnot use this altitude in determining vertical guidance because of an invalid constraint condition An altitude constraint is invalid if Meeting the constraint requires the aircraft to climb Meeting th...

Page 105: ...b clockwise to highlight the first zero and enter the three digit flight level 4 Press the ENT Key to accept the altitude constraint if the selected waypoint is an airport without a runway selected an...

Page 106: ...2 Push the FMS Knob and turn the large FMS Knob to highlight the desired waypoint altitude constraint ALT 3 Turn the small FMS Knob to begin entry of the altitude constraint and use the FMS Knobs to e...

Page 107: ...Press the VNV Softkey or press the MENU Key highlight VNV Direct To and press the ENT Key An Activate vertical Direct to to NNNNNFT at XXXXXX confirmation window is displayed 4 Press the ENT Key Verti...

Page 108: ...age Or Press the APR Softkey The WPT Approach Information Page is displayed defaulting to the airport displayed on the WPT Airport Information Page 2 Press the FMS Knob to activate the cursor To selec...

Page 109: ...ort Information Page first page in the WPT Page Group press the DP Softkey The WPT Departure Information Page is displayed defaulting to the airport displayed on the WPT Airport information Page 2 To...

Page 110: ...rved by the selected departure if required Press the ENT Key 6 Select a transition for the selected departure Press the ENT Key 7 Press the ENT Key to load the selected departure procedure REMOVING A...

Page 111: ...FMS Knob to remove the flashing cursor LOADING AN ARRIVAL INTO THE ACTIVE FLIGHT PLAN USING THE PROC KEY 1 Press the PROC Key The Procedures Window is displayed 2 Highlight Select Arrival 3 Press the...

Page 112: ...the Sequence Box The arrival is previewed on the map 4 Press the MENU Key to display the Arrival Information Page Menu Window 5 Turn the FMS Knob to highlight Load Arrival 6 Press the ENT Key to load...

Page 113: ...ENT Key To cancel the removal request highlight CANCEL and press the ENT Key 5 Press the FMS Knob to remove the flashing cursor REMOVING AN ARRIVAL FROM A STORED FLIGHT PLAN 1 Press the FPL Key to di...

Page 114: ...shed LNAV VNAV minima downgrades to L VNAV Baro VNAV if SBAS unavailable LP available only if SBAS available RNAV GPS approach using published LP minima downgrades to LNAV if SBAS unavailable LP V ava...

Page 115: ...FF and press the ENT Key 6 Press the ENT Key with Load highlighted to load the approach procedure or turn the large FMS Knob to highlight Activate and press the ENT Key to load and activate the approa...

Page 116: ...rge FMS Knob to highlight Activate and press the ENT Key to load and activate the approach procedure When GPS is not approved for the selected final approach course the message NOT APPROVED FOR GPS GP...

Page 117: ...Window is displayed with Activate Approach highlighted 2 Press the ENT Key to activate the approach ACTIVATING A PREVIOUSLY LOADED APPROACH WITH VECTORS TO FINAL 1 Press the PROC Key to display the P...

Page 118: ...the FPL Active Flight Plan Page 2 Turn the small FMS Knob clockwise one click to display the FPL Flight Plan Catalog Page 3 Press the FMS Knob to activate the cursor and turn the FMS Knob to highlight...

Page 119: ...ompensation Window is displayed with the temperature highlighted 4 Use the small FMS Knob to change the Temperature at airport Field The compensated altitude is computed as the temperature is selected...

Page 120: ...U Key highlight Flight Plan Mode or Waypoints Mode and press the ENT Key SELECTING A FLIGHT PLAN AND LEG FOR TRIP STATISTICS 1 From the Aux Trip Planning Page press the FMS Knob to activate the cursor...

Page 121: ...LITY AT A SELECTED WAYPOINT 1 Select the Aux GPS Status Page 2 If necessary press the RAIM Softkey 3 Press the FMS Knob The Waypoint Field is highlighted 4 Turn the small FMS Knob to display the Waypo...

Page 122: ...pecified waypoint time and date PREDICTING RAIM AVAILABILITY AT THE AIRCRAFT PRESENT POSITION 1 Select the Aux GPS Status Page 2 If necessary press the RAIM Softkey 3 Press the FMS Knob The Waypoint F...

Page 123: ...nagement Hazard Avoidance AFCS Additional Features Abnormal Operation Annun Alerts Appendix Index ENABLING DISABLING SBAS 1 Select the Aux GPS Status Page 2 If necessary press the SBAS Softkey 3 Press...

Page 124: ...ce Guide for the Cessna NAV III 190 02178 02 Rev A 98 Flight Management Flight Instruments EIS Nav Com XPDR Audio Flight Management Hazard Avoidance AFCS Additional Features Abnormal Operation Annun A...

Page 125: ...Navigation Map Page STORMSCOPE OPTIONAL WARNING Do not rely on information from the lightning detection system display as the sole basis for hazardous weather avoidance Range limitations and interfere...

Page 126: ...Cell and Strike Softkeys are displayed Press the Cell Softkey to display CELL data or press the Strike Softkey to display STRIKE data CELL or STRIKE is displayed in the mode box located in the upper r...

Page 127: ...sion the weather information shown by the data link weather product may be older than the indicated weather product age WEATHER PRODUCT AGE The weather product age is shown automatically for weather p...

Page 128: ...n Time Minutes City Forecast 90 Surface Analysis 60 Freezing Levels 120 Winds Aloft 90 County Warnings 60 Cyclone Warnings 60 Icing Potential CIP and SLD 90 Pilot Weather Report PIREP 90 Air Report AI...

Page 129: ...t Rate Minutes METARs 90 5 Pilot Weather Report PIREP 90 10 Winds Aloft 90 10 SIGMETs AIRMETs 60 5 No Radar Coverage no product image 30 2 5 Terminal Aerodrome Forecast TAF no product image 60 10 Temp...

Page 130: ...DATA LINK WEATHER PRODUCTS Viewing the Weather Data Link Page and Changing the Data Link Weather Source If Applicable 1 Turn the large FMS Knob to select the Map Page Group 2 Turn the small FMS Knob t...

Page 131: ...t an option 8 Press the FMS Knob or the CLR Key to return to the Weather Data Link XM Page with the changed settings Selecting a map orientation for the Weather Data Link Page 1 Select the Weather Dat...

Page 132: ...ther legend on the Map Navigation Map Page 1 Select the Map Navigation Map Page 2 Press the Map Opt Softkey 3 Press the Legend Softkey to show the weather legends window 4 When finished press the Lege...

Page 133: ...ayout Softkey 3 Press the WX LGND Softkey to enable disable the weather product age source and icon box display on PFD Maps CONNEXT DATA REQUESTS Manually Requesting Garmin Connext Weather information...

Page 134: ...ress 1 Select the Map Weather Data Link CNXT Page 2 Press the MENU Key 3 With Connext Data Request highlighted press the ENT Key 4 Turn the large FMS Knob to select the Cancel Request field and press...

Page 135: ...weather information on PFD maps 1 Press the Map HSI Softkey 2 Press the NEXRAD Softkey Changing the NEXRAD coverage region 1 Select the Map Weather Data Link XM Page 2 Press the MENU Key 3 Turn the l...

Page 136: ...FIS B Page 1 Select the Map Weather Data Link FIS B Page 2 Press the NEXRAD Softkey Each press cycles though a coverage option as the softkey name changes US RGNL or US RGNL Displaying the FIS B NEXR...

Page 137: ...eather Data Link XM Page 2 Press the Echo Top Softkey Cloud Tops SiriusXM Displaying Cloud Tops information 1 Select the Map Weather Data Link XM Page with the FMS Knob 2 Press the CLD Top Softkey Dat...

Page 138: ...ss the MENU Key 3 With Map Settings highlighted press the ENT Key 4 Turn the small FMS Knob to highlight Weather and press the ENT Key 5 Turn the large FMS Knob to On or Off for the Cell Movement menu...

Page 139: ...the Weather Data Link Page Or 1 Select the Weather Information Page a Turn the large FMS Knob to select the Waypoint Page Group b Press the WX Softkey to select the Weather Information Page 2 Press th...

Page 140: ...t the Map Weather Data Link XM Page 2 Press the More WX Softkey 3 Press the SFC Softkey 4 Press the softkey for the desired forecast time Current 12 HR 24 HR 36 HR or 48 HR The SFC Softkey label chang...

Page 141: ...data display for the VSD 1 Select the Map Navigation Map Page 2 Press the MENU Key 3 With Map Settings highlighted press the ENT Key 4 Turn the small FMS Knob to select VSD and press the ENT Key 5 Tur...

Page 142: ...desired altitude 21 000 feet up to 45 000 feet Press the Next or PREV Softkey to cycle through the altitude softkeys The TURB Softkey label changes to indicate the altitude selection PIREPs and AIREP...

Page 143: ...press the ENT Key The system displays the TFR Information window 5 Press the FMS Knob or the CLR Key to remove the TFR Information window Setting up and customizing TFR data for maps on which TFR data...

Page 144: ...r any circumstances or conditions relieve the pilot s responsibility to see and avoid other aircraft NOTE TIS is available only when the aircraft is within the service volume of a TIS capable terminal...

Page 145: ...affic is now displayed on the map Displaying TIS Traffic on PFD Maps 1 Ensure TIS is operating With the Map Navigation Map displayed press the Map Opt Softkey 2 Press the Traffic Softkey Traffic is no...

Page 146: ...d NOTE If Garmin GTX 345R transponder is installed refer to the Automatic Dependent Surveillance Broadcast ADS B Traffic discussion for more information about ADS B traffic displays Symbol Description...

Page 147: ...with ADS B directional information Pointed end indicates direction of travel Ground traffic is only displayed when ADS B is in Surface SURF Mode or own aircraft is on the ground Non aircraft ground t...

Page 148: ...oftkeys Above Displays Other Non Threat and Proximity Advisory traffic from 9900 feet above the aircraft to 2700 feet below the aircraft Typically used during climb phase of flight Normal Displays Oth...

Page 149: ...Press the MENU Key 3 With Map Settings highlighted press the ENT Key 4 Turn the small FMS Knob to select the Traffic Group and press the ENT Key 5 Turn the large FMS Knob or press the ENT Key to scrol...

Page 150: ...conditions relieve the pilot s responsibility to see and avoid other aircraft WARNING Do not rely solely upon the display of traffic information to accurately depict all of the traffic information wi...

Page 151: ...ormation Ground traffic is only displayed when ADS B is in Surface SURF Mode or own aircraft is on the ground Non aircraft ground traffic with ADS B directional information Pointed end indicates direc...

Page 152: ...ct one of the following softkeys Above Displays Other Non Threat and proximity traffic from 9900 feet above the aircraft to 2700 feet below the aircraft Typically used during climb phase of flight Nor...

Page 153: ...to the Map Traffic Map Page Showing Additional Traffic Information 1 Select the Map Traffic Map Page 2 Press the FMS Knob A cyan border appears on the first selected traffic symbol Additional informa...

Page 154: ...led terrain database coverage area NOTE Terrain and obstacle alerting is not available north of 89 North latitude and south of 89 South latitude This is due to limitations present within the Terrain d...

Page 155: ...o select the Map Group and press the ENT Key 5 Turn the large FMS Knob or press the ENT Key to scroll through product selections Terrain Display Enables the display of relative REL terrain data or sel...

Page 156: ...SVT or TAWS B Page Showing hiding aviation information on the terrain page 1 Press the MENU Key 2 Turn the FMS Knob to highlight Show Aviation Data or Hide Aviation Data choice dependent on current s...

Page 157: ...ld default ROL Pitch Hold default PIT AP Key Roll Hold default ROL Pitch Hold default PIT CWS Button Roll Hold default ROL Pitch Hold default PIT GA Button Go Around GA Go Around GA ALT Key Roll Hold...

Page 158: ...y VS nnnn fpm Flight Level Change Maintains the current aircraft airspeed while the aircraft is climbing descending to the Selected Altitude FLC Key FLC nnn kt Level Commandspitchanglenecessarytoestab...

Page 159: ...Target Altitude Capture Captures the Vertical Navigation VNV Target Altitude ALTV Glidepath Captures and tracks the SBAS or Baro VNAV glidepath on approach APR Key GP Glideslope Captures and tracks t...

Page 160: ...ld Vertical Speed Flight Level Change Vertical Path Tracking or an altitude capture mode is active airspeed is monitored by the flight director Overspeed protection is provided to limit the flight dir...

Page 161: ...two knots USP Airspeeds Altitude Critical Modes 172 182 206 KIAS KIAS KIAS All Flap All Flap All Flap MINSPD Alert Appears 60 61 61 Altitude Critical USP Activation 60 Stall Warning Stall Warning USP...

Page 162: ...ved from the trim motor Power is also removed from all primary servo motors and engaged solenoids Note the visual and aural alerting indicating autopilot disconnect 3 Retrim the aircraft as needed Sub...

Page 163: ...the autopilot s automatic trim to run resulting in an out of trim condition or cause the trim to hit the stop if the action is prolonged In this case larger than anticipated control forces are requir...

Page 164: ...eference Guide for the Cessna NAV III 190 02178 02 Rev A 138 AFCS Flight Instruments EIS Nav Com XPDR Audio Flight Management Hazard Avoidance AFCS Additional Features Abnormal Operation Annun Alerts...

Page 165: ...the DCLTR Softkey twice removes VOR station ID the VOR symbol and intersection names if within the airport plan view Pressing the DCLTR Softkey a third time removes the airport runway layout unless t...

Page 166: ...le viewing the Navigation Map Page Nearest Airport Page or Flight Plan Page select the Charts Softkey Or 1 Press the MENU Key to display the Page Menu 2 Turn the large FMS Knob to scroll through the O...

Page 167: ...all FMS Knob to change the percentage value The percentage value is the day night crossover point based on the percentage of backlighting intensity For example if the value is set to 15 the day night...

Page 168: ...til Info 2 is displayed SIRIUSXM RADIO ENTERTAINMENT The XM Radio Page provides information and control of the audio entertainment features of the SiriusXM Satellite Radio Selecting the XM Radio Page...

Page 169: ...1 Select the Category Softkey on the XM Radio Page 2 Select the CAT and CAT Softkeys to cycle through the categories Or Turn the small FMS Knob to display the Categories list Highlight the desired cat...

Page 170: ...key to mute the audio Select the Mute Softkey again to unmute the audio SATELLITE TELEPHONE Disabling enabling telephone and low speed data services 1 Turn the large FMS Knob on the MFD to select the...

Page 171: ...ormal Operation Annun Alerts Appendix Index Internal Phone External Phone Description Phone is ringing Phone has a dial tone off hook or connected to another phone Phone dialed is busy Phone is dialin...

Page 172: ...shed through the FMS Knob on the MFD 7 Press the ENT Key The cursor moves to the Email field 8 Enter the desired email address Entry can be accomplished through the FMS Knob on the MFD 9 Press the ENT...

Page 173: ...oftkey will extinguish the pop up window and leave the call unanswered Pressing the Phone Softkey will display the Aux Telephone Page al lowing additional call information to be viewed before answerin...

Page 174: ...NT Key OK is highlighted 7 Press the ENT Key The system will begin calling the number To exit the call press the Hangup Softkey Making an external call from the cockpit by using the Contact List 1 Pre...

Page 175: ...ing an external call on the Iridium satellite network 4 Press the ENT Key OK is now highlighted 5 Press the ENT Key again to place the call Viewing the Text Messaging Page 1 Turn the large FMS Knob on...

Page 176: ...Enable New Message Popups 3 Press the ENT Key The pop up alert will not be displayed when an incoming text message is received Replying to a text message While viewing the text message press the Reply...

Page 177: ...ed 4 The cursor is displayed in the Title field Enter the desired message title using a combination of the FMS Knob or softkeys on the MFD The FMS Knob is used to enter letters and numbers or numbers...

Page 178: ...ters can be accessed by pressing the Symbols Softkey 3 Press the ENT Key The cursor is now displayed in the Message field 4 Press the Predefined Softkey The Predefined Message Menu Window is displayed...

Page 179: ...ob to activate the cursor 3 Turn either FMS Knob to select the desired message 4 Press the VIEW Softkey Or Press the ENT Key Message content is displayed 5 To close the text message press the Close So...

Page 180: ...rting automatically reset to the original timer value once the message is displayed When power is cycled all messages are retained until deleted and message timer countdown is resumed Entering a sched...

Page 181: ...3 Turn the large FMS Knob to highlight the name field of the scheduler message to be deleted 4 Press the CLR Key to clear the message text If the CLR Key is pressed again the message is restored 5 Pre...

Page 182: ...SurfaceWatch Setup Page 2 Press the FMS Knob momentarily to activate the flashing cursor 3 Turn the large FMS Knob if necessary to highlight the REQD Takeoff DIS or REQD Landing DIS field 4 Use the F...

Page 183: ...s displayed Enabling Disabling Flight Plan Importing from Garmin Pilot 1 While viewing the Connext Setup Page press the FMS Knob to activate the cursor 2 Turn the large FMS Knob to place the cursor in...

Page 184: ...he optional checklist functions are displayed on two levels of softkeys that are available on any MFD page The MFD is able to display optional electronic checklists which allow a pilot to quickly find...

Page 185: ...GO TO NEXT CHECKLIST will be highlighted by the cursor 9 Press the ENT Key to advance to the next checklist 10 Press the EXIT Softkey to exit the Checklist Page and return to the page last viewed Imme...

Page 186: ...deo 1 Turn the large FMS Knob to select the Aux page group 2 Turn the small FMS Knob to select Video and display the Aux Video Page Selecting video menu options 1 While viewing the Aux Video Page pres...

Page 187: ...deo display magnification between 1x and 10x The RANGE Knob can be used to increase or decrease the range setting on the map display or zoom in and out on the video display While in the Split Screen m...

Page 188: ...th ESP reference Without ESP reference ESP engages when the aircraft exceeds one or more conditions beyond the normal flight envelope pitch roll VNE or impending stall Enhanced stability for each cond...

Page 189: ...yengagedwiththeflightdirectorinLevelMode bringingtheaircraft into level flight An aural Engaging Autopilot alert is played and the flight director mode annunciation will indicate LVL for vertical and...

Page 190: ...de decreases The applied force is intended to encourage pilot input that returns the airplane to a more normal roll attitude As roll attitude decreases ESP will disengage at 30 ESP is automatically di...

Page 191: ...isengagement Angle 14 12 17 ESP Pitch Protection by Aircraft Model HIGH AIRSPEED PROTECTION Exceeding Vne will result in ESP applying force to raise the nose of the aircraft When the high airspeed con...

Page 192: ...e Guide for the Cessna NAV III 190 02178 02 Rev A 166 Additional Features Flight Instruments EIS Nav Com XPDR Audio Flight Management Hazard Avoidance AFCS Additional Features Abnormal Operation Annun...

Page 193: ...ssing the DISPLAY BACKUP Button on the audio panel NOTE The Pilot s Operating Handbook POH always takes precedence over the information found in this section ABNORMAL COM OPERATION When a COM tuning f...

Page 194: ...formation Window Wind Data Selected Heading Box Selected Course Box Transponder Status Box System Time PFD Setup Menu Windows displayed in the lower right corner of the PFD Timer References Nearest Ai...

Page 195: ...time a GPS NAV LOST alert message appears on the PFD Normal navigation using GPS SBAS source data resumes automatically once a valid GPS solution is restored It is important to note that estimated na...

Page 196: ...is displayed as yellow text on the display to denote degraded navigation source information This data includes the following Navigation Status Box fields except Active Leg TAS and DTK GPS Bearing Poi...

Page 197: ...windows associated with the failed data Refer to the Pilot s Operating Handbook POH for additional information regarding pilot responses to these annunciations System Annunciation Comment Air Data Att...

Page 198: ...computer Display system is not receiving vertical speed input from the air data computer Display system is not receiving valid heading input from the AHRS or magnetometer Display system is not receivi...

Page 199: ...s of communication between the system and the CO Guardian RELATIVE POINT OBSTACLE SYMBOLS AND COLORS Unlighted Obstacle Lighted Obstacle Obstacle Location 1000 AGL 1000 AGL 1000 AGL 1000 AGL Red obsta...

Page 200: ...AND COLORS Unlighted Wind Turbine Obstacle Lighted Wind Turbine Obstacle Wind Turbine Obstacle Location Red obstacle is above or within 100 ft below the aircraft altitude Yellow obstacle is between 10...

Page 201: ...educed Required Line Clearance RLC Warning Wire Wire ImminentTerrain Impact Warning ITI Warning Terrain Terrain Reduced Required Obstacle ClearanceWarning ROC Warning Obstacle Obstacle Imminent Obstac...

Page 202: ...one Terrain System Test OK Terrain Alerting Inhibited None None No GPS position NO GPS POSITION Terrain System Not Available Excessively degraded GPS signal or Out of database coverage area None Terra...

Page 203: ...ced Required Terrain Clearance Warning RTC Terrain Terrain Pull Up Pull Up Imminent Line Impact Warning ILI Wire Ahead Pull Up Pull Up Reduced Required LIne Clearance Warning RLC Wire Wire Pull Up Pul...

Page 204: ...Up Alert Aural Message Required Reduced Line Clearance Impact Caution RLC Caution Wire Caution Wire Imminent Line Clearance Impact Caution ILI Wire Ahead Wire Ahead Reduced Required Obstacle Clearanc...

Page 205: ...st pass None None TAWS System Test OK TAWS B FLTA Alerting Inhibited None None No GPS position NO GPS POSITION TAWS Not Available Excessively degraded GPS signal or Out of database coverage area None...

Page 206: ...a stream FAILED The transponder has failed UNAVAILABLE TIS is unavailable or out of range Contact a service center or Garmin dealer for corrective action TIS MODES AND STATUS ANNUNCIATIONS Traffic Map...

Page 207: ...X XX System cannot determine bearing of Traffic Advisory Annunciation indicates distance in nm altitude separation in hundreds of feet and altitude trend arrow climbing descending AGE MM SS Appears i...

Page 208: ...c System Failed FAIL TAS FAILURE ANNUNCIATIONS Traffic Map Page Center Annunciation Description NO DATA Data is not being received from the TAS unit DATA FAILED Data is being received from the TAS uni...

Page 209: ...g incorrectly formatted data NO TRFC DATA Data is not being received from the TAS unit Shown as symbol on Traffic Map Page Shown in center of Traffic Map Page ADS B MODES ADS B Mode Traffic Mode Annun...

Page 210: ...ncorrect data format received from the traffic unit ADS B TRAFFIC STATUS ANNUNCIATIONS Traffic Status Banner Annunciation Description TA OFF SCALE A Traffic Advisory is outside the selected display ra...

Page 211: ...ilable but it does not meet performance require ments Fault Traffic application is not available Required input data is not available or the application has failed Not Configured Traffic application i...

Page 212: ...XM Radio Page MFD Acquiring channel audio or information OFF AIR XM Radio Page MFD Channel not in service XM Radio Page MFD Missing channel information WEATHER DATA LINK FAILED Weather Datalink Page...

Page 213: ...a non runway e g a taxiway AFCS ALERTS Condition Annunciation Description Aileron Mistrim Right AIL Roll servo providing sustained force in the indicated direction Aileron Mistrim Left AIL Elevator M...

Page 214: ...escended below the preset barometric minimum descent altitude Vertical track The aircraft is one minute from Top of Descent Issued only when vertical navigation is enabled Traffic Played when a Traffi...

Page 215: ...one mile One Mile through Ten Miles or More than ten miles Played to indicate distance of traffic from own aircraft Airspeed Underspeed condition is impending or active Only applicable to aircraft eq...

Page 216: ...S Annunciation Window Text Audio Alert PROP HEAT None SYSTEM MESSAGE ADVISORIES Message Comments ABORT APR Loss of GPS navigation Abort approach Abort approach due to loss of GPS navigation ADC1 ALT E...

Page 217: ...S1 SERVICE AHRS1 Magnetic field model needs update The 1 AHRS earth magnetic field model is out of date Update magnetic field model when practical AHRS1 TAS AHRS1 not receiving airspeed The 1 AHRS is...

Page 218: ...led The system should be serviced CO DET SRVC The carbon monoxide detector needs service A failure in the carbon monoxide detector has been detected The detector may still be available The system shou...

Page 219: ...be usable The system should be serviced when possible COM1 TEMP COM1 over temp Reducing transmitter power The system has detected an over temperature condition in COM1 The transmitter operates at red...

Page 220: ...are correct and up to date DB CHANGE Database changed Verify stored airways This occurs when a stored flight plan contains an airway that is no longer consistent with the navigation database This ale...

Page 221: ...sagreement has been detected in a DME receiver Check position sensors FAILED PATH A data path has failed A data path connected to the GDU or the GIA 63W has failed FPL TRUNC Flight plan has been trunc...

Page 222: ...d GDL 69 69A SXM configuration settings do not match those of backup configuration memory The system should be serviced GDL69 FAIL GDL 69 has failed A failure has been detected in the GDL 69 69A or G...

Page 223: ...ication halted The 1 GEA 71 has incorrect software installed The system should be serviced GEO LIMITS AHRS1 too far North South no magnetic compass The aircraft is outside geographical limits for appr...

Page 224: ...ld be serviced GIA2 COOLING GIA2 over temperature The GIA2 temperature is too high If problem persists the system should be serviced GIA2 COOLING GIA2 temperature too low The GIA2 temperature is too l...

Page 225: ...ERVICE GPS1 needs service Return unit for repair A failure has been detected in the GPS1 and or GPS2 receiver The receiver may still be available The system should be serviced GPS2 SERVICE GPS2 needs...

Page 226: ...ic variance for geographic locations near the magnetic poles Displayed magnetic course angles may differ from the actual magnetic heading by more than 2 MANIFEST MFD1 software mismatch communication h...

Page 227: ...s missing on the specified LRU MFD1 SERVICE MFD1 needs service Return unit for repair The MFD self test has detected a problem The system should be serviced MFD1 KEYSTK MFD1 key name is stuck A key is...

Page 228: ...m should be serviced NAV2 SERVICE NAV2 needs service Return unit for repair A failure has been detected in the NAV2 receiver The receiver may still be available The system should be serviced NON MAGNE...

Page 229: ...MFD1 CARD 2 REM Card 2 was removed Reinsert card The SD card was removed from the bottom card slot of the specified PFD or MFD The SD card needs to be reinserted PFD1 or MFD1 CARD 1 ERR Card 1 is inv...

Page 230: ...ect NAV on CDI for approach The system notifies the pilot to set the CDI to the correct NAV receiver Set the CDI to the correct NAV receiver SLCT NON MAG Select alternate NAV ANGLE display units The s...

Page 231: ...errain Awareness DB resolution too low TAWS is disabled because a terrain database of sufficient resolution is not currently installed TIMER EXPIRD Timer has expired The system notifies the pilot the...

Page 232: ...n detected in the 1090 receiver XPDR1 ADS B FAIL Transponder XPDR1 is unable to transmit ADS B messages ADS B is inoperative The transponder may not be receiving a valid GPS position Other transponder...

Page 233: ...XPDR1 OVER TEMP Transponder Transponder over temp The system has detected an over temperature condition in XPDR1 The transmitter operates at reduced power If the problem persists the system should be...

Page 234: ...ystem have been modified No flight plan files found to import The SD card contains no flight plan data Flight plan import failed Flight plan data was not successfully imported from the SD card File co...

Page 235: ...t all the user waypoints on the SD card have been imported Any flight plan user waypoints that were not imported are locked in the flight plan The flight plan must be edited within the system before i...

Page 236: ...Guide for the Cessna NAV III 190 02178 02 Rev A 210 Annunciations Alerts Flight Instruments EIS Nav Com XPDR Audio Flight Management Hazard Avoidance AFCS Additional Features Abnormal Operation Annun...

Page 237: ...of the display window CAS Up Scroll up list of CAS messages CAS Down Scroll down list of CAS messages Map HSI Displays the PFD Map display settings softkeys Layout Displays the PFD Map selection soft...

Page 238: ...rmation based on weather data source selection on the PFD Map LTNG Off Disables lightning function on PFD Map The softkey annunciator is green when the lightning function is off Datalink Selects the d...

Page 239: ...formation ADF frequency and Off ALT Units Displays softkeys to select altitude unit parameters Meters When enabled displays altimeter in meters IN Press to display the BARO setting as inches of mercur...

Page 240: ...on Identification SPI pulse for 18 seconds identifying the transponder return on the ATC screen TMR REF Displays Timer References Window Nearest Displays Nearest Airports Window Alerts or Message Disp...

Page 241: ...ity in 1 gallon increments 10 GAL Press to increase remaining fuel quantity in 10 gallon increments 35 GAL Sets remaining fuel to 35 gallons 53 GAL Sets remaining fuel to 53 gallons Map Opt Displays t...

Page 242: ...ltitude airways are displayed HI Only high altitude airways are displayed STRMSCP Displays Stormscope information on Navigation Map optional NEXRAD Displays XM NEXRAD weather and coverage on Map Navig...

Page 243: ...ure procedure chart STAR Displays standard terminal arrival procedure chart APR Displays approach procedure chart WX Displays weather information NOTAM Displays NOTAM information for selected airport...

Page 244: ...gement and flight planning functions Included is detailed data for way points procedures arrivals departures approaches and airways The navigation da tabase is updated every 28 days The basemap databa...

Page 245: ...18 000 ft and IFR Low designed for navigation below 18 000 ft IFR VFR Charts are updated every 28 days except for Canadian IFR VFR Charts which are updated every 56 days Updated Databases Using a Supp...

Page 246: ...ing displayed A cyan double arrow will appear between the Standby and Active columns to show which Standby databases will be transferred to Active at the next power cycle 9 Verify the correct database...

Page 247: ...select Details using the small FMS Knob and press the ENT Key Press the ENT Key or push the FMS Knob to exit 19 To view database information for an individual display a Turn the large FMS Knob and se...

Page 248: ...connected to the FS510 and is not connected to another WiFi source the mobile device should connect automatically to the FS510 If the mobile device is connected to anotherWiFi source i e hangar wifi...

Page 249: ...he mobile device Enter the password shown in the Password Field of the Aux Connext Setup Page 12 Database update progress may be monitored on the mobile device 13 When the transfer is complete a scree...

Page 250: ...e large FMS Knob and select Aux b Turn the small FMS Knob and select System Status c Press the Display Database Selection Softkey MFD1 DB PFD1 DB PFD2 DB to show database information for each display...

Page 251: ...to be loaded from the mobile device pressing the Stby Actv Softkey will again display the current Standby and Active databases 11 The Aux Databases Page will show the databases connected to the mobile...

Page 252: ...softkey on MFD display to acknowledge the startup screen f Turn the large FMS Knob and select Aux g Turn the small FMS Knob and select Databases h Verify that the standby databases transferred and ar...

Page 253: ...ll FMS Knob to select Delete Databases 3 Press the ENT Key 4 A prompt will appear to confirm deletion of all internal databases Push the ENT Key 5 Another prompt will appear to confirm deletion of all...

Page 254: ...on database MV DB is included with the navigation database At startup the system compares this version of the MV DB with that presently being used by the ADAHRS If the system determines the MV DB need...

Page 255: ...proach Service Levels 88 Arrival procedure 85 Arrivals 85 86 87 Removing 86 Audio panel controls NAV1 NAV2 32 Automatic Flight Control System AFCS Overpowering the Autopilot 137 Auxiliary video 160 B...

Page 256: ...ting a Flight Plan 73 Map 57 Flight Stream 156 FliteCharts 139 140 Fly by Waypoint 62 Fly over Waypoint 61 Frequency Transfer 32 Fuel Calculations 27 Quantity 29 Range Ring 28 Fuel Flow Indicator 13 1...

Page 257: ...Digital SD card 158 SiriusXM Weather Icing 116 Softkeys 212 EIS 214 Split Screen 57 Standby navigation database 220 Stormscope lightning data 100 Strike mode 100 Surface Analysis 114 SVT 9 Synthetic...

Page 258: ...dex 4 Flight Instruments EIS Nav Com XPDR Audio Flight Management Hazard Avoidance AFCS Additional Features Abnormal Operation Annun Alerts Appendix Index Video 160 VNV 168 VNV guidance Enabling 76 W...

Page 259: ......

Page 260: ...66062 U S A Garmin AT Inc 2345 Turner Road SE Salem OR 97302 U S A Garmin Europe Ltd Liberty House Hounsdown Business Park Southampton Hampshire SO40 9LR U K Garmin Corporation No 68 Zhangshu 2nd Roa...

Reviews: