Chapter 12
12-6
- Press [Additional Functions (*)] key.
- Press 2 and 8 of the numeric keys at the same time.
- Press [Additional Functions (*)] key. => SERVICE MODE LEVEL1
A-2. Initialize e-RDS
- Select (touch) [COPIER] > [Function] > [CLEAR] > [ERDS-DAT] on the Touch Panel Display.
A-3. Display Menu screen of e-RDS
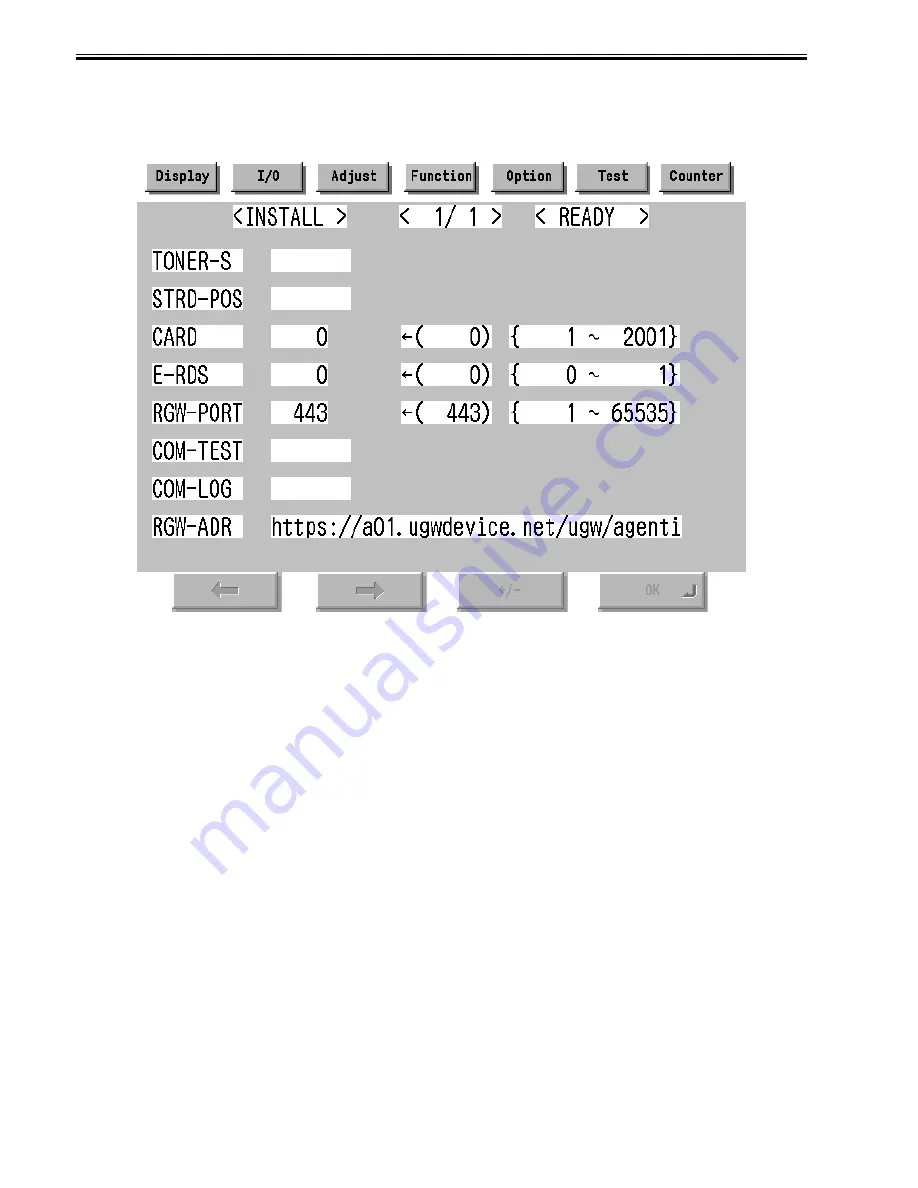
- Select (touch) [COPIER] > [Function] > [INSTALL] => Menu screen
F-12-4
B. Set 1 in [E-RDS].
C. Input the URL of UGW in [RGW-ADR]. (Select the input area to shift to the keyboard screen, and Input URL.)
D. Input the port number of UGW in [RGW-PORT].
E. Select [COM-TEST] and push [OK] button to start the communication test with UGW.
F. While the result is "NG!", repeat to correct the setting and try [COM-TEST] until the result becomes "OK!". You need checking the setting of the network of the
device and the connection of the network if necessary.
Notes: In the environment with the proxy server, you should set the proxy server. Refer to the proxy setting in the network guide of the device for details.
12.1.12 Trouble shoot
0011-6842
iR7105 / iR7095 / iR7086 / iR7095P
1-1
Q. There is no setting item.
A. Confirm the network setting.
Confirm the model
1-2
Q. The communication test fails.
A. Confirm the firmware version.
Confirm the network setting.
Confirm the communication test result.
12.1.13 Error message
0011-6843
iR7105 / iR7095 / iR7086 / iR7095P
Error information displayed in "Log list screen" or "Log detailed screen" is as follows.
Notes: Only the first part of error information is displayed in "Log list screen". Maximum length of error information in "Log detailed screen": 128 characters (not
include NULL)
When the communication test is not completed end e-RDS is 1 (ON), following string is displayed:
"SUSPEND: Communication test is not performed."
Summary of Contents for iR7086
Page 1: ...Sep 7 2007 Service Manual iR7105 7095 7086 Series...
Page 2: ......
Page 6: ......
Page 26: ...Contents...
Page 27: ...Chapter 1 Introduction...
Page 28: ......
Page 30: ......
Page 32: ...Chapter 1 1 2 Not all products are necessarily available in all sales areas...
Page 55: ...Chapter 2 Installation...
Page 56: ......
Page 150: ......
Page 151: ...Chapter 3 Basic Operation...
Page 152: ......
Page 154: ......
Page 159: ...Chapter 4 Main Controller...
Page 160: ......
Page 162: ......
Page 183: ...Chapter 5 Original Exposure System...
Page 184: ......
Page 228: ......
Page 229: ...Chapter 6 Laser Exposure...
Page 230: ......
Page 232: ......
Page 238: ...Chapter 6 6 6 F 6 7 1 Laser light 2 Laser shutter 1 2 1 2 2 1...
Page 240: ......
Page 241: ...Chapter 7 Image Formation...
Page 242: ......
Page 246: ......
Page 294: ......
Page 295: ...Chapter 8 Pickup Feeding System...
Page 296: ......
Page 300: ......
Page 353: ...Chapter 9 Fixing System...
Page 354: ......
Page 378: ......
Page 379: ...Chapter 10 External and Controls...
Page 380: ......
Page 384: ......
Page 394: ...Chapter 10 10 10 F 10 7...
Page 417: ...Chapter 11 MEAP...
Page 418: ......
Page 420: ......
Page 466: ......
Page 467: ...Chapter 12 RDS...
Page 468: ......
Page 470: ......
Page 479: ...Chapter 13 Maintenance and Inspection...
Page 480: ......
Page 482: ......
Page 496: ......
Page 497: ...Chapter 14 Standards and Adjustments...
Page 498: ......
Page 526: ......
Page 527: ...Chapter 15 Correcting Faulty Images...
Page 528: ......
Page 530: ......
Page 560: ......
Page 561: ...Chapter 16 Self Diagnosis...
Page 562: ......
Page 564: ......
Page 584: ......
Page 585: ...Chapter 17 Service Mode...
Page 586: ......
Page 588: ...Contents 17 8 1 1 COPIER Items 17 94...
Page 688: ......
Page 689: ...Chapter 18 Upgrading...
Page 690: ......
Page 692: ......
Page 696: ...Chapter 18 18 4...
Page 713: ...Chapter 18 18 22 formatting and download the system software once again...
Page 726: ...Chapter 19 Service Tools...
Page 727: ......
Page 729: ......
Page 733: ......
Page 734: ...Sep 7 2007...
Page 735: ......


