


Chapter 2
2-1
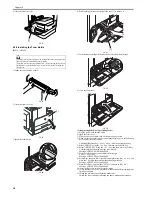
2.1 Making Pre-Checks
2.1.1 Selecting the Site of Installation
0017-5507
iR2022i / iR2025 / iR2030 / iR2018 / iR2022 / iR2018i
Select the site of installation against the following requirements; if possible, visit the user's before delivery of the machine:
1) There must be a power outlet properly grounded and rated as indicated (-/+10%) for exclusive use by the machine.
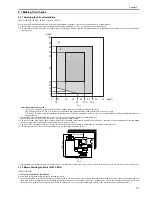
2) The environment of the room must be as indicated in the following diagram, and the machine must not be installed near a water faucet, water boiler, humidifier,
or refrigerator:
F-2-1
<Environmental zone assured>
[A]: Zone A: Satisfies all the conditions of the standard image quality and paper feed performance.
[B]: Zone B: Inferior to Zone A in terms of the standard image quality and paper feed performance, or may not apply.
[C]: Zone C: Problems associated with safety, malfunctions, or incorrect message display do not occur, but image quality and paper feed performance are
not guaranteed.
3) The machine must not be installed near a source of fire or in an area subject to dust or ammonium gas.
If the area is exposed to direct rays of the sun, provide curtains to the window.
4) The level of ozone generated by the machine will not affect the health of individuals around it. Some, however, may find its odor unpleasant as while remaining
in contact with it for long hours. Be sure that the room is well ventilated.
5) The floor of the machine must be level so that the feet of the machine will remain in contact and the machine will remain level.
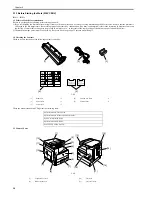
6) The machine must be at least 10 cm away from any wall, permitting unobstructed use.
F-2-2
7) The machine must be placed in a well ventilated area. It is important to make sure, however, that the machine is not near the air vent (for suction) of the room.
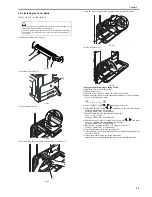
2.1.2 Before Starting the Work (230V CENV)
0017-7145
iR2022i / iR2018i
1-1 Points to Make Before Installation
Be sure to go through the following before starting the work:
1) If you are installing the machine after moving it from a cold to warm location, be sure to leave the machine unpacked for at least 2 hours so that the machine is
fully used to the site temperature, thus avoiding image faults caused by condensation. (The term "condensation" refers to the formation of droplets of water on
the surface of a metal object brought in from a cold to warm place, i.e., as the result of the rapid cooling of the moisture (vapor) around the object.)
100
(%RH)
(degC)
90
85
75
70
50
20
25
15
10
5
0
10
7.5
23
27.5
32.5
15
20
25
30
35
40
[A]
[B]
[C]
100 mm min.
100 mm min.
1247 mm
1249 mm
Summary of Contents for imageRunner 2022
Page 1: ...Aug 8 2007 Service Manual iR2030 2025 2022 2018 Series ...
Page 2: ......
Page 6: ......
Page 20: ...Contents ...
Page 21: ...Chapter 1 Introduction ...
Page 22: ......
Page 57: ...Chapter 1 1 33 ...
Page 60: ......
Page 61: ...T 1 11 ...
Page 64: ......
Page 65: ...T 1 12 ...
Page 68: ......
Page 69: ...Chapter 2 Installation ...
Page 70: ......
Page 72: ......
Page 125: ...Chapter 2 2 53 ...
Page 126: ......
Page 127: ...Chapter 3 Main Controller ...
Page 128: ......
Page 130: ......
Page 142: ......
Page 143: ...Chapter 4 Original Exposure System ...
Page 144: ......
Page 170: ......
Page 171: ...Chapter 5 Laser Exposure ...
Page 172: ......
Page 174: ......
Page 181: ...Chapter 6 Image Formation ...
Page 182: ......
Page 184: ......
Page 196: ......
Page 197: ...Chapter 7 Pickup Feeding System ...
Page 198: ......
Page 217: ...Chapter 8 Fixing System ...
Page 218: ......
Page 220: ......
Page 234: ......
Page 235: ...Chapter 9 External and Controls ...
Page 236: ......
Page 255: ...Chapter 10 RDS ...
Page 256: ......
Page 258: ......
Page 268: ......
Page 269: ...Chapter 11 Maintenance and Inspection ...
Page 270: ......
Page 272: ......
Page 275: ...Chapter 12 Standards and Adjustments ...
Page 276: ......
Page 278: ......
Page 281: ...Chapter 12 12 3 ...
Page 282: ......
Page 283: ...Chapter 13 Correcting Faulty Images ...
Page 284: ......
Page 286: ......
Page 299: ...F 13 11 F 13 12 1 2 3 4 5 6 7 8 9 10 11 12 13 14 15 16 17 ...
Page 300: ......
Page 301: ...Chapter 14 Self Diagnosis ...
Page 302: ......
Page 304: ......
Page 317: ...Chapter 15 Service Mode ...
Page 318: ......
Page 381: ...Chapter 16 Upgrading ...
Page 382: ......
Page 384: ......
Page 411: ...Chapter 17 Service Tools ...
Page 412: ......
Page 414: ......
Page 417: ...Aug 8 2007 ...
Page 418: ......


