


Chapter 4
4-18
4.4 Parts Replacement Procedure
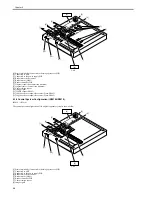
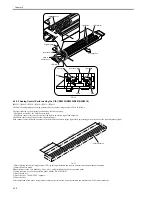
4.4.1 Copyboard glass
4.4.1.1 Removing the Copyboard glass
0017-8452
iR2022i / iR2025 / iR2030 / iR2018 / iR2022 / iR2018i
1) Open the copyboard cover (or ADF).
2) Remove the copyboard glass [1].
- Screws [2], 2 pcs.
- glass retainer [3].
F-4-33
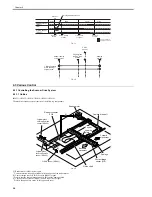
4.4.1.2 Procedure after Replacing the Copyboard Glass
(Model equipped with ADF)
0017-8454
iR2022i / iR2025 / iR2030 / iR2018 / iR2022 / iR2018i
After replacing the copyboard glass, enter the correction values (X, Y, Z) of
the standard white plate which are indicated on the back of the new copy-
board glass in the service mode.
Correction value (X): Service mode>#SCAN>#SCAN NUMERIC>No.213
Correction value (Y): Service mode>#SCAN>#SCAN NUMERIC>No.214
Correction value (Z): Service mode>#SCAN>#SCAN NUMERIC>No.215
Also, rewrite the values on the service label.
F-4-34
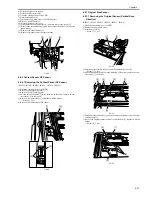
4.4.1.3 Removing the ADF Reading Glass
0017-8455
iR2022i / iR2025 / iR2030 / iR2018 / iR2022 / iR2018i
1) Open the copyboard cover (or ADF).
2) Remove the glass retainer [1].
- Screws [2], 2 pcs
3) Remove the ADF reading glass [3].
F-4-35
F-4-36
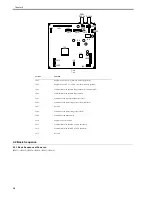
4.4.2 Reader Controller PCB
4.4.2.1 Removing the Reader Controller PCB
0017-8440
iR2022i / iR2025 / iR2030 / iR2018 / iR2022 / iR2018i
1) Detach the rear cover.
2) Open the front cover.
3) Detach the right cover (lower).
When removing the copyboard glass, take care not to touch the following:
- Glass surface
- Standard white plate
Dirt on these parts can show up as white/black lines in the image. If dirt is
found, remove it with lint-free paper moistened with alcohol.
[2]
[3]
[1]
- When removing the ADF reading glass, take care not to touch the glass
surface. Dirt on these parts can show up as white/black lines in the image.
If dirt is found, remove it with lint-free paper moistened with alcohol.
- When installing the ADF reading glass, position the cut portion [1] of the
ADF reading glass sheet at the front-left corner.
8 2 0 6 8 6 6 7 9 3 4 9
c o r r e c t o n
va l u e ( X )
c o r r e c t o n
va l u e ( Y )
c o r r e c t o n
va l u e ( Z )
[3]
[2]
[1]
[1]
Summary of Contents for imageRunner 2022
Page 1: ...Aug 8 2007 Service Manual iR2030 2025 2022 2018 Series ...
Page 2: ......
Page 6: ......
Page 20: ...Contents ...
Page 21: ...Chapter 1 Introduction ...
Page 22: ......
Page 57: ...Chapter 1 1 33 ...
Page 60: ......
Page 61: ...T 1 11 ...
Page 64: ......
Page 65: ...T 1 12 ...
Page 68: ......
Page 69: ...Chapter 2 Installation ...
Page 70: ......
Page 72: ......
Page 125: ...Chapter 2 2 53 ...
Page 126: ......
Page 127: ...Chapter 3 Main Controller ...
Page 128: ......
Page 130: ......
Page 142: ......
Page 143: ...Chapter 4 Original Exposure System ...
Page 144: ......
Page 170: ......
Page 171: ...Chapter 5 Laser Exposure ...
Page 172: ......
Page 174: ......
Page 181: ...Chapter 6 Image Formation ...
Page 182: ......
Page 184: ......
Page 196: ......
Page 197: ...Chapter 7 Pickup Feeding System ...
Page 198: ......
Page 217: ...Chapter 8 Fixing System ...
Page 218: ......
Page 220: ......
Page 234: ......
Page 235: ...Chapter 9 External and Controls ...
Page 236: ......
Page 255: ...Chapter 10 RDS ...
Page 256: ......
Page 258: ......
Page 268: ......
Page 269: ...Chapter 11 Maintenance and Inspection ...
Page 270: ......
Page 272: ......
Page 275: ...Chapter 12 Standards and Adjustments ...
Page 276: ......
Page 278: ......
Page 281: ...Chapter 12 12 3 ...
Page 282: ......
Page 283: ...Chapter 13 Correcting Faulty Images ...
Page 284: ......
Page 286: ......
Page 299: ...F 13 11 F 13 12 1 2 3 4 5 6 7 8 9 10 11 12 13 14 15 16 17 ...
Page 300: ......
Page 301: ...Chapter 14 Self Diagnosis ...
Page 302: ......
Page 304: ......
Page 317: ...Chapter 15 Service Mode ...
Page 318: ......
Page 381: ...Chapter 16 Upgrading ...
Page 382: ......
Page 384: ......
Page 411: ...Chapter 17 Service Tools ...
Page 412: ......
Page 414: ......
Page 417: ...Aug 8 2007 ...
Page 418: ......


