Audio Production System with Optional Networking
INPUT AND OUTPUT PATCHING
Brio 36 desk inputs and outputs can be patched to physical I/O ports or virtual Hydra patchbay ports, or to each
other. To enter the I/O patching screen, tap ‘I/O patching’ in the Show menu.
Patches are made between sources and destinations.
•
A source can be an I/O input port, Hydra patchbay output, or console DSP output from the local Brio console.
•
A destination can be an I/O output port, Hydra patchbay input, or console DSP input from the local Brio console.
Each source can be patched to multiple destinations but a destination can only have one source. When patching an
input port to multiple input channels it is important to remember that phantom power (48 V), input gain and sample rate
conversion are all set within the Hydra2 domain and so altering these controls from any point on the surface will affect that
feed for every instance of it across the surface and across the Hydra2 network.
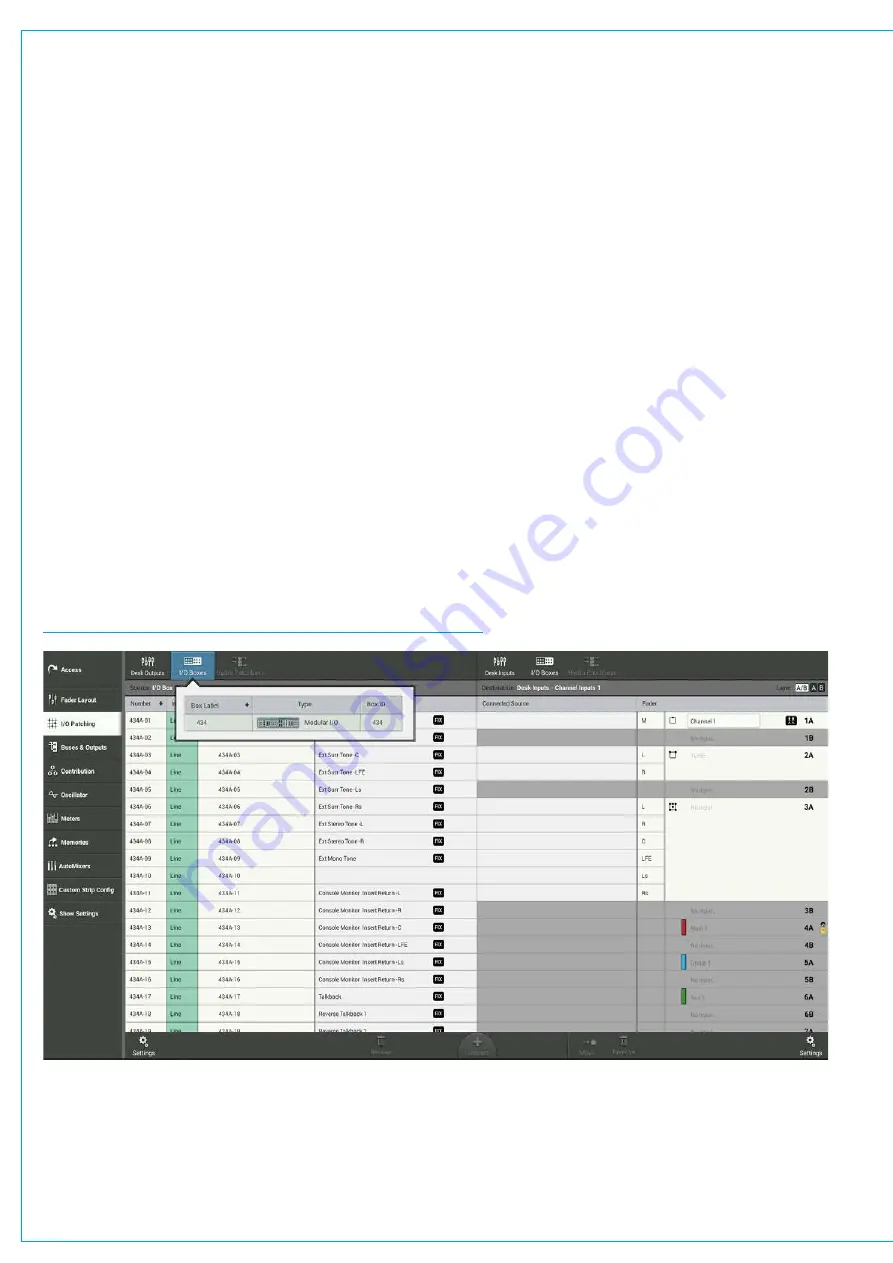
The I/O Patching Screen
The I/O patching screen is split into two halves, sources are displayed on the left and destinations on the right. Each side
has a series of buttons running along the top for you to select which source/destination type you wish to access.
Selecting Sources and Destinations
Tap a source or destination selection button and a pop-up reveals all available options of that type, either as a set of
buttons, or, in the case of I/O boxes, within a sortable table. Tapping to select one of these options, i.e. ‘Aux Outputs’,
populates the source/destination screen with the associated ports.
FIGURE 1 -
I/O PATCHING SCREEN—SELECTING A PORT TYPE
Summary of Contents for BRIO 36
Page 1: ...calrec com Audio Production System with Optional Networking BRIO 36 USER MANUAL V1 1...
Page 12: ...12 BRIO 36 Audio Production System with Optional Networking...
Page 13: ...calrec com BRIO 36 PRODUCT INFORMATION...
Page 20: ...20 BRIO 36 Audio Production System with Optional Networking...
Page 21: ...calrec com BRIO 36 SYSTEM OVERVIEW...
Page 29: ...29 FIGURE 1 BRIO 36 USER INTERFACE DISPLAY...
Page 43: ...calrec com BRIO 36 SETTING UP...
Page 47: ...47 FIGURE 1 SYNCHRONISATION OPTIONS...
Page 67: ...calrec com BRIO 36 GETTING SIGNALS IN AND OUT...
Page 93: ...93 FIGURE 1 THE DIRECT OUTPUT SCREEN...
Page 100: ...100 BRIO 36 Audio Production System with Optional Networking...
Page 101: ...calrec com BRIO 36 PROCESSING...
Page 146: ...146 BRIO 36 Audio Production System with Optional Networking...
Page 147: ...calrec com BRIO 36 MONITORING...
Page 149: ...149 FIGURE 3 EXAMPLE LOUDSPEAKERS SETUP...
Page 155: ...calrec com BRIO 36 METERING...
Page 163: ...calrec com BRIO 36 COMMUNICATIONS...
Page 172: ...172 BRIO 36 Audio Production System with Optional Networking...
Page 173: ...calrec com BRIO 36 ROUTING...
Page 175: ...175 FIGURE 1 CONFIGURING BUSES AND OUTPUTS...
Page 182: ...182 BRIO 36 Audio Production System with Optional Networking...
Page 183: ...calrec com BRIO 36 EXTERNAL INTERFACING...
Page 193: ...calrec com BRIO 36 CONSOLE FACILITIES...
Page 198: ...198 BRIO 36 Audio Production System with Optional Networking...
Page 199: ...calrec com BRIO 36 TERMINOLOGY...
Page 207: ...calrec com BRIO 36 FEATURES BY SOFTWARE VERSION...


