•
Each EQ band has a dedicated on/off switch.
•
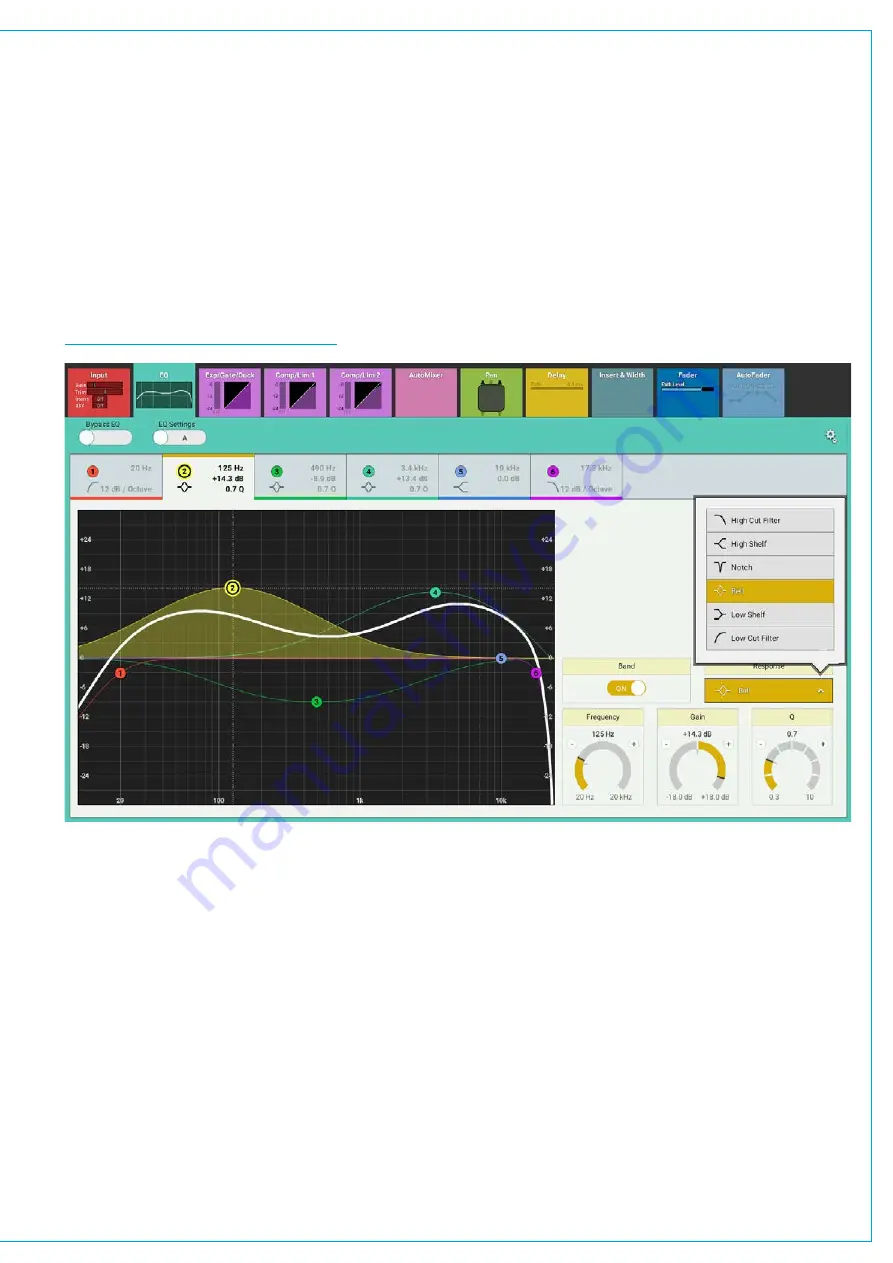
Response: Select the desired EQ response curve for the selected band, from high cut filter, high shelf, notch, bell,
low shelf, low cut filter. See Figure 2
•
Frequency: Sets the frequency that the EQ band is operating around.
•
Gain: Sets the gain increase or reduction for the band.
•
Q: Sets the width of the frequency band for the selected response. The higher the Q, the narrower the bandwidth.
Once a response type is selected, the relevant Frequency/Gain/Q controls become active. There are several ways to
manipulate these controls:
•
Drag up and down or left or right on the touch display to turn the rotary control.
•
Drag the band node up, down, left or right within the EQ graph.
•
Use the context sensitive controls under the touchscreen.
FIGURE 2 -
EQ RESPONSE CONTROLS
Bypass and Alternate EQ
BYPASS in the EQ screen header bypasses the whole EQ module.
The A/B alternate EQ button allows the user to compare two EQ set-ups, simply tap to switch between EQ A and EQ B
and change the parameters within each. Then tap to switch between the two to compare.
EQ Settings
Tapping the cog icon in the top right of the EQ screen header displays three EQ settings options:
•
RESET EQ A AND B
returns all EQ settings to their defaults.
•
COPY EQ A TO EQ B
and
COPY EQ B TO EQ A
allows the user to duplicate EQ settings which can be useful in
auditioning subtle differences in EQ. Modify either EQ A or B, copy these settings to the other EQ module and use
the EQ A/B switching button towards the top right of the EQ screen header to quickly switch between the two.
See Figure 3 on the next page.
Summary of Contents for BRIO 36
Page 1: ...calrec com Audio Production System with Optional Networking BRIO 36 USER MANUAL V1 1...
Page 12: ...12 BRIO 36 Audio Production System with Optional Networking...
Page 13: ...calrec com BRIO 36 PRODUCT INFORMATION...
Page 20: ...20 BRIO 36 Audio Production System with Optional Networking...
Page 21: ...calrec com BRIO 36 SYSTEM OVERVIEW...
Page 29: ...29 FIGURE 1 BRIO 36 USER INTERFACE DISPLAY...
Page 43: ...calrec com BRIO 36 SETTING UP...
Page 47: ...47 FIGURE 1 SYNCHRONISATION OPTIONS...
Page 67: ...calrec com BRIO 36 GETTING SIGNALS IN AND OUT...
Page 93: ...93 FIGURE 1 THE DIRECT OUTPUT SCREEN...
Page 100: ...100 BRIO 36 Audio Production System with Optional Networking...
Page 101: ...calrec com BRIO 36 PROCESSING...
Page 146: ...146 BRIO 36 Audio Production System with Optional Networking...
Page 147: ...calrec com BRIO 36 MONITORING...
Page 149: ...149 FIGURE 3 EXAMPLE LOUDSPEAKERS SETUP...
Page 155: ...calrec com BRIO 36 METERING...
Page 163: ...calrec com BRIO 36 COMMUNICATIONS...
Page 172: ...172 BRIO 36 Audio Production System with Optional Networking...
Page 173: ...calrec com BRIO 36 ROUTING...
Page 175: ...175 FIGURE 1 CONFIGURING BUSES AND OUTPUTS...
Page 182: ...182 BRIO 36 Audio Production System with Optional Networking...
Page 183: ...calrec com BRIO 36 EXTERNAL INTERFACING...
Page 193: ...calrec com BRIO 36 CONSOLE FACILITIES...
Page 198: ...198 BRIO 36 Audio Production System with Optional Networking...
Page 199: ...calrec com BRIO 36 TERMINOLOGY...
Page 207: ...calrec com BRIO 36 FEATURES BY SOFTWARE VERSION...


