Restoring Shows
1. Tap
RESTORE
in the footer of the Shows List and navigate to select the Show to restore.
2. Tap
RESTORE
.
Settings Stored within Shows
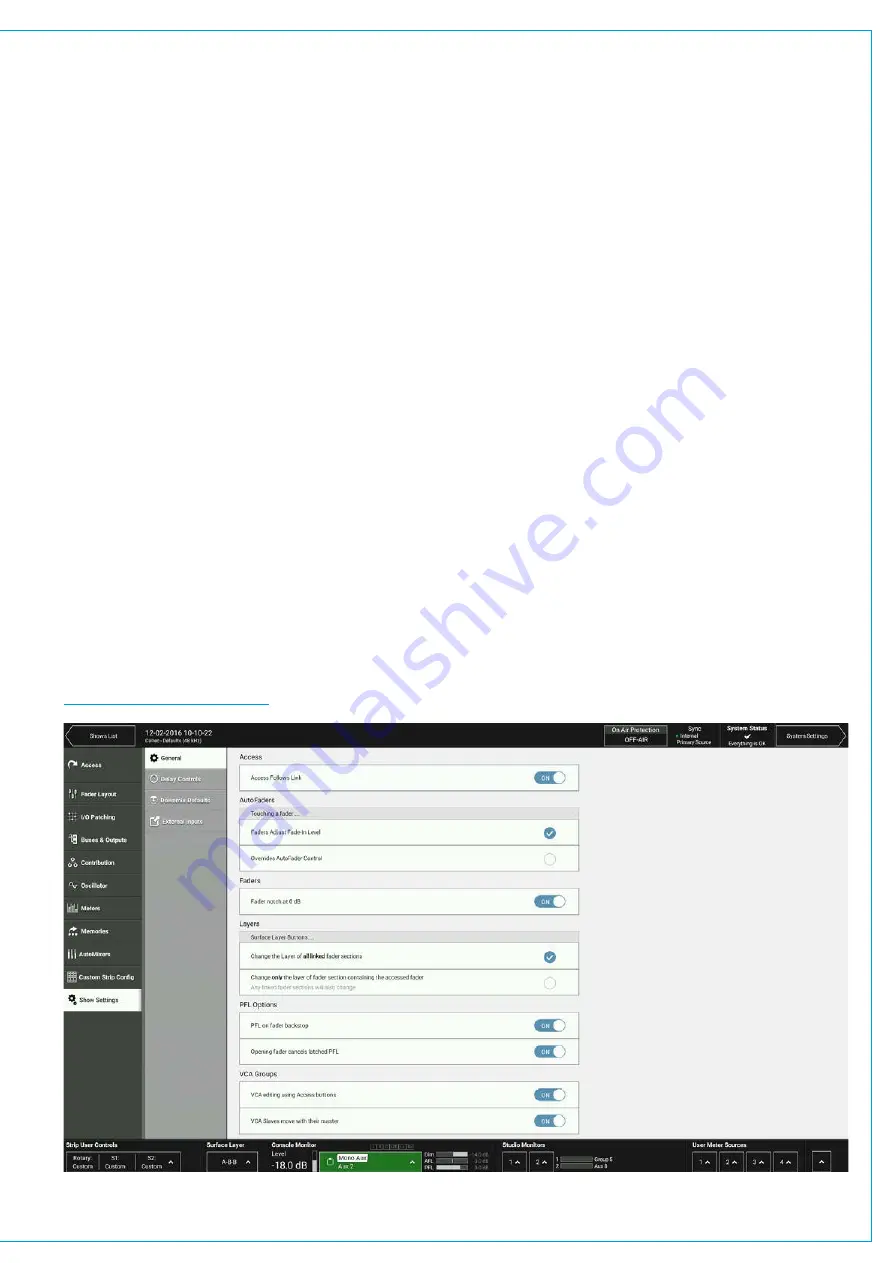
Tap Show Settings within the Show menu on Brio 36’s touch display and the user will see four options: General, Delay
Controls, Downmix and External Inputs.
General Settings:
•
Access Follows Link defaults to on, but when turned off allows the access path to stay where it is when creating a link
using the Access buttons.
•
For AutoFaders touching a fader whilst fading has two options, by default the Fader adjusts the fade-in level or
alternatively it overrides AutoFader Control.
•
By default, a notch can be felt at the ‘0’ point on the fader scale. This can be switched off if required.
•
The surface layer buttons can be set to operate in one of two ways. They either change all linked fader sections or
only the sections which contains the accessed fader, plus any sections which are linked to that section.
•
By default, PFL can be activated momentarily by pulling the fader down below its lowest point, and deactivated once
released. This feature can be switched off for the whole surface.
•
By default, if a fader is closed and it’s PFL is activated, it will be automatically deactivated once the fader is opened.
This feature can be switched off for the whole surface. (See
”PFL, AFL AND OUTPUT LISTEN” on page 153
.
•
VCA groups are generally made and dissolved by pressing fader access buttons but this process can be disabled to
protect all VCA assignments or to stop VCA groups being made accidentally.
•
By default, VCA slave faders move automatically when their levels are changed by their masters. If you would rather,
this functionality can be switched off and instead slaves will remain stationary. Combined master/slave levels will still
be indicated by the nulling indicators in the fader displays. (See
Other settings are explained in the relevant sections:
,
and
FIGURE 6 -
SHOW SETTINGS
Summary of Contents for BRIO 36
Page 1: ...calrec com Audio Production System with Optional Networking BRIO 36 USER MANUAL V1 1...
Page 12: ...12 BRIO 36 Audio Production System with Optional Networking...
Page 13: ...calrec com BRIO 36 PRODUCT INFORMATION...
Page 20: ...20 BRIO 36 Audio Production System with Optional Networking...
Page 21: ...calrec com BRIO 36 SYSTEM OVERVIEW...
Page 29: ...29 FIGURE 1 BRIO 36 USER INTERFACE DISPLAY...
Page 43: ...calrec com BRIO 36 SETTING UP...
Page 47: ...47 FIGURE 1 SYNCHRONISATION OPTIONS...
Page 67: ...calrec com BRIO 36 GETTING SIGNALS IN AND OUT...
Page 93: ...93 FIGURE 1 THE DIRECT OUTPUT SCREEN...
Page 100: ...100 BRIO 36 Audio Production System with Optional Networking...
Page 101: ...calrec com BRIO 36 PROCESSING...
Page 146: ...146 BRIO 36 Audio Production System with Optional Networking...
Page 147: ...calrec com BRIO 36 MONITORING...
Page 149: ...149 FIGURE 3 EXAMPLE LOUDSPEAKERS SETUP...
Page 155: ...calrec com BRIO 36 METERING...
Page 163: ...calrec com BRIO 36 COMMUNICATIONS...
Page 172: ...172 BRIO 36 Audio Production System with Optional Networking...
Page 173: ...calrec com BRIO 36 ROUTING...
Page 175: ...175 FIGURE 1 CONFIGURING BUSES AND OUTPUTS...
Page 182: ...182 BRIO 36 Audio Production System with Optional Networking...
Page 183: ...calrec com BRIO 36 EXTERNAL INTERFACING...
Page 193: ...calrec com BRIO 36 CONSOLE FACILITIES...
Page 198: ...198 BRIO 36 Audio Production System with Optional Networking...
Page 199: ...calrec com BRIO 36 TERMINOLOGY...
Page 207: ...calrec com BRIO 36 FEATURES BY SOFTWARE VERSION...


