Audio Production System with Optional Networking
Assigning AutoFaders to faders
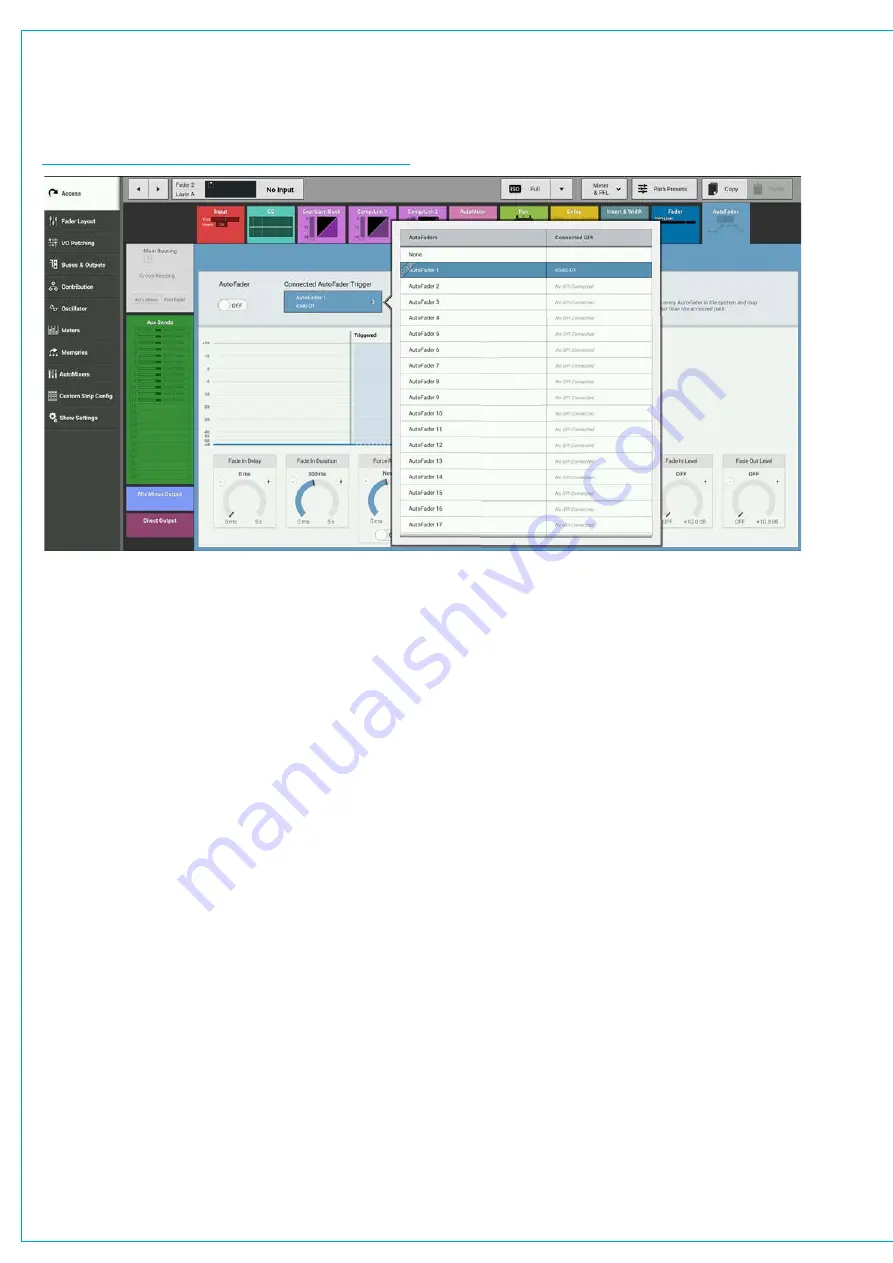
Once the relevant GPIs have been assigned to AutoFaders, the AutoFaders can be assigned to control faders on the
surface. This is done on the Access>AutoFader screen as shown in Figure 3.
FIGURE 3 - ASSIGNING AUTOFADERS TO FADERS
AutoFader levels
When an AutoFader is attached to a fader and is enabled, providing the trigger signal is not present, the fader will go to
the OUT LEVEL complying with the Fade-Out Duration parameter, rather than snapping the audio to the Fade-Out level.
If an AutoFader is enabled, either from path or global enable, for a path whose GPI is currently triggered, the audio should
fade (up or down) to the Fade-In Level (if it is not there already), complying with the Fade-In Duration parameter, rather
than snapping the audio to the Fade-In level. When the trigger signal is present, the fader will follow the settings made on
the Access>AutoFader screen.
AutoFader parameter settings
The AUTOFADER screen allows the settings of the AutoFaders to be configured. The available settings for all the Time
based controls are :
•
0 to 100ms in 10ms steps.
•
100ms to 1s in 100ms steps.
•
1s to 5s in 500ms steps.
The IN and OUT gain level settings are -100dB to +10dB.
Global AutoFader Bypass
At the bottom of the AutoFader screen there is a copy of the Global Bypass button which effectively disables all
AutoFaders.
AutoFader indicators
When an AutoFader is assigned to a fader, the Fader display will show the AutoFader Number and the Meter display
shows when the AutoFader is active.
Summary of Contents for BRIO 36
Page 1: ...calrec com Audio Production System with Optional Networking BRIO 36 USER MANUAL V1 1...
Page 12: ...12 BRIO 36 Audio Production System with Optional Networking...
Page 13: ...calrec com BRIO 36 PRODUCT INFORMATION...
Page 20: ...20 BRIO 36 Audio Production System with Optional Networking...
Page 21: ...calrec com BRIO 36 SYSTEM OVERVIEW...
Page 29: ...29 FIGURE 1 BRIO 36 USER INTERFACE DISPLAY...
Page 43: ...calrec com BRIO 36 SETTING UP...
Page 47: ...47 FIGURE 1 SYNCHRONISATION OPTIONS...
Page 67: ...calrec com BRIO 36 GETTING SIGNALS IN AND OUT...
Page 93: ...93 FIGURE 1 THE DIRECT OUTPUT SCREEN...
Page 100: ...100 BRIO 36 Audio Production System with Optional Networking...
Page 101: ...calrec com BRIO 36 PROCESSING...
Page 146: ...146 BRIO 36 Audio Production System with Optional Networking...
Page 147: ...calrec com BRIO 36 MONITORING...
Page 149: ...149 FIGURE 3 EXAMPLE LOUDSPEAKERS SETUP...
Page 155: ...calrec com BRIO 36 METERING...
Page 163: ...calrec com BRIO 36 COMMUNICATIONS...
Page 172: ...172 BRIO 36 Audio Production System with Optional Networking...
Page 173: ...calrec com BRIO 36 ROUTING...
Page 175: ...175 FIGURE 1 CONFIGURING BUSES AND OUTPUTS...
Page 182: ...182 BRIO 36 Audio Production System with Optional Networking...
Page 183: ...calrec com BRIO 36 EXTERNAL INTERFACING...
Page 193: ...calrec com BRIO 36 CONSOLE FACILITIES...
Page 198: ...198 BRIO 36 Audio Production System with Optional Networking...
Page 199: ...calrec com BRIO 36 TERMINOLOGY...
Page 207: ...calrec com BRIO 36 FEATURES BY SOFTWARE VERSION...


