20
11
2
1
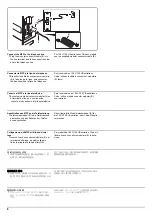
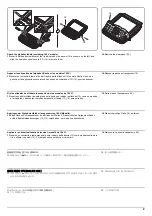
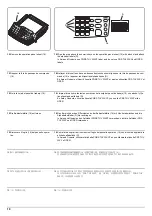
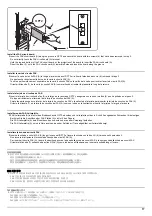
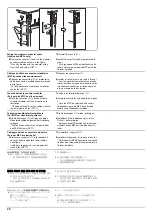
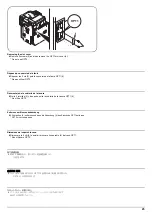
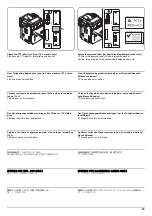
Wiring the modular connector cable
(High-speed MFPs only)
6.
Remove the covers (11) and run the modular
connector cable as shown in the figure.
*Run it by binding with the modular cords
from the Fax System (OPT1).
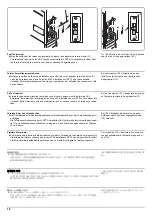
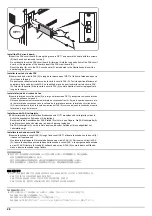
7.
Reinstall the covers (11).
8.
Install the cover (4) which was removed in
step 1.
* For high-speed MFPs with/without the fin-
isher and for medium-speed MFPs with the
finisher installed.
Câblage du câble à connecteur modulaire
(MFP à grande vitesse uniquement)
6.
Déposer les couvercles (11) et implanter le
câble à connecteur modulaire comme illustré
par la figure.
*Le faire passer avec les cordons modulai-
res du fax (OPT1).
7.
Reposer les couvercles (11).
8.
Installer le cache (4) qui a été retiré à l'étape 1.
* Pour les imprimantes multifonction à grande
vitesse avec/sans module de finition et pour les
imprimantes multifonction à vitesse moyenne
avec le module de finition installé.
Tendido del cable conector modular
(Solo para las MFP de alta velocidad)
6.
Quite las cubiertas (11) y tienda el cable
conector modular como se muestra en la
ilustración.
* Tiéndalo uniéndolo con los cables modula-
res del sistema de fax (OPT1).
7.
Vuelva a instalar las cubiertas (11).
8.
Instale la cubierta (4) que se quitó en el paso
1.
* Para los MFP de velocidad alta con/sin
finalizador y para los MFP de velocidad
media con el finalizador instalado.
Verlegung des Modularsteckerkabels
(Nur MFP der Hochleistungsklasse)
6.
Die Abdeckungen (11) entfernen und das
Modularsteckerkabel gemäß der Abbildung
verlegen.
*Führen Sie es zusammen mit dem Kabel
des FAX-Systems (OPT1).
7.
Die Abdeckungen (11) wieder anbringen.
8.
Installieren Sie die Abdeckung (4), die in
Schritt 1 entfernt wurde.
* Bei schnellen MFPs mit/ohne Finisher oder
mittelschnellen MFPs mit installiertem Fin-
isher.
Cablaggio del cavo connettore modulare
(Solo per MFP a velocità alta)
6.
Rimuovere i coperchi (11) e far passare il
cavo connettore modulare come indicato
nella figura.
*Infilarlo collegandolo ai cavi modulari del
modulo fax (OPT1).
7.
Reinstallare i coperchi (11).
8.
Installare il coperchio (4) rimosso al punto 1.
* Per dispositivi MFP di fascia alta con/senza
finisher e per dispositivi di fascia media con
finisher installato.
モジュラーコードの配線
(高速 MFP の場合のみ)
6.
カバー
(11)を取り外し、モジュラーコードを
図のように通す。
※ ファクスシステム (OPT1) のモジュラー
コードと束ねて通す。
7.
カバー
(11)を取り付ける。
8.
手順 1 で取り外したカバー
(4)を取り付け
る。
※ 高速 MFP の場合および中速 MFP にフィ
ニッシャー装着時の場合。
电话线的配线(仅限高速 MFP 时)
6.
拆下盖板(11),将电话线如图所示穿过。
※ 将传真系统(OPT1) 的连接线整理成束。
7.
安装盖板(11)。
8.
安装在步骤 1 中取下的盖板(4)。
※ 对于高速机来说装订器可装可不装,对于
中速机来说要安装。
모듈러 코드의 배선(고속 MFP 의 경우만)
6.
커버(11)를 떼어 내고 모듈러 코드를 그림
과 같이 지나가게 합니다 .
※ 팩스 시스템 (OPT1) 의 모듈러 코드와 묶
어서 실행합니다 .
7.
커버(11)을 장착합니다 .
8.
1 단계에서 분리한 커버 (4) 를 설치합니다 .
※ 피닛셔 장착 및 비장착의 고속 MFP 및 피
닛셔 장착 중속 MFP.
Содержание TASKalfa 3010i
Страница 1: ...SERVICE MANUAL Published in September 2016 842NL11B 2NLSM06B Rev B TASKalfa 3010i TASKalfa 3510i ...
Страница 10: ...This page is intentionally left blank ...
Страница 100: ...2NL 2P8 1 2 76 This page is intentionally left blank ...
Страница 286: ...2NL 2P8 1 3 186 This page is intentionally left blank ...
Страница 443: ...2NL 2P8 1 5 59 This page is intentionally left blank ...
Страница 463: ...2NL 2P8 2 1 18 Figure 2 1 23 Duplex conveying section block diagram EPWB DU_SENS DU_CL_REM YC14 5 YC8 1 DUCL DUS ...
Страница 471: ...2NL 2P8 2 2 8 This page is intentionally left blank ...
Страница 532: ...Installation Guide DP 770 B Document processor DP 772 Document processor Installation Guide ...
Страница 568: ...DP 773 Document processor Installation Guide ...
Страница 594: ...PF 791 500 x 2 Paper feeder Installation Guide ...
Страница 602: ...PF 810 3000 sheet deck Installation Guide ...
Страница 615: ...DF 791 3000 sheet finisher Installation Guide ...
Страница 630: ...DF 770 D 1000 sheet finisher Installation Guide ...
Страница 648: ...AK 740 Bridge unit Installation Guide ...
Страница 650: ...MT 730 B Mailbox Installation Guide ...
Страница 665: ...PH 7A C D Punch unit Installation Guide ...
Страница 686: ...DT 730 B Document tray Installation Guide ...
Страница 731: ...5 2013 5 302LC56750 01 H F G D D 6 4 3 7 E C D D M4 8 M4 8 M4 8 M4 8 ...
Страница 732: ...FAX System W B Installation Guide ...

