12
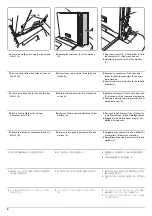
29
28
30
26
27
25
2.
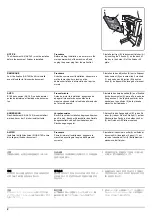
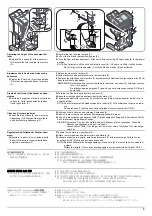
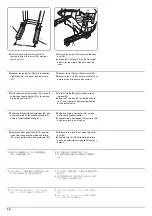
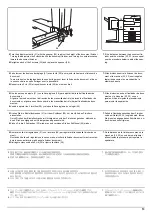
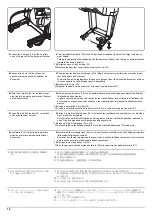
Remove each of the screws (25) and
remove the front foot cover (26) and rear
foot cover (27).
3.
Remove the screw (28) to remove the span-
ner (29).
4.
Loosen the 2 screws (30) on the front right
and on the rear right of the document fin-
isher.
2.
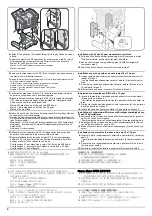
Déposer toutes les vis (25) puis le capot du
pied avant (26) et le capot du pied arrière
(27).
3.
Déposer la vis (28) pour libérer la clé (29).
4.
Desserrer les 2 vis (30) du côté avant droit et
arrière droit du finisseur de document.
2.
Quite cada uno de los tornillos (25) y quite la
cubierta de la pata frontal (26) y la cubierta
de la pata posterior (27).
3.
Quite el tornillo (28) para extraer la llave
inglesa (29).
4.
Afloje los 2 tornillos (30) en los lados dere-
cho frontal y derecho posterior del finaliza-
dor de documentos.
2.
Entfernen Sie sämtliche Schrauben (25) und
nehmen Sie die Vorderfußabdeckung (26)
und die Hinterfußabdeckung (27).
3.
Entfernen Sie die Schraube (28), um den
Schlüssel (29) abzunehmen
4.
Lösen Sie die 2 Schrauben (30) vorne rechts
und hinten rechts am Finisher.
2.
Rimuovere ciascuna delle viti (25) e quindi
rimuovere la copertura del piede anteriore
(26) e la copertura del piede posteriore (27).
3.
Rimuovere la vite (28) per rimuovere la chi-
ave (29).
4.
Allentare le 2 viti (30) sulla parte anteriore
destra e posteriore destra della finisher doc-
umenti.
2.
ビス (25) 各 1 本を外し、フットカバー前
(26)、
フットカバー後 (27) を取り外す。
3.
ビス (28)1 本を外し、スパナー(29) を取り
外す。
4.
ドキュメントフィニッシャー右前と右後の
ビス (30) 各 2 本を緩める。
2.
拆除各 1 颗螺丝 (25),取下前脚座盖板
(26)、后脚座盖板 (27)。
3.
取下螺丝 (28) 以便拆下扳手 (29)。
4.
拧松装订器右前侧与右后侧的各 2 颗螺丝
(30)。
2.
나사 (25) 각 1 개를 빼고 전면 풋커버 (26),
와 후면 풋커버 (27) 를 제거합니다 .
3.
나사 (28) 1 개를 빼고 , 스패너 (29) 를 떼어
냅니다 .
4.
도큐먼트 피니셔 우측 앞과 뒤의 나사 (30)
각 2 개를 느슨하게 합니다 .
Содержание TASKalfa 3010i
Страница 1: ...SERVICE MANUAL Published in September 2016 842NL11B 2NLSM06B Rev B TASKalfa 3010i TASKalfa 3510i ...
Страница 10: ...This page is intentionally left blank ...
Страница 100: ...2NL 2P8 1 2 76 This page is intentionally left blank ...
Страница 286: ...2NL 2P8 1 3 186 This page is intentionally left blank ...
Страница 443: ...2NL 2P8 1 5 59 This page is intentionally left blank ...
Страница 463: ...2NL 2P8 2 1 18 Figure 2 1 23 Duplex conveying section block diagram EPWB DU_SENS DU_CL_REM YC14 5 YC8 1 DUCL DUS ...
Страница 471: ...2NL 2P8 2 2 8 This page is intentionally left blank ...
Страница 532: ...Installation Guide DP 770 B Document processor DP 772 Document processor Installation Guide ...
Страница 568: ...DP 773 Document processor Installation Guide ...
Страница 594: ...PF 791 500 x 2 Paper feeder Installation Guide ...
Страница 602: ...PF 810 3000 sheet deck Installation Guide ...
Страница 615: ...DF 791 3000 sheet finisher Installation Guide ...
Страница 630: ...DF 770 D 1000 sheet finisher Installation Guide ...
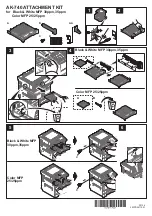
Страница 648: ...AK 740 Bridge unit Installation Guide ...
Страница 650: ...MT 730 B Mailbox Installation Guide ...
Страница 665: ...PH 7A C D Punch unit Installation Guide ...
Страница 686: ...DT 730 B Document tray Installation Guide ...
Страница 731: ...5 2013 5 302LC56750 01 H F G D D 6 4 3 7 E C D D M4 8 M4 8 M4 8 M4 8 ...
Страница 732: ...FAX System W B Installation Guide ...

