24
E
H
3
3
1
2
Procedure
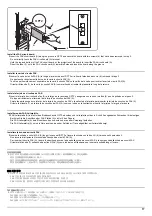
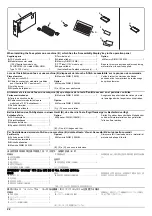
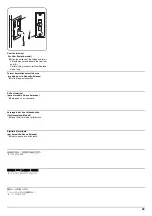
Installing the memory DIMM
1.
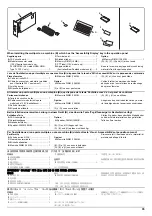
Remove 2 screws (1), and then remove the
cover (2).
2.
Install the memory DIMM (E) or the optional
memory DIMM (H) into the memory slot (3)
on the lower level (FLS).
Install it with the IC side facing down.
Insert it in the direction of the arrow until it
clicks.
3.
Replace the cover (2) using the 2 screws (1).
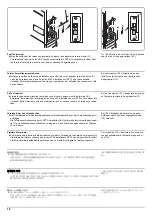
Procédure
Installation de la mémoire DIMM
1.
Déposez les 2 vis (1) puis enlevez le couver-
cle (2).
2.
Installer la mémoire DIMM (E) ou la mémoire
DIMM en option (H) dans la fente mémoire
(3) se trouvant au niveau inférieur (FLS).
L'installer avec le côté IC en bas.
L'insérer dans la direction de la flèche
jusqu'au clic.
3.
Reposez le couvercle (2) à l'aide des 2 vis (1).
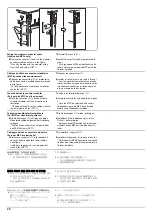
Procedimiento
Instalación de la memoria DIMM
1.
Quite 2 tornillos (1) y, después, desmonte la
cubierta (2).
2.
Instale la memoria DIMM (E), o la memoria
DIMM opcional (H), en la ranura para memo-
ria (3) en el nivel inferior (FLS).
Instálelo con el lado IC hacia abajo.
Insértela en la dirección que indica la flecha
hasta que escuche un clic.
3.
Vuelva a colocar la cubierta (2) utilizando los 2
tornillos (1).
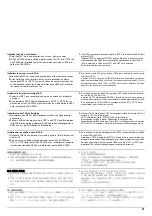
Vorgehensweise
Installation der DIMM-Speichermodule
1.
Entfernen Sie 2 Schrauben (1) und nehmen
Sie dann die Abdeckung (2) ab.
2.
Setzen Sie das DIMM-Speichermodul (E) oder
das optionale DIMM-Speichermodul (H) in die
untere Position (FLS) der Speicherbank (3) ein.
Mit der IC-Seite nach unten weisend install-
ieren.
Schieben Sie das Modul in Pfeilrichtung, bis
es hörbar einrastet.
3.
Bringen Sie die Abdeckung (2) wieder mit den 2
Schrauben (1) an.
Procedura
Installazione della memoria DIMM
1.
Rimuovere 2 viti (1), e quindi rimuovere il
coperchio (2).
2.
Installare la memoria DIMM (E) o la memoria
DIMM opzionale (H) nello slot della memoria
(3) al livello inferiore (FLS).
Installare con il lato IC rivolto verso il basso.
Inserirla nella direzione della freccia finché
non scatta in posizione.
3.
Ricollocare il coperchio (2) utilizzando le 2 viti (1).
取付手順
メモリーDIMM の取り付け
1.
ビス (1)2 本を外し、カバー(2) を取り外す。
2.
メモリーDIMM(E)または、オプションのメモ
リーDIMM(H) を下段 (FLS) のメモリース
ロット (3) に取り付ける。
IC 面を下向きに取り付けること。
カチッと音がするまで矢印方向に挿入する。
3.
ビス (1)2 本で、
カバー(2) を元通り取り付
ける。
安装步骤
安装内存模组 DIMM
1.
取下 2 个螺丝 (1),然后取下盖板 (2)。
2.
将内存模组 DIMM (E) 或选购件内存模组
DIMM (H) 安装至下层 (FLS) 的内存插槽 (3)。
安装时,将 IC 侧正面朝下。
沿箭头方向将其插入到底直至发出喀嗒声。
3.
使用 2 个螺丝 (1) 重新安装盖板 (2)。
설치순서
메모리 DIMM 설치
1.
나사 (1) 2 개를 제거하고 커버 (2) 를 제거합
니다 .
2.
메모리 DIMM(E) 또는 옵션 메모리 DIMM(H)
를 하단 (FLS) 의 메모리 슬롯 (3) 에 장착합니
다 .
IC 면을 밑으로 할 것 .
딸칵하고 소리가 날 때까지 화살표 방향으로
삽입합니다 .
3.
나사 (1) 2 개로 커버 (2) 를 원래대로 장착합니
다 .
Содержание TASKalfa 3010i
Страница 1: ...SERVICE MANUAL Published in September 2016 842NL11B 2NLSM06B Rev B TASKalfa 3010i TASKalfa 3510i ...
Страница 10: ...This page is intentionally left blank ...
Страница 100: ...2NL 2P8 1 2 76 This page is intentionally left blank ...
Страница 286: ...2NL 2P8 1 3 186 This page is intentionally left blank ...
Страница 443: ...2NL 2P8 1 5 59 This page is intentionally left blank ...
Страница 463: ...2NL 2P8 2 1 18 Figure 2 1 23 Duplex conveying section block diagram EPWB DU_SENS DU_CL_REM YC14 5 YC8 1 DUCL DUS ...
Страница 471: ...2NL 2P8 2 2 8 This page is intentionally left blank ...
Страница 532: ...Installation Guide DP 770 B Document processor DP 772 Document processor Installation Guide ...
Страница 568: ...DP 773 Document processor Installation Guide ...
Страница 594: ...PF 791 500 x 2 Paper feeder Installation Guide ...
Страница 602: ...PF 810 3000 sheet deck Installation Guide ...
Страница 615: ...DF 791 3000 sheet finisher Installation Guide ...
Страница 630: ...DF 770 D 1000 sheet finisher Installation Guide ...
Страница 648: ...AK 740 Bridge unit Installation Guide ...
Страница 650: ...MT 730 B Mailbox Installation Guide ...
Страница 665: ...PH 7A C D Punch unit Installation Guide ...
Страница 686: ...DT 730 B Document tray Installation Guide ...
Страница 731: ...5 2013 5 302LC56750 01 H F G D D 6 4 3 7 E C D D M4 8 M4 8 M4 8 M4 8 ...
Страница 732: ...FAX System W B Installation Guide ...

