9
21
20
19
21
18-1
17
18-1
18-2
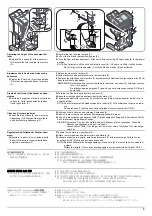
18
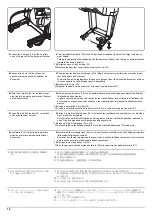
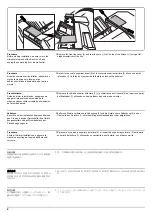
18.
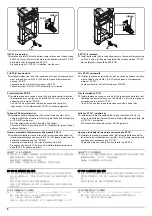
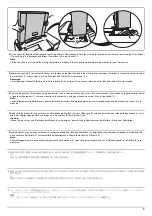
Separate the rear cover(18) into the two cov-
ers(18-1,18-2).
The cover (18-2) is not used.
19.
Install the cover (18-1) using the screw (17)
removed in step 17.
20.
Open the document finisher front cover
(19).Remove the screw (20).Pull the lock
frame (21) frontwards.
18.
Séparez le capot arrière (18) en deux capots
(18-1, 18-2).
Le capot (18-2) n'est pas utilisé.
19.
Installez le capot (18-1) à l'aide de la vis (17)
déposée à l'étape 17.
20.
Ouvrir le capot avant du finisseur de docu-
ment (19). Retirez la vis (20). Tirer le cadre
de verrouillage (21) vers le bas.
18.
Separe la cubierta posterior (18) en las dos
cubiertas (18-1, 18-2).
La cubierta (18-2) no se utiliza.
19.
Instale la cubierta (18-1) con un tornillo (17)
quitado en el paso 17.
20.
Abra la cubierta frontal del finalizador de
documentos (19). Quite el tornillo (20.
Empuje el marco de cierre (21) hacia del-
ante.
18.
Teilen Sie die hintere Abdeckung (18) in
zwei Abdeckungen (18-1, 18-2) auf.
Die Abdeckung (18-2) wird nicht benötigt.
19.
Installieren Sie die Abdeckung (18-1) mit der
in Schritt 17 entfernten Schrauben (17).
20.
Öffnen Sie die vordere Abdeckung des Fin-
ishers (19). Entfernen Sie die Schraube (20).
Ziehen Sie die Verriegelung (21) nach vorne.
18.
Separare il coperchio posteriore (18) in due
coperchi (18-1,18-2).
Il coperchio (18-2) non viene utilizzato.
19.
Installare il coperchio (18-1) utilizzando la
vite (17) rimossa nel passo 17.
20.
Aprire il coperchio frontale del finisher docu-
menti (19). Togliere la vite (20). Tirare in
avanti la frame di blocco (21).
18.
後カバー(18) を 2 つのカバー(18-1,18-2)
に分ける。
カバー(18-2) は不要。
19.
手順 17 で外したビス (17) でカバー(18-1)
を取り付ける。
20.
ドキュメントフィニッシャーの前カバー
(19) を開く。ビス (20) を外す。
ロックフ
レーム (21) を手前に引く。
18.
将后盖板 (18) 分成 2 个盖板 (18-1,18-2)。
不需要盖板 (18-2)。
19.
使用在步骤 17 中取下的螺丝 (17) 来安装盖
板 (18-1)。
20.
打开装订器的前盖板(19)。 取下螺丝
(20)。 向身体前侧拉出固定架(21)。
18.
후면 커버 (18) 를 2 개의 커버 (18-1, 18-2)
로 분리합니다 .
커버 (18-2) 는 사용되지 않습니다 .
19.
순서 17 에서 뺀 나사 (17) 를 사용하여 커버
(18-1) 를 장착합니다 .
20.
도큐먼트 피니셔의 상단 프론트 커버 (19) 를
엽니다 . 나사 (20) 를 제거합니다 . 잠금 프
레임 (21) 을 앞으로 뺍니다 .
Содержание TASKalfa 3010i
Страница 1: ...SERVICE MANUAL Published in September 2016 842NL11B 2NLSM06B Rev B TASKalfa 3010i TASKalfa 3510i ...
Страница 10: ...This page is intentionally left blank ...
Страница 100: ...2NL 2P8 1 2 76 This page is intentionally left blank ...
Страница 286: ...2NL 2P8 1 3 186 This page is intentionally left blank ...
Страница 443: ...2NL 2P8 1 5 59 This page is intentionally left blank ...
Страница 463: ...2NL 2P8 2 1 18 Figure 2 1 23 Duplex conveying section block diagram EPWB DU_SENS DU_CL_REM YC14 5 YC8 1 DUCL DUS ...
Страница 471: ...2NL 2P8 2 2 8 This page is intentionally left blank ...
Страница 532: ...Installation Guide DP 770 B Document processor DP 772 Document processor Installation Guide ...
Страница 568: ...DP 773 Document processor Installation Guide ...
Страница 594: ...PF 791 500 x 2 Paper feeder Installation Guide ...
Страница 602: ...PF 810 3000 sheet deck Installation Guide ...
Страница 615: ...DF 791 3000 sheet finisher Installation Guide ...
Страница 630: ...DF 770 D 1000 sheet finisher Installation Guide ...
Страница 648: ...AK 740 Bridge unit Installation Guide ...
Страница 650: ...MT 730 B Mailbox Installation Guide ...
Страница 665: ...PH 7A C D Punch unit Installation Guide ...
Страница 686: ...DT 730 B Document tray Installation Guide ...
Страница 731: ...5 2013 5 302LC56750 01 H F G D D 6 4 3 7 E C D D M4 8 M4 8 M4 8 M4 8 ...
Страница 732: ...FAX System W B Installation Guide ...


