18
C
10
C
C
C
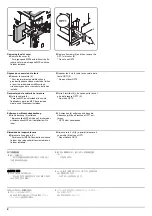
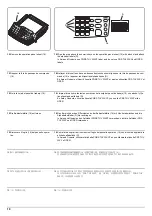
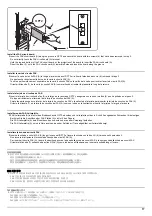
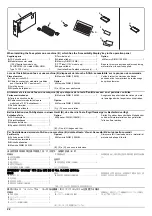
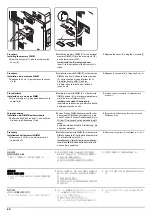
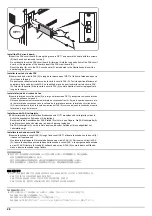
Seal the terminal.
4.
Wipe the surface of the telephone terminal with alcohol and adhere the terminal seal (C).
The telephone terminal on the FAX circuit board installed to OPT2 is unavailable (invalid). Seal
the terminal securely to prevent a user from connecting a separate phone.
On 120 V models, be sure that it is not attached
over the top of the approval label (10).
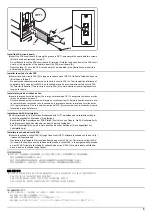
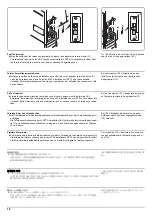
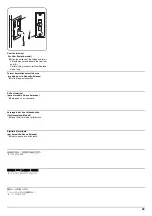
Fermer hermétiquement la borne.
4.
Nettoyer la surface de la borne de téléphone avec de l’alcool, et apposer le joint de borne (C).
La borne de téléphone de la carte à circuits FAX installée sur l’OPT2 n’est pas utilisable
(invalide). Fermer hermétiquement la borne pour empêcher tout utilisateur de connecter un télé-
phone séparé.
Sur les modèles 120 V, attention à ne pas
installer en recouvrant le haut de l'étiquette
d'approbation (10).
Selle el terminal.
4.
Limpie la superficie del terminal de teléfono con alcohol y pegue el sello de terminal (C).
El terminal de teléfono de la tarjeta de circuitos de FAX instalado en el OPT2 no está disponible
(inválido). Selle firmemente el terminal para evitar que un usuario conecte un teléfono por sepa-
rado.
En los modelos de 120 V, asegúrese de que no
se fije sobre la etiqueta de aprobación (10).
Versiegeln der Anschlussbuchse.
4.
Die Oberfläche der Telefonanschlussbuchse mit Alkohol abwischen und die Verschlusskappe (C)
anbringen.
Die Telefonanschlussbuchse der in OPT2 installierten FAX-Leiterplatte ist nicht verfügbar (ungül-
tig). Die Anschlussbuchse vollkommen versiegeln, um den Anschluss eines separaten Telefons
zu verhindern.
Bei 120-V-Modellen darauf achten, dass der
Aufkleber nicht den Genehmigungsaufkleber
(10) verdeckt.
Sigillare il terminale.
4.
Pulire la superficie del terminale del telefono con alcol e fare aderire la guarnizione terminale (C).
Il terminale del telefono sulla scheda a circuiti FAX installata su OPT2 non è disponibile (invalido).
Sigillare il terminale saldamente per prevenire a un utente di collegare un telefono separato.
Sui modelli da 120 V, assicurarsi che essa non
venga applicata sopra l’etichetta di approvazi-
one (10).
端子シールの貼り付け
4.
TEL 端子周囲をアルコール清掃し、
端子シール (C) を貼り付ける。
OPT2 に取り付けた FAX 基板の TEL 端子は使用不可(無効)となる。
ユーザーが誤って外付け電話
を接続しないよう確実に貼り付けること。
120V 仕様は認可ラベル(10)
に重ならないよう
に、
貼り付けること。
安装端子密封
4.
用酒精擦拭电话端子表面并粘上端子密封 (C)。
安装在 OPT2 上的传真电路板的电话端子不可使用 ( 无效 )。为了避免用户错误与其它电话连接,
必须确实粘贴好端子密封。
120V 规格在粘贴时注意不要与认可标签 (
10
) 重
叠。
단자씰의 부착
4.
TEL 단자주위를 알코올청소하고 단자씰 (C) 을 부착합니다 .
OPT2 에 부착한 FAX 기판의 TEL 단자는 사용불가(무효)가 됩니다 . 사용자가 잘못해 외부 전화
를 접속하지 않도록 확실히 부착할 것 .
120V 사양은 허가 라벨 (10) 에 겹치지 않도록
붙일 것 .
Содержание TASKalfa 3010i
Страница 1: ...SERVICE MANUAL Published in September 2016 842NL11B 2NLSM06B Rev B TASKalfa 3010i TASKalfa 3510i ...
Страница 10: ...This page is intentionally left blank ...
Страница 100: ...2NL 2P8 1 2 76 This page is intentionally left blank ...
Страница 286: ...2NL 2P8 1 3 186 This page is intentionally left blank ...
Страница 443: ...2NL 2P8 1 5 59 This page is intentionally left blank ...
Страница 463: ...2NL 2P8 2 1 18 Figure 2 1 23 Duplex conveying section block diagram EPWB DU_SENS DU_CL_REM YC14 5 YC8 1 DUCL DUS ...
Страница 471: ...2NL 2P8 2 2 8 This page is intentionally left blank ...
Страница 532: ...Installation Guide DP 770 B Document processor DP 772 Document processor Installation Guide ...
Страница 568: ...DP 773 Document processor Installation Guide ...
Страница 594: ...PF 791 500 x 2 Paper feeder Installation Guide ...
Страница 602: ...PF 810 3000 sheet deck Installation Guide ...
Страница 615: ...DF 791 3000 sheet finisher Installation Guide ...
Страница 630: ...DF 770 D 1000 sheet finisher Installation Guide ...
Страница 648: ...AK 740 Bridge unit Installation Guide ...
Страница 650: ...MT 730 B Mailbox Installation Guide ...
Страница 665: ...PH 7A C D Punch unit Installation Guide ...
Страница 686: ...DT 730 B Document tray Installation Guide ...
Страница 731: ...5 2013 5 302LC56750 01 H F G D D 6 4 3 7 E C D D M4 8 M4 8 M4 8 M4 8 ...
Страница 732: ...FAX System W B Installation Guide ...

