10
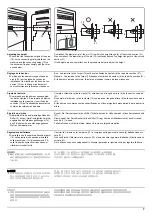
a
b<20mm
b>20mm
1
㸫
㸩
20±2.5mm
b
b
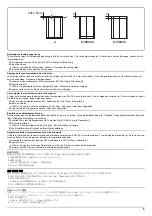
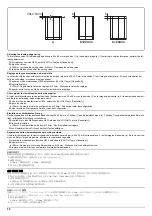
Adjusting the leading edge timing
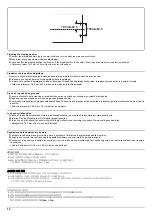
The reference value for the leading edge timing is 20 ±2.5 mm at position (1) in the sample image (a). If the timing is outside this range, perform the fol-
lowing adjustment.
1.
Set maintenance mode U034, select [LSU Out Top] and [Cassette(L)].
2.
Adjust the values.
b<20mm : Increase the setting value. b>20mm : Decrease the setting value.
3.
Press the Start key to confirm the setting value.
Réglage de la synchronisation du bord de tête
La valeur de référence pour la synchronisation du bord de tête est de 20 ±2,5 mm à la position (1) sur l'image d'exemple (a). Si la synchronisation est
hors de cette plage, procéder au réglage suivant.
1.
Passer en mode maintenance U034, sélectionner [LSU Out Top] et [Cassette(L)].
2.
Régler les valeurs.
b<20mm : Augmentez la valeur de réglage. b>20mm : Diminuez la valeur de réglage.
3.
Appuyer sur la touche de Start pour confirmer la valeur de réglage.
Cómo ajustar la sincronización del borde superior
El valor de referencia para la sincronización del borde anterior es 20 ±2,5 mm en la posición (1) en la imagen de muestra (a).Si la sincronización estuvi-
era fuera de este rango, haga el siguiente ajuste.
1.
Entre al modo de mantenimiento U034, seleccione [LSU Out Top] y [Cassette(L)].
2.
Ajuste los valores.
b<20mm : Aumente el valor de configuración. b>20mm : Reduzca el valor de configuración.
3.
Pulse la tecla de Start para confirmar el valor de configuración.
Einstellen des Vorderkanten-Timing
Der Bezugswert des Vorderkantenabstands beträgt 20 ±2,5 mm an Position (1) des Beispieldokuments (a). Falls das Timing außerhalb dieses Bereichs
liegt, ist folgende Einstellung vorzunehmen.
1.
Schalten Sie in den Wartungsmodus U034, wählen Sie [LSU Out Top] und [Cassette(L)].
2.
Die Werte einstellen.
b<20mm : Den Einstellwert erhöhen. b>20mm : Den Einstellwert verringern.
3.
Den Einstellwert durch Drücken der Start-Taste bestätigen.
Regolazione della sincronizzazione del bordo principale
Il valore di riferimento per la sincronizzazione del bordo superiore è pari a 20 ±2,5 mm sulla posizione (1) nell'immagine di esempio (a). Se la sincronizza-
zione è all'infuori di questa gamma, effettuare la regolazione seguente.
1.
Impostare la modalità manutenzione U034, selezionare [LSU Out Top] e [Cassette(L)].
2.
Regolare i valori.
b<20mm : Aumentare il valore dell'impostazione. b>20mm : Diminuire il valore dell'impostazione.
3.
Premere il tasto di Start per confermare il valore dell'impostazione.
先端タイミング調整
先端タイミングは、サンプルイメージ (a) の (1) の位置で基準値は 20±2.5mm。
これから外れるときは以下の調整をおこなう。
1.
メンテナンスモード U034 をセットし、
[LSU Out Top]、[Cassette(L)] を選択する。
2.
設定値を調整する。
b<20mm :設定値を上げる。
b>20mm :設定値を下げる。
3.
スタートキーを押し、設定値を確定する。
前端对位调节
前端对位的基准值在图像样张(a)的(1)位置为 20±2.5mm。超出该范围时,须进行以下调节。
1.
设置维护模式 U034,选择 [LSU Out Top]、[Cassette(L)]。
2.
调整设定值。
b<20mm :调高设定值。 b>20mm :调低设定值。
3.
按 Start 键,以确定设定值。
선단 타이밍 조정
선단 타이밍은 샘플화상 (a) 의 (1) 위치에서 기준치는 20±2.5mm. 여기에서 벗어나는 것은 이하의 조정을 합니다 .
1.
메인터넌스 모드 U034 를 세트하고 [LSU Out Top], [Cassette(L)] 을 선택합니다 .
2.
설정치를 조정합니다 .
b<20mm :설정치를 높입니다 . b>20mm :설정치를 내립니다 .
3.
시작키를 누르고 설정치를 확인합니다 .
Содержание TASKalfa 3010i
Страница 1: ...SERVICE MANUAL Published in September 2016 842NL11B 2NLSM06B Rev B TASKalfa 3010i TASKalfa 3510i ...
Страница 10: ...This page is intentionally left blank ...
Страница 100: ...2NL 2P8 1 2 76 This page is intentionally left blank ...
Страница 286: ...2NL 2P8 1 3 186 This page is intentionally left blank ...
Страница 443: ...2NL 2P8 1 5 59 This page is intentionally left blank ...
Страница 463: ...2NL 2P8 2 1 18 Figure 2 1 23 Duplex conveying section block diagram EPWB DU_SENS DU_CL_REM YC14 5 YC8 1 DUCL DUS ...
Страница 471: ...2NL 2P8 2 2 8 This page is intentionally left blank ...
Страница 532: ...Installation Guide DP 770 B Document processor DP 772 Document processor Installation Guide ...
Страница 568: ...DP 773 Document processor Installation Guide ...
Страница 594: ...PF 791 500 x 2 Paper feeder Installation Guide ...
Страница 602: ...PF 810 3000 sheet deck Installation Guide ...
Страница 615: ...DF 791 3000 sheet finisher Installation Guide ...
Страница 630: ...DF 770 D 1000 sheet finisher Installation Guide ...
Страница 648: ...AK 740 Bridge unit Installation Guide ...
Страница 650: ...MT 730 B Mailbox Installation Guide ...
Страница 665: ...PH 7A C D Punch unit Installation Guide ...
Страница 686: ...DT 730 B Document tray Installation Guide ...
Страница 731: ...5 2013 5 302LC56750 01 H F G D D 6 4 3 7 E C D D M4 8 M4 8 M4 8 M4 8 ...
Страница 732: ...FAX System W B Installation Guide ...

